That sounds pretty nice having the extended time for a chemical bond. I just re-stocked with 105/207 for upcoming projects though so it would be a while before I have the opportunity to try anything new.
-
Happy National Bikini Day! 🏖️👙👀
You are using an out of date browser. It may not display this or other websites correctly.
You should upgrade or use an alternative browser.
You should upgrade or use an alternative browser.
Kite +6%
- Thread starter BigandSmall
- Start date
I'm refering to fill coats. Wetting out the cloth is not a problem.The precoat means you don't need to worry about the epoxy absorbing in any one area, so you can simply apply a lighter coat and not worry about starving the cloth. The sqeegeeing takes care of any excess, so runs really aren't/weren't a thing with the longer cure.
The recoat regime with the System 3 really does make the epoxy application a much simpler process IMO.
Brian
It's the fill coats I'm referring to.
Sorry for my lack of description.
Jim
I've always been a fan of system three too, and have never worried about chemical vs mechanical bonds. Fill coat runs can be almost completely avoided by using the small foam rollers. Roll on a thin coat, tip off with a foam brush, walk away from it with few worries. The amount of fill coats often depends on the viscosity of your epoxy. For instance, general purpose system three is thicker than silver tip, and usually requires fewer fill coats. However, using a foam roller means a fill coat can be completed in about ten minutes, so in the end it doesn't really matter.
I started with System Three. Agree it is a good epoxy. At the time, it was very reasonably priced. They sold out, and the price went way up.
I used their Clear Coat epoxy. It was thin, and required two extra fill coats. A great wetout epoxy though. Not the best for fill coats.
After contacting a Tech at System Three about excessive runs ? He advised I apply fill coats while the previous coat, was still tacky.
That solved the problems of runs.
At the time, I was using the big black foam roller covers, that fit a regular paint roller.
Switching to the "Cigar" type foam rollers, improved application.
This last hull, I waited a little too long, between fill coats. Yes, the next day, I was scraping runs.
Not a big problem, but it could have been avoided had my timing been better.
Jim
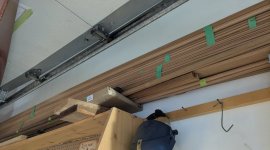
Yesterday as I was getting ready to lay the glass out I noticed that the hull had flared a little at the bottom. I wrapped cam buckle straps around the hull and hot glued the inside to the forms to keep the proper shape when glassed.
I rolled out the Hexcel 4533 6oz x 60” the night before and trimmed it pretty close so there wouldn’t be any weight hanging once epoxied. I should have gone with closer to 1” overhang rather than the minimal amount I did just to prevent getting loose bits of glass on my scraper, brush and roller. I should have remembered that from previous times I’ve cut it too short.
I used the Bondo scraper for the initial wet out. It seems that it’s the easiest way to get the cloth tight to the hull. Then I used a paint brush to tip off and push/work the glass into corners. For the fill coats I used low pile foam roller cut in half and then tipped it off with a foam brush. I’ve learned it’s easy to turn your project grey (air bubbles) by poking/mucking with anything other the scraper and it’s then difficult to flush out with fresh epoxy. I’ve had to learn that lesson a few times for it to sink in but this time I was able to avoid it.
Everything went pretty well. I’m really happy with how this glassing job turned out. I ended up with a couple of small runs at the bow. I should have put down a some plastic on the floor though.
That is common for the hull, to pull away from the forms at the shearline.
I staple it back in place, just very near the edge. I glass over it.
Later I pull the staple through the glass.
One could use hot melt glue also.
Jim
I staple it back in place, just very near the edge. I glass over it.
Later I pull the staple through the glass.
One could use hot melt glue also.
Jim
It sure looks good from here...
Are you planning any more glass than that single layer of 6 oz? Or did I miss the part where you talked about a football layer?
You didn't mention anything about your stems, I assume you put a couple layers of bias cut covering there.
Any plans for Dynel? I know it doesn't look so nice, but it's a life saver (or stem saver, actually) for hulls that actually get used and abused.
Once it cures I'll do the inside and then see how it feels. I'm going to do a full 6oz layer inside plus an additional 5 foot layer in the cockpit area. If it's still too flexible I'll add a layer on the exterior football once I level sand the outside. I'll be putting bias cut S glass on the stems. Debating a 4" wear strip on the bottom as well. I'd like to see how flexible it is before committing to the extra football layer. If you guys say I should do the football layer I'll do it but I believe the previous suggestion was wait and see.
Sounds like a good plan....I used to tell my employees "There's always time to reach for a bigger hammer".
Whether you'll need more glass (either inside or out) depends on your tolerance for any deflections and the sanded thickness of your strips. There's that thickness cubed relation that can work in your favor...or not!!
Whether you'll need more glass (either inside or out) depends on your tolerance for any deflections and the sanded thickness of your strips. There's that thickness cubed relation that can work in your favor...or not!!
Before making your determination about whether the build is stiff enough, make sure you put in at least mockups of any planned thwarts. They make a huge difference in how much the hull bends transversely.
it's looking great! can't wait to see how it comes out, and I'm very interested to hear how it feels in the water. Nice work!
I lucked out and scored a good deal on some 18' bead and cove cedar strips. The coves aren't in the best of shape but the price was good for 2 boats worth and only a few blocks away from home. When I had the garage door open with the natural light I could see I didn't do as good of job on the Kite as I thought I had in regards to runs. There are quite a few sags that will need attention. Hopefully get back to it on Tuesday.
Attachments
Great score on the strips. Oh, if you lived close to me ?
I've got some good deals on canoe stuff !
As for the Runs ? Yeah, we've all been down the road to dealing with runs. Timing ! Get them, while the epoxy is still soft. A Carbide paint scraper is your best friend !
Hoping you added bias strips on the ends. A carbide scraper works great on those, to feather the edges also.
Jim
I put two layers of bias cut s glass on the stems. This didn't turn out so great colour wise. S glass doesn't seem to wet out as clear as E glass plus I got some air in there despite trying not to. Durability has a cost I suppose. I'll go scrape off what I can of the excess while it's still green but will be waiting on cleaning it up until the inside is done.


I should have added that it looked a lot worse when I first applied it. I used my gloved hand like a squeegee and forced out as much of the grey air trapped epoxy as I could. I then added fresh over top and carefully worked it in. This helped a lot in removing the grey but it left it looking pretty rough. The carbide scraper is doing a fine job taking it down though.
I really hope so Jim. Scraping went well, the epoxy was still pretty green so shaved easily.


When I was unscrewing everything to flip the boat over I discovered that I slopped epoxy right into a 3" screw head.


The boat turned over well, a few forms fell out. The center ones stayed so I think I'll leave those in while I do some sanding. They only needed some gentle taps to remove most of them.


Now that the boat is right side up the yellow cedar is growing on me.

When I was unscrewing everything to flip the boat over I discovered that I slopped epoxy right into a 3" screw head.
The boat turned over well, a few forms fell out. The center ones stayed so I think I'll leave those in while I do some sanding. They only needed some gentle taps to remove most of them.
Now that the boat is right side up the yellow cedar is growing on me.
- Joined
- Aug 10, 2018
- Messages
- 2,413
- Reaction score
- 8,516
Looks awesome! As you mentioned, the s-glass does not wet out as clear as the e-glass but the durability makes up for it IMO.
Like Jim, I really doubt you'll even see the difference once it's all done. (and certainly no one else will notice it)
Now the crappy part: sanding the inside.
Like Jim, I really doubt you'll even see the difference once it's all done. (and certainly no one else will notice it)
Now the crappy part: sanding the inside.
I only got a little done today. I had to fix our snowblower since no one likes shoveling. I planed down the bow stem and really should have started in the stern. Get it figured it out in a less obvious spot. I started with my 6" plane but that made a few contact lines in the cedar. I switched out to the micro plane and it didn't take long shaving it down. I used the long board with some 80 grit and knocked the glue down before switching to the random orbital with an interface pad and some 80 grit. I just went light until the glue disappeared. I don't mind sanding the inside. There's worse jobs. We'll see if my opinion changes once I spend some more time at it.


Similar threads
- Replies
- 12
- Views
- 1K
- Replies
- 42
- Views
- 4K
- Replies
- 170
- Views
- 14K