Thanks for the pic rotation Karin!
-
Happy National Sunglasses Day! ☀️🕶️😎
You are using an out of date browser. It may not display this or other websites correctly.
You should upgrade or use an alternative browser.
You should upgrade or use an alternative browser.
Hiawatha 15- Long term build
- Thread starter Momentum
- Start date
I did manage to get out to the garage tonight. I got my son to help me flip the boat and hang it from the mezzanine, as the outside is still not cured enough to put it down on a surface. When will it dry???It took an hour or so to roll on an interior coat. Much more fiddley (is that a word?) than the outer, because of all the scuppers and seat supports. Again, the coat went on very well. I’m happy with the Compass Clear at this point, but only time, and wear will tell.
My apologies for the crapy shots. Iphones work to a certain point but don’t compensate for lighting very well. Next time, I’ll get my DSLR out.
Here’s the before…

And after…

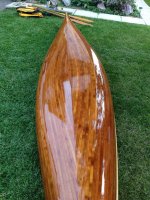
I’m quite pleased with the inlays I took the time to make and install. They certainly add a nice touch. I’m gonna love looking at them every time I paddle this little lady.


And for those of you interested in seeing the brass inserts I used, here’s a closer look at them. You can see that they protrude from the surface by about an 1/8” I just drilled a larger hole on the underside of the seat, at that depth to accept them.


As far as getting it in the water...it kind of depends on how long it takes for this varnish to dry. We'll see.
Momentum
My apologies for the crapy shots. Iphones work to a certain point but don’t compensate for lighting very well. Next time, I’ll get my DSLR out.
Here’s the before…
And after…
I’m quite pleased with the inlays I took the time to make and install. They certainly add a nice touch. I’m gonna love looking at them every time I paddle this little lady.
And for those of you interested in seeing the brass inserts I used, here’s a closer look at them. You can see that they protrude from the surface by about an 1/8” I just drilled a larger hole on the underside of the seat, at that depth to accept them.
As far as getting it in the water...it kind of depends on how long it takes for this varnish to dry. We'll see.
Momentum
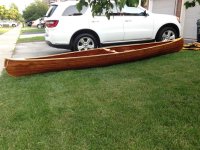
Today marks the end of a very long era. It is finished! What a journey, and it hasn’t even seen water yet!
I ended up with 4 coats of varnish on both interior and exterior. I think she turned out pretty well. I’ll let the pics speak for me. What strikes me as it is sitting on top of my truck, is how flat the lines are from bow to stern. I really didn’t notice this as pronounced as it is. Now that it is above eye level, I really see it. No rocker what so ever.


My brother and I took it to a sheltered bay on Lake Ontario near Hamilton, called Princess Point. Here’s a link ( I hope it works) if you are interested…
https://plus.google.com/112468960492703463734/about?gl=ca&hl=en
Many go there for hiking, birdwatching, kayaking and of course canoeing. You would never know that a bustling city lies just minutes away.


So, how does she paddle? I was actually quite surprised at how stable it was. I read and have heard some pretty negative things about this design. They said it was quite tender in the water, and would need a fairly experienced paddler to handle it. Either I fall into that category, or maybe what I read was incorrect. Not sure, but I do know that installing the seats as low as I did would sure help that instability. I didn’t feel like testing just how cold the water was, so we didn’t push our luck too much. I still plan on taking it to friend’s pool and swamping it to see how far I can lean without dumping. I also want to see if she floats while capsized. With not having float tanks, it will be interesting to see what happens.
It’s quite quick. I have no real basis or numbers to tell me so, but there wasn’t a great deal of effort needed to get moving at a steady pace. No GPS or mile markers and timers to tell me, just a feeling.
It tracks fairly well for a shorter boat, probably due in part to the lack of rocker. We weren’t out that long, but correction strokes were minimal from my position on the bow.
It’s quiet. So nice to flow quietly across the lake. No banging, no lapping of water on the hull, nothing. Nice
It’s light. I haven’t weighed it yet, but it would surprise me if it were over 50lbs. My brother’s first remark, was “Wow, it’s a feather weight” I’ll have to steal the bathroom scale and see what the real numbers are. I’ll let you know.
I must have got my seat positions pretty close to where they needed to be, as we were quite level with the both of us in the boat. My brother is pretty much the same size as me, although a little shorter. He had more than enough leg room too. It helps from that stand point to not have floatation tanks taking up space.


So what do you think?
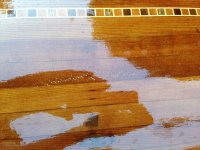
One problem I did notice, was this (see the pics below) Can someone tell me what causes this and how to fix it?


I ended up with 4 coats of varnish on both interior and exterior. I think she turned out pretty well. I’ll let the pics speak for me. What strikes me as it is sitting on top of my truck, is how flat the lines are from bow to stern. I really didn’t notice this as pronounced as it is. Now that it is above eye level, I really see it. No rocker what so ever.
My brother and I took it to a sheltered bay on Lake Ontario near Hamilton, called Princess Point. Here’s a link ( I hope it works) if you are interested…
https://plus.google.com/112468960492703463734/about?gl=ca&hl=en
Many go there for hiking, birdwatching, kayaking and of course canoeing. You would never know that a bustling city lies just minutes away.
So, how does she paddle? I was actually quite surprised at how stable it was. I read and have heard some pretty negative things about this design. They said it was quite tender in the water, and would need a fairly experienced paddler to handle it. Either I fall into that category, or maybe what I read was incorrect. Not sure, but I do know that installing the seats as low as I did would sure help that instability. I didn’t feel like testing just how cold the water was, so we didn’t push our luck too much. I still plan on taking it to friend’s pool and swamping it to see how far I can lean without dumping. I also want to see if she floats while capsized. With not having float tanks, it will be interesting to see what happens.
It’s quite quick. I have no real basis or numbers to tell me so, but there wasn’t a great deal of effort needed to get moving at a steady pace. No GPS or mile markers and timers to tell me, just a feeling.
It tracks fairly well for a shorter boat, probably due in part to the lack of rocker. We weren’t out that long, but correction strokes were minimal from my position on the bow.
It’s quiet. So nice to flow quietly across the lake. No banging, no lapping of water on the hull, nothing. Nice
It’s light. I haven’t weighed it yet, but it would surprise me if it were over 50lbs. My brother’s first remark, was “Wow, it’s a feather weight” I’ll have to steal the bathroom scale and see what the real numbers are. I’ll let you know.
I must have got my seat positions pretty close to where they needed to be, as we were quite level with the both of us in the boat. My brother is pretty much the same size as me, although a little shorter. He had more than enough leg room too. It helps from that stand point to not have floatation tanks taking up space.
So what do you think?
One problem I did notice, was this (see the pics below) Can someone tell me what causes this and how to fix it?
Attachments


Wow! That finish is deep enough to take a bath in. Congrats on finishing the build, and I'm glad that you are enjoying the handling. Your cedar seems... unusually dark. Did you stain? Or is it just the age from having been in-build for so long?
The flaw in your lower photo is a set of air bubbles in the glass. Either you were slightly short of (mixed) resin when you wet that out, or your cedar structure released some bubbles after everything was laid up. This is why some people do a seal coat of resin on the plank before they lay cloth.
Looking back through your build this may date from when you set the boat out in the sun after the mixing mistake, but I've had this happen with properly mixed epoxy & normal setting conditions.
The upper one is either the same, or sometimes glass can de-laminate and look like that if the sandwich gets over-stressed/bent. Since this is a brand new build, I'll guess resin starvation here as well.
How to fix:
- Leave the one in the side. Any repair will make it look worse, and it's not extensive enough to cause structural issues in normal use.
- I'd be tempted to leave the one on the stem as well, unless it's really bothering you.
The proper way to fix this: (Some experience, and tips I've picked up here)
- Cut out a circle of the affected glass, with xacto blade or box cutter.
- Feather the surrounding glass until there is no edge that you can feel.
- Place Masking tape around the perimeter of the feathering.
- Lay up a glass patch so that it half overlaps the edge of the masking tape.
- When the epoxy is green-cure (no longer tacky, but not yet fully hard) pull up the masking tape, and use the box cutter blade to cut the patch at the edge of the tape.
- Feather down what is left of that edge, and finish with varnish again.
A bit more of a "Hack" if your'e feeling adventurous:
- Get a hypodermic syringe intended for cattle (around here, farm supply stores carry them for use with OTC veterinary drugs)
- Use a small (1/16") drill bit, put some holes in the glass layer only at what seem to be strategic locations.
- Fill the hypodermic with mixed resin. You need a very thin epoxy for this, something like SystemThree Clearcoat sounds about right.
- Inject epoxy into the void. Work the glass surface up and down a bit - you'll see what I mean.
NOTE: I have used that technique, but only with a thicker resin. This meant wider holes, and I sort of dribbled the resin into place. This resulted in a distinctly visible repair. - I would probably prefer to experiment with a thinner resin before I recommend this without major warnings.
Thanks for the repair advice Sailsman. I can't recall if the glass was starved in that area or not. Since my mistake with the epoxy, I have been thinking that this was going to bite me at some point. Maybe that's just what it is.
From the moment I applied epoxy and fiberglass in the first coat, that's the colour the cedar went. Like you, I think it is from the duration of time I've had it on the forms and "exposed" to the environment, although I did have it under blankets for 90% of the time.
Thanks again,
Momentum
From the moment I applied epoxy and fiberglass in the first coat, that's the colour the cedar went. Like you, I think it is from the duration of time I've had it on the forms and "exposed" to the environment, although I did have it under blankets for 90% of the time.
Thanks again,
Momentum
Fine job ! Especially on the trim and finish ! You deserve to be proud !
No screws showing, gunnels capped, nice seat work, and awesome deck.
I can guarantee your next build won't take as long !
I built a Hiawatha years ago and sold it. Wish I had it back, as I loved it solo.
Jim
No screws showing, gunnels capped, nice seat work, and awesome deck.
I can guarantee your next build won't take as long !
I built a Hiawatha years ago and sold it. Wish I had it back, as I loved it solo.
Jim
Thanks for the compliments guys. It means a lot coming from builders such as yourselves.
There isn't a build in my immediate future, but I'm sure not gonna close the door to building another one at some point. I have learned so much too, about all sorts of things I didn't know before. Honed my skills a little, and made a few mistakes along the way. It's all good though. I have a beautiful boat to show for it.
Thanks again,
Momentum
Momentum,
Just saw this...yeah, that is a beautiful finish and nice colors. Love the look of your decks and gunnels.
So now that you have it finished, when and where are you going to properly christen it? Somewhere in the BWCA? Someplace worthy, I hope.
Just saw this...yeah, that is a beautiful finish and nice colors. Love the look of your decks and gunnels.
So now that you have it finished, when and where are you going to properly christen it? Somewhere in the BWCA? Someplace worthy, I hope.
G
Guest
Guest
The flaw in your lower photo is a set of air bubbles in the glass. Either you were slightly short of (mixed) resin when you wet that out, or your cedar structure released some bubbles after everything was laid up. This is why some people do a seal coat of resin on the plank before they lay cloth.
Perhaps someone can confirm, or refute, something I recall reading years ago. I remember reading that epoxy and cloth over wood should be applied with temperatures that are falling slightly, or at least not rising temps. Something about epoxy curing in rising temperatures causing release of air bubbles?
Mike
That is correct ! It's called outgassing. It is air trapped between strips, staple holes, and air within the wood itself. The heat created when the resin cures expands the air.
A seal coat helps. But when applying the wet out coat, if the temperatures are falling it reduces those little air bubbles.
One needs to stay with the resin until it cures past the tacky stag, and with a foam brush, pop those bubbles.
Jim
Thanks Stipperguy.Momentum,
Just saw this...yeah, that is a beautiful finish and nice colors. Love the look of your decks and gunnels.
So now that you have it finished, when and where are you going to properly christen it? Somewhere in the BWCA? Someplace worthy, I hope.
I think it turned out pretty nice. I'm happy with it, but of course I see all the flaws. I hope others don't
I'm planning a trip to Killarney Provincial Park sometime at the end of August or mid September. That's a pretty worthy place for a canoe with a name like Hiawatha. At least I think so.
I'm also taking it out for little jaunts here and there, but nothing really note worthy.
Thanks again,
Momentum
G
Guest
Guest
A seal coat helps. But when applying the wet out coat, if the temperatures are falling it reduces those little air bubbles.
Good to verify that I remembered that correctly. I try to manipulate the temperature in my shop when doing large resin jobs. Often that simply means doing the work late in the day when the temps will naturally be falling slightly.
But in winter I’ll warm the shop, do the resin work and then allow the shop to slowly cool. In the last month’s hot and humid conditions I have turned on the shop air conditioner when I start work.
G
Guest
Guest
Mike
An alternative I'm often forced to use, is a hair dryer. I warm the hull with it, and the bubbles really appear, brush over them, and that usually solves the problem
In the winter if I need to warm the hull I put the boat on sawhorses upside down and stick a radiant oil heater underneath. The hull cavity captures and holds the warmth nicely, and I can turn off the heater and let it slowly cool.
In the winter if I need to warm the hull I put the boat on sawhorses upside down and stick a radiant oil heater underneath. The hull cavity captures and holds the warmth nicely, and I can turn off the heater and let it slowly cool.
That works. You just do what you gotta do !
Looks great! Now you have to get some scratches on it. Looks like it would make a nice solo boat.
Similar threads
- Replies
- 42
- Views
- 3K
- Replies
- 14
- Views
- 2K
- Replies
- 13
- Views
- 2K
- Replies
- 90
- Views
- 14K