• Happy Weed Appreciation Day! 🌱🌿🌻

Heat Sealable Fabric as Sail Material?

G

Guest

Guest
Beyond making custom sized and shaped dry bags heat sealable fabric is wonderful for folks like me who simply do not/can not sew.

Even something as simple tarp flags are beyond my sewing ken without joining the local quilting bee. Although the cross stitch possibilities with bespoke tarp flags has potential. The Etsy version of friend Ed’s tattered Tibetan prayer flags.

https://www.etsy.com/listing/681042...MIvJS7-oDR5QIVxIVaBR3iDQchEAQYASABEgJC8PD_BwE

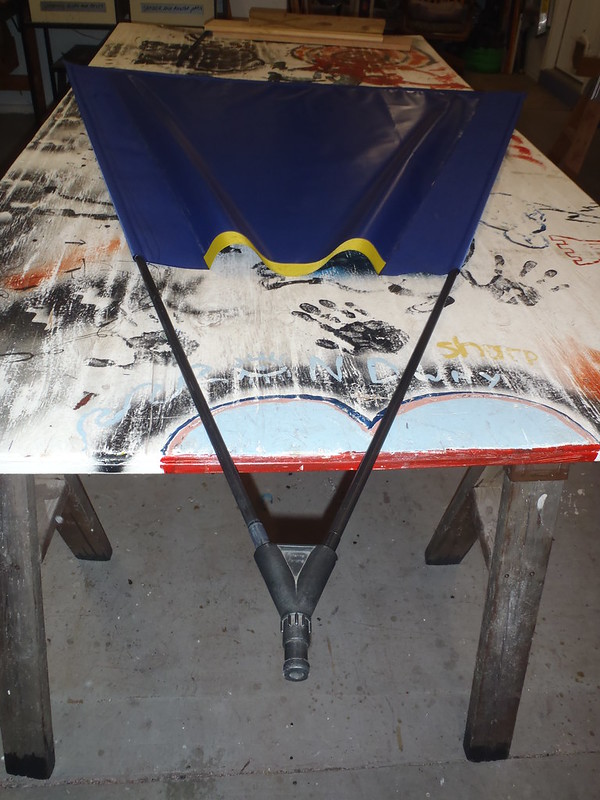
I just got a fresh supply of heat sealable Packcloth and I’m thinking of using that no-sewing-needed material to make a DIY Spirit Sail. I have some carbon fiber battens that fit the Sprit Sail Y connector (as do old Timberline tent poles).

A sewn fabric sail would be better, lighter, more compactable, but I do not sew any more than absolutely necessary, and another full size downwind sail isn’t a necessity, it’s more of a funsee just to see if I can make one using heat sealable fabric.

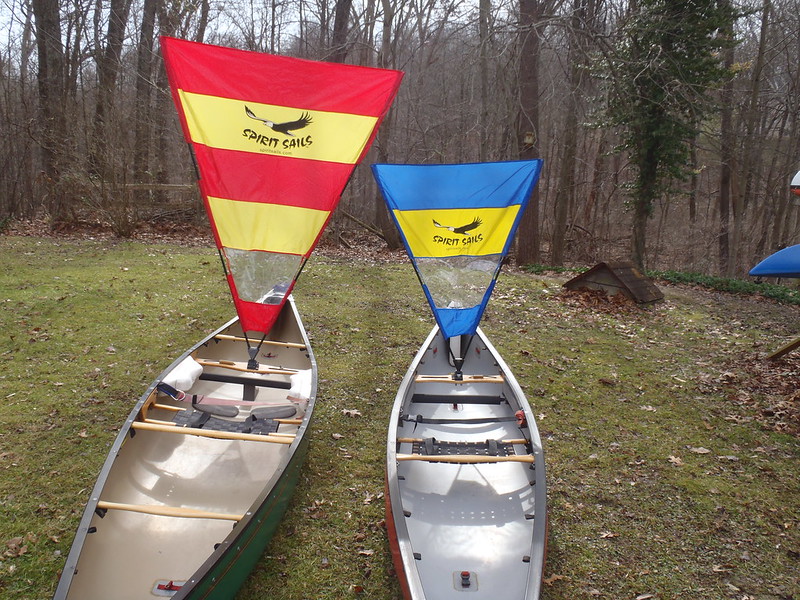
We have one larger (taller) Spirit Sail, which is far more efficient in light breezes, and scary in stronger winds, and it is kind of a PITA to three-ferrule assemble/disassemble while underway.

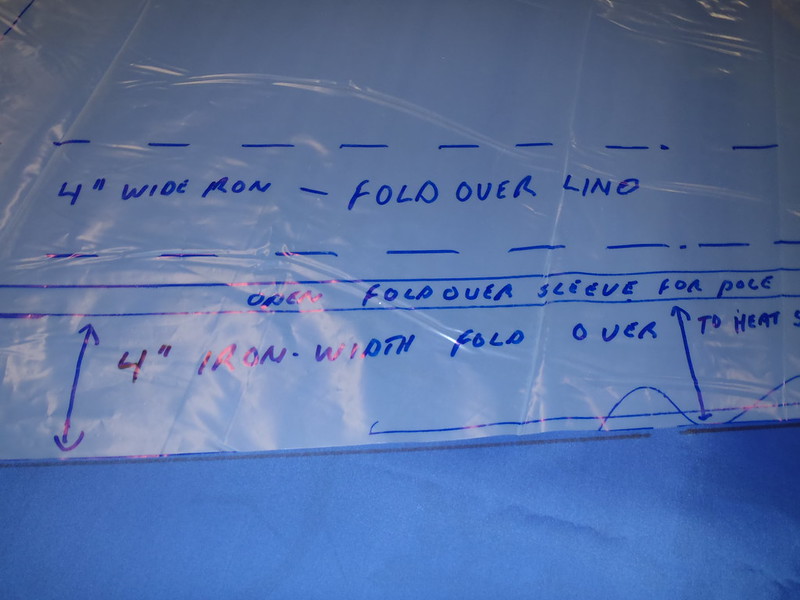
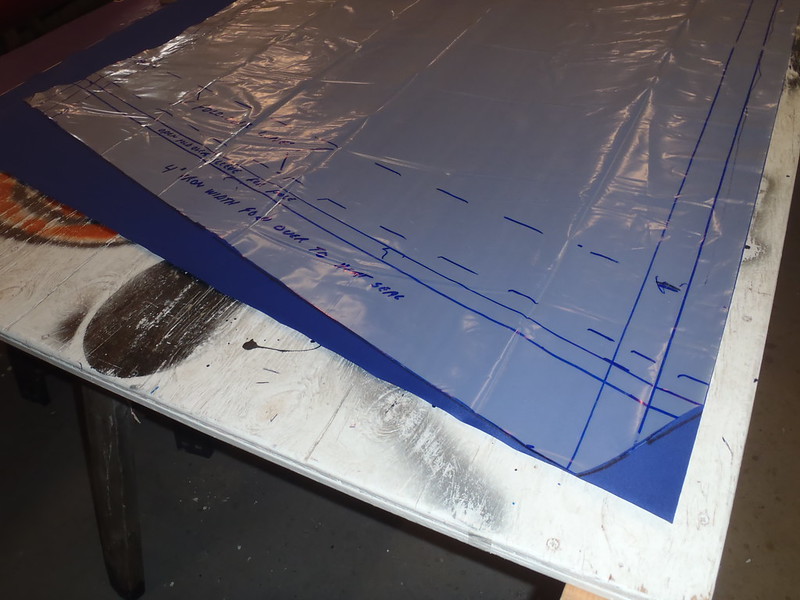
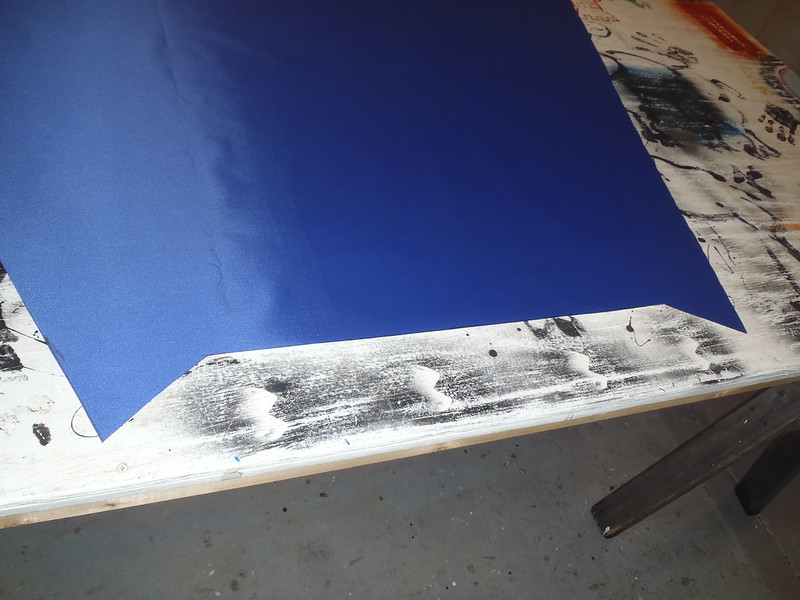
To that end I have some simpler assemble/disassembly thoughts in mind, and can use that OEM sail for a height and angle pattern. Should be (no jinx!) pretty simple; cut the material to \_/ size and shape, plus a couple or three inches on the sides to form an open sleeve for the battens

Instead of the smeary-view vinyl window, which sucks to look through while in a beautiful place, I’ll just end the bottom of the taller sail at eye level above the utility thwart or deck \--/, leaving an open area at the bottom of the sail for visibility ahead.

In some places (don’t know about universality) that style downwind sail is required to have a transparent window, or at least not occlude the “sailor’s” forward vision. Much of that narrow bottom V is blocked downwind by the paddler’s body in any case, and I’d rather look through clear open air than spray splashed smeary vinyl.

While I wouldn’t actually need to iron a backing piece of heat sealable on that sturdy 400 denier Packcloth, the stick-to coated side would be available, and I could. That would use up a whopping lot of yellow and blue scrap material. It would be twice as heavy as necessary, but would make for a distinctively striped pattern on one side.

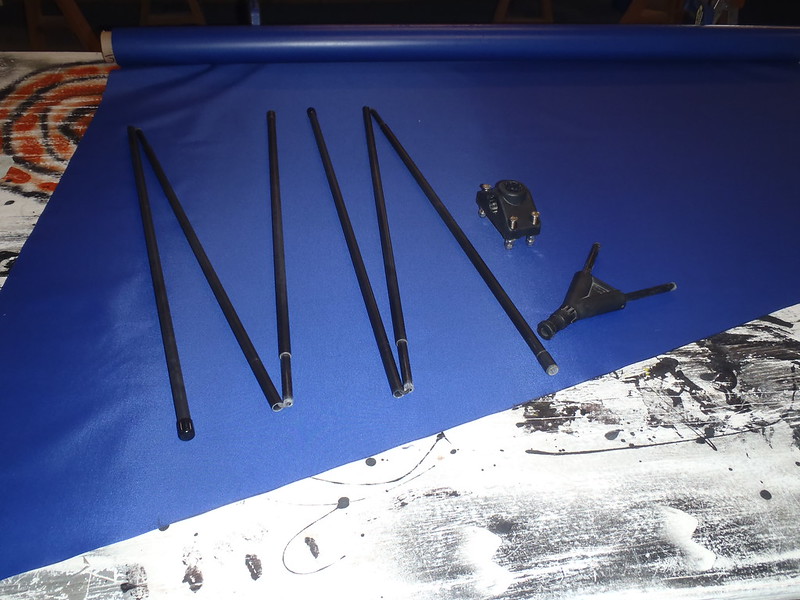
I pulled out the carbon battens that fit the Spirit Sail Y connector. Yippee, I have just enough; the full size Spirit Sail uses three shock corded battens per side (the smaller one uses two per side), and I have six battens with proper ferrule ends.

Those carbon fiber battens flex and return better in gusts than our DIY sail made with shock-corded Timberline poles, and much better than the DIY downwind sail made with single piece stiff stainless steel pipes as makeshift battens, and are less likely to take a permanent bend.

Another DIY project to add to the winter list. Even if the result is mediocre I’ll have a visqueen template to improve upon, and making a larger size sail would require no more material than a big tapered dry bag.
 
No Sewing DIY Downwind Sail

Been a little shop busy, but finally got around to this heat sealable downwind sail DIY.

I am a big fan of the hands-free Spirit Sail design for simple downwind cruising. Those sails are sadly discontinued, so I have no qualms about copying the design and DIYing one.

The parts of that sail are simple. Some kind of sail material, in this case no-sewing heat sealable Packcloth. Two battens, in this case six lengths of 3/8” ID carbon fiber tube with ferrules. As with the OEM version I used three ferruled and shock corded sections on each side, so I can fold the sail down to short length when not in use.

Old Eureka Timberline poles will work,

49381105217_1f94793782_c.jpg
P1130027 by Mike McCrea, on Flickr

But old carbon fiber tent poles will flex better in gusts.

A base mount, which is nothing more than a $7 Scotty Side/Deck Mounting Bracket rod accessory base.

https://www.walmart.com/ip/Scotty-Si...CABEgIHJ_D_BwE

And the only proprietarily manufactured piece, the Y connecter, which locks in the Scotty base at 0, 30 or 60 degree tailwind angles, with the battens poles sleeved over the Y arms. I have never found remaining stock of those Y connectors, but we have a family’s worth of Spirit Sails and Y’s. Those Y’s might be something DIY-able, or even 3D printable.

Carbon fiber poles, Scotty base mount and Y connector

49380449953_7a411a1da9_c.jpg
P1120020 by Mike McCrea, on Flickr

Tools: An iron; use the hottest “linen” setting, making sure to press firmly for at least 30 seconds over every square millimeter of material, especially where the cut edges of the fabric are heat sealed down. Big work table and long thick piece of corrugated cardboard as a firm ironing “pad”. A couple of long ironing fence boards and some clamps. Sharpie, scissors and Scotch tape.

49381107032_33c4187b80_c.jpg
P1120021 by Mike McCrea, on Flickr

(Yeah, yeah, for someone who sews this would be a lot easier. Mikey don’t sew, but he does have a new Ssupply of 58” wide heat-sealable Packcloth). FWIW this is a fabric DIY Spirit sail a friend sewed up using Timberline tent poles.

49380442753_5b74ea5982_c.jpg
P1130045 by Mike McCrea, on Flickr

Works well enough, haven’t snapped the poles yet, but it lacks the see-through “window”. That unobstructed forward vision is legally mandated in some locales.

I use the smaller manufactured Spirit Sail every tailwind chance I get. But the larger Spirit Sail comes in handy in lighter winds, and I need to remember to always bring both. Last trip three of us had the smaller Spirit Sails up, in barely enough breeze, kinda wishing we were flying more sail.

Large and small Spirit Sails
49380447768_9060ef6be9_c.jpg
P1130028 by Mike McCrea, on Flickr

However, that OEM larger sail is a handful even in a light breeze, and an especially awkward struggle to connect or disconnect the three ferrules in the sleeves cut outs. Two ferrule connections, one on each batten side, is quick folding work. Multiple ferrule connections on each side is a too-time-consuming-while-underway PITA. I have an idea to simplify that annoyance.

I copied the dimensions of the full-size Spirit Sail \_/, same 75” tall battens, same 66” width across the top. But eliminated two feet of sail material at the bottom of the vee, where there is a damnable smeary vinyl window to look through on the OEM version. Here I am in a beautiful place, taking in the scenic lake vista through a smeary splash spattered piece of vinyl. Eh, no thanks.

I ended the sail material above eye level for a clear view ahead; the narrowing bottom of that vee is mostly blocked by the paddler’s body in a tailwind anyway. It is superfluous.

The pattern is easy enough. I got smart this time, cut a long length of visqueen plastic to the heat sealable fabric 58” width, and left it rolled around a piece of pipe to take the wrinkle folds out.

Er, I got smart last time I made heat sealable dry bags and didn’t have enough smooth rolled Visgueen to have enough left for the sail template width. So I cut a bunch more, like 40 feet more this time; I won’t be running out anytime soon.

It wasn’t cylinder rolled long enough to take the wrinkles out, but I didn’t want to wait; I’ll have plenty of smoothly rolled plastic for the next templates.

FWIW the large sail needed a piece of Packcloth 86” wide (with excessive 10 inch heat sealable edge fold overs on each edge), so just over two yards worth of fabric.

I Sharpie marked the cut out lines, and all of the fold over and pole sleeve lines onto the Visgueen, including iron-wide 4 inch heat sealed edges, so I’d remember how and where everything folds and heat seals.

49380452993_c391dc8914_c.jpg
P1100010 by Mike McCrea, on Flickr

The template has the usual funky corners that occur on anything triangular with an ironed fold-over “hem”. The same fold over triangles cut off the wide end can be taped onto the narrow end to make the pointy fold over “ears”. When using heat sealable fold-overs the pattern gets weird.

49380453748_24246c9891_c.jpg
P1100008 by Mike McCrea, on Flickr

49381111347_09cccd6b29_c.jpg
P1100007 by Mike McCrea, on Flickr

A four inch wide heat seal because my ( ) iron is 4” at widest, and I’ll need to use two fences with the iron pressed down in between, one fence over the open sleeve, one adjacent to the edge of the fold over. That will make ironing sense later. I really need to find a square or rectangular iron with a straight not-curved ( ) sides. I know they exist and have seen them before. Not as a $7.99 Walmart shop iron though.

Lay the cut out template over the sail material. It helps to Scotch tape the template to the material so it can’t shift. Sharpie the template lines on the material with a straight edge; curves or wavy sloppy cuts suck when ironing heat sealable, straightest edges possible are your ironing fence friend.

Take the template off, roll it up just in case there is a next time, and cut out the sail material along the Sharpie lines.

49380915121_e08d1a0807_c.jpg
P1100011 by Mike McCrea, on Flickr

Measure (in this iron-width case + X sleeve inches) along each fold over side and draw a Sharpie line there. Fold the heat sealable cloth over to that line and Scotch tape it held there folded in place.

Run one ironing fence along the edge of that 10” inset fold over line, so you don’t iron over onto the heat sealable side smutch.

Run another ironing fence an inch away from the folded outer edge, to form the open, un-ironed batten sleeve. Check to make sure the iron slides along perfectly between the two fences. Heat seal that (much larger than needed) 4” seam together, avoiding the Scotch tape areas on the first pass. Take the Scotch tape off and iron those areas once the rest of the hem has been sealed flat, flush and straight.

49381109582_7f035ac5d2_c.jpg
P1110013 by Mike McCrea, on Flickr

Once the Scotch tape pieces have been pulled iron the entire length of the hem length once again, and clamp the fence board tightly over that hot hem. Luckily I had a nice flat 5” wide piece of hardwood for that big 5” foldover. Let it cool down while clamp compressed.

Flip the sail material around and do the same process on the opposite 4” hem and batten sleeve.

Finally, almost done slaving over a hot iron.

Instead of incorporating folded heat sealed hems with notches at the top and bottom I just ironed on pieces of scrap material as edge reinforcement, and ironed the top edge of the pole/batten sleeve closed at the same time.

Wish I had enough yellow Packcloth left for an accent stripe across the top. If I ever order more red or yellow heat sealable material I may stripe the coated side of that sail for colorful distinction.

49381108702_1afae0b56a_c.jpg
P1110016 by Mike McCrea, on Flickr

Stick the battens in the sleeves. Eh, confession, my sleeves were a little tight fitting with the protective caps fitted on the batten tips. The sleeves on the OEM Spirit Sail are twice as wide as need be; wider is easier.

As planned the sail material has enough excess width arc to properly billow and spill wind. In on-water use, putting it up or taking it down, I will only connect/disconnect the exposed bottom ferrule on each side. Those ferrules are located conveniently below the bottom of the sail material, and one ferrule on each side with the large sail should be much easier to quickly manipulate on the breezy fly.

And, best of all, instead of a smeary (much worse when drippy spray or rain wet) vinyl window to peer through I have a clear view ahead.

49380909306_dc86200bf4_c.jpg
P1130030 by Mike McCrea, on Flickr

I finally have complete clarity, and forward visibility legality. Almost done. While I had the heat sealable material out I made a storage sleeve to hold the sail.

BTW, don’t even think about squaring up that angled edge left on the heat sealable material. That same taper (or nearly so) may be just the angle you need for the next piece you cut. Or in this case the next three pieces; a small tapered piece, a smaller tapered piece and a long piece for the DIY sail storage sleeve material.

49380911401_8984f114b4_c.jpg
P1120023 by Mike McCrea, on Flickr

dang, that DIY downwind sail that was fun, quick and easy to make.

I need to figure out how to make (or have made) the Y connectors; the rest of the sail parts and pieces are inexpensive or easy to DIY. Scotty has some mounts that fit that base with the same 0/30/60 degree locked in place pivot that could be adapted or retro-fitted with DIY arms

http://scotty.com/product/no-368-uni...sounder-mount/


EDIT: Edit- Arrgghh. Too many in-progress photos. The non-smeary non-vinyl view looks like this:

49380446193_64b522dba6_c.jpg
P1130034 by Mike McCrea, on Flickr
 
Last edited:
"I need to figure out how to make (or have made) the Y connectors; the rest of the sail parts and pieces are inexpensive or easy to DIY. Scotty has some mounts that fit that base with the same 0/30/60 degree locked in place pivot that could be adapted or retro-fitted with DIY arms

http://scotty.com/product/no-368-uni...sounder-mount/ "


Mike, after our discussion regarding the lack of availability of the Spirit Sail brackets I found my way to the same Scotty #368 universal fish finder mount. I'd like to find out just how stout they are and whether the mounting base plate is solid or molded hollow underneath. As they are only made to support a fish finder I have some concern as to whether they would take the wracking they would get from a sail. The mounts are less than $13 online so I guess I won't go broke finding out though....

Drilling and tapping a hunk of Delrin, nylon etc to bore it for the tent poles...err, masts(?) and to fasten it to the mounting platform would be a piece of cake. All in all, I think my first choice would be the Delrin.

The cost of the Delrin would likely run around $10-12 a mast base for something stout enough to leave no doubts regarding strength. If the Scotty #368 mount is a stout enough starting point to consider a sailing test the material cost would be something like $25-26 plus the permanently attached $7 rod holder base.

The actual machining of the Delrin block would be a matter of less than 10 minutes.... It would take longer to round over edges and get rid of excess material in areas of no/low stress to lower the weight than to make a test ready mast base......

Any thoughts?

Best regards to all,


Lance
 
after our discussion regarding the lack of availability of the Spirit Sail brackets I found my way to the same Scotty #368 universal fish finder mount. I'd like to find out just how stout they are and whether the mounting base plate is solid or molded hollow underneath.
Drilling and tapping a hunk of Delrin, nylon etc to bore it for the tent poles...err, masts(?) and to fasten it to the mounting platform would be a piece of cake. All in all, I think my first choice would be the Delrin.

I have never worked with Delrin, but that’s right along the lines of how I was thinking that 0/30/60 pivot mount could be adapted.

The smaller Spirit Sail, the one used most often, was $220 retail (15 years ago) for the sail, battens, mount and Y connector. And a backing plate for use under kayak decks. That is no more than the cost of a decent paddle, and I have 15 years worth of near effortless (and very pleasurable) miles on the first one. For the simplicity, folded size/storage and hands free downwind function nothing else even comes close.

The Scotty side/deck mount is quite hollow underneath, just a armature of thin plastic (?) spines inside a hollow core. Even the base of the Y-piece is hollow up to the pegs that hold the batten poles. In fact those batten poles are hollow carbon tubes. I have no idea what plastic Scotty uses for their various rod accessories; something like the fish finder mount, designed to hold a rod, would certainly be sturdy enough.

No, it is not a real sail, with mast and mast step, and lee board and tiller and lines/sheets. It will not sail upwind. I don’t need all that; I just want to be able to catch a tail wind when I have that opportunity. Since the sail goes up or down on the fly in seconds while in the boat, and takes up no room, it is worth bringing along.

I’ve posted this link before, but it is one of the few Spirit Sail videos around. Note that there is only a gentle breeze, and that the water is too dang shallow to paddle effectively. Also note that this is the first time Joel had ever used a Spirit Sail. He didn’t remember that he could turn it from 0 degrees to 30 or 60 degrees directionally, and I abandoned him with minimal instruction to make my transit out in the windier open bay.

https://www.youtube.com/watch?v=jU2mE83Gi0M

Any thoughts?

I always have thoughts. Starting with I never want to be out in a manageable tailwind without that little sail, and moving on to I can design a better mousetrap.

No need for a smeary fugly-forward view window, just end the bottom of the sail V above eye level. No need for the batten poles to be as short as the small sail (51” battens), or as tall as the big SS. With the bottom vee removed a few inches more batten height and sail would still easily manageable.

No need to find batten poles matching the 13/32” diameter of the missing Y piece “arms”. Find a likely pair of carbon or glass tent poles of substantial strength/girth, with no more than one ferrule connection per side and size the Y arms to match.

FWIW those OEM Spirit Sail carbon battens are an un-measurably hair over ½ inch OD. Next time you are up this way let’s have a good look at all of the OEM Spirit Sail parts and pieces.
 
Back
Top