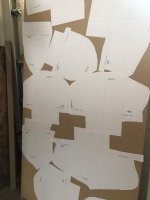
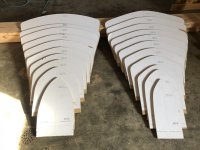
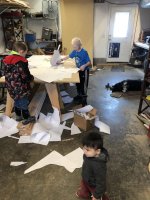
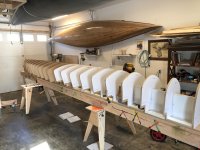
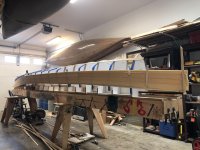
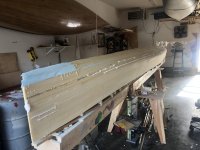
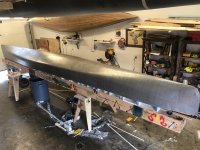
This canoe will be a 23’ family touring C4. Foam is Divinicel 1/2”. Strips were cut with a table saw with a foam cutting blade. Some were cut at 2” and some at 1”. All strips were cut at 90 degrees. Foam was secured to the forms by a 23’guage finish nail. Cedar strips were tacked upto hold strips with twist. Gorilla foaming glue worked well. Spray foam insulation works well to fill in larger gaps. A stationary belt sander works well for beveling angled joints.
-
Happy National Avocado Day! 🥑💚
You are using an out of date browser. It may not display this or other websites correctly.
You should upgrade or use an alternative browser.
You should upgrade or use an alternative browser.
Foam stripper build.
- Thread starter Mp214parks
- Start date
What did you use to sand that sample portion?
And thank you for posting more pics and making it a build thread
Brian
And thank you for posting more pics and making it a build thread
Brian
6” random orbital air with 40 grit for the rough sand. I’m going to borrow an air long board next week to fine tune it.
Thanks for the pics, this looks great. Any thoughts on how much it will weigh compared to a cedar strip?
Interesting build using Divinicell for the core. How were you able join strips for long runs?
I see your location is Palmer Alaska. I spent three weeks fishing in your area about 5 years ago. Stayed at a place across the street from the Matanuska river.
I see your location is Palmer Alaska. I spent three weeks fishing in your area about 5 years ago. Stayed at a place across the street from the Matanuska river.
Wow. It’s been a while. I got side tracked with spring.
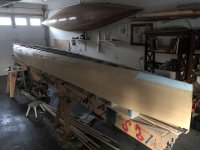
One problem with this construction method is that the foam is not stiff enough to get a perfect fairing. Foam in between stations gets depressed as you pass over it with the sander. So the foam at the stations gets sanded deeper than the foam that is unsupported. This is exaggerated when using a long board sander. I went back to the six inch orbital which helped a lot. At this point my plan is to do the layup inside and out then fair it perfectly once it is rigid. I don’t anticipate it being a big problem but time will tell. One alternative option would be to build a female strong back and layup the inside of the canoe first. This would give it enough rigidity to fair the foam perfectly.
One problem with this construction method is that the foam is not stiff enough to get a perfect fairing. Foam in between stations gets depressed as you pass over it with the sander. So the foam at the stations gets sanded deeper than the foam that is unsupported. This is exaggerated when using a long board sander. I went back to the six inch orbital which helped a lot. At this point my plan is to do the layup inside and out then fair it perfectly once it is rigid. I don’t anticipate it being a big problem but time will tell. One alternative option would be to build a female strong back and layup the inside of the canoe first. This would give it enough rigidity to fair the foam perfectly.
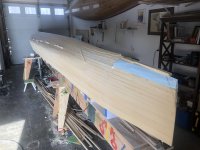
A dry run fitting. I stapled spruce strips under the hull about an inch. I will clamp the fabric to this. I made sure there is no concavity in the design so I’m hoping this will hold the fabric in the tumble home areas. Any thoughts ? Layup day is Friday!
Attachments
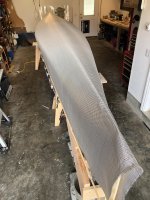
Beings there is no release of any kind, like Partal, or a plastic film? I doubt the cloth will pull away, even in the tumblehome.
I looked for the nails, how did you remove them ? And is the foam rigid enough to stay tight to the forms ?
I haven't worked with Innegra yet . Are you using Innegra/Carbon, or Bassalt ?
The hull looks smooth , your sanding must have worked !
Adding the strip to the inside of the shear should help maintain the shape of the shear.
I'd be carefull with a squeegee, and not put too much pressure on the hull ! If a seam came loose you would have a Night Mare.
No seal coat, I presume ?
At 23' That is a stretch !
Hope you can give details, as this is exciting !
Good Luck !
Jim
Ok so on a cedar strip with tumble home, fabric pulling away isn’t a problem ?? That would be good news. Makes sense.
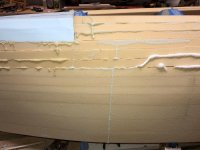
I pulled the nails with pliers. It left dimples everywhere I had to fill with thickened epoxy.
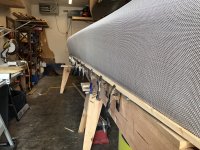
The outside layup is 8 oz of basalt innegra and 8 oz S glass with gel coat over that. I haven’t decided on an inside layup yet. I was going to do the same but I may skip the glass and just do 8 oz of the BI. I think each layer of fabric is around 10# added weight.
I’m going back and forth on a seal coat. One thought I may do is lay the fabric out. Then fold up the sides and get a good saturation there before I lay the fabric back down and do a normal application.
The foam is actually pretty strong. Strips have separated in places where I didn’t get good glue tie in. The Gorilla glue bonded well. And I used thickened epoxy over some spots.
the problems I’ve had so far are not deal breakers in my mind. I’ve done things wrong so many times I’ve learned usually worse case scenario just means more time on the sander later on
I pulled the nails with pliers. It left dimples everywhere I had to fill with thickened epoxy.
The outside layup is 8 oz of basalt innegra and 8 oz S glass with gel coat over that. I haven’t decided on an inside layup yet. I was going to do the same but I may skip the glass and just do 8 oz of the BI. I think each layer of fabric is around 10# added weight.
I’m going back and forth on a seal coat. One thought I may do is lay the fabric out. Then fold up the sides and get a good saturation there before I lay the fabric back down and do a normal application.
The foam is actually pretty strong. Strips have separated in places where I didn’t get good glue tie in. The Gorilla glue bonded well. And I used thickened epoxy over some spots.
the problems I’ve had so far are not deal breakers in my mind. I’ve done things wrong so many times I’ve learned usually worse case scenario just means more time on the sander later on
I have been repairing a wrecked motorhome front cap...I used a bunch of 1/4" H80, E-glass and polyester resin.
While doing this, I made up a few sample hull laminations in preparation for my eventual foam core build.
I wet out some 6 oz e-glass on both sides of the 1/4" foam, no seal coat.
Sample sections are ridiculously stiff, with a great bond. Epoxy resin would be even better, I suspect.
While doing this, I made up a few sample hull laminations in preparation for my eventual foam core build.
I wet out some 6 oz e-glass on both sides of the 1/4" foam, no seal coat.
Sample sections are ridiculously stiff, with a great bond. Epoxy resin would be even better, I suspect.
- Joined
- Oct 3, 2017
- Messages
- 1
- Reaction score
- 0
Mp214parks, which Divinycell are you using? Like H60, H80, etc.? stripperguy would you consider 1/4" H80 to be a good substitute for cedar?
I used divinycell H 60 1/2”. One problem I had was that the foam isn’t rigid enough to sand it to a perfect fairing. If a guy used 1/4”, that problem would be worse and I think I unmanigable.


Exterior layup went well. Layup is
1/2” h60 foam
8oz basalt innegra
8 oz s glass
Epoxy weight for the exterior was 15 #.
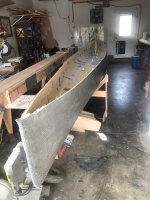
total weight currently is 45.5 #.
I was really hoping to have this canoe come in under 75#, but now I’m getting nervous. My current plan is to put 8oz of basalt innegra on the inside. It will have four seats that I should be able to fabricate at 1# each out of all carbon components. I was planning to do a small alder gunwale just because my last foam/carbon gunwale was so difficult. For decks and lunch trays I will probably do carbon and foam or soric. Any suggestions on getting this thing lighter?? I have enough 6oz carbon fabric I could use instead of the basalt innegra. If I stick to my current plans I would estimate another 15-20 in trim and 15-20# in the interior layup. Thanks guys.
Final coat will be an opaque paint.
1/2” h60 foam
8oz basalt innegra
8 oz s glass
Epoxy weight for the exterior was 15 #.
total weight currently is 45.5 #.
I was really hoping to have this canoe come in under 75#, but now I’m getting nervous. My current plan is to put 8oz of basalt innegra on the inside. It will have four seats that I should be able to fabricate at 1# each out of all carbon components. I was planning to do a small alder gunwale just because my last foam/carbon gunwale was so difficult. For decks and lunch trays I will probably do carbon and foam or soric. Any suggestions on getting this thing lighter?? I have enough 6oz carbon fabric I could use instead of the basalt innegra. If I stick to my current plans I would estimate another 15-20 in trim and 15-20# in the interior layup. Thanks guys.
Final coat will be an opaque paint.
- Joined
- Aug 16, 2017
- Messages
- 5
- Reaction score
- 4
Where do you source your foam? I was thinking of trying something similar for a solo boat. I wanted to experiment with foam but do not know where to get it in small quantities.
Looks like the cloth stuck to the foam at the tumblhome ! Good !
I'd say using the roller, was a better choice than a squeegee to wet out the hull, at least on the outside.
Already have it off the forms ! Wow !
Jim
I'd say using the roller, was a better choice than a squeegee to wet out the hull, at least on the outside.
Already have it off the forms ! Wow !
Jim
Last edited:
My Nokomis composite (Vader), 16+' suffered some, while in transport. Enough I need to reinforce the gunnels !
Met an oncoming Semi with a strong Left to Right wind. This rocked my truck, and of course the canoe. Where the hull was strapped to the rack on the stern end. I have some stress on the Ash inwhale. Have a repair plan and it can be fixed easily.
Guess my point is, a hull as long as yours may suffer the same fate. Make your gunnels tough enough !
Loving this build !
Jim
Last edited:
MP, I think i am misunderstanding your weights .... when you say 15 lbs of epoxy, do you mean just the epoxy and that the basalt and glass weight is on top of that ... or that the exterior sheathing weighed 15 lbs. Cause if it's the latter that puts the foam hull much heavier than I would have thought it would be.
As far as weight savings go, you are pretty deep in to make many changes at this point. I don't think lessening layers inside is very good for hull strength. As I understand it, when you contact an external force, it creates the compressive load on the exterior and a stretching load on the interior ... so you want that strength on the inner layers, so that when the hull tries to buckle under impact, the inner layers provide the highest support.
Sizing the seat and gunnels is about your only option, properly sized wood seats and gunnels will provide quite competitive strength at about the same weight IMO ... the key is to determine that point at which you have enough strength. You may have to make a few test sticks to check strength for a given thickness .... until you figure where it is stiff enough at the least weight.
23' is a long boat and you have some pounds that are going to have to be packed on, good luck.
Brian
Similar threads
- Replies
- 42
- Views
- 4K
- Replies
- 90
- Views
- 15K
- Replies
- 14
- Views
- 3K