• Happy Midnight Ride of Paul Revere (1775)! ⛪🕯️🕛🏇🏼

First stripper build: Prospector-16 Help & comments appreciated

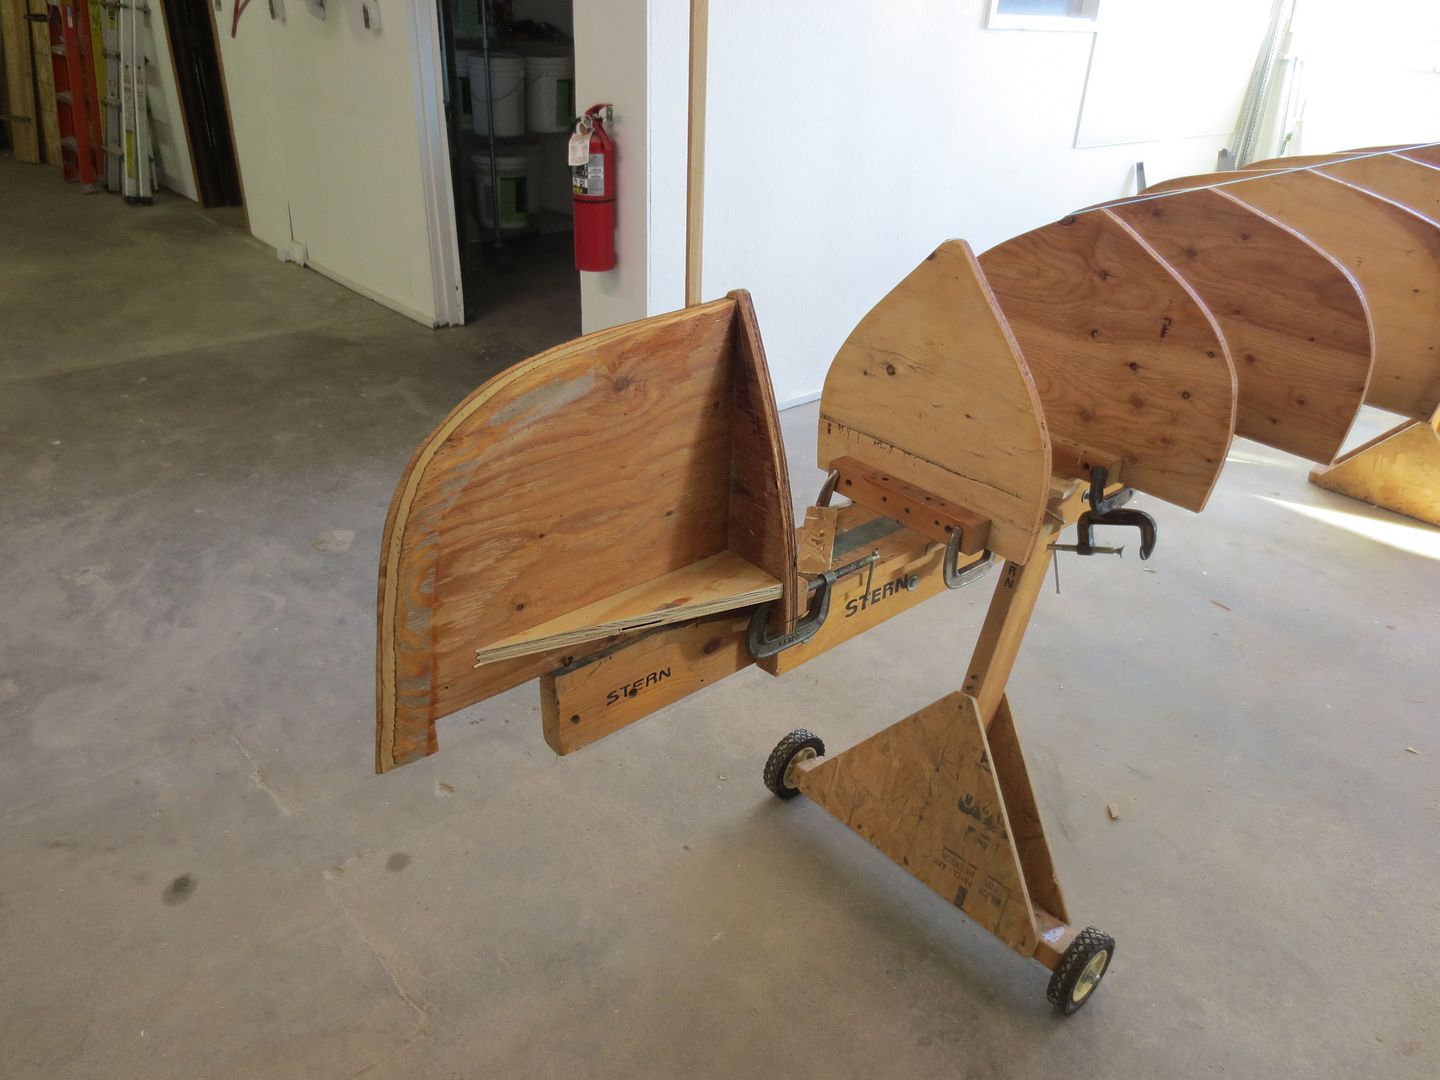
I bent, clamped and glued my stems this weekend. I ended up using epoxy, for several reasons:
1. After steam bending, the grain was raised considerably, and the layers didn't align tight enough for wood glue
2. Wood glues do remain more flexible than epoxies, and I was concerned about spring back. They're still clamped to the station, so I won't know until tonight.

Unfortunately, I think one of my stems is going to end up being "practice". When I was ripping my strips, I ripped an entire cedar plank I had for inner stem, and a plank of walnut for outer stem, ending up with about twice as many strips as I needed. Inadvertently grabbed one of the inferior strips that had a knot in it. In the bending process, it cracked at the knot. If it shows tonight when I take it out of the clamps, I'll make another one.

Here's my nifty little steam chamber. Worked better than I had hoped. If you've never steam bent wood, YOU GOTTA WORK QUICK. The biggest lesson I learned between first and second stem, plan the order of clamping...... Start just before the most severe curvature, clamp through the curve, then do the ends. For the first one, I had all the clamps set, and layed out handy. Started at one end, worked to the other. I didn't get it done. Had to take it out, and re-steam. IMG_2023.jpgIMG_2026.jpg
 
Got the stems steamed, bent, and glued this weekend. If you've never steam bent wood before, you have to work very quickly.

Lessons I learned after the first stem: I had all clamps set, and handy, still didn't get it clamped before it lost pliability. Start at the beginning of any severe curvature, clamp through the curve, then do the ends. I started at one end, worked towards the other. Only got half way through the curvature, had to remove it, and steam it again.

I also cut twice as many strips as I needed (just ripped a 4 foot plank of cedar for inner stem, and walnut for outer stem). I inadvertently grabbed one cedar strip that had a knot in it, and it cracked when bending. I haven't taken them off since glueing yet. If the crack is visible, I'll chalk it up to practice, and make another.

I used epoxy for lamination for two main reasons:
1. After steaming, the grain was raised where I wasn't confident in wood glue for the joint.
2. PVA wood glues do remain somewhat flexible. I didn't want to use a hyde glue, though that would be great IMO. I didn't want to worry about spring-back. We'll see when I take the clamps off.

Here's my little steam box.

IMG_2023.jpgIMG_2026.jpg
 
Stems are a pain, a waste of time and materials, in my book.
But every builder makes that choice.

Stemless, requires only to bevel the stem forms, and you are good to go !

At least you could Grill, while waiting for the wood to steam !

IMG_2211_zps1fzqjmtf.jpg
 
Jim:

I realize now why you prefer stemless! As I suspected, first stem was practice. Bent another one last night. I have enough strips cut to do another, and I think I will at some point, to video the entire process with some tips & pointers. Unfortunately, there's NO WAY to video and do this at the same time.

From one rookie to another, if you're starting your first build, listen to Jim. Go stemless, unless you're bullheaded like me, or otherwise set on using stems. I'm glad I'm using stems for my first one, to experience the process, but it easily adds 3 days to the build. Cut the stem strips. Steam, bend, clamp, wait. Glue, clamp, wait. Clean up, etc. Not a big deal from a time perspective, I'm in no rush. My big lessons:

1. Pick your stem strips carefully. As straight grain as possible, no hard spots, knots, or irregular grain turns. ADD MORE TO LENGTH FOR TRIMMING LATER THAN YOU WOULD THINK. The outer strip needs to be longer than the inner strip (Duh!). I started with about 3" "extra", and they are BARELY long enough.
2. Mark your stem strips & form with a line, about at the beginning of the sharp curvature, to quickly align properly when bending/clamping. Start clamping at the sharp curve, work through the curve, then fill in and clamp the ends.
3. Use clamps with more jaw surface area than "C" clamps. I used Quick Grip for the first 3-5 clamps, then filled in with Jorgensen parallel jaw clamps.
4. Draw the stem close to the form at all clamping locations first, then go back & tighten all clamps.
5. A second set of hands would be really helpful. I didn't have this, as the wife was otherwise busy (AKA hiding).

Take it for what it's worth, this comes from a guy who has now made a total of three stems.
 
Yes Some videos make stems, look easy. I have built a bunch of canoes ! If I had to go through the process, of making stems for all of them ? I'm sure I would have stopped building a long time ago !

Good experience, others will appreciate you sharing !

Jim
 
One of the nice things about a first build is the opportunity to learn different skills and processes. Good on you to redo the stem you weren't happy with. It's only a mistake if you refuse to fix it.

I like stems. I don't care about the extra time, material and weight. My next build will be a solo, with stems.
 
Is a stemless weaker in that area then having a stem?

Love the advice and explaining the do's and don'ts Kliff. Thank you.
 
Is a stemless weaker in that area then having a stem?

Love the advice and explaining the do's and don'ts Kliff. Thank you.
Stemless, is no weaker in my experience !
On the inside I simply over lap the cloth, and wet it out. Some will add a fillet, but I have found it unnecessary ! I apply two bias strips to the outside, and that's it.
I have had three, canoes come off my racks going down the highway, over the years. One was run over by an SUV. That one was crushed? The stems stayed intact. The other two were easily repaired.

I like the Stemless look, and the time it saves me building? Is time I get to paddle sooner !

Jim
 
While this is my first stripper build, I've done extensive woodworking for a very long time. For concave shapes, I now use a random orbital sander, and add home made interface pads, which are basically a soft pad that has both sides of velcro (hook & loop) on each side. Sticks to the sander, and sanding disc sticks to it. I have a collection of different thicknesses, and firmness, depending on severity of curvature. It works pretty well. I'm sure there will still be a fair share of hellish hand sanding, but hopefully this will handle a bulk of the heavy work. I'm still a day or two away from sanding.
 
Use the plastic bag method to steam. It allows you to bend bag and all without removing the steam. You can clamp the piece bag and all to the form or to the canoe depending on what you are bending. You can also try the bend several times during steaming to see if it will "go". The only time I use a steam box now is to do a batch of ribs. Once you go bag, you never go back!!

Also, pre-soak the piece you are bending for a few days or more depending on the thickness.
 
Last edited:
The inside sanding did suck. I would tilt the hull and sit on a bucket, as much as I could, and concentrate on one section at a time. I tried not to think about the entire job that was before me. I figured I would eventually get the sanding done.

Wow Jim, great way to put a canoe to a test. Maybe see how aerodynamic the canoes are also. I bet that was a real "Oh C"*p!" moment.
 
Man I would sit right down and cry on the side of the road if I dropped a canoe and it got run over.
 
Last edited:
I used a 2 inch wide paint scraper to smooth things out before sanding. I would shave some off and then hit the blade edge with a fine file to keep it sharp. That reduced sanding substantially. I can't recall who on here told me to do that? These people here are great.
Kliff, you have just ignited a spark under my tail end. I need to start building another canoe.
I be watching your progress👀.
Roy
IMG_20200703_115702442~2.jpg
 
Yeah, I've made a few "French Curve" scrapers. If there's lots of material removal, it's worth the time spent to custom shape a scraper or two. I have a bunch of cabinet scraper blades. I'll just grab one, shape and sharpen on the belt grinder.

Question for those of you that go stapleless. Do you still staple the first strip where it will be covered by the outwale? I made a bunch of blocks to hold the first strip in place, started lining up a scrap strip just to check for fairness. Used the blocks, and they work well, but time consuming. Thought "why not staple it?" Other than trying to be a purist about the process. But if that's the case, shouldn't use epoxy or glass cloth either. Not going down that road.

I lost a ladder once. Ever since then, I tie/strap the heck out of anything going on my vehicle or trailer. I also don't let anyone else "help". The extra 10-15 minutes is worth the piece of mind. Half my straps could go, and I'd still be better than most loads I see going down the road.

Stems are done, and rough formed. Stations all in place, except top strip. I'm sure tomorrow will be a yard work day. Hoping to take a break to at least start cutting the cedar strips. I cut a bunch of walnut that I might use for accents. Had to run it through a new planer I was setting up anyway.
 
Yes, the first strip if you follow the shearline with the first strip, gets stapled, or screwed. No one will see it, It's the foundation of all the rest to follow, so make it secure !
 
I posted a couple pics of shaped paint scrapers to the inside scraping, in my last build thread .... for the inside, they really are an easier way to make relatively short work of the job.

One extra step I did this last time, is to use a long board or equivalent to level the hull, an ROS will just not leave a level surface (think canoe length surface). I found a significant different in how level the finished product is.

I would go ahead and staple it, then when you sand the hull, just whittle a couple of toothpick like pieces and glue the holes up, they will disappear i am sure. That's not viable for a whole hull, but easy for 1 locale.

Suggestion, don't mix hardwood (walnut) and softwood (cedar) on the hull, it can be done, but you can't avoid a hump at the hard wood as it won't sand the same as the softwood ...

And Jim, you are still biased, you haven't done a stemmed canoe yet to compare ... but you do think of great clamping solutions

Brian
 
And Jim, you are still biased, you haven't done a stemmed canoe yet to compare ... but you do think of great clamping solutions

Brian
Yes Brian ! I still don't see the need for stems. I If wanted my hulls to LOOK like they had stems? I would just add stem bands to the outside. The older I get ? The more value I place on my remaining time ! I don't want to waste it on stems ! Ha !

I'm not smarter than anyone else ! Just sometimes things hit me ! :rolleyes:
 
I spent a lot of time with getting the first strip on the forms. It's like laying brick or block, that very first run has to be perfect. My first and last forms were cut wrong, so I was glad I spent time with it. I did a lot of measuring from the first strip to the keel line using a seamstress tape. Follow the curve of your form up to the keel line. I figured that would show me if something wasn't right, each side had to be the same. I used a jigsaw to cut my forms, so I knew they wouldn't be perfect. Be careful when running strips thru a planer. Any weak spots, knots or uneven grain in the wood, and the planer will beak the area and shoot part of the strip back out at you. I learned to stand off to the side of the planer, of course my planer wasn't a very good one.

Cruiser is right about mixing different wood. I did it and it was challenging when it came to sanding.
Roy
 
Back
Top