• Happy "Killer Rabbit" Attacks President Carter in His Paddle Boat (1979)! 🚣🏼‍♂️🐇

Experimental Plug for a mini-Merlin

I tried to find his book, but I must have loaned mine out.

Yes, you did! You loaned it to me just before I sold my last house. At some point I opened a box and found it but keep forgetting to bring it when we meet up. Another excuse to get together.

Alan
 
Yes, you did! You loaned it to me just before I sold my last house. At some point I opened a box and found it but keep forgetting to bring it when we meet up. Another excuse to get together.

Alan

Ha ! I had no Idea who I leant it to !
Don't worry about it ! I still owe you some epoxy !!!

Yes ! Time for me to make a road trip !

Can't wait to see your Mill !! And House ! And everything else you have been making !!!

Jim
 
The question of quick and cheap male molds is an interesting problem to solve. I like the experiments here! When I tried it, I stripped with pine and faired with drywall mud. The unforeseen problem was that the water in the mud made the wood swell and buckle, and it was difficult to get a smooth surface.

If I try it again, I would either 1) strip with cheap pine and add a layer of fiberglass to stabilize and then sand smooth, or 2) have the whole plug cut from foam on a cnc- then fiberglass and sand smooth. Or as alan said, wood strips covered in bondo.

I think the only known truth is that unless you use an existing boat as a male plug, no matter the method you will need to put in a lot of work to get a smooth surface.
 
The question of quick and cheap male molds is an interesting problem to solve.
1) strip with cheap pine and add a layer of fiberglass to stabilize and then sand smooth,

Each hull and boat are different but there were two reasons I elected not to fiberglass the outside of my male mold.

A: Cost

B: Unless I left the stems open the boat would not lift off the mold due to tumblehome. Not fiberglassing the mold meant I could enclose the stems when laying up the hull and fairly easily rip out the mold. I don't think that would have worked if it was glassed.

I didn't go crazy fairing my hull so it didn't take much bondo. Mostly I just used it instead of thickened epoxy for filling cracks and gaps. I'd always been happy with how fair my strip hulls turned out so I didn't put any extra effort into the mold.

Alan
 
The question of quick and cheap male molds is an interesting problem to solve. I like the experiments here! When I tried it, I stripped with pine and faired with drywall mud. The unforeseen problem was that the water in the mud made the wood swell and buckle, and it was difficult to get a smooth surface.

If I try it again, I would either 1) strip with cheap pine and add a layer of fiberglass to stabilize and then sand smooth, or 2) have the whole plug cut from foam on a cnc- then fiberglass and sand smooth. Or as alan said, wood strips covered in bondo.

I think the only known truth is that unless you use an existing boat as a male plug, no matter the method you will need to put in a lot of work to get a smooth surface.

I remember seeing some of Gene Jensen's plugs at auction, in Mn. They were stripped up, it looked like Cedar ? But may have been something else, and then covered in Bondo type putty, and Tooling resin. Beings he used them as a plug for a Female Mold ? They were Highly polished.

At the Time, They claimed Gene could strip up a plug in very short order, something like a day.

I would have liked to have spent a day in the corner, and watched that man work !

With this weather warming up ! I'm itching to build another canoe !


Jim
 
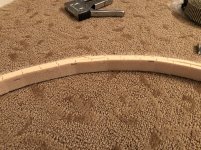
Like Muddyfeet mentioned, I ran into a similar issue with some of my boards warping in or out after applying the first coat of drywall mud. It happened in just a few spots between stations where it was already kinda floppy. I really had to lay extra layers on thick in those spots. I’m liking Alan’s method, and will try that if I build another one. In any case, I just have to sand a few small touch up spots and I’m calling the plug good enough!

Also, the materials have arrived! I feel like a kid at Christmas :) Here’s the layup schedule for now, inside to out, more on that later. As you’ll notice, I’m going
pretty light on this solo. I won’t have to worry about “dry footed, rapid shooting, dang I’m tired let me huck this canoe off my back” trip mates if I’m the only one in it.

- 0.8 oz surfacing veil chop strand mat - 50 in
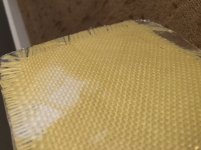
- 9.2 oz plain weave Kevlar - 60 in (left over from 2 builds ago)
- 4 oz E-glass - 50 in
- 4 oz S-glass football - 30 in

Stems: 5 oz Kevlar, a layer inside and out

Foam core: 1/4” divinicell H80 grid type, covered with 1 layer of 6 oz intermediate modulus carbon fiber. Maybe I’ll add a layer of the tightly woven 3.16 oz E-glass I have left over. Maybe.

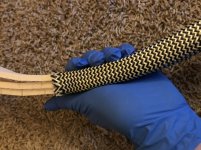
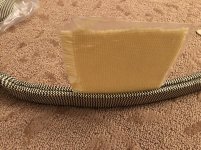
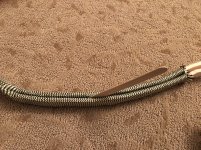
Gunwales: Same Divinicell foam covered in this cool carbon-Kevlar snakeskin thing. The sleeve is 7.5 oz

Epoxy; RAKA 127 thin, 350 non-blush hardener.
Peel ply will be used everywhere.

What I’m still debating:
- Surfacing veil. I bought this because I’m worried the foam core won’t bond very well to the bare Kevlar. It works best with vinylester, but this video inspired some confidence that it could work. Currently testing a sample in my garage. I really don’t like using a plastic spreader or a foam brush on it. Will try a foam roller next time. https://youtu.be/uLKiDa2dqq8

- Gunwales: Is 1/4” divinicell on either side of the hull too thin? I have enough to do 2 layers (1/2”) on the outside, 1 layer (1/4”) on the inside. Pictured is that setup.
 

Attachments

  • photo15680.jpg
    photo15680.jpg
    282.5 KB · Views: 2
  • photo15681.jpg
    photo15681.jpg
    292.5 KB · Views: 2
I used that snakeskin sleeving over H80 foam to make the center thwart on my carbon copy Kite. I love the look, there's plenty of strength, but it was difficult to blend in due to the usual fuzzing challenges from the Kevlar.
If I could have figured out a way to use the same sleeving for gunnels, that would have been ideal.

Are you're gonna use 1/4" H80 for selective stiffening? Or wrap the entire hull in it?
If you did the entire hull as a foam core, you could drastically reduce the number of layers in your laminate schedule.
Do you have any way to do load deflection tests on sample laminates? That could generate some flexural rigidity values for you as a guide toward an ideal lamination schedule.

Anyway, I'm anxiously waiting and watching...
Here's a look at that snakeskin thwart.

ACtC-3dgP5dli_jgfN7fiNSCs20e4fc0YffED3jUWHgzPdqq9jhRrdACT4xmLH3R_wtaL9qK6HuLn0kJWAmdbV342sPGVREWXuACrnGrwjTX1yQNhCC3V9THBN1SRMV2mQQABwTV73lof4A_jsg4NzasK8SLpQ=w1318-h882-no?authuser=0.jpg

ACtC-3f6I67EZYM1tvIjdcoR6Vc3pbuEsvd4VjxRhFhtNbGI7lcFQM0mjVsEntQH2vtUI-lGTulJB-GuETbvOEnDIfALTzGy1CqhRLc_Vwdl2iQPqQ_dN8cXigHRcyhAWGXiBJ7fJwcuDggcS_QxmUNT_OaDpw=w1318-h882-no?authuser=0.jpg
 
Thanks for the heads up Stripperguy, I’m going to consider putting a thin layer of glass over the gunwales given the challenges with the Kevlar in the sleeve. What was the width of that thwart?

I don’t have enough foam to cover the entire hull so it will just be a foam bottom like your carbon kite or most manufacturers’ composite canoes. I’ve built a canoe with this same Kevlar and 6 oz E-glass and it has held up very well which gives me some confidence in a slightly thinner glass layer.

I was really amazed by how stiff the 1/4” H80 ended up on the core for my last boat which is why I’m even considering using one strip each side for the gunwale. The consequences of going too thin are pretty steep though.
 
I would think that a single layer of 1/4” H80 on both sides would be plenty strong. The Savage River canoes I’ve seen seem to have only a foam gunnel on the inside of the hull only. What is the weight of the sleeving fabric? Have you considered how you are going to clamp or hold or them in place while the epoxy sets? I was trying to think of how this would work.
 
Thanks! I’ll do some photo research on the Savage River gunwales. The sleeve is 7.5 oz. If you look closely at the grainy 2nd picture of the foam in sleeve I posted, I’m imagining creating a crease between the inwale and ouwale where it will slide onto the thin hull. If I staple the tops of the foam together before putting it in the sleeve, they should stay together tightly and keep an even top line. Wet the piece out somehow, fit it onto the hull, cover in peel ply and clamp it down with vertical pressure...Stiffening the long foam gunwale to shape ahead of time might make this easier now that I’m writing out my thoughts lol.
 
One of the guys here did some elaborate fixturing to build composite gunnels in place on the hull.
he made some offset rails so that the 3D profile of the gunnels were replicated perfectly
 
One of the guys here did some elaborate fixturing to build composite gunnels in place on the hull.
he made some offset rails so that the 3D profile of the gunnels were replicated perfectly

That was me. It was a bit of a mess. I put the sleeve on the gunwale, wetted it out, and then attached it to the "mold." When I did this the fabric would wrinkle, especially on the inside edge, when it took the curve. It made for a lot of work trying to smooth it out afterwards. After curing, and released from the mold, it sprung back to mostly straight.

After that initial trial kind of failed I tried putting the sleeve on the gunwale and wetting it out and then adding thickened epoxy and clamping it directly to the hull so it was all done at the same time. That of course led to wrinkles too and plenty of work trying to pretty it up afterwards. Very messy too.

I talked to a local fella recently that wrapped his gunwales in some sort of fabric, I think it was carbon, and he used sleeve. He left the gunwale flat on the bench and said that after it cured it still had plenty of flex to attach to the hull. I've always wondered about that but never had the cuts to try.

Personally I decided the carbon sleeve, though so tempting, is more work and money than it's worth for gunwales. I'm kind of feeling the same way about DIY composite gunwales in general but I think the cheapest and easiest way to do it is attach the gunwales and then wrap them with fiber tape of your choice. It's hard to keep a straight edge (to look pretty) but I don't care. I've been painting everything anyway so it gets covered up.

Alan
 
I would think that a single layer of 1/4” H80 on both sides would be plenty strong. The Savage River canoes I’ve seen seem to have only a foam gunnel on the inside of the hull only. What is the weight of the sleeving fabric? Have you considered how you are going to clamp or hold or them in place while the epoxy sets? I was trying to think of how this would work.

Would these work, if you covered the wet gunnel with plastic ?.

Of course, no need for the plastic tubing.

IMG_2325_zpszsmaxyny.jpg
​​​​​​​
 
Alan,
I didn't remember that was you...but I thought you had better results, I guess not. As far as fancy cloth and keeping it straight on the gunnels, why bother?! Use some standard glass and paint it black. No one will ever know it's not carbon and you can mask a very straight line to make it look like you're a wet out master!

To answer your question, Mrindy, I do think a piece of 1/4" H80 in and out, wrapped with just about anything (not Christmas paper though) would be stiff enough for the gunnels. You might need to double up on the cloth where the boat will rest on roof racks.
 
If I staple the tops of the foam together before putting it in the sleeve, they should stay together tightly and keep an even top line. Wet the piece out somehow, fit it onto the hull, cover in peel ply and clamp it down with vertical pressure...Stiffening the long foam gunwale to shape ahead of time might make this easier now that I’m writing out my thoughts lol.

I bet you could get close to the shape if you: 1) milled a slot between the two foam strips for the fabric fold/hull, and 2) clamped/glued the two foam strips together along the hull to match the curve. Then its just a matter of covering with the sleeve, mashing the sleeve into the slot, and pressing it into place on the hull.

One of my other thoughts was using a needle and thread to stitch right through the sleeve and foam and hold them in place. Then you could apply epoxy without leaving tool marks. Thinking about it now, though- it seems that it would be a more janky way of holding things together.
 
Wow, thank you all for sharing your wisdom. I’m feeling better about using the 1/4” foam on either side, which should leave me a little extra foam if side ribs are needed in places.

Alan, you’re freaking me out man. Found your post in question where you preshaped the gunwales and thanks for steering me clear. Sleeve really is SO tempting, that Siren lured me. If you couldn’t tame that beast I’m in for a ride.

Rather than try to explain this with too many words, I’ll share some pictures of the dry run. I mimicked a curve and stapled appropriately on both sides and wow did that stiffen them up. I first tried 3/8” staples which came undone when I tried to jam the cloth up the crack. 1/2” staples seem to work though. If it starts falling apart at larger scale I like that sewing idea!

Oh and in other news, that surfacing veil mat laminated fine, can’t even see it. I’ll give it a day or two and sand to confirm there’s something to bond to.
 

Attachments

  • photo15692.jpg
    photo15692.jpg
    184 KB · Views: 1
  • photo15693.jpg
    photo15693.jpg
    332.4 KB · Views: 1
  • photo15694.jpg
    photo15694.jpg
    363.6 KB · Views: 1
  • photo15695.jpg
    photo15695.jpg
    415.6 KB · Views: 1
  • photo15696.jpg
    photo15696.jpg
    452.4 KB · Views: 1
I'm sure you'll be fine. All the methods I tried worked, many were just messy or awkward and took extra time trying to get a good finished surface. The only one that was a disaster was trying to infuse gunwales in place with vinyl ester resin over the epoxy hull. People said it wouldn't work. I thought it would. I was wrong. It was a gummy mess that I had to rip all apart. Maybe if I'd let the epoxy cure longer?

Anyway, I've had enough of all that jazz. It was fun at the time and I learned a lot but I think I'll be doing wood and screws from here on out. :)

Alan
 
Ha ! Here's my Sermon for the day !

A screw holds at it's location. What is holding the gunnel on the rest of it's length ? Yup ! Nothing.

What happens if there is a a paper thin gap between the hull and the gunnel ? It Rots if it gets wet. That is as true as the World is round !

Glue holds the gunnel on every square inch of the gunnel, making it part of the canoe.. Giving you the maximum strength.

Gluing Seals, far better than a mere coating on the gunnel.

Gluing makes the gunnel part of the hull. not something added on.

Here is an idea ! Why even have a gunnel ? Just wrap several layers of cloth on the shearline ! No Gunnels to worry about ! No rot !

I remember seeing an old Racing hull, without gunnels ! The Shear strip was a wider strip, tapered to blend with the hull.

If the Shear strip was a hard wood ? Such as Ash ? No need for Screws, or gunnels ! It would be sealed by cloth and epoxy, part of the hull.

Amen

Jim
 
Last edited:
Since we're talking about it here is the link to the build where I tried to infuse the gunwales. Too bad since the finish looked nearly perfect right out of the bag. The gunwales start on page 6: https://www.canoetripping.net/forum...ing-discussions/diy/52804-barrens-build/page6

And here's the one where I started by shaping them off the hull using forms: https://www.canoetripping.net/forum...ons/diy/38693-composite-bloodvein-build/page5

Funny how a person forgets things. I completely forgot I tried heat shrink tape, which totally didn't work out. Reading what I'd written at the time I didn't seem to think it was such a messy mess up after all and I was quite happy with the method of wetting them out and them gluing and clamping directly to the hull. I also see I mentioned that even after curing they were pretty flexible and I thought that with many hulls you could probably lay it up straight and then form it to the boat after curing. That's what my local friend did with cedar (and either fiberglass or carbon) and he said it worked fine for him. Sure would be an easier way to do it.

Alan
 
Back
Top