• Happy National Audubon Day! 🐣🐦🦅🕊️

DIY Soft side cooler

G

Guest

Guest
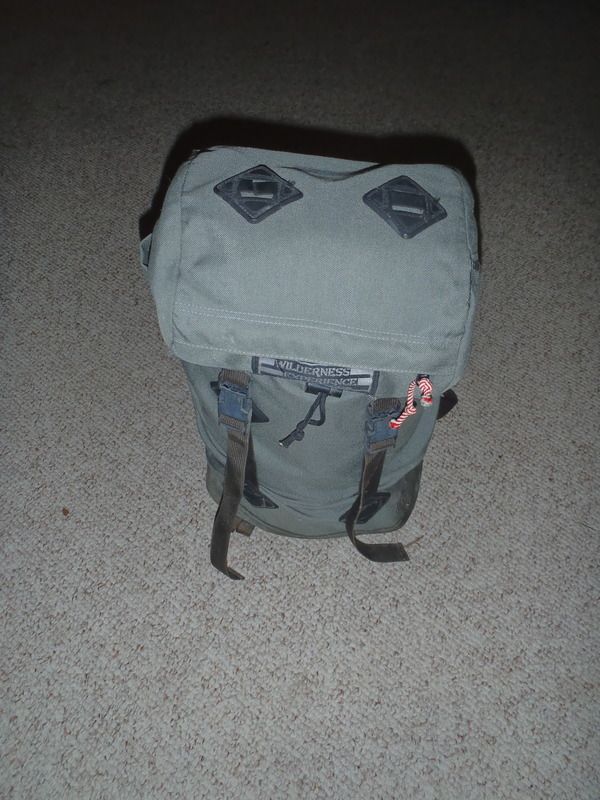
Wait, that’s not a cooler, it’s a day pack. That disguise is a good thing, especially if you launch from State Parks or other places that prohibit alcohol.


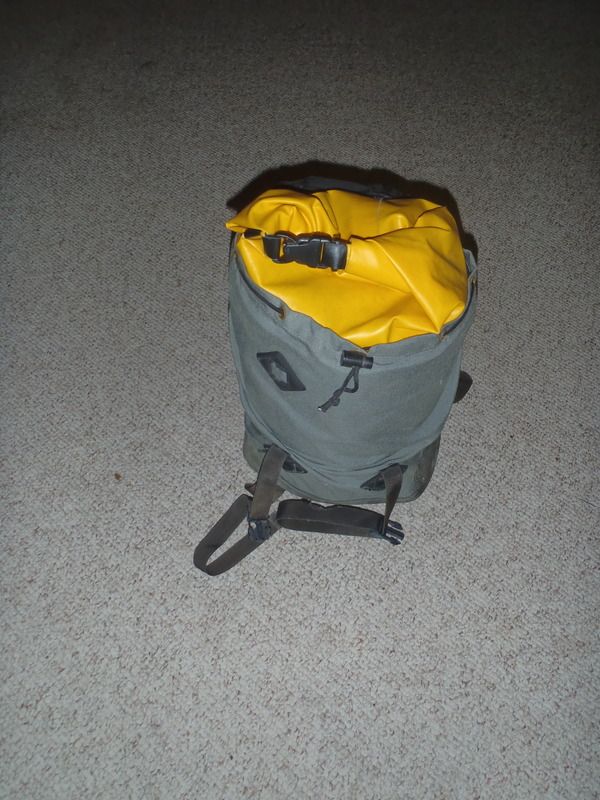
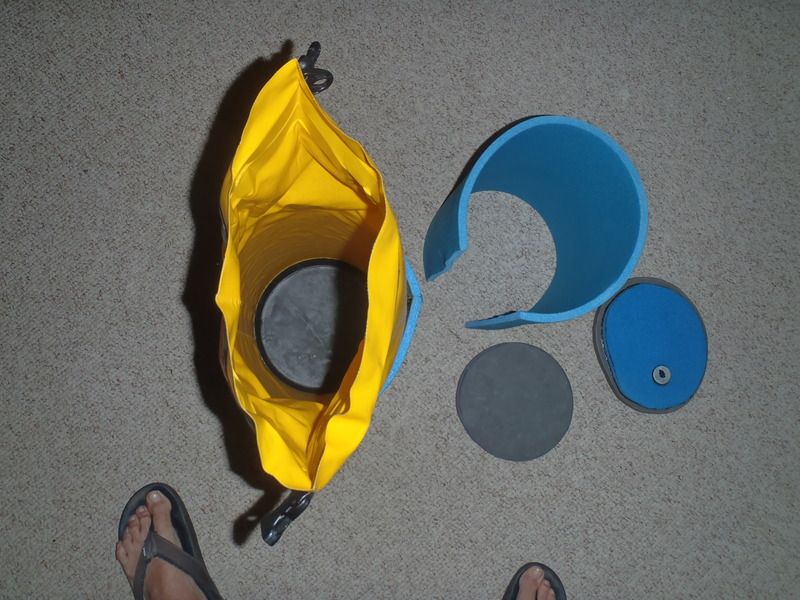
Inside the daypack is a Sealline 20L dry bag


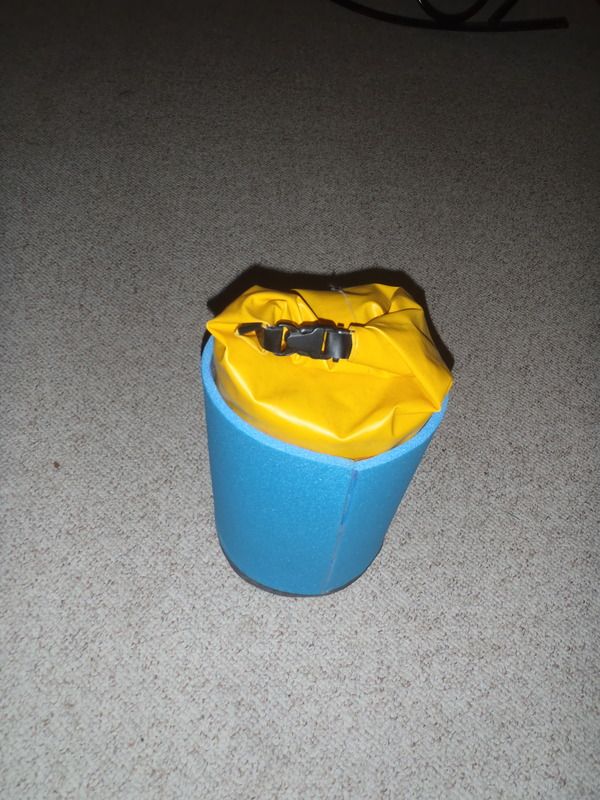
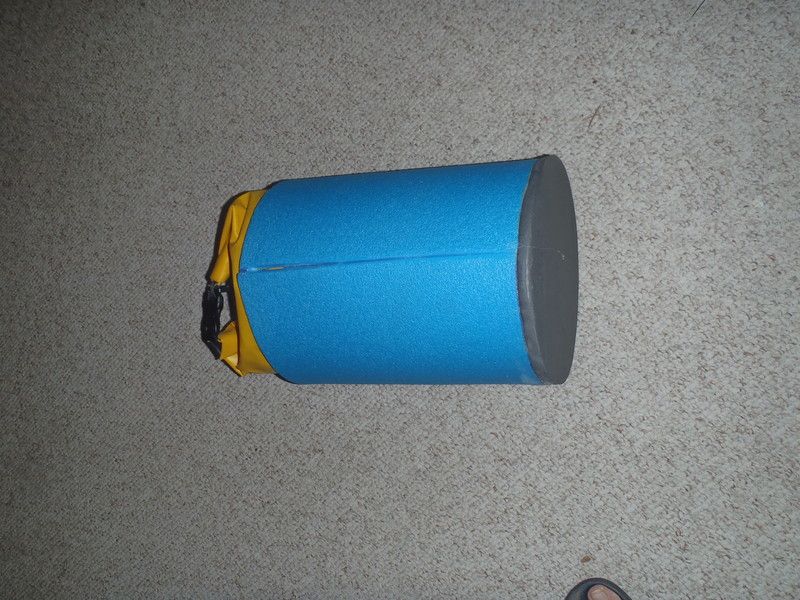
Hmmm, not just a dry bag, but a dry bag insulated with a 360 wrap of cheap blue sleeping pad foam.


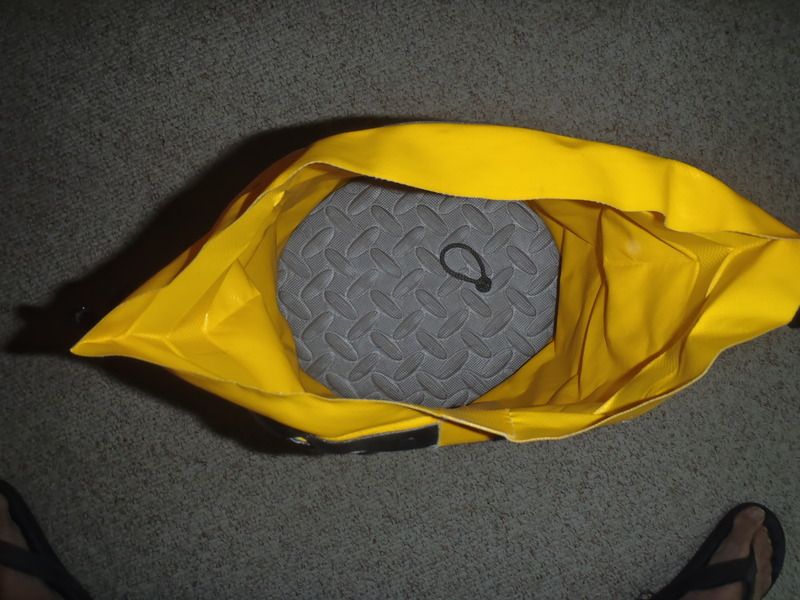
Two foam circles of exercise flooring (the smaller circle is inset) on the bottom, where the cooler might rest on the warm ground.


So what’s this inside the dry bag? A curious insulating lid, with a handy little pull loop.


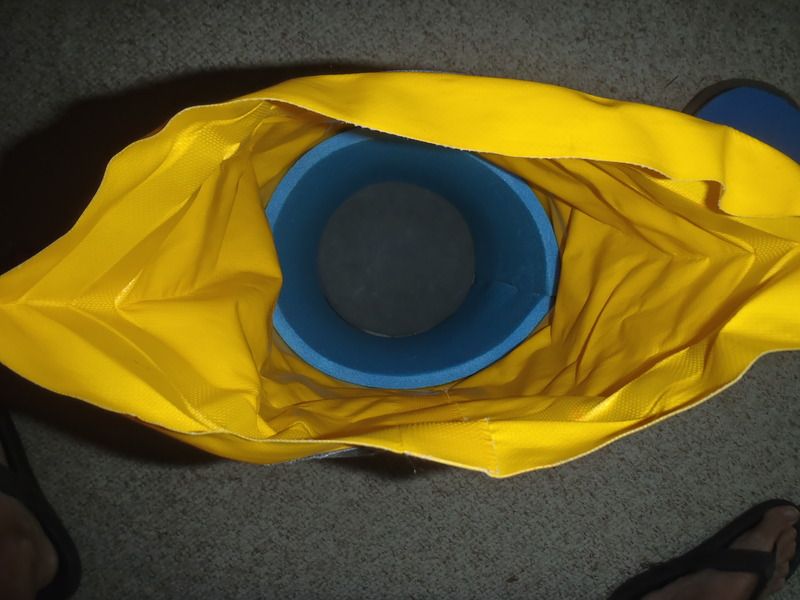
Let’s give that loop a pull. Whoda thunk it, it’s another blue foam stovepipe layer, with a couple more circles of exercise pad bottom. If you are counting, that’s four layers of foam on the bottom and two wrapped around the sides.


dang well insulated, more so if you consider the layers of waterproof dry bag rolled down tight with little air space and the day pack exoskeleton. The foam on the outside of the dry bag is contact cement permanent. All of the inside piece are removable for easy cleaning.


Holds 21 cans, three stacks of seven. More if I remove the inner foam stovepipe. Well insulated and well sealed.

Carry handle straps are the bane of cheap soft side coolers. 20 lbs of beer and ice is a load for a small satchel. That unobtrusively disguised cooler tote has excellent carry straps. Plus lash tabs and an external pocket. It floats high even when fully loaded. And I have a nice daypack to use if I remove the cooler insert and stash it in the camp shade.

That DIY remains my favorite cooler for many reasons.

Fifth best reason:
Yup, looks like a daypack to me.

Fourth best reason:
Stupid quick and easy to make.

Third best reason:
It was cheap.
Old day pack, free. Thanks Doug.
Shop scrap sleeping pad and exercise flooring remains, free
Baja 20 bag, twenty-ish bucks at the time, but I didn’t buy one, we had spares. Including a spare Baja 10 bag that now makes a great daytrip cooler in an even less obtrusive daypack.

Second best reason:
It’s essentially bombproof. There is not much to fail, and it would be hard to damage it with anything less than a hydraulic press blowout.

Best best reason, it’ll keep the original beers cold for a week.
 
Last edited:
As always from you, stupid simple and functional. Nice work. If only I liked cold beer, or even cold pop, I might have to give this a try. As it is I don't even like cold water so I'm good with a tepid bottle bouncing around the bottom of the boat.

Alan
 
As always from you, stupid simple and functional.

If it is coming out of my shop it better be stupid simple. The day I start making my own carbon fiber gunwales you’ll know I was hit on the head by a falling coconut and woke up a savant.

If only I liked cold beer

I had entertained thoughts of stopping in Iowa for a visit if I was passing by, but fearing I’d be offered a glass of tepid water, maybe not.
 
As always from you, stupid simple and functional. Nice work. If only I liked cold beer, or even cold pop, I might have to give this a try. As it is I don't even like cold water so I'm good with a tepid bottle bouncing around the bottom of the boat.

Alan

Considering you will need to drive right by our house this Summer on your way to Kinoosao, we will keep a tepid bottle of water on tap for you!

Might be a good over night spot for you on your long trip north.
 
Last edited:
Yes for sure Alan...you can stay here. We are just north of the Peg on #6 which is the road you need to take. Might as well rest up in a nice quiet spot. I have been known to cook on occasion also. Just sayin.
 
Considering you will need to drive right by our house this Summer on your way to Kinoosao, we will keep a tepid bottle of water on tap for you!

Yes for sure Alan...you can stay here. We are just north of the Peg on #6 which is the road you need to take. Might as well rest up in a nice quiet spot. I have been known to cook on occasion also. Just sayin.

I appreciate the offer, and I may take you up on it, but right now I'm leaning to starting at Wollaston Lake instead of Kinoosao on Reindeer. A couple hundred extra miles in the car but 120 fewer miles on the water (round trip). It also avoids what sounds like a difficult climb up the Cochrane River at the beginning of the trip. Saving mileage and time at the beginning of the trip means I can paddle farther into, and maybe past, Neultin Lake and/or spend more time exploring other areas of interest and hiking along the way.

But even then I won't be far from Winnipeg and depending on when I'm coming through sitting in a well stocked boat shed might be some nice rest for road weary eyes. We'll see what happens as plans firm up closer to departure date.

Alan
 
I got a request for the foam dimensions to make a DIY Cooler using a Baja 20L bag. In case anyone else is interested, here goes:

Parts:
20L Sealline Baja dry bag
Closed cell foam sleeping pad ($7 at Wallyworld)
Contact cement and disposable brush
Push pins (I’ll explain later)

Optional:
Exercise flooring pad
Day pack

There are five (removable) interior pieces of foam. Two 8 inch diameter circles on the bottom and a stovepipe of foam 26 ¾” long x 14 inches tall. The remaining two pieces make the interior lid and are best saved for last.

Stick the two bottom circles in the dry bag and curl the stovepipe so that it slips inside. When you spread the stovepipe out to full diameter the ends should meet snuggly and hold in place. The interior insulation is nearly done. Put 21 cans of your preferred beverage in the dry bag and roll it closed. Now the bag is heavy, stable, more rigid and easier to work with on the outside.

There are three pieces of exterior foam insulation contact cemented to the dry bag. An encircling wrap of sleeping pad foam, cut to 32 inch long x 14 inch tall, and two bottom circle pieces cut to 9 inch diameter and 10 inch diameter. I used exercise flooring for all of the bottom circles, but sleeping pad foam will work.

Center the smaller circle on the bottom of the bag and Sharpie outline. Coat the smaller circle and bottom of the bag with contact cement. The foam will require at least two coats, I do three. Once the last coats are tacky press them together with the foam circle centered on the bottom of the bag. Don’t put the larger circle on just yet.

Take the 32 x 14 exterior foam piece, wrap it around the bag and mark the top edge on the bag. If you are satisfied with that dry test fit use the push pins to secure the foam on some flat surface. Large pieces of foam will curl when the contact cement dries, so the push pin restraints are needed. Coat that foam and the outside of the bag up to the top mark with contact cement. Again, at least two coats on the foam.

Sit the beverage loaded dry bag upright on the bench and unpin the foam. Holding both sides of the foam set it down on edge behind the dry bag and slide it forward. If all your cuts were square the foam should fit perfectly straight around the bag. Once stuck I wrap some large rubber bands around that piece to keep it tight while the contact cement sets up.

Coat the foam glued to the bottom of the bag and the larger foam circle with contact cement. Usual multi-coat routine. Using a heat gun or even a (not the wife’s) blow drier on the contact cement immediately before installation helps. Stick that large circle on the bottom and walk away while everything sets up, that’s enough contact cement fumes for today.

. . . . Good morning, time for the only tricky part. The interior lid is not quite a circle. Because of the fold down dry bag closure the opening is slightly oblong. For a 20L Baja bag that top foam piece is +/- 9 7/8 inches x 8 inches. Once you have that piece fitted to your satisfaction cut another oblong ½ inch narrower all the way around. Trace that shape on the bigger bottom piece, leaving the ½ overlay on all sides. Glue those together.

The smaller inset circle fits tightly inside the foam stovepipe, and the bigger top circle spans the outer diameter. It is a snug fit.

Snug enough that it’s a PITA to get the lip out without a pull loop. A short length of cord through a fender washer on the bottom does the trick.

With a cloth tape measure it is easy enough to calculate the foam sizes needed for any dry bag and stupid simple to construct. The smaller 10L Baja bag hold 8 cans in 2 rows of 4. I double wrapped the outside of that one with foam (plus the single layer stovepipe inside) and left more space atop the can stack for ice. That thing, smaller volume and better insulated, is freaking amazing at keeping ice.


I took my Duluth Camp Kitchen Pack and converted it into a cooler. Worked pretty well on the Missouri River in Montana last week, kept stuff cool or five days.

DSCN5651.JPG

Built a hard foam box, covered it with duct tape and then used rubber cement to attach softer closed cell foam to the sides and bottom. Have one lid that fits inside so it can be pressed down against whatever is in the box (lower as the week goes on) then I made a second lid where the foam fits inside the box but the wood rests on the sides, that makes a great little table for cards,etc and doubles as a fillet board.

DSCN5653.JPG

DSCN5652.JPG

DSCN5654.JPG
 
I like the tabletop and card playing surface. My wife and sons play a lot of cards games on family trips, most of which require a card table of sorts. Most of which also apparently require being quite boisterous.
 
Shoe Goop cement and Reflectix High-R factor bubble insulation is a good deal too. Gotta a few of those creations, but these two 'featured' coolers are slicker than anything I had come up with before. I am just as likely to use mine in cold weather to keep things from freezin' up!
 
I am envisioning a blue barrel with a cooler built into the bottom of it, although the two packs shown here are pretty spiffy too. I take a little soft sided cooler that can be folded up and stashed once it is empty, about three days into the trip. But a cooler in a barrel would be toooooo cool.

Christy
 
Shoe Goop cement and Reflectix High-R factor bubble insulation is a good deal too. Gotta a few of those creations, but these two 'featured' coolers are slicker than anything I had come up with before.

We have a bath towel-sized piece of heavy duty rip-stop reflective material that has lasted for years, maybe decades. Purchased from America Science & Surplus, and I wish I had bought more. That stuff is at least 15 years old, maybe closer to 20, and just now starting to fall apart at the grommet corners.

In the boat I wrap that reflective blanket around the cooler if it is sun exposed, and it helps a lot in camp when shade is hard to come by on coastal or desert trips. Or even in the trees when I don’t remember to move the cooler very couple hours to a new shady spot.

Cooler management gets into a whole nother realm, starting with “That ain’t the frig at home, no opening and browsing”, and ending with “Anyone else want a beer while the cooler is open?”,

There are now soft side coolers advertised with some newfangled solar protective/reflective fabric; if I knew where to get that material I’d buy a yard and punch some grommet holes in the corners for in-boat and camp use.

Time for an experiment. The local forecast is for daytime temps 80 – 90F, nights 60-70 for the rest of the week. I’m going to grab a couple bags of ice tomorrow, fill the 20L and 10L dry coolers and open them up every day to check the ice. I realize there are a lot of variables, using dry ice or block ice vs cubes, ice temp, air space, pre-chilling, etc, etc.

Most quality soft side cooler manufacturers have vague claims “over-engineered to keep ice for days” or “three to five days in X temperatures”. I’m mostly curious to see when the last of the ice disappears from those dry bag coolers. For a rudimentary test I’ll just fill them with cube ice, set them outside and check the ice level once or twice a day until all that is left is cold water.

Pretty scientific huh? Maybe pour out and measure the amount of ex-ice water in each. Ohh,Weights and measures! Ooh,ooh, graphs!

I think I’ve got another winner for the 7[SUP]th[/SUP] grade Science Fair
 
I am envisioning a blue barrel with a cooler built into the bottom of it, although the two packs shown here are pretty spiffy too. I take a little soft sided cooler that can be folded up and stashed once it is empty, about three days into the trip. But a cooler in a barrel would be toooooo cool.

Those foam insulated dry bag coolers are not foldable. I generally stuff something else in there once the ice/contents are gone. A sopping wet tent fly. Or, I know it isn’t good nibblage risk, I garbage bag it. I can remove the interior insulation parts, hang the now garbage dry bag and scrub the bag clean of odors at home.

With a barrel cooler there better be a trap door access built into the bottom, lest I have to take out all of the food bags every time I want a beer.

A barrel with a cooler might have some advantages. Condensation inside the barrel could be an issue, but for fresh food and veggie lovers having an insulated cooler pack safely inside the barrel might be a boon. On hot weather or desert trips the barrel cool could mean I wouldn’t have to lick melted chocolate off the Snicker’s wrappers.

Anything with wet ice placed inside the barrel would have to be 100% absolutely guaran-dang-teed not to leak, but I suppose one of the cylindrical barrel organizers could be DIY insulated and work with reusable ice packs or sleeves, or even just frozen water bottles.

Someone needs to get really design tricky; incorporating a sealed, freezable bladder on the bottom of an insulated barrel food pack. It the bladder was re-fill able you could dump the water when the cold was gone and lose the ex-ice weight.

Oh man! 7th grade! I love science fairs...

My science fair project back in the 60’s was “How to Brew Beer”, complete with all the materials, including the bottle capping press.

EDIT: Oh yeah, it won. Even better, half the dads present were taking copious notes.
 
Last edited:
Home brew, That's great! And in the 7th grade. Respect!

All I have to offer on this topic is my attempt to prolong the ice in my existing soft cooler. I used 1 layer of blue sleeping pad foam cut and glued together tightly fitting the inside dimensions. In the summer, with Temps in the 80s and keeping the top wet, and in the shade as much as possible I was able to get 3 full days or 2 nights of ice in frozen 1 liter bottles. The food inside was also frozen. (Hot dogs, egg omlets, corned beef hash, etc) I drink my coldest beer in the morning after the cool night has done it's thing. At base camp I have been known to place 30 or so in a mesh beach bag, attatched to a large rock, tied to a line with a float at the deepest point I can find. If you find an under water spring they stay pretty cool. No beers in my cooler. The kids milk takes priority as per house hold 6!
 
Home brew, That's great! And in the 7th grade. Respect!

My father made homebrew for years before it was legal, and I grew up helping. Among other things he supplied his homebrew to the bar where the local State troopers and County cops drank.


All I have to offer on this topic is my attempt to prolong the ice in my existing soft cooler

The better cooler manufacturers have a page of ice management tips. Yeti does a nice job of it:

http://yeticoolers.com/pages/maximizing-ice-retention/
 
The better cooler manufacturers have a page of ice management tips.

I'm always surprised when people act surprised when I tell them, "No, you can't put a warm can/bottle of whatever in the cooler. If it's not already cold or frozen it's not going in."

Alan
 
My pet peeve practice is browsing, someone opening the cooler for a lingering look and selection. Not just my cooler; I can’t help but wince and look away when someone browses their own cooler in long contemplation on a group trip. Although that can be comical, like a puppy farm Golden Retriever staring perplexed at an unopened can of dog food.

On lux family trips I accept that the food cooler will be repeatedly browsed, but dad’s beverage cooler is mine to manage. On group trips I am happy to offer you something from my cooler, just keep your grubby mitts off, eh?

I'm always surprised when people act surprised when I tell them, "No, you can't put a warm can/bottle of whatever in the cooler. If it's not already cold or frozen it's not going in."

There is a temperature balancing compromise going between vanishing ice and cooler re-fillings. Void space is an enemy of ice retention. Am I better off leaving the air space, or filling it with cans or canteens that I have chilled using the best available method? At some point I might as well fill the void with a 50 F canteen chilled overnight or a dunk bag of cans.

I have thought about cutting another circle of exercise flooring (and pull loop) to fit down inside the stovepipe, for use when the available contents are diminished. It would pose a second, interior lid to remove, but I could stick it in the daypack pocket until needed.

Hmmm, I could even layer stuff above and below the foam bulkhead. Yeah, OK, I’m making a couple of those from scrap exercise flooring.

I started the rudimentary ice retention test yesterday and the results are already both unsurprising and curious. Unsurprisingly, the ice in the cheap soft side cooler will probably be gone this warm and sunny afternoon.

Curiously, there may be advantages to a cylindrical cooler. What shape would present the least surface area for volume? It would be challenging to make a spherical cooler, and even less fun chasing it as it rolled downhill.
 
Have you found a good way to get true cylindricity (sp?) from cut foam?* I seem to end up with a noticeable goose egg on one side, even if I have tried to match up, weight down at time of gluing, the edges...not a deal breaker, but it offends my exactitude w a new blade!

*then doing a 2nd layer/wrap just makes it go more out of round.

“Cylindri City”. What a great word. I think that is where little known superhero TootsieRoll Man lives while doing battle with his destructive arch nemesis, Kool-Aid Man. Oh yeah!

https://www.youtube.com/watch?v=_fjEViOF4JE

Nice perfectly square cuts, done with a band saw, help make ends meet perfectly.

The two foam wrapped dry bags I have are very cylindrical, aside from the crown of roll-down tops poking out ^ from the top. The foam wrap is round and tight, even with the double foam wrapped 10L bag, and the bottom pieces are flat and flush. That outer bottom layer is not only valuable insulation, it helps protect the vinyl dry bag bottom from ground punctures and wear.

Adding the stiffening interior stovepipe and bottom circles first, and filling/weighing the bag down with a load of beer cans before adhering the outer foam layers helps, but mostly it is a matter of having all of the cuts square, and dragging the foam level along the shop bench into the now rigid and weighty vertical dry bag. That initial contact cement stuckness touch is Yer-screwed-if-it-ain’t-straight. The ends on mine meet pretty much perfectly.

Some photos to follow around dusk when I do a 36 hour ice check. I fully expect by then the cheapo soft side will be just cold water with no ice remaining. I love me a stupid shop experiment.
 
Back
Top