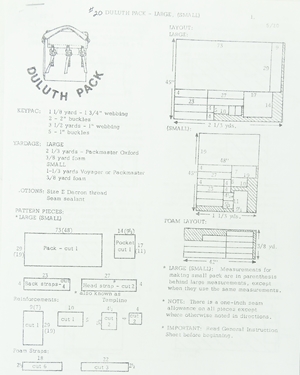
Well, back in October(?) I washed some 18 ounce #8 canvas to preshrink it and then ironed it and cut out most of the parts for a 70 liter(ish) basic envelope pack loosely based on the Duluth #4 Traditional pack. I used a Sew-Go pattern and general instructions set I bought from Outdoor Wilderness Fabrics in Idaho for a whopping $1.50 USD.
Duluth uses 15 ounce canvas but I have most of a 50 yard roll of black 18 ounce canvas so that's what I used. I have a pair of industrial sewing machines so I used T-135 bonded nylon thread which as twice as heavy as the T-69 heaviest thread most home sewing machines can handle (some can't even handle T-69). The pattern calls for fairly light pack cloth though which pretty much any machine can sew well. If you wanted to use canvas I suspect that you wouldn't want to go heavier than 10 ounce canvas, and maybe not even that heavy, using a household sewing machine. Both my machines are triple feed (AKA "Unison feed") with the usual feed dog under the fabric and both a walking foot and needle feed up top. Triple feed makes it easy to sew lots of layers of heavy fabric.
I got a good bit of the sewing done in October and then other projects and the holidays got in the way of wrapping it up until this week. Please don't yell at me about the absence of in-progress pictures as I've always sucked at stopping for pictures.
The biggest modification from the basic Duluth pattern was to order a shoulder harness set from ALPS Mountaineering for a Red Tail 80L pack that mounts to a webbing ladder on the pack that allows you to adjust the harness up and down on the pack body. That feature is intended to allow folks with widely varying torso lengths to wear a single pack size of a pack with a waist belt. I wanted to be able to ensure that the pack would ride low enough to be out of the way when carrying a canoe so I went with the webbing ladder for that reason. A plus is that I can buy the harnesses for less than the cost of the materials to make it.....
So.....
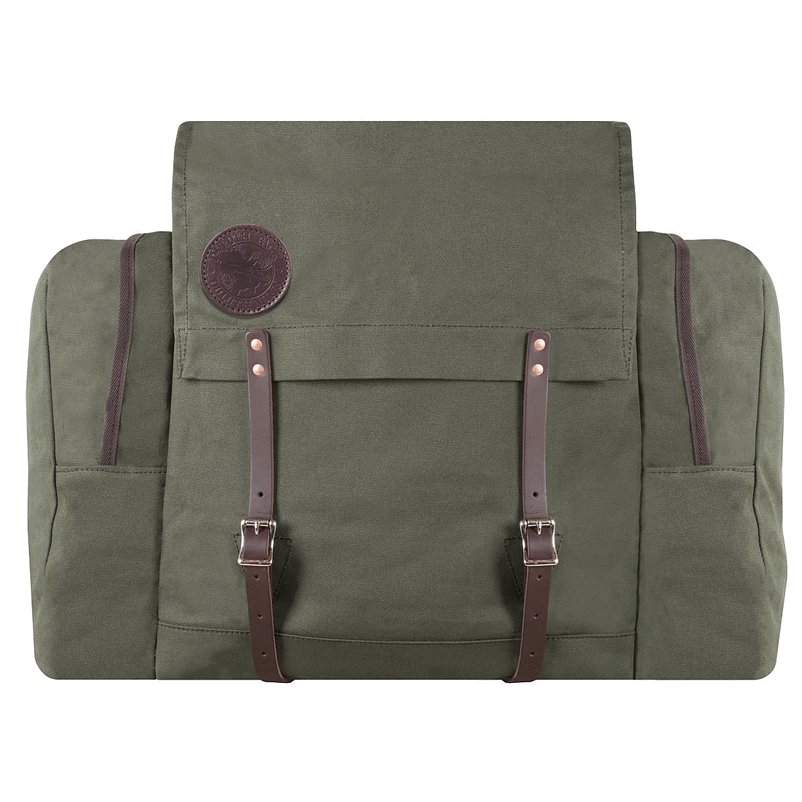
Here's the pack with a Council Tool Hudson Bay belt hatchet for some scale.

The strap locations were reinforced on the inside. As a part time climbing instructor I have a 50 yard roll of 2" tubular nylon so I cut 2" squares of that which gave me good stout reinforcements with minimal work. The lower shoulder strap locations already had canvas reinforcement sewn on before I switched to the webbing so they are kind of holding your pants up with a belt, suspenders and Gorilla Tape. And the lower shoulder strap locations were already on the double layer reinforcement wrapping the lower part of the pack. Happily, the sewing machine didn't care even a little bit about sewing through all that. It did grunt a bit on places where three doubled seams intersected each other so I turned the machine over by hand on those. And wrestling that much canvas and leather around on the machine took some planning and a good bit of sewing seams in reverse to make it all fit under the machine's arm.


The straps were all sewn with "Box X" stitching.

Here's a few shots of the shoulder harness showing the height adjustment ladder and the removable tumpline. One lesson learned is that the next time I'll add a pair of side release buckles to the lower end of the straps so I won't have the straps dangling if the tumpline is removed. The webbing ladder is sewn through to a 6x10" piece of 8-10 ounce vegetable tanned leather cut from the belly section of a hide where the leather is too soft for making holsters. The pattern called for a total of three layers of packcloth there but I have a lot of the leather and the machines sew it so that's what I used.


Like the Duluth pack there's a inner pocket.

But unlike the Duluth pack I got a rash every time I thought about the unfinished edged of the pack body Duluth leaves in their pack interiors so I used heavy nylon binding on all the exposed cut edges.

It took all of ten minutes and a couple yards of binding to clean up the exposed edges. The rash stopped itching right after I got that done......
I stuffed a couple of sleeping bags, two wool blankets, my Gore-Tex parka and trousers and a heavy cold weather parka into it. There was still more room but you get the idea.
Oops! One thing I should have done differently was to put the fixed part of the buckle on the flap and the webbing on the pack body. Oh well.....

Now I need to go over the seams to clean up and melt any thread ends I didn't attend to while sewing and put a pair of grab handles on the side of the pack to make getting it into and out of a canoe that's below you easier.
The next few projects will be smaller bags and pouches to learn how to make different kinds of pockets and to try different styles of zippers and then I want to make something similar to Duluth's Kitchen Pack.
 www.duluthpack.com
Best regards to all,
Lance
Duluth uses 15 ounce canvas but I have most of a 50 yard roll of black 18 ounce canvas so that's what I used. I have a pair of industrial sewing machines so I used T-135 bonded nylon thread which as twice as heavy as the T-69 heaviest thread most home sewing machines can handle (some can't even handle T-69). The pattern calls for fairly light pack cloth though which pretty much any machine can sew well. If you wanted to use canvas I suspect that you wouldn't want to go heavier than 10 ounce canvas, and maybe not even that heavy, using a household sewing machine. Both my machines are triple feed (AKA "Unison feed") with the usual feed dog under the fabric and both a walking foot and needle feed up top. Triple feed makes it easy to sew lots of layers of heavy fabric.
I got a good bit of the sewing done in October and then other projects and the holidays got in the way of wrapping it up until this week. Please don't yell at me about the absence of in-progress pictures as I've always sucked at stopping for pictures.
The biggest modification from the basic Duluth pattern was to order a shoulder harness set from ALPS Mountaineering for a Red Tail 80L pack that mounts to a webbing ladder on the pack that allows you to adjust the harness up and down on the pack body. That feature is intended to allow folks with widely varying torso lengths to wear a single pack size of a pack with a waist belt. I wanted to be able to ensure that the pack would ride low enough to be out of the way when carrying a canoe so I went with the webbing ladder for that reason. A plus is that I can buy the harnesses for less than the cost of the materials to make it.....
So.....
Here's the pack with a Council Tool Hudson Bay belt hatchet for some scale.
The strap locations were reinforced on the inside. As a part time climbing instructor I have a 50 yard roll of 2" tubular nylon so I cut 2" squares of that which gave me good stout reinforcements with minimal work. The lower shoulder strap locations already had canvas reinforcement sewn on before I switched to the webbing so they are kind of holding your pants up with a belt, suspenders and Gorilla Tape. And the lower shoulder strap locations were already on the double layer reinforcement wrapping the lower part of the pack. Happily, the sewing machine didn't care even a little bit about sewing through all that. It did grunt a bit on places where three doubled seams intersected each other so I turned the machine over by hand on those. And wrestling that much canvas and leather around on the machine took some planning and a good bit of sewing seams in reverse to make it all fit under the machine's arm.
The straps were all sewn with "Box X" stitching.
Here's a few shots of the shoulder harness showing the height adjustment ladder and the removable tumpline. One lesson learned is that the next time I'll add a pair of side release buckles to the lower end of the straps so I won't have the straps dangling if the tumpline is removed. The webbing ladder is sewn through to a 6x10" piece of 8-10 ounce vegetable tanned leather cut from the belly section of a hide where the leather is too soft for making holsters. The pattern called for a total of three layers of packcloth there but I have a lot of the leather and the machines sew it so that's what I used.
Like the Duluth pack there's a inner pocket.
But unlike the Duluth pack I got a rash every time I thought about the unfinished edged of the pack body Duluth leaves in their pack interiors so I used heavy nylon binding on all the exposed cut edges.
It took all of ten minutes and a couple yards of binding to clean up the exposed edges. The rash stopped itching right after I got that done......
I stuffed a couple of sleeping bags, two wool blankets, my Gore-Tex parka and trousers and a heavy cold weather parka into it. There was still more room but you get the idea.
Oops! One thing I should have done differently was to put the fixed part of the buckle on the flap and the webbing on the pack body. Oh well.....
Now I need to go over the seams to clean up and melt any thread ends I didn't attend to while sewing and put a pair of grab handles on the side of the pack to make getting it into and out of a canoe that's below you easier.
The next few projects will be smaller bags and pouches to learn how to make different kinds of pockets and to try different styles of zippers and then I want to make something similar to Duluth's Kitchen Pack.
Camp Kitchen Pack - 64L
Check out the deal on Camp Kitchen Pack - 64L at Duluth Pack
www.duluthpack.com
Best regards to all,
Lance
Last edited:
")
