• Happy National American Red Cross Founder's Day (1881)! 🇨🇭🚑🏥

Bell Mystic Repair Help Needed

Joined
Dec 9, 2014
Messages
1,239
Reaction score
461
Location
Penacook, NH on a back road
I got from a friend an 18' 6" Bell Mystic for free last year. This boat has a bad juju history. He bought it brand new, didn't tell his wife, and trailered down to Florida and on a dirt road going to the putin he watched in the side view mirror it bounce off the trailer and do a nose dive into the dirt. Bent the heck out of the gunwales but was able to fix them enough to paddle. Months later he and I put new gunwales, aluminum, which took the better part of a day with a lot of swearing and pounding with rubber mallets to fit but got it done.

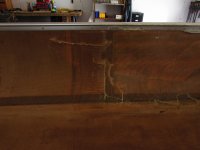
A couple of years go by and he moves, again, and storing the hull outside during a storm a piece of plexiglass from the cupula went sailing out from its frame, slide down the metal barn roof and at about 100 mph punctured the side of the canoe. Bad juju!
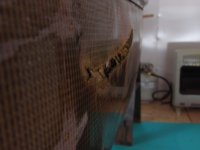
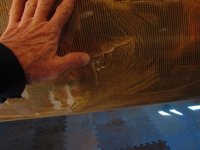
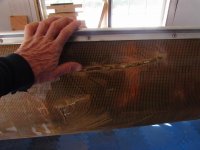
So another friend says he wants it, heck I don't, but will fix it for him. This is kevlar and although I have worked on many a boat kevlar is not one of the materials I've done work on. I'm posting some pictures in hopes that I can get the wisdom of the canoe builders/fixer uppers on how to go about this. With FG I just cut out a slot where the puncture is but with Kevlar I think it will fuzz up pretty good from what I've read and asked about in the past. I am open to suggestions if any cares to jump in. I can measure the length of the puncture later but it is pretty long. In my minds eye the biggest problem is that the ends of the break are off set and that is where I am coming up short. The actual patch is easy enough but it's getting those frayed end together for a clean match up.

Many thanks for any suggestions/thoughts/come up to my shed and fix it while I look is welcome.

dougd

For some reason not all of the photo's copied over, something about being too big. Sorry, hope these give an idea of what I'm dealing with.
 

Attachments

  • photo9123.jpg
    photo9123.jpg
    144.9 KB · Views: 0
  • photo9124.jpg
    photo9124.jpg
    309.8 KB · Views: 0
  • photo9125.jpg
    photo9125.jpg
    298.7 KB · Views: 0
  • photo9126.jpg
    photo9126.jpg
    329.9 KB · Views: 0
I got from a friend an 18' 6" Bell Mystic for free last year. This boat has a bad juju history.

So another friend says he wants it, heck I don't, but will fix it for him. This is kevlar and although I have worked on many a boat kevlar is not one of the materials I've done work on. I'm posting some pictures in hopes that I can get the wisdom of the canoe builders/fixer uppers on how to go about this. With FG I just cut out a slot where the puncture is but with Kevlar I think it will fuzz up pretty good from what I've read and asked about in the past.

Doug, that Mystic deserves another chance at rebuilt life, bad juju and all.

Hopefully more experienced folks will chime in, but, with little kevlar wisdom, and not standing beside the boat repairs in question, I would probably. . . . .

Clean up the tears as well as possible, meaning both strays and frays and any contaminates on the hull material to assure good epoxy adhesion.

Prop, push and jimmy the tears back into position, probably using some wood rods braced from the inside. Stick some wax paper on the ends of the rods.

Fill the outside of the cracks with thickened epoxy. Maybe prop the canoe on its side, lay some wax paper and sand bags atop the epoxy, glass and peel ply repairs and let that set up. Sand smooth, refill with thickened epoxy if necessary.

Lay a couple of concentric pieces of S glass, largest to smallest on the outside of the cracks. Peel ply.

If that is acceptable remove the internal armature rods and do the same thickened fill coat S glass layers to the inside.

I would not bother with using kevlar as a patch material, but like you I have little experience using kevlar for repairs. When laying glass and peel ply over top I would not be overly concerned about the kevlar sanding fuzz, which will be buried below the S glass and smoothed by the peel ply.

I know you like Dynel for ease of unfrayed use, especially with peel ply application, but you really do not need beefy cloth abrasion resistance along those side repairs.

Many thanks for any suggestions/thoughts/come up to my shed and fix it while I look is welcome.

Shed heck, that is a shop. I do hope to come up and visit the new boatworks sometime this year.
 
I have to agree, with Mike on the S-glass ! I'd put maybe a couple patches, on the inside, and, at least one on the outside. Glass it just like regular Fiberglass, and use Epoxy !

I'd shy away from fillers, as they will show. Unless you plan to paint ! Me ? I'd like to show off the damages ! Battle Scars !!!

Dynel would be durable, but also visible.

The fine weave of the S-glass, I used on Black Pearl, would be a good choice, especially for patches ! It is thin, and won't soak up a lot of resin ! It can be difficult, to get the air squeezed out, but you will like the results .

Looks like a fun project !

Jim

PS. Seems like Strippers fare better coming off a vehicle, at 60 MPH :rolleyes:
 
I'd shy away from fillers, as they will show. Unless you plan to paint ! Me ? I'd like to show off the damages ! Battle Scars !!!

From conversations with Doug neither he or the end user are not concerned about aesthetics. The Mystic already sports battle scars from previous misadventures and will surely acquire more.

The question, to my mind, is where to start the glass patch repairs, on the inside or the outside?

The cracks arrear to be pushed inwards, which makes flying Plexiglas spear wound sense. I think the cracks need to be trimmed and pushed outwards first.

Without standing beside the canoe for an up close eyeful I think that, after cleaning up the jagged bits the repairs would be easiest to tackle with the Mystic set on its side, working on the top outside of the hull first. That means adding some L bracket on sawhorses to hold the canoe sideways, so it does not topple over. I have taken to using cam straps around the canoe and horses as well, so the hull can not so much as wiggle. Finally a good use for cam straps.

That might also mean using short sawhorses, so that the initial top outside working surface is no more than chest high. Note to Doug, canoe repair and ladder work should not mix.

Tape up the inside so the epoxy does not drip through and add thickened epoxy filler to the cracks. Covered with peel ply, wax paper and sand bag weights might be enough to bring the split ends reasonably together. Sand that smooth, refill if necessary, patch with S glass.

I would definitely want the cracks below the waterline as smooth as possible, and some thicken epoxy filler applied first and sanded flush would help the glass patch lay smoothly without air pockets in the divots.

Pushing and propping the cracks back into position from the inside at the same time, using lengths of scrap wood braced against the opposite inwale or side, might be helpful to push the wound closed. Or even be required when laying sandbag weights atop the flexible kevlar sides. Brace board and wax paper over the epoxy drip tape, maybe a little piece of exercise foam to add some cushion to the pushin.

Flip the hull 180 degrees on the horses and do the same on the inside, thickened filler as needed, glass and epoxy patch, peel ply, wax paper, sandbag weights. And if necessary use the same already cut to size internal bracing boards for help forcing things back into position.

The most memorable braced back to position canoe was a Dagger Caper that had been torn almost in half amidships. One gunwale ripped completely in two, with a crack from the sheerline all the way to the center line. Those two pieces were nowhere close to being aligned and the hull was slightly twisted and bent.

We ended up with the Caper braced six ways to Sunday. With the hull upside down on sawhorses we tied a loop of rope between the carry handles, stuck a short board in the loop and twist tightened the rope until the halves came together.

Almost together in one alignment, there was a lot of up down gap remaining between the two halves.

We ended up with another twist loop underneath between thwarts on one side, a car jack and piece of board pushing up from underneath, and another car jack and board on top of the Caper, pushing down from a ceiling joist. Probably some other braces and weights.

There was a lot of niggling twist loop tightening and loosening, and little up, little down adjustment with the car jacks, but we eventually got everything aligned and solidly held in place near perfect.

I do have a patching kevlar question. The bugaboo with kevlar is that it fuzzes when sanded. Does that fuzz matter if the area is going to be covered with glass, epoxy and peel ply? I think the fuzz would be compressed and invisibly buried. heck, the fuzz fibers might even help mechanically with epoxy adhesion.
 
If you have 1 good side, it seems you have the correct shape for the damaged area from that. To keep the correct shape, would it be possible to prepare a couple of "molds" similar to what we use to build strippers. Once in place, you would have internal braces to strap against for the correct shape of the repair.

With that big a damaged area, I would be worried about changing the canoe profile in that area, adding a couple of internal, properly shaped braces would probably make things a little easier when doing the repair.

My $.02


Brian
 
Mike
the Fuzzies will lay down under the glass, no problem there. Your plan sounds good to me. As Brian says, get the hull to shape. If you can lay a kevlar patch on the inside, over the heavy damage, that would be a plus, but S-glass would also work..

Looks like a fun project !

Jim
 
About the hull sideways work, it is amazing how useful sawhorses of different heights can be doing boatwork.

We have a lot of sawhorses. A giant tall pair, 48 inches high, so I can work inside an inverted hull without hunching down. I can sit in a wheeled shop chair and scoot in and out from underneath with barely a scrunch. It is kinda fun, a little push and weeeee, glide over to the work bench. More fun at least than working on my knees.

Several sets at 28.5 inches tall, which with a platform atop match our table heights for seated banquet gatherings. And a set at 33 inches tall, which are nice when I am doing gunwales or, especially, doing brightwork installation. The gunwales are about 4 feet high, so I do not have to bend over too far while screwing on nylocks upside down, blind and backwards under an inwale.

That brightwork installation is hard enough on my aching back without hunching over all day. I have the Wilderness on a set of those 28.5 inchers and as an experiment set it on its side. The top side work surface is about perfect for my unhunched height.

If need be I will use a taller and shorter horse to get the hull angled and present a more vertical stem curve on canoes. Even better for when working way up in the stems of decked boats, where I have to crawl partway inside to reach.
 
Hi Doug I once repaired a hull with similar damage. I prepped the damage by picking and cutting out the broken resin and delaminated cloth. Then I screwed 1/8 inch ply wood to the outside of the hull. A layer of wax paper keeps the ply wood from being a permanent part of the hull. The screws going from inside through the hull and into the ply wood which flexed enough to provide a fair but not prefect curve. The goal here was to line up the broken edges not to pull the ply wood flat to the hull. By keeping the screws back from the edges of the repair I set myself up to do a structural repair on the inside of the hull. With the plywood removed and the edges aligned and stable I could grind on the outside of the canoe. The deepest gouges were filled with a paste made buy cutting scrap fiberglass into 1/4 inch fibers and mixing with resign. I used a throw away bristle brush to push the fibers into the gouge and get the air out. Once the outside is smooth an inner layer of Kevlar covered buy a fiberglass patch about an inch and a half larger will allow the patch to be sanded smooth without dealing with Kevlar fuzz. The same going for the patch on the inside. Jim Dodd suggested making a wood strip mold from the undamaged side, I wish I had thought of that. I would use it in place of the plywood and likely get near perfect curves. I have paddled the canoe I repaired for a number of years and it is still going strong. Good luck.
 
Thanks for the advice and tips. I have some thin left over hardboard with one shiny surface that I could use as a face plate or perhaps to sandwich from both sides when it comes time to fill the hole/gap. After that is filled it will be covered with cloth of some type. I'll have to look it over again. Going to be a bit though. Just had lower back surgery and won't be doing much of anything for a bit.

dougd
 
Back
Top