Kite +6%

I've been thinking about the double layer thing quite a bit lately. My first Osprey, which saw several thousand kilometres of tripping over the course of a decade was built with one single six ounce layer of regular fiberglass, inside and out. It saw some very rough usage, had some bad dumps in whitewater, and did get quite a few superficial repairs. Since then I've always put a football on, but I'm thinking that unless you are going to beat the heck out of your canoe, why bother?

I would agree with this. I nearly always put in extra layers somewhere, and it now seems to be the thing to do, but the vast majority of cedar strip canoes have been built with 1/4" strips and a single layer of 6 oz cloth and they work great.

I haven't done the math but I'd guess that 1/4" strips with a single layer is lighter weight than 3/16" strips with an extra layer to add stiffness. I've built boats where I used thicker strips on the bottom (where I wanted the stiffness) and transitioned to thinner strips on the sides.

Alan
 
Twice over the years, the double layer would have been the "Stitch in Time"
Once, on a friend's canoe, that developed a small split, in the keel.
This was in the BWCA. Duct tape got him home.
The other time, was a guy, that decided to climb into one of my Wee Lasse strippers, while sitting on dry ground.

I heard the crack. When I got her home, I gave her an extra layer, over the football.
Two lessons learned. Don't let people climb into my canoes on dry ground. and double layer for longevity.
My $.02 worth.

Jim
 
So today I moved away from the instructions. When I was deciding whether to use the yellow cedar or not I came to the conclusion that it would look best framed in. That was one of the reasons I was hesitant to use it. I tied a test strip into place for reference. After getting it secured end to end I put a pencil line down the inside of the test strip. I used a razor knife to knock the big chunks down before switching to my hand plane and shaving down the rest. I put the test piece back up and and worked on fitting the ends. The ends were tricky because of the tumblehome tapering into the hull. This makes the plane stand off the last bit. I found a razor knife worked best for shaving it down. I tried scraping and sanding first but they didn’t work as well. I also learned that if you fumble your knife just let it fall... After getting the ends to an acceptable level I swapped out the test piece for the oversized walnut accent strip. I had to drill it and pin it before spending some more time working on the ends. It still needs some more fitting on the ends but it’s almost ready to be glued in.
 

Attachments

  • 20.jpg
    20.jpg
    109 KB · Views: 13
  • 25.jpg
    25.jpg
    98.6 KB · Views: 14
  • 24.jpg
    24.jpg
    101 KB · Views: 13
  • 23.jpg
    23.jpg
    105.6 KB · Views: 13
  • 22.jpg
    22.jpg
    73.8 KB · Views: 10
  • 21.jpg
    21.jpg
    74.8 KB · Views: 10
It took a fair bit more work today on the ends to get the walnut sitting well at the ends. I used my oscillating tool with a sander head to help me fit it tighter then a final shave with the razor knife. When I was ready for gluing I was able to just slide the walnut back 3/32 on the nail to run a bead of glue in the gap. I used tape to keep it fitting tight to the existing wood between stations. I started at the bow, glued two stations worth then applied tape. This allowed me work slower and not worry about the glue setting up. I went for lunch and came back to discover the nail in the bow stem popped out and the tape let go. There was a big gap between the yellow cedar and the walnut. I was able to pull it back and scrape out what glue I could. I re-glued it and added some clamps for good measure. I'll know once I sand it.

After it dried and took off the tape I could see I had a few gaps between the walnut and the stations up to 1/8”. I had some cedar laminations on hand so I cut some pieces and sanded them thin to fit. I would have used tongue depressors but I only have a few. After taping the shims in place I played with the Robo bevel a little then test fit a strip. It looks ok, tomorrow I get to start planking.
28.jpg29.jpg30.jpg31.jpg32.jpg33.jpg34.jpg
 
It took a fair bit more work today on the ends to get the walnut sitting well at the ends. I used my oscillating tool with a sander head to help me fit it tighter then a final shave with the razor knife. When I was ready for gluing I was able to just slide the walnut back 3/32 on the nail to run a bead of glue in the gap. I used tape to keep it fitting tight to the existing wood between stations. I started at the bow, glued two stations worth then applied tape. This allowed me work slower and not worry about the glue setting up. I went for lunch and came back to discover the nail in the bow stem popped out and the tape let go. There was a big gap between the yellow cedar and the walnut. I was able to pull it back and scrape out what glue I could. I re-glued it and added some clamps for good measure. I'll know once I sand it.

After it dried and took off the tape I could see I had a few gaps between the walnut and the stations up to 1/8”. I had some cedar laminations on hand so I cut some pieces and sanded them thin to fit. I would have used tongue depressors but I only have a few. After taping the shims in place I played with the Robo bevel a little then test fit a strip. It looks ok, tomorrow I get to start planking.
View attachment 149103View attachment 149104View attachment 149105View attachment 149106View attachment 149107View attachment 149108View attachment 149109
You have discovered the problems involved keeping the strips tight to the forms.
There are more to come.
Good luck !

Jim
 
Mike,
You're sure moving right along...
I can't quite tell from your pics how that accent strip works relative to the crease.
When I strip built my Kite (2014, had to look back at mt photos) I followed the build guidelines. Specifically, I stripped the crease, extending up beyond where the hull profile blends in. The next strip nearly falls into place against the crease profile, making for easing stripping and plenty of material at the crease for blending and radiusing.
easier to see than explain...
I even added some temporary guide rails, to keep the crease strips in profile as they extended up beyond the forms.
The pics that I have from that stage of the build aren't ideal, but in the last one below you can see the crease strips extended beyond as described.

AP1GczPRiDSsb5ccmhPn7rP06pedHDfPfYYYYEoO6CJxtDKSFQpaJmSVu0VSfMb9tMOcxnEgV6lA5TIPoGZi0CYljxI5Q4KrmHO80nfN23DJxVd8jGt-Ikq6VkLbiBwnuM0AQLYhq4y8YtN3E9PUQBstxuto8w=w1339-h896-s-no


AP1GczNl57aV1Aq2vcCr9RySWqW5kazufD--dI1GVnMmhsHqYuGSi69FJroimOtkcbQTmiX0Z2-Q1NN_1GopoSI8FJ9SuBKoIpM8NaWew_DEq9D4dYnzCGuUdzL1KChfWma2q5eMbHIy4IfcnLQ-UAYiJZmL_w=w1339-h896-s-no


AP1GczO2-tpRWXPQccGcwndJdg5X6Y30IPuaBx6k578o1IUyWCAXPgKBlSSVDGRiqqZk6FJdIPwq81M3lzE6otYYwUwQPPzwKcHeAbqIYFQxfGW8S9_-24xKraehftUQ9diFvxmIOdY6Ye7AX6MLQqFjLGapmQ=w1339-h896-s-no
 
SG, my wife is away right now so I'm free to put the hours in. Like you mentioned before the plans come with very good directions for stripping. The reason I varied from the directions was the colours I chose. The instructions with my wood choice would have the yellow cedar all the way down the tumblehome section and draped over top of the walnut. The yellow cedar would be the corner. The way I did it the yellow cedar transitions to walnut and the walnut will be the corner edge being rounded over. It will be a very long exposed joint that the eyes will be drawn to so I'm really hoping it's a tight fit. I just thought the yellow would look better captured.

I should have stated at the beginning that I'm hoping that this will be a quick build. I pushed an ongoing project to the side and had to relocate everything that lives in the garage. Once I get the hull varnished it will have to wait until mid October when I can pick up the aluminum gunnels.
 
Last edited:
My first strip didn’t go so well. I end up breaking it off just as the glue was finishing setting. There gaps were too big and I knew I’d always stare at those bits even if no one else noticed them. I spent more time with the Robo bevel and the razor knife bringing the quality back up. I ended up getting 6 strips on. A friend came by for a bit so I lost some production time there. I see tomorrow I’ll need to ensure my inner stems are uniform sizing to keep the strips tracking well. Starting to take shape.
35.jpg
 
I'm in mem's camp. Staple holes and bead & cove allow me to work quickly and usually by the time I get my stem taper cut, scarf the strip & glue / clamp it in place, I can move to the other side & do it again so, working around the hull, I'd estimate that adding one strip to both sides takes 20 minutes or so.

I've considered trying beveling each strip and even building stapleless but I know that I don't have that much patience. Scratches sometimes improve the aesthetics greatly on mine and you can see daylight through the hulls when portaging.

Looking good & I do admire those with the patience to do it your way.
 
I'm currently getting a strip an hour maybe which I'm not too pleased with. I was actually planning on using staples, the distressed look looks good on furniture. I even had my stapler and staples on the bench but after I put the ropes onto the strong back and test fit that strip for marking it was so secure lashed in I thought why not try it.

I will have gaps even at the pace I'm going. I'm now thinking I should have bought LePage white glue that dries clear rather than the LePage Pro that dries yellow that I've always used so they'd be less noticeable.

I don't think I'd use square edge again at this point, or 3/16 strips for that matter. I don't have much experience strip building but my first strip build had some tricky curves to it. After heat gunning and twisting the strip into place I was very grateful that it locked itself inline onto the strip below it. The reason I see 1/4" as better over 3/16" is when it comes to sanding. Sanding out the imperfections in the wood, scratches, dents etc. This is magnified with square edge if you do a poor job on the overlap with 3/16" there's not a lot of material left by the time you sand both sides. If you were more experienced this likely wouldn't be an issue but I know I came dangerously close to sanding through the deck on my first build.
 
A strip an hour?! I haven't timed myself, and I don't recall doing more than 6 strips total per session, but maybe 30 minutes - so 5 minutes per strip give or take. I let those strips set-up for at least 30 minutes before going back to do 6 more.

Operations:
- Bevel the last strip that is already stapled to the form (if needed!). 3 - 4 minutes
- Run a bead of glue along the strip. 15 seconds
- Place the new strip on top of the previously beveled strip and staple it to the forms. 1 - 2 minutes
- Apply tape to align strips between forms (if needed!). 1 minute

I'd feel comfortable saying that I save time over bead and cove. Certainly less dusty.

Edit: My example is of the rare occasion of applying one strip per "level". I was often applying 3, shorter strips per level - mitering as I went. This easily added another 5 minutes "per level".
 
Last edited:
I see a fair bit of this was user error and not using staples. Having a coffee break now but things are going a lot smother today. I see you really need to run both directions with the Robo bevel and not be too aggressive with it.
 
All I know, is it takes me a lot more time, and trips back and forth, to the wood shop.
Even when I'm just doing a partial Staple less method.

If a guy could hold the strips in place with Jimmie clamps, and use CA glue, and accelerator ? A guy could whizz through a hull.

Jim
 
Jim, I'm sure tech will be here soon to 3D print the hull you want but what fun would that be?

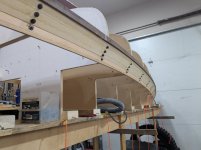
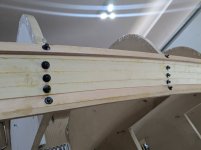
So I finally got the hang of the Robo Bevel. I was doing a couple of things wrong. First I was tipping it too far over on the forms. Second I was starting at the center and working out to the ends. You really need to go both directions. If you just go one direction it leaves a bit behind and I was doing a poor job shaving it with the razor knife. Now I start at one end and slowly work my way to the other in a single pass. Then I flip the plane in the Robo Bevel and go the other way. After 4 passes it's done. I still go along and shave any inconsistencies. The bit at the stems always needs cleaning up. I see as I get higher the hull is slightly moving away from the form so I added another screw for the lashings to go around. Pulls the wood in and then down.

So my incredibly slow method goes like this:
-4 passes plus clean up with of fine details, then check for irregularities etc.
-Test fit new strip after giving the inside should a quick pass with sand paper.
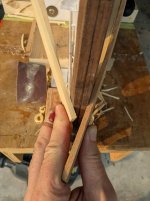
-Glue/lash the first two feet then hot glue lash the end
-Work my way down gluing about 4' at a time lashing and taping as I go. I use 3 pieces of tape between stations then suck it down further with 3 more. Pretty much a piece of tape every 2" by the time I'm done. Doing this hoping for a tight fit and less weight due to less epoxy.
-I pinch the seam into alignment as I go. When I get to the end I hot glue tack that end as well and go work on the other side. My glue dries in 20 minutes so it's ready by the time I finish the other side.

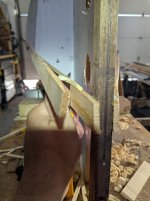
As for tape I made the mistake of buying some Painter's Mate instead of my usual 3M Scotch 1" painters tape. The Painter's Mate doesn't adhere so well and keeps popping loose. With the 3M Scotch I only have to use a few inches and it sticks well. As I used up my old stock I see they've made it thinner but it seems stronger and sticks better so that's good.

As for the time I must admit that I'm having fun as I go. I normally build in the winter with the garage door closed. With nice weather and the garage open I get lots of people stopping for a look and enjoying the progress. So even with getting the hang of the tool It's still taking me an hour by the time I remove the cords and tape to start the next strip. Definitely not worth it to not use staples.
41.jpg43.jpg47.jpg
 
Back
Top Bottom