• Happy Hot Cross Bun Day! ♨️❌🥧

Kite +6%

Joined
May 19, 2025
Messages
9
Reaction score
24
Location
BC Canada
I thought I would post my build here as this site is such a great resource for building my Kite. Plenty of Jonathan Winters designs built here as well as many of those builders lending advice when needed. I was able to look though build threads and see pictures by Stripper Guy, Memaquay, Alan Gage, Dogbrain, Gama1214, Blackrock and others. Hopefully this thread will add to that collective knowledge aiding future builders.

I’ve built a few boats now. I started with a fuselage frame SOF kayak, then I helped my daughter build a stitch and glue kayak. I followed that up with a strip built kayak for my wife. I had planned on building myself a kayak but after a back injury I don’t find the seated kayak position comfortable for long days. I bought a Clipper Caribou S a couple of years ago now and have really enjoyed paddling it with a double blade. I find it very nice in the river and still pretty decent on lakes. I don’t have a lot of experience with different canoes but I know what I like in a hull after years in kayaks. On a recent trip I was thinking I’d like to try a something a little more efficient over distance as well as a little harder tracking in the wind. Since I already have the materials on hand I thought why not attempt to build that boat.

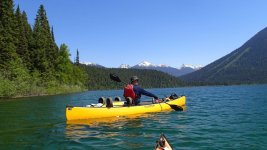
When looking for a solo canoe that fit that description I wasn’t really seeing plans for anything like it in a high volume version. Designers should consider offering their plans in LV, MV and HV versions. The Kite sounded great and I really loved the look of the tumble home. I’m a bigger guy and learned a long time ago that boats paddle poorly overloaded. Slower speed, slow turning and often not so stable. I find the volume and stability of my Caribou excellent so I thought I’d attempt scaling a Kite up to similar dimensions. I messaged Noah’s and Stripper Guy for opinions on scaling. Both thought it would be fine. I also messaged Alan Gage about his thwart material plus I included a rough build plan in case it sent up any red flags to him. Thanks guys for the responses and special thanks for responding while on vacation SG. This is me in my Caribou on a trip this spring.
 

Attachments

  • 1.JPG
    1.JPG
    104.9 KB · Views: 16
Initially I was thinking 8% increase but after reading through the plans I saw they had different dimensions written on them than in the “brochure”. I settled on 6% increase which will give the same overall width of 32-1/4” as my Caribou. It will be pretty close to 16 feet depending on stems. I want the boat to be easy to move around. Tough enough for a lake but not overbuilt to take hits in the river. I’ll be using 6oz S glass inside and out, 3/16 square edge cedar strips, West Systems 105/207 epoxy, planning on 2 piece stems and a webbed seat. I’ll be disappointing the traditionalists by using aluminum gunnels and thwarts. I choose aluminum gunnels because they’re light and should make for quick easy construction.

I got the plans printed scaled up 6% at Staples and ordered enough copies to cut out and spray glue one to each form. Be sure to check the price before placing the print order. I didn’t and wound up spending 2.5 times the money over the last set of plans I had printed due to the much larger paper size, my mistake. The CNC precut forms look like a pretty good value at this point. I spent more money on printing, MDF plywood and spray glue not mention 2 whole days time between printing, cutting and sanding.
 

Attachments

  • 2.jpg
    2.jpg
    81.8 KB · Views: 1
  • 3.jpg
    3.jpg
    72.9 KB · Views: 1
Day 1: (Day 3 if you count making the forms)

Most of the day was spent emptying the garage making room for the build. I have too many hobbies and also had to move an underway project to make room for this project that I’m sneaking in. I was given a strong back by a friend years back and I have been tripping over all the years since. I started by peeled off the layout tape from last build and chiselled up the old epoxy and glue globs so the stations could sit flat. I cut some 2x4’s to the 14” width of my strong back then ripped a straight side on them all with the table saw to keep the stations as vertical as possible. I put a strip of tape down next to the marked center on the strongback and measured my station spacings out from there. In metric with the 6% added to the spacings the station lines were spaced 32.31cm apart. I put tape across and used a square to mark the station lines. I used deck screws and washers to mount the stations because that’s what I had on hand. As per the instructions Stations 1-7 I have the paper side right on the line, the body of the form and the 2x4 base are behind that towards the center. Stations 8-14 also have the paper side right on the line but the body of the station and 2x4 base are in front of the line towards center. This is because the shape of the hull is on the line where the paper is. If you didn’t do it this way when you hold a strip up to the stations the thickness (5/8 MDF) of the station would be in the way and would hold the strip away from it’s designed natural curve. I ended up getting all the stations mounted. It’s nice at this point to step back and see the hull shape. Tomorrow I’ll true the stations up and see how the strips lay to the stems.

Day 2:

Partial day, I ran a string line and levelled things out a bit. I had to use a few shelving brackets to get the stations fully vertical. I had planned on the 2 piece stems as shown in the plans but the material I have isn’t the 1-5/8” wide as specified.

Stems: I want to have walnut stems for a highlight. I was tempted to just sand the station form and use Jim Dodd’s interlocking stemless stripping method. I’d then shave down the outer and apply the walnut but that would mean I’d be staring at a fillet joint each time I paddled. In the end I cut down the form some, quickly drilled some clamp holes and made some narrow inner stems from the walnut strips I have. This way I’ll have walnut showing right through. I then pre-bent the outer stems for future laminating. It was a long day figuring it all out and getting the inners glued and outers clamped to dry.

Accent strips: I really like the look of Alan’s Kite and hoping mine turns out similar. I’m planning to do a single accent strip of Peruvian walnut on the side to match the stems and likely a keel strip as well. I considered using yellow cedar for the tumblehome sections but I don’t want it to look too busy. All of the wood I am using was milled by Rod Tait of Orcaboats that I had bought for a kayak build. My accent strips needed scarfing so I did that and set them aside for now.

Stripping: After laying out a few strips while figuring out my stems I went back to the plans to look for suggestions. Their “Stripping the Kite” section was very helpful here and I’ll probably use some extra bead and cove strips I have to do the tumblehome bit before figuring out how to use Nick Schade’s Robobevel. That’s where I’m at for now. Hopefully I’ll get that first strip on in a few days.
 

Attachments

  • 4.jpg
    4.jpg
    99.2 KB · Views: 9
  • 5.jpg
    5.jpg
    112.2 KB · Views: 9
  • 11.jpg
    11.jpg
    124.2 KB · Views: 9
  • 10.jpg
    10.jpg
    132.9 KB · Views: 9
  • 9.jpg
    9.jpg
    149.1 KB · Views: 9
  • 8.jpg
    8.jpg
    145.2 KB · Views: 9
  • 7.jpg
    7.jpg
    127.3 KB · Views: 9
  • 6.jpg
    6.jpg
    89 KB · Views: 9
A 6 percent increase should bring you close to 16 feet I'm guessing. I'm wondering how close your canoe will be to the Shearwater, the bigger sister of the Osprey.
 
Curious where you are finding 6 oz S-glass ?

I'm building another 38 Spl. now. Finishing up a Kevlar copy of it also.
I find the 38 Spl, one of the best hulls I have built and put on the water.
The Kevlar copy should weigh in at around 35 #, and 16'3" long.
Good to see another build thread.

Jim
 
Memaquay, I wasn't aware of the Shearwater. I completely missed it researching available solo plans. Now that I do see it I don't see any dimensions listed for it but am interested for friend of mine looking to build. I do prefer the look of the full length tumblehome but would have preferred not to scale anything.

Scratchypants, those threads were a good read with coffee this morning.

Jim, I already had the glass on hand from an order a while ago from Composites Canada. Not ideal not having fresh glass but I had intended to use it a while ago. Hopefully the 6oz x 60 comes back into stock soon for you.
 
I think you'll find the Kite design has very high initial stability. Every time I go back to paddling it after paddling any other canoe it surprises me. It isn't a fast canoe, and I also wouldn't classify it as hard tracking at all. It is quite river friendly, entering and exiting eddys, front ferrys. The stern is sticky, but easily released by moving your weight forward. I would guess that increasing all the dimensions by the same amount wouldn't change those characteristics unless you also lengthen it more than the 6%. The canoe is really sensitive to trim, as I alluded to above, and as I was told by others. It took me a few years to realize that I really had to load the back to get the stern planted for downwind travel. This is because the lowest point on the hull is well behind the center point. Once I mastered the trim, it all fell into place. You may want to experiment with seat placement, especially with a load. This canoe behaves very differently with a load vs. without.

This canoe can be frustrating for the photographer and fisherman. The moment you lift your paddle out of the water, it starts to overstear in one direction or another. There seems to be no correction for this behavior. Probably the only thing I don't like about the Kite.

The only building advice that is specific to the Kite that I'll give is make sure to round over the hard edged tumblehome so that the glass lays down. I didn't do it enough and it fought me. Also, I ocassionally rap my knuckles on that sharp edge. You might consider adding a little more glass to the inside football. With the relatively flat and wider bottom, combined with 3/16" strips, you might end up with a little more flex than you want. Maybe others have an opinion on this.

Good luck, Mark
 
Thank you Mark, I really enjoyed your Wabakimi solo YouTube series. I haven't got to Quetico yet. I saw that you shared that you settled on 8" aft of center and I was going to do that +6. I have a 7 web seat on order as well as hangers that will be riveted to the gunnels. Do you think I should wait on seat install?

I am very open to suggestions on glassing. I have 39' of 6oz x 60" and 39' of 6oz x30" as well as a roll of 4" 6oz tape and 2" 6oz tape to work with. Whatever I don't use on this build will be used on a boat for my son after.

I did find it interesting reading the builds that you guys put the extra layer on the inside.

Mike.
 
Hi Mike, Thanks for the comments. Just so you know, I re-gunwaled that canoe and beleive I may have moved the seat back even further. If it were me, I would wait to decide on seat placement. Either way, it's usually easy enough to trim the canoe with your gear.

I'm always the one in the minority advocating the s-glass football layer on the outside, mostly because it both strengthens the hull to some extent and protects the bottom from gouging. In your case, since you're already using 6oz s-glass on the outside, my inclination would be to put an extra layer on the inside to stiffen up and strengthn the middle. If you were using 1/4" strips and 6oz s-glass, an extra layer wouldn't be necessary. But since you are widening a hull that is a shallower arch than most, and using 3/16" strips, adding an extra patch in the center will increase strength and reduce flex. No need to go all the way to the front, just the bilge and center 6 to 8 feet or so.

Mark
 
I'm still in the camp of putting the extra layer, layer of cloth, on the outside, and on top of main layer.
It adds stiffness and durability.
Inside ? just stiffness.

Actually using thicker wood would give you a stiffer hull.
 
Yes there's additional 6% spacing on the forms as well.

I put some hours in getting things going. I had to shave the inner stems down so that the width of the inner stem plus the strips outside of that is under 3cm. That's the width of my exterior laminations.
12.jpg13.jpg

I pretty much have the tumblehome section done. I ended up using the yellow cedar.

15.jpg
 
Just a thought on the extra layers: I like s-glass on the exterior but you'd save cash (and a tiny bit of weight) by using 30" wide, 4 oz e-glass on the inside football. (I haven't found 4 oz s-glass yet but I'm still looking.)

The e-glass isn't a stiff as the s-glass but with a double layer, it should be plenty IMO. (I've never built with anything thicker than 3/16 in strips and I've had good luck with the lighter, cheaper glass)

What fasteners are you using to hold strips to the forms?
 
I've been thinking about the double layer thing quite a bit lately. My first Osprey, which saw several thousand kilometres of tripping over the course of a decade was built with one single six ounce layer of regular fiberglass, inside and out. It saw some very rough usage, had some bad dumps in whitewater, and did get quite a few superficial repairs. Since then I've always put a football on, but I'm thinking that unless you are going to beat the heck out of your canoe, why bother?

The modified Pal that I'm building for the school club is almost ready for glassing. It is going to be outfitted as a solo, and will only see a few trips a year, with the longest one being no more than eight days. I have decided on only a single layer inside and out on that one. I would probably go with a football on the outside for a bigger tandem, because of the increased weight and chances of harder impact, but I think my solos from now on are going to be one layer only.
 
Hey Mike,
Glad to see you’re starting your stretched Kite build.
The builder guide that comes with the plans gives excellent directions WRT where to start stripping. That “crease” is actually quite easy to strip, but, as Mr. dog brain above warns, be sure to NOT maintain a sharp edge on the outside. Also, be sure to provide a fillet on the inside of the crease. Doing so in both cases will ensure that you’ll have good adhesion with your laminate.
 
I too am interested in the fasteners, you are using ?
Looks like a great start.
In my opinion, it's fun to modify plans.
Makes the build, especially when you put it in the water, more exciting !

Jim
 
Over the 35 years of building these things, I've always gone stemless.
It's easier, and I like the look.
Never had a problem with the strength of the laminations at the stems.
I overlap the inside glass, and add two bias strips of cloth to the outside.

Had a Wee Lasse size canoe, fall off my truck going down the highway. It was run over by a SUV. Busted the hull up, way beyond repair. Both stems stayed intact.
I'll never question the strength of stemless construction.

Even with Stemless, you could add a Walnut band to the stems.
It would save a lot of the work of building the inner stems. Just a thought.

Jim
 
Back
Top Bottom