• Happy Weed Appreciation Day! 🌱🌿🌻

​Skid plates, an evolution

G

Guest

Guest
I finally finished topcoating the 2” bias weave fiberglass tape skid plates on the Cronje with black enamel spray paint and thought it was an opportune time to look at some past skid plates and experiments.

A Vermont era RX Explorer, with kevlar felt (and I suspect urethane resin) skid plate kits. That skid plate was on the boat when I bought it and was so horribly rough that I topcoated it excess urethane resin from another kit and later spray painted it white. Still nasty, rough and unnecessarily heavy.


2008 RX Penobscot, again with kevlar felt and urethane epoxy, but DIY (wax paper) covered to compress the thick kevlar felt unsmoothieness. Green pigment in the resin, which didn’t turn out a very matching green, later spray painted for a UV topcoat. Still heavy and thick, but at least not nasty rough.


Then some experiments.

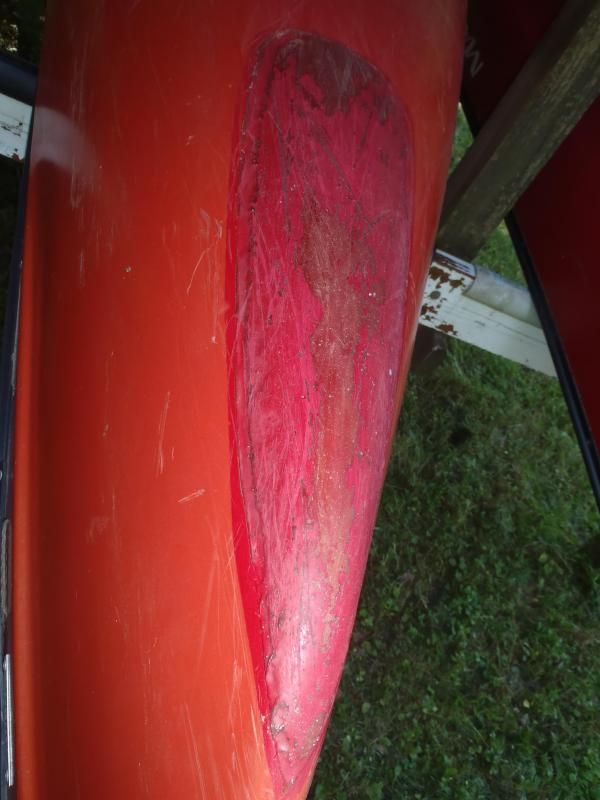
Small Kevlar felt skid plate and urethane resin on a Freedom Solo


And a similar small kevlar felt and G/flex skid plate on the other stem of that same canoe. Not much difference in scraping and rock bashing wear and tear. Both epoxies pigmented red and spray painted red.


BTW – Most manufactured skid plate kits now seem to come with some kind of epoxy resin. Old Town kits, at least as of a few years ago, still had urethane resin (the thick, vile smelling stuff that seems superior to epoxy resin in impact and wear resistance).

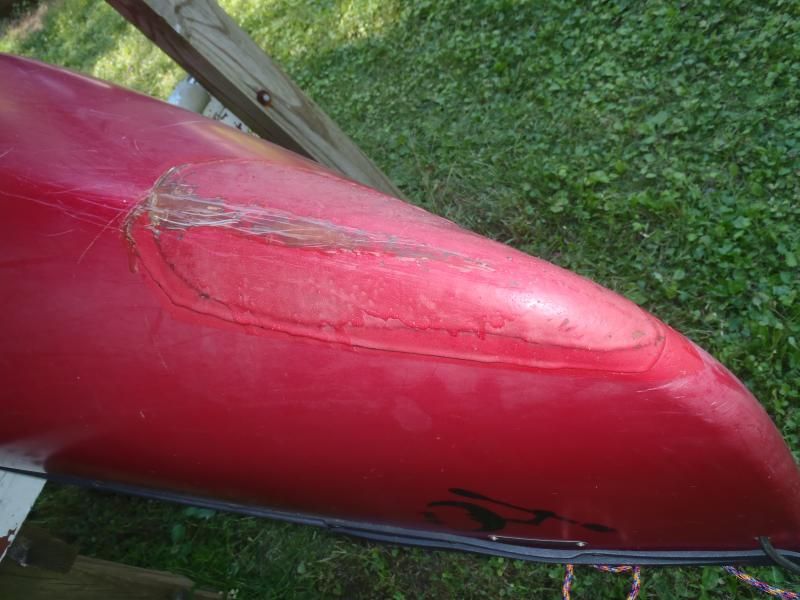
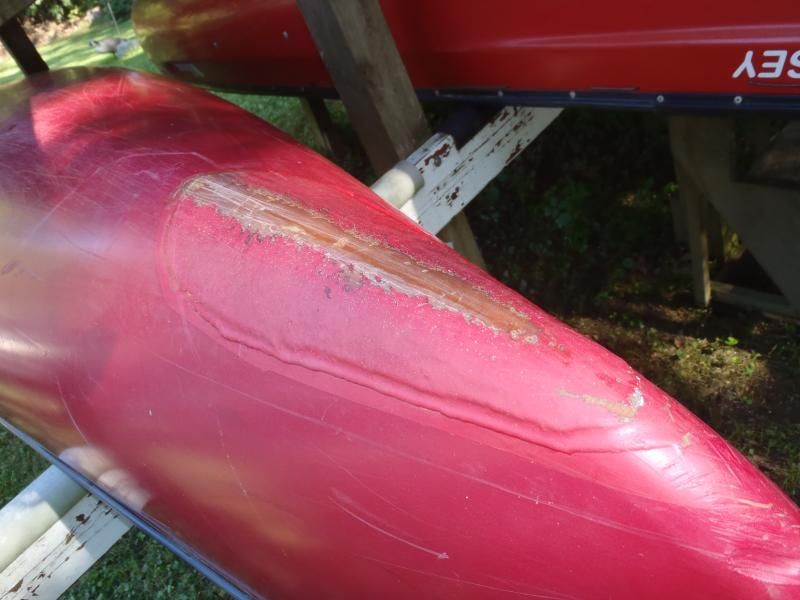
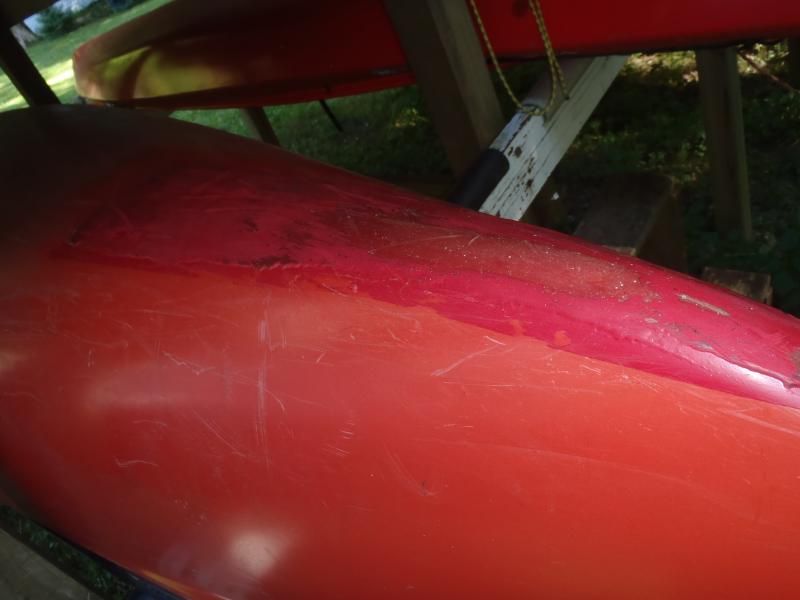
Mohawk Odyssey 14. Stern skid plate kevlar felt and red tinted G/flex (spray painted red), bow just a teardrop of tinted G/flex with no cloth. I have smacked a rock or two with the bow of that clothless Odyssey. G\flex is amazing stuff.


Further experiments. 1971 Old Town Sockeye. Bow and stern with 2-layer skid plates of 1” glass atop 2” glass with epoxy resin. Untinted epoxy, but top coated with black spray paint for UV protection. Much nicer lighter and tighter conforming to the stem. I’ll never use kevlar felt again, and I don’t take that boat places where I’d smack a rock, so West 105/206 resin seemed sufficient.


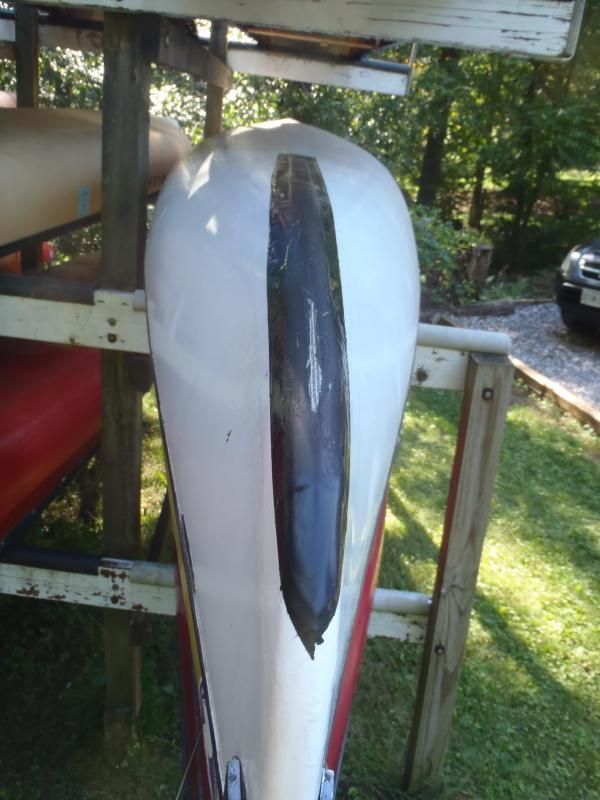
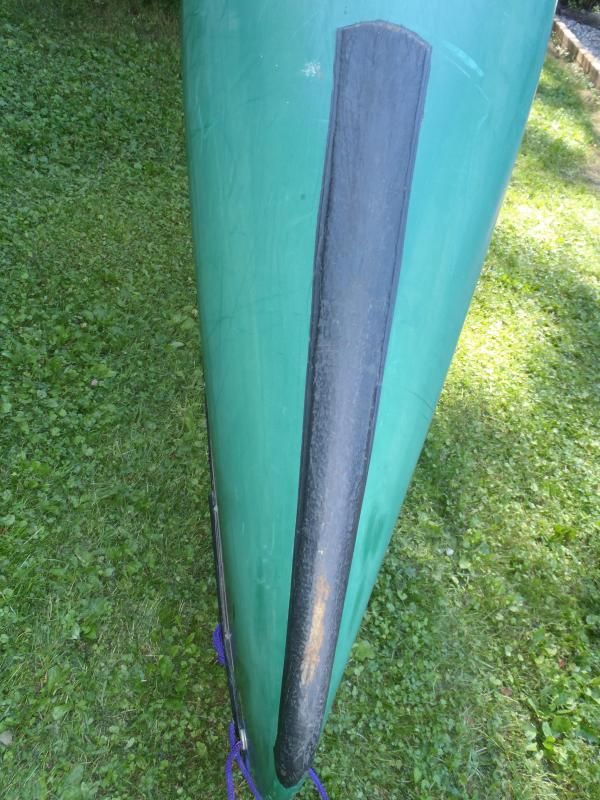
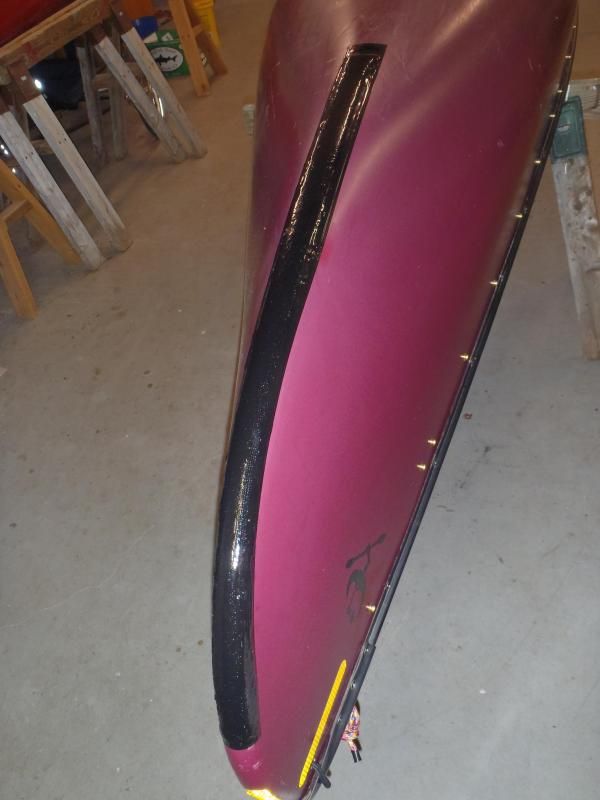
Nova Craft Cronje done right. Dynel cloth (1 layer), G/flex and West 105/206 mix, graphite powder and black pigment. Peel ply smoothed and compressed. Black spray paint topcoat on the stern.


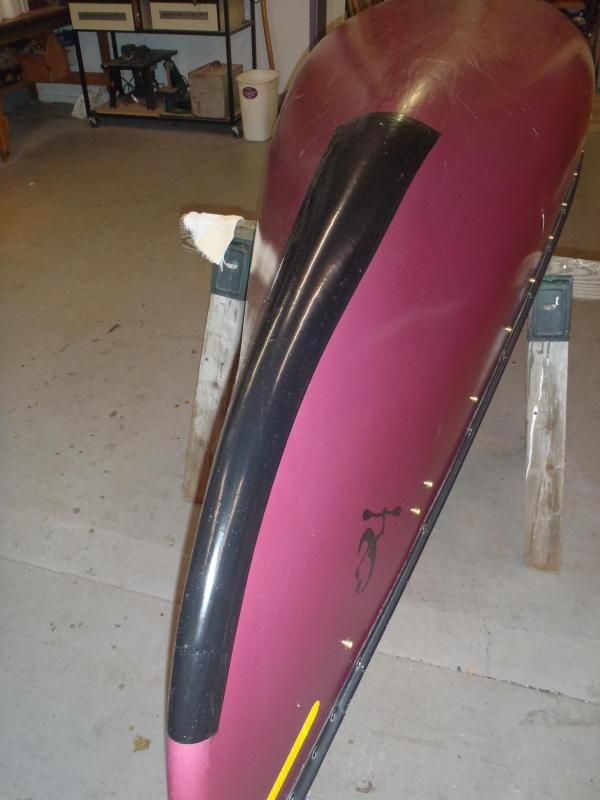
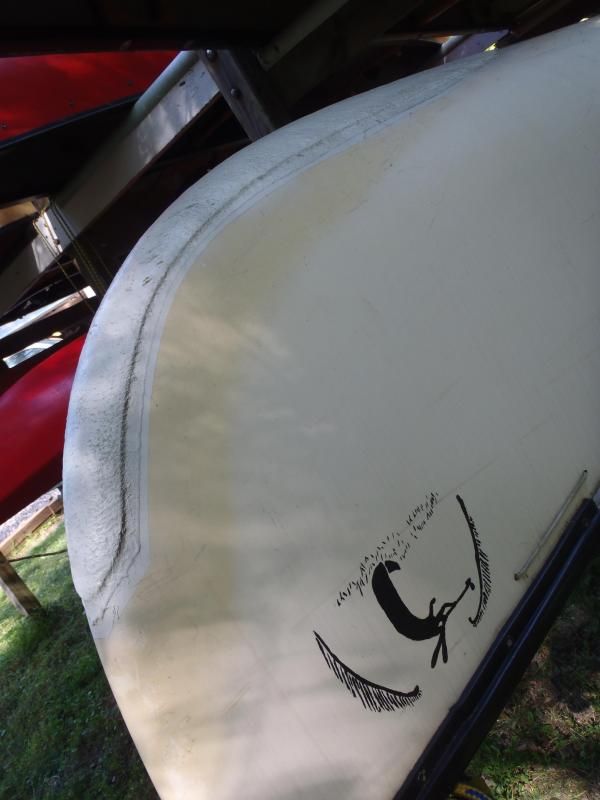
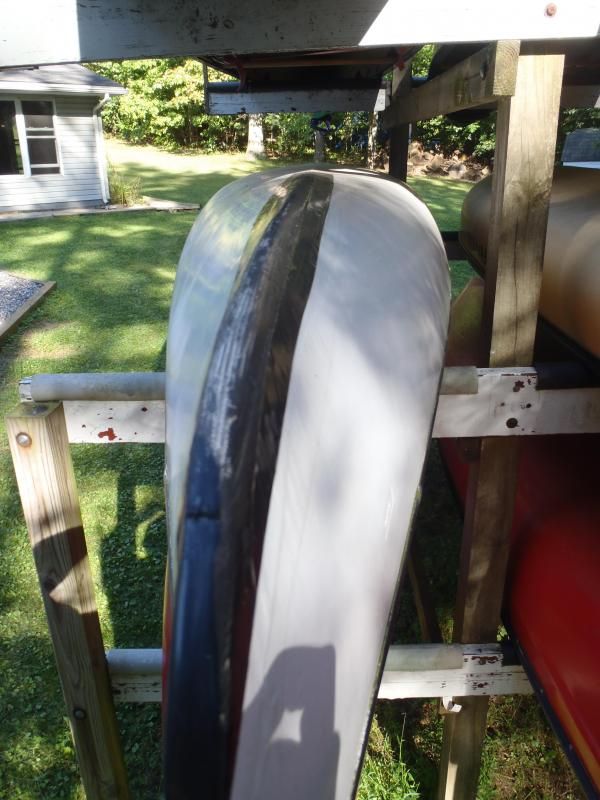
Samesame technique on the bow, except using 2” bias woven (thick, German) fiberglass tape. I probably won’t use that thick bias tape again; even though it worked and was easy enough the Dylel is easier still and wrinkled less, even with release treated peel ply smushing down the fabric.


So far the clear winner for my purposes and a combination ruggedness, durability, ease of application and weight is a single layer of Dynel with G/flex, with peel ply as a release fabric to compression/smooth out the cloth. With graphite powder, black pigment and black spray paint top coat an aesthetic option.

I know there is some question about Dynel’s impact durability (it is definitely a very abrasion resistant cloth), but I have slammed the bejeepers out of rocks with dynel skid plates, as have friends with similar DIY Dynel and G/flex grunch pads, and so far so good.
 
My Swift has the factory kevlar felt skid plates and not only are they ugly but they gurgle all the time which is annoying when I like the silence.

The question I have is, can you make your dynel and g-flex skid plates colour matched to the boat?
 
My Swift has the factory kevlar felt skid plates and not only are they ugly but they gurgle all the time which is annoying when I like the silence.

The question I have is, can you make your dynel and g-flex skid plates colour matched to the boat?

Somewhat. If you wanted a red or green (or blue or etc) skid plate add that color pigment to the resin mix (and it takes only a tiny dab of pigment to tint resin). When the cloth soaks of that tinted resin it will be red or green, etc.

And then find a red or green (etc) spraypaint and top coat it with that. Your pigmented resin/cloth color match may not be perfect, but if the spray paint color is close to the hull color even the inevitable scrapes and scratches in the paint won’t show as badly.

I don’t mind the black skid plates, especially if the edge lines are sharp, so I use graphite powder and black pigment in the resin mix.

The more seamless you can make the edges of a skid plate, so that it fairs nicely into the hull the less gurgling. Using fiberglass cloth, tape or dynel make for less of a protrusion to start with. And they are lighterweight than resin saturated kevlar felt.

And using peel ply helps fair out both the surface of the cloth and the edge transitions.
 
Too bad we don't live closer together Mike. I'd even be good enough to loan you my boat so you could do a nice tutorial. Dave
 
Too bad we don't live closer together Mike. I'd even be good enough to loan you my boat so you could do a nice tutorial. Dave

Dave, single layer Dynel skid plates are pretty straightforward if you have the right materials and take your time doing thorough prep work. The installation is 90 percent prep work and 10 percent actually laying on cloth and epoxy.

First, wash and alcohol wipe the stems where the skid plates will be positioned. What the heck, wash the whole boat so you don’t lean on a grungy area and later transfer some contaminate to the stems.

Figure out how long/wide you want the skid plates. The need not be as large as the kevlar felt plates included in skid plate kits. The heaviest scratches on the stems will be your guide, and the smaller you can make an effective skid plate the lighter the end results will be.

Cut a piece of Dynel fabric to that size and shape. Cut a piece of release treated peel ply and inch or so larger all the way around than the Dynel.


Dynel and release treated peel ply are available from Express Composites. I have in the past always bought my FRP materials from Sweet Composites, but they do not carry release treated peel ply.

http://www.expresscomposites.com/

(Thanks CEW)

For a composite canoe with sharp stems it helps to cut the Dynel on the bias, so the weave is XXXX along the keel line instead of HHHH. On blunt nosed Royalex canoe this is less necessary, but still helpful so that the fabric can upset more easily along the complex curves without wrinkling at the edges.

For the best ABS adhesion results with G/flex West System data suggests alcohol wiping and “flame treating” the area. The flame treatment is simply running the blue tongue of a propane torch along the area where the epoxy will be applied. You don’t even need to get the plastic hot, just hit it a lick with the torch.

http://www.westsystem.com/ss/g-flex-epoxy-adhesion-data/
Once it is flame treated you want to immediately start the actual skid plate installation.

Lay the Dynel in place and run a perimeter of tape a quarter inch or so outside the cloth. I use blue painter’s tape for that (first) tape run so that I have a good clean epoxy line when I later pull the tape. If you are really careful with the touch you can run that painters tape first and just hit inside the box with the torch. It doesn’t hurt to leave a little extra space at the wide end of the tape box, maybe an inch away from the cloth, in case it stretches some when wetted out.


Tape newspaper (small pieces of tape) half way up the painters tape. Then run tape (masking tape is fine) around the perimeter so that it overlaps the newspaper edge onto the painters tape. The hull is now as drip and dribble proof as possible, and the newspaper and second run of tape serves another important purpose (more later).


All of that was just prep work. Straight G/flex is probably the best epoxy available, but if you are cheap like me and have West System 105/206 and pumps in the shop you can mix those two in any ratio. Make small batches, I usually make no more than 4oz at a time and, if mixing 105/206 and G/flex you can increase the G\flex portion in the heaviest wear areas as you make additional batches.

If you are tinting the resin add the pigment. I use the “Color agent for polyester and epoxy resins” that comes in 1oz tubes available at any marine supply store. A tiny dab of pigment (smaller than the eraser on a pencil) will do for 4oz of epoxy, and unless you are in the skid plate installation business a single tube of pigment will last a lifetime. I have heard from friends that pigment their epoxy that a dab of acrylic artist’s paint will work as well, but I have accumulated a ROYGBIV of color agent pigments over the years and never actually tried that.

If you don’t mind black skid plates add graphite powder to the epoxy pot as you are stirring the mix. The suggested graphite powder-to-epoxy ratio is “up to” 10 percent by volume (or one tablespoon per 5 ounces). Add the graphite powder to the epoxy a little at a time. I use a plastic spoon and shake off a sprinkle of graphite powder, mix, another sprinkle, mix and etc. If you dump a whole spoonful of graphite powder into your pot of epoxy and try to mix it all at once you’ll know why a little at a time is better.

For the most opaque blackest-of-black skid plates I add a dab of black pigment and maybe half that amount of graphite powder to the epoxy pot. Like the pigments a 6oz can of graphite powder will probably last a lifetime.


BTW – My favorite epoxy “pot” is a Chinet Cut Crystal 9oz disposable cocktail glass.

Grab a disposable chip brush (you bought a couple of those right?) and paint a layer of epoxy on the hull. Lay the Dynel atop that epoxy and smooth out any wrinkles with a gloved hand (you bought disposable gloves right?), taking care that the cloth is inside the tape box all the way around.

Dynel doesn’t stretch as much as fiberglass cloth, but if it does (or if you use S-glass) it will stretch lengthwise, and you can pull just the tape and paper at the wide end of the skid plate boxif you didn’t leave enough room. The epoxy at that end is unlikely to drip too far afield anyway.

At some point along the epoxy road you will be making an additional pot or two of resin, so it helps to have another set of disposable gloves at the ready. And it can’t hurt to have a can of Acetone and a rag handy just in case you manage to dribble epoxy on some unprotected area, like the floor or your shoe.

Top coat the Dynel you laid in place with additional epoxy. It’s hard to completely fill the cloth weave on a ^ surface since the epoxy (especially the thinner 105/206) wants to drip down off the peak and there is no point in having 6 inch long streams of epoxy running down newspaper you will later throw away. Best you can.

Do the same sequence on the other stem. Stand around and wait impatiently. Have a beer. When you think that any epoxy drips or dribbles have finished running down the newspaper pull the outer layer of tape and newspaper, leaving the painters tape in place.


Stand around and wait impatiently some more. When you are sure that any remaining drips on the painters tape have stopped moving, pull that layer of tape. (You left tape ends conveniently folded over so they are easy to grab, right?)

Oh my, what nice clean epoxy lines you have Mr. Skid plate.


Take the peel ply, lay it atop the still-soft epoxy and (more disposable gloves, or a small hard plastic roller) push it down all over and especially around the edges of the Dynel cloth.


If you have used release treated peel ply walk again for 12 hours or overnight, etc. Pull the peel ply.

Oh my, what a nice smooth Dynel surface and edges you have Mr. Skid plate.


If you guesstimated the right amount of epoxy to fill the weave the dynel/epoxy surface will show only the slight imprint of the peel ply fabric. If not tape the area again and top coat it with epoxy, the sooner the better. Yes, that’s the second time you taped the skid plate area. And not the last.

If you ended up with any wrinkles or crinkles on the edges of the Dynel sand them smooth before applying the epoxy topcoat. If the edges of the fabric are smooth and faired flush against the hull the skid plate shouldn’t gurgle disturbingly when paddling.

That epoxy top coat does not need to be very thick, just enough to fill any remaining weave that is visible in the Dynel or to fill the very fine peel ply imprint if you are really anal.


Use just enough epoxy to fill the weave. Do not slather the excess epoxy you seem to have mixed onto the skid plate just because you have it. Instead use it to repair something else you thoughtfully cleaned, prepped and set aside before you started on the canoe. Some other canoe, epoxy project, busted hand tool or etc. (You did set aside some other project BEFORE you mixed the epoxy, right?)

Walk away. And stay away, for several days at least.

Wash/scuff up the skid plates with a Scotchbrite pad and then alcohol clean them. How many times have you taped and papered the hull now, three? One more time; tape and paper the hull around the skid plate, with the tape maybe an eighth inch away from that nice clean epoxy line. It doesn’t hurt to lay newspaper over most of the hull in case you get overly vigorous with the next topcoat, spray paint.

Grab the can of enamel spray paint you bought, black to match black graphite skid plates or hull-colored if you skipped the graphite and pigmented the epoxy to match the canoe. (You bought matching spray paint, right?)

Spray paint the skid plate. The extra newspaper laid atop the hull will prevent any aerosolized overspray from settling on the bottom of the canoe. That’s not a big deal, although if you are working in an enclosed shop and doing lots of spray paint work the floor will take on an interesting hue over the years (mine is pinkish from lots of red spraypaint). If you are doing an especially large spray paint job do not wear Crocs – polka dot feet are never stylish.

Pull the tape and paper one last time.

Clean the nozzle on the spray paint can. In a year or so when some of the paint has scraped off you can hit it a lick again, but if the pigmented epoxy/cloth and spray paint are close in color even those scrapes won’t show as badly.

Done. 90 percent washing, alcohol wiping, taping and papering, 10 percent cloth and epoxy installation. It’s hard to really eff up the prep work, and if you do all of the prep work thoroughly it’s hard to eff up the actual epoxy and cloth application.

If you opt to install multiple layers of S-glass cloth instead of Dynel the process is largely the same, just lay the largest piece of cloth first and the smallest last.

There are of course alternate sequences and materials. For a long skinny skid plates a couple layers of (increasingly smaller width) fiberglass tape is a good option, and the peel ply will knock down the raised seam edge of the tape.

Some folks leave the tape(s) and paper in place, put the peel ply over top and later cut the tape edge free with a razor blade once the epoxy has set. I don’t trust my delicate touch with a razor blade that much, especially with a Royalex hull, so I pull all of the tape and paper before laying on the peel ply. That still gives me a nice clean epoxy edge and eliminates the razor blading or chance to accidentally glue tape or paper to the hull.

That sounds like a lot of work, especially prep work, but I could have installed a set of skid plates in the time it took to type the how-to sequence. Seriously, if you gather everything you need and have it ready before you start, with the hull washed, alcoholed, flamed and taped, cloth and peel ply cut to size and the epoxy, gloves, pigment etc all laid out at the ready the epoxy and cloth work is surprisingly quick.
 
Nice write up. I never thought about painting for UV protection. It makes since since I varnish everything else that has epoxy! Thanks.
 
A finely crafted treatise on skid plates. The photos and text combine to make an excellent reference tool. It would be nice if this thread could be easily found for those engaging in hull repair.

Great job Mike!
 
That was a nice step by step description of how to apply abrasion plates, Mike. Since I happen to have a few boats lying around my place to which I have applied abrasion plates recently, and in the past, I will offer my 2 cents worth of advice and experience.

It so happens that I agree with virtually everything Mike said, although I do a few things a little differently. I don't put abrasion plates on new canoes, or on used ones, unless the boat has sustained significant stem damage. I have applied maybe around 30 abrasion plates to a little over half as many canoes, and I have used both Dynel fabric (5 oz/sq yd) and S fiberglass in either 4 oz/sq yd or 6 oz/sq yd weight, or a combination of both. I have applied them to composite boats, Royalex boats, and polyethylene boats. I generally use West Systems 105 resin with 206 hardener on composite boats, G Flex epoxy sometimes mixed with West 105/206 on Royalex boats, and G Flex epoxy straight on polyethylene boats.

I entirely agree that Kevlar felt is crap. I understand why this material has been sold in so many DIY skid plate kits. Kevlar felt holds its shape when cut and does not fray at the edges, making it rather user-friendly to wet out. However the kits that this stuff is sold with usually require one to mix up all of the adhesive at one time. In order to fill the weave of any abrasion plate, multiple applications of resin are necessary. So the Kevlar felt plates are invariably rough. Also Kevlar does not sand well so it is difficult to nicely feather the edges of such a plate. Furthermore, Kevlar felt, like all felt materials, consists of short, compressed fibers. Without long fibers running through the material, it is inherently weak. I have seen scores of whitewater canoes to which Kevlar felt skid plates were applied on which big sections of the plate(s) have broken off in sizable chunks. The stuff does not abrade off smoothly. So with Kevlar felt the end result is a thick, rough, ugly, weak plate with sharp edges that soaks up a lot of expensive resin.

I do not care for using fiberglass tape for abrasion plates. This necessitates a narrow, rectangular plate and I find an elongated tear drop shape both functionally and aesthetically preferable. The selvage edge on tape does prevent fraying along that edge but could make it more difficult to smoothly apply a plate over a relatively plumb stem on which there was a sharp angulation. I use plain weave fabrics.

Anyone who has used plain weave fabrics knows that these materials will fray. The individual fibers are woven, but not bound to each other in any way. The material will also snag like a wool sweater if handled roughly. The cut material also likes to change shape as it is wet out, trading length for width, and vice versa. The fibers of the fabric do not "stretch" appreciably but the whole cut piece of fabric distorts to become longer and narrower. It is like the old Chinese finger traps that some of us played with as kids. Those were made of a plain weave as well. You stuck your finger in the woven tube, and as you tried to pull it out, the weave elongated and simultaneously narrowed to trap your finger. These characteristics mean that plain weave fabrics have to be cut, handled, and wetted out with a bit more care than something like Kevlar felt.

Both Dynel and S 'glass make excellent abrasion plates. My feeling is that S 'glass is stronger, and I have some experience to back that up. The 5 oz/sq yd Dynel fabric I use is a somewhat denser weave and the individual fibers seem to be of slightly greater denier than the S 'glass. Dynel definitely takes up more resin than a layer of 6 oz/sq yd S 'glass, and will therefore result in a somewhat thicker plate, maybe not quite as thick as 2 layers of 6 oz 'glass, but at least as thick as a layer of 6 oz covered by a layer of 4 oz 'glass.

For either Dynel or S 'glass plates, I fill the weave of the cloth with multiple applications of epoxy. I have not used peel ply simply because it involves an additional expense, but using it no doubt speeds the process. You can, however, achieve a very smooth plate with a smoothly feathered edge by wet sanding the plate and edges between multiple applications of epoxy. But the process probably takes longer. I use graphite powder in the epoxy, and I do not usually paint the plate. To my eye tying to color match the plate by using pigment in the epoxy or painting it does not look as good as a plain black plate. You will always see the plate regardless, and painting it to match results in what looks like a clumsy attempt to hide it, in my eye. But you might feel otherwise. Graphite powder mixed in the epoxy will result in a glossy black surface. If you want a flat or semi-gloss appearance you can wet sand it. I will usually "paint" on a thin, final coat of epoxy mixed with graphite powder free hand using a disposable foam brush to achieve that glossy appearance. I think that the graphite powder renders the epoxy quite opaque enough to protect it from UV degradation without painting it over.

I have applied plates and patches to Royalex boats both with and without prior flame oxidation treatment. West states that flame oxidation is "optional" for Royalex. I have not seen any difference in results. Flame oxidation is absolutely critical, however when applying G Flex epoxy to a polyethylene surface. I have also not usually made an attempt to remove all of the surface vinyl layer from Royalex prior to applying a plate. Some advocate doing so to allow bonding directly to the ABS. I have not had any plates or patches come off of Royalex boats as a result of the outer vinyl layer delaminating from the underlying ABS.

There are a few points that Mike did not touch on in the application process. I will usually make some type of template of the plate that I want to cut and apply. I have usually used thick, brown packing paper for this purpose. The paper can be cut to a pleasing shape and appropriate size. Fold it down the center line and trim to make sure it is symmetrical. This template can be used to mark the boat for the mask as well as to mark your fabric when cutting it out. Tape the template onto the boat with a few pieces of masking tape and make sure it is centered. The paper will not lay down smoothly along a sharp curve, so you have to "fudge" a bit when marking the boat. Like Mike, I mark out a shape about 1/4-3/8 inch concentrically larger than the plate I want to apply. I use a Sharpie to mark the boat.

I then sand the surface of the gel coat, polyethylene, vinyl, or ABS as the case may be, using 80 grit paper. Any depressions, breaks into the foam core, or chips in the gel coat can be first filled in with epoxy and sanded fair so that the cloth lays smoothly. After sanding I thoroughly wash the hull, and wipe it down with denatured alcohol. If you are then going to flame oxidize, do it. (Tip: make sure the EtOH has completely flashed off before flaming so as to avoid the dreaded "canoe flambe".) I then make a mask with painters tape along the marked line.

Lay out your cloth on a clean, dry, and flat surface. Avoid prolonged atmospheric contact during periods of high humidity as some cloths can absorb a lot of atmospheric water vapor which can affect bonding. When you lay our your cloth make sure that the warp lies at right angles to the weft (or woof) so that it is not distorted, and handle it gently to avoid snagging the fabric. Lay your template on the cloth and mark it (Sharpie). If you want to cut a patch on the bias, lay your template on the cloth so that its long axis is at a 45 degree angle to the weft and warp. Any decent pair of scissors will easily cut either 5 oz/sq yd Dynel or 6 oz/sq yd S 'glass. After cutting your cloth, look along the edges for fibers that are almost certainly going to fray, and remove them.

It sometimes helps to apply a thin coat of epoxy to the hull before laying your cloth on it as the epoxy tends to hold it in place as it is wet out. As you wet out the cloth, start by applying the epoxy in the center of the plate or patch and work gently out to the ends. You can apply epoxy with a plastic spatula, an inexpensive metal handled "acid brush", an inexpensive chip brush. or a disposable foam brush. You can also pour the epoxy on a horizontal surface and spread it using a plastic squeegee. As you get to the edge, very gently dab epoxy on the fibers to avoid fraying. Once the fibers have become saturated with epoxy, they will have less tendency to fray and can be made to lay smoothly over a sharp bend. Fiberglass will become virtually clear when fully saturated. Dynel will remain a translucent milky white (if you are using unpigmented epoxy).

As you wet out the cloth it will want to change shape but as long as you keep it within the confines of your painter's tape mask you will prevent this and keep it symmetrical. The most difficult area to deal with is where the keel line of the stem makes the sharpest bend. You might need to wait until the epoxy starts to "kick" a little for it to become sticky enough to keep the cloth from rising up at this area but if you are gentle and keep at it, you will be able to avoid pleats and wrinkles. You may need to move the edge of the cloth longitudinally a bit to "take up the slack" to avoid a pleat.

If you are going to use multiple layers of cloth it is best to apply the second layer while the epoxy on the first is still "green". This will provide the best chemical, in addition to mechanical, bond between the layers. If you can't do the second layer until after the first has cured, you will need to wash the first layer to remove any amine blush that could interfere with bonding. The reason that you put the concentrically smaller layer over the larger one is to allow you to later feather the edge of the smaller patch without cutting through the fibers of the larger one. I agree with Mike that one layer of 5 oz Dynel is plenty for an abrasion plate. One layer of 6 oz S 'glass will result in a thin, but very strong plate. If you want a thicker one you can use 2 layers of 4 oz cloth, 2 layers of 6 oz cloth, or one of 4 oz and one of 6 oz.

I will usually apply a second layer of epoxy while the first is still green and then let that mostly cure before removing the mask. Any frayed fibers that might have crossed onto the painter's tape I cut with a scalpel but an Exacto knife or sharp utility knife will work. I then feather the patch edges and smooth the patch surface. After washing the plate well I will generally apply a final coat of epoxy using a disposable foam brush free hand and if I am feeling lucky I won't reapply the mask.

Here is a single layer of 6 oz sq/yd S 'glass that has been applied to a Curtis Dragonfly canoe that had seen a good bit of whitewater use and had significant stem damage. The bottom of the boat has been sanded to the 4" waterline and will later be painted:IMG_2065.JPG IMG_2066.JPG

That single layer of S 'glass with the weave completely filled stands probably less than .5 mm proud of the adjacent hull, and the edges are smoothly feathered. It will not create any drag that I consider significant, and it will not gurgle.

Here is a Royalex livery canoe which had stem damage with wear into the foam core. After filling in the void in the ABS with thickened G Flex and sanding it fair, a single layer of 5 oz/sq yd Dynel was applied as an abrasion plate:

IMG_2067.JPG IMG_2068.JPG

Note that the plate is thicker and has more texture. I could have gotten a smoother surface by using peel ply or by additional sanding and coats of epoxy, but this is not my boat, is used by livery clients for whom it is more than good enough, and because I wanted to keep the expense down. The plates on neither of these boats were painted. That is the appearance of the epoxy/graphite powder mixture.

Both of those plates were recently applied. Here are some photos of plates that have seen some use.

This is an old Mad River Twister whitewater slalom boat to which I applied plates of 6 oz/sq yd S 'glass:
IMG_2069.JPG IMG_2070.JPG

These plates have seen some abuse. I have taken this boat down the Hiwassee and Nantahala Rivers several times as well as a few low-water runs of Indiana's Wildcat Creek. On one run through the top hole of Nantahla falls, my stern stem hit bottom with such a terrible sound that I was concerned I had cracked the hull. I have also hit a few rocks head on. The result has been only a few minor scuff marks:

IMG_2071.JPG IMG_2072.JPG

Based on my experience with the livery boats to which I have applied Dynel plates, I am pretty sure that type of abuse would have resulted in at least a cut fiber or two with Dynel.

This is an old Wenonah Jensen WWC1 which had seen extensive whitewater downriver racing damage (judging from the prodigious number of patches it has) before I acquired it for $75 and put on a single layer of 5 oz/sq yd Dynel as a bow abrasion plate to cover some stem damage:
IMG_2073.JPG

I spent a little more time smoothing this plate than the previous Dynel plate I showed.

This is an old three layer poly Discovery 174 that started life as a livery canoe in Ohio. After it had worn through into the core at both ends, and been patched multiple times, it was left for dead out in the sun, exposed to the elements for about 3 years. I took it home and rebuilt the stems which had eroded into the core over an area more than a foot in length and 4-6 inches in width using G Flex and E fiberglass, then covered the areas of repaired damage with necessarily large Dynel skid plates:
IMG_2074.JPG

I would say that both Dynel and S 'glass make excellent abrasion plates. Dynel has a bit less tendency to fray and results in a bit thicker plate than a single layer of 6 oz glass. It might be the better choice for those who have not worked much with cloth and epoxy. But if you want the thinnest, smoothest, and strongest abrasion plate you can get, use S 'glass.
 
Last edited:
Some great information in this thread, thank you both so much. Some real pretty looking work.

Alan
 
Pete, pretty work. I was pleased to see the Duckhead sticker on the Twister.

I’ll add another penny.

I don’t install skid plates on new canoes, but I don’t wait until the stems have suffered significant damage either. Once the stems are scuffed and scratched enough that the vinyl is starting to wear and I can see where a skid plate is most needed I do so. I know I’m going to install a skid plate eventually, and do so sooner rather than later. I’d prefer to lay the skid plate material on a relatively undented and ungouged surface, without having to fill cracks and voids.

Kevlar felt is crap, and overpriced crap at that. I regret every kevlar felt skid plate I have ever installed. There are some steps that can be taken to make them slightly less crappy. First, the kevlar felt material included with the kit is often far larger than needed and cutting it down to a more reasonable size is a good first step.

Second the amount of resin included in those kits is half again as much as would be need to saturate even the full sized pieces of kevlar felt. More resin does not equal more better, and most of the broken or cracked kevlar felt skid plates I have seen were resin rich to the point that the felt was floating on a lake of resin.

Third, the surface of the resin saturated felt will be extremely rough (see the 1[SUP]st[/SUP] photo above of the white Explorer stems). Much of that roughness can be eliminated by laying strips of wax paper (not a whole sheet, but multiple 3” or 4” wide strips) over the resin and smoothing it out by hand. In a similar vein once the resin has begun to set up it helps to press a putty knife or tongue depressor along the tall-standing edges of the felt to create a more beveled edge fairing against the hull.

Fourth, and most importantly, just avoid kevlar felt skid plates. They are expensive, heavy, ugly and gurgly noisy. The DIY alternatives are far less expensive, not much harder to install and are superior in every way.

I have done the “flame” thing on some Royalex canoe skid plates, and not done it on others (it is absolutely necessary on poly hulls) and have not so far seen any difference. But since I have a torch and the flame treatment takes only a few extra seconds I do so (when I remember…it often pays to work slowly and thoughtfully, especially in prep-work)

I have never removed the vinyl layer, partly because I don’t trust myself with a chisel or grinder and mostly because it seems like a lot of work. Again, my G/flex or G/flex 105/206 mix skid plates adhered to the vinyl RX skin have shown no sign of detaching.

I do appreciate having West System’s adhesion prep data available for Royalex and other surfaces.

http://www.westsystem.com/ss/g-flex-epoxy-adhesion-data/

S-glass, especially in multiple layers, is no doubt more impact resistant than a single layer of Dynel and would be preferable for whitewater use. Dynel is more abrasion resistant and, since I do not paddle serious whitewater but do paddle lots of shallows and occasionally drag my canoes over sand bars and cobble or around obstructions abrasion resistance is welcome.

One downside to using Dynel is that the cloth surface is extremely rough (think 40 grit sandpaper textured) once the epoxy sets up, unless topcoated with additional epoxy or smoothed out with peel ply. That 40-grit surface will remove your epidermis in a boat recovery (as will an unflattened seam edge on fiberglass tape). Eliminating rough or sharp edges on a hull is important; the skin you save may be your own.

I am a huge fan of release treated peel ply, especially for Dynel, where it smoothes out that 40-grit surface without needing a heavy epoxy topcoat, for fiberglass tape, where it flattens the otherwise tall-sanding (and razor sharp) seamed edge, and for any heavier weight cloth, where it helps fill the weave with the initial epoxy coat.

I’ll trade off the better bond of an immediately applied epoxy top coat for a smoother finish a few hours later and a thinner top coat to fill the weave. That using release treated peel ply largely eliminates amine blush (it lifts off atop the peel ply) is a bonus.

I do use fiberglass tape in many instances where I need a long, thin (1 to 4 inch wide) reinforcement. I have regunwaled a couple of old glass canoes on which the gunwale removal revealed - Hey, whadda ya know, this isn’t the first time this canoe has been regunwaled – 100 old gunwale holes unevenly scattered along each side of the sheerline. Not wanting to add new gunwales to that Swiss cheesed edge I laid fiberglass tape from stem to stem along the inside sheerline. I’m not going to try to cut a 16 foot long by 2 inch wide strip from fiberglass cloth, even if I had 16 foot long bolts of glass cloth.

(BTW – there is an easy trick to managing long lengths of fiberglass tape. Cut the tape to length, mix a pot of epoxy, lay a couple of back-and-forth folds of tape in a rectangular plastic container (think wife’s Tupperware…replace it), pour a little epoxy on top, more folds of tape, more epoxy, more tape, etc. Squish that lasagna around some to saturate the layers of cloth, walk to one stem, grab the loose top end of the tape, stick it in place and walk along the hull laying it in place as it pulls out of the container. The edge of the Tupperware container will squeegee off most the excess resin as you lay the cloth and you can use the excess to immediately top coat any thin places on the tape after you reach the other end.)

I’ve had good results using fiberglass tape on sharply vee stemmed canoes and kayaks where the wear is long and linear. Most of my shaped Dynel or S-glass skid plates are not much over 4 inches wide, so if necessary 4” tape (covered by 2” tape) provides enough coverage.

Lastly, an aside: Two freebie publications that provide good reading for the boat tinkerer – West System’s “Epoxyworks” and Chesapeake Light Craft’s “Notes from our shop”.

Epoxyworks:
http://www.epoxyworks.com/

CLC Notes from our shop:
http://www.clcboats.com/shopnotes/winter2006.html

EpoxyWorks had a very informative article on peel ply (which I cannot find), as did CLC in their Shop Notes:

http://www.clcboats.com/shoptips/epoxy_and_fiberglass/peel-ply-release-fabric.html

Both publications make for informative reading, and you can’t beat the freebie price.

OK, somewhat more than a penny’s worth.
 
I'm happy I currently don't need skid plates but this info will be here for me when I do.

Nice work shown in the photos and excellent descriptions of the methods used.

Thanks guys!
 
Another useful reference available as a free download is "The Epoxy Book". This has a lot of information and suggestions that those relatively new to using epoxy and cloth will find helpful:

http://www.systemthree.com/reslibrary/m_published-literature.asp

Although it is published by epoxy manufacturer System Three, the information contained is applicable to the use of all epoxies.
 
Last edited:
(BTW – there is an easy trick to managing long lengths of fiberglass tape. Cut the tape to length, mix a pot of epoxy, lay a couple of back-and-forth folds of tape in a rectangular plastic container (think wife’s Tupperware…replace it), pour a little epoxy on top, more folds of tape, more epoxy, more tape, etc. Squish that lasagna around some to saturate the layers of cloth, walk to one stem, grab the loose top end of the tape, stick it in place and walk along the hull laying it in place as it pulls out of the container. The edge of the Tupperware container will squeegee off most the excess resin as you lay the cloth and you can use the excess to immediately top coat any thin places on the tape after you reach the other end.)

A time-honored method for seaming the deck onto the hull of a kayak or decked canoe working though a smallish cockpit opening is to roll up an appropriate length of cloth tape, saturating it with resin as you do so. The coil of tape is then applied to the seam at the cockpit end and unrolled out towards the stem, using some type of stick to center the tape and press it down in place. The same technique can be used when dealing with long lengths of cloth tape, as when repairing the sheer line of a canoe, which I have also had occasion to do.
 
A time-honored method for seaming the deck onto the hull of a kayak or decked canoe working though a smallish cockpit opening is to roll up an appropriate length of cloth tape, saturating it with resin as you do so. The coil of tape is then applied to the seam at the cockpit end and unrolled out towards the stem, using some type of stick to center the tape and press it down in place. The same technique can be used when dealing with long lengths of cloth tape, as when repairing the sheer line of a canoe, which I have also had occasion to do.

I had a DIY’ed stick and roller for that purpose in the shop for years. I am happy to be done working on old glass slalom kayaks and C1’s – man there were some hard to reach places.

Despite the larger cockpit openings on decked canoes getting way up into the interior stems to install hardware or etc is problematic. The extra tall sawhorses help immensely.


Even with that underneath accessibility I have sometimes had to rest one end on the tall horse and one end on a pad on the shop floor, so the hull was positioned / , and then essentially crawl inside to get a nut seated on a carry handle bolt, security bar or fairlead.
 
Back
Top