• Happy National Zipper Day (pat. 1913)! 🤐

DIY Soft side cooler

Soft side cooler test

I picked up a couple 20lb bags of ice yesterday and filled four soft side coolers. And still had to empty the ice bin at home.

For comparative funsies I used an inexpensive soft side cooler (with approximately the same interior dimensions as the 10L), the 10L dry bag cooler, the 20L dry bag cooler, and a Polar Bear 24.


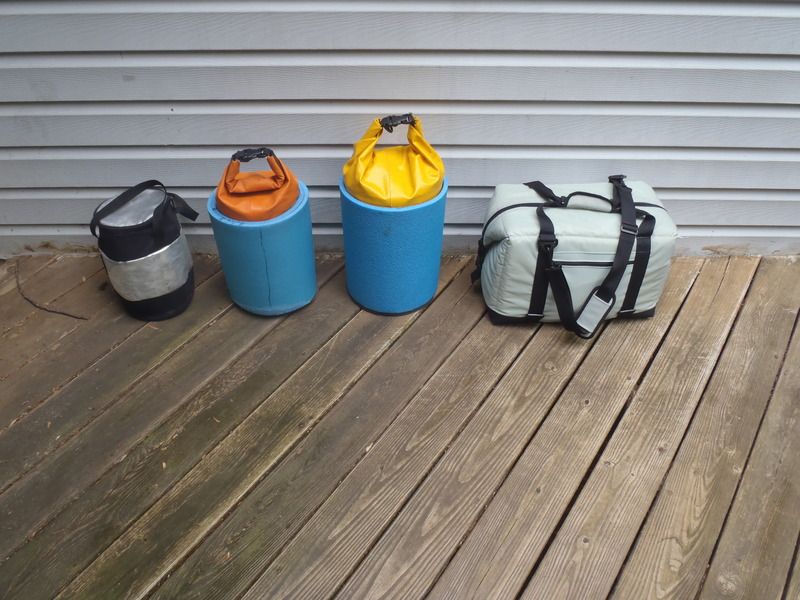
I didn’t realize it until now but the replacement cooler Polar Bear sent me is a Solar Bear, a nice upgrade from the original purchase. At the least it isn’t black this time.

http://www.polarbearcoolers.com/product/PB247.html

I also didn’t realize how little different in size the 10L and 20L cooler bags appear when set naked side by side. The 20L holds twice + as much and is far heavier, but doesn’t take up much more space.

All four coolers were filled with as much cube ice as they would hold and still close, almost 50 lbs of ice in total.

They are all outside. I’ll open them every 24 hours to check the ice. I didn’t encase the dry bag coolers in their respective day packs, cover any of them with the reflective blanket or even move them around into the shade, I just set them outside and let the elements have their way.

Start, day one. Weather forecast: Partly sunny, high 85F, low 63F, 84% max humidity. Windy and rainy that night.

Next day, 24 hour time lapse reveal:

El Cheapo cooler: The ice is mostly melted, with approximately a double handful of ice floating in 6 inches of water. Maybe I’ll check every 12 hours, I expect the ice in that one will be gone by dusk.

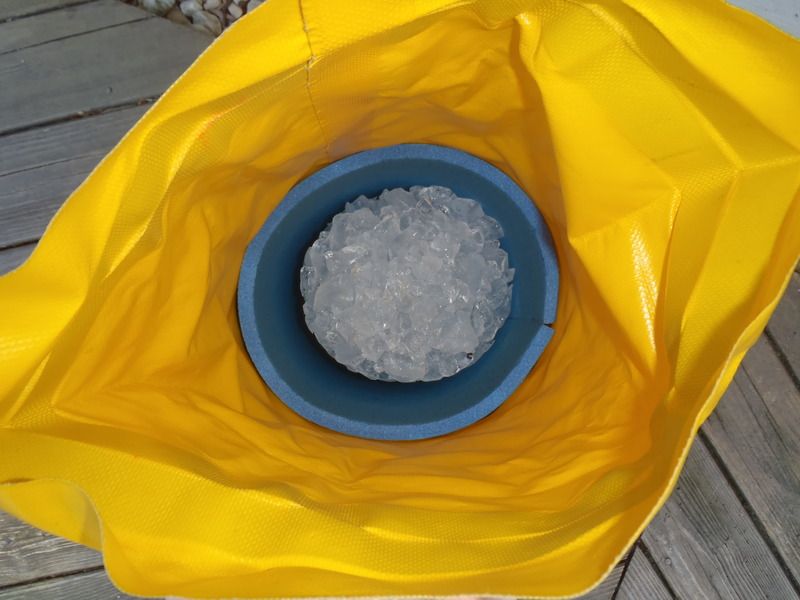
10L dry bag: An internal cylinder of clumped cube ice, down a couple inches from the filled level, with a ½ inch void on the sides and a couple inches of water at the bottom.

20L dry bag: Ditto the 10L bag, with a bit less melted void space on the sides. Odd because the 10L is double insulated. I guess the available volume of ice matters.


Solar Bear: Hard to compare, different shape and a lot more volume of ice. The ice level is down two inches from topped off full.

Day two weather was clear & sunny, high 81F, low 61F, 66 % max humidity. 5 to 10 mph breezy.

36 hour evening reveal. The coolers got a lot of sun today and the ice took a beating

El Cheapo: Zero ice left and the residual water is only cool, not cold. By tomorrow it will be tepid enough even for Alan Gage.

10L dry bag: Still a clumped cylinder of ice in the middle, but slightly more shrunken on the sides and down another inch in height.

20L dry bag: Ditto.

Solar Bear: The ice level has dropped about 4 inches from topped off full.
 
Band saw...okay, bit beyond what I have here (exacto knife, heavy metal ruler, shoe goop)...but I might aspire to make the next set (short canoe box w 1 layer foam, 1 reflectix, removable for cleaning, drying, etc) just a bit tidier and more straight and level. And I just bought contact cement yesterday, so it may all come together over the 4th holiday weekend. I had found an old bottle that was my best form until I forgot about it.

Clearly I am finding that my childhood was even more 'shortchanged' than I had believed the last 55 years or so - unknown to me, 'COOL AID MAN!"...30 seconds of Youtubing' that and I was quite distracted by the other offerings on the menu to the side...
 
I think if this was a high school science project I would have to fail you! Any kid knows that the better way of doing this would be to use some electronic temperature data loggers with a blue tooth link to your iPad. Just sit back and watch the data role in and produce some nice graphs at the end!

Failing that just weigh the ice at the beginning and the clump of ice you have left.

If you wanted to get serious about making a cooler the best way would be to cut doughnuts from a thick sheet of closed cell foam (or styrofoam if you were OK with a rigid cooler) then stack them, gluing each layer to the next. It would be easy to build up a cylinder using layers of 2" minicel with whatever wall thickness you wanted. You could cut them with a router or zip cutter though a CNC water jet would be best. If you wanted to try a sphere this would also be possible with this technique.
 
Any kid knows that the better way of doing this would be to use some electronic temperature data loggers with a blue tooth link to your iPad.

Failing that just weigh the ice at the beginning and the clump of ice you have left.

You could cut them with a router or zip cutter though a CNC water jet would be best.

Dang, I don’t have a temperature data logger, iPad or Bluetooth, and I left my CNC water jet in my other pair of overalls.

I was simplistically curious about how long the ice would last in each cooler. I will measure the volume of water in each cooler when all of the ice has completely melted, which should provide the initial amount of ice.

Obviously my experimental research methodology and practices leave a lot to be desired. The test coolers are being opened only twice a day, not being jostled from canoe to camp and, most critically, no foodstuff or cans are being removed and I am not shielding them from the sun.

I’ll be happy to recreate this experiment with more real world use if someone buys me another 50lbs of ice and a couple of cases of pale ale. I’ll fill the coolers with beer and ice, kick them around the yard, open each cooler several times a day and drink a beer from each. It’s a tough assignment, but someone needs to do it in the name of science.

BTW, even the cool is gone from the cheap soft side 48 hours in and it was already Alan Gage tepid. It held just under 3 quarts of water so, simplistically (at room temperature) about 6 lbs of ice.
 
BTW, even the cool is gone from the cheap soft side 48 hours in and it was already Alan Gage tepid. It held just under 3 quarts of water so, simplistically (at room temperature) about 6 lbs of ice.

And much more to the point - the beer LONG GONE!

BV, I think you will find that you are working too expensive on this experiment. Almost anyone I know on this site will dothe work you proposed, in the name of science (or a good afternoon thirst) for just a case of beer...!
 
Still probably cheaper than one of those Yeti coolers!

You fellas have been bamboozling me with your fancy canoe builds, infused gunwales and all that jazz I just thought it was time to get my own back.
 
Mike, I think you just discovered the good news-bad news aspect of freezing. The more frozen stuff (volume) you have in your freezer the longer you'll maintain freezing temps. It needn't be ice, even frozen bowling ball turkeys will do. So the upside of a larger freezer bag is it'll last longer; the downside to a larger freezer bag is it's heavier larger size. And you'd better have a lot of recipes for campfire turkey.
Personally I'd opt for (near) frozen cans of beer. Skip the volume of ice, crush the empty cans, and try to ascertain the difference between a cold beer buzz on day 1 and a warm beer buzz on day...what day is it?
 
Last edited:
The more frozen stuff (volume) you have in your freezer the longer you'll maintain freezing temps. It needn't be ice, even frozen bowling ball turkeys will do.

In actual tripping use I would have probably taken up with empty space in the coolers by now with a couple more lake chilled beers or a canteen, just to occlude the air space.

Still probably cheaper than one of those Yeti coolers!

Well, the Yeti Hopper 20 is $300. Even if I had to buy every part and piece, 20L dry bag ($28), sleeping pad foam ($7), contact cement ($15) and a couple of $1 chip brushes I still only be in it for $50 and have lots of foam and contact cement left to use.

You fellas have been bamboozling me with your fancy canoe builds, infused gunwales and all that jazz I just thought it was time to get my own back.

No worries, I took it kind of tongue in cheek, although a solid core-cut minicel donut around a dry bag would provide superior insulation.

I just enjoy stupid shop experiments. I have another shop test I have long been contemplating; maybe someone would like to give it a shot. I’m curious about how much force or weight is needed to make a D-ring or other tie down accessories fail.

Vinyl pad D-rings with nylon D’s and SS D’s, DIY webbing under glass and epoxy, pop riveted pad eyes, webbing loop and washer on the end of a thwart machine screw, etc. Probably want to be wearing a full face shield for when the failed parts fly off BAWANG in all directions.

I think the pop riveted pad eyes would fail first, with the rivets simply pulling out, and it would take a lot of weight to pull a webbing loop off a machine screw, but have no idea how much weight any of them would support.

Anyone what to give it a go?
 
Pretty awesome. Kind of reminds me of the ICEMULE. I appreciate the stealth aspect, especially with more and more individual government entities creating their own rules about what you can and can't have while taking out at the "public" boat ramp. Or what can and can't be in your possession in "public." Empty cans: bad. Full cans: good. No, wait. Full cans: bad. Empties: good. No wait, just keep it all in a coozy but give me the right to search your cooler. No, wait. Only beer bought from the vendor registered to do business at the ramp is allowed, and you've got to keep it in the flagged area. No, wait.

I can't keep up with what I'm not supposed to drink or eat or smoke or where I'm not supposed to do it. In fact, I think I'll create my own rules involving fast food and other "crap that ain't good for you" at my own house. If a beer can be illegal to flash in public, so can a McDonald's Big Mac.
 
I appreciate the stealth aspect, especially with more and more individual government entities creating their own rules about what you can and can't have while taking out at the "public" boat ramp. Or what can and can't be in your possession in "public." Empty cans: bad. Full cans: good. No, wait. Full cans: bad. Empties: good. No wait, just keep it all in a coozy but give me the right to search your cooler. No, wait. Only beer bought from the vendor registered to do business at the ramp is allowed, and you've got to keep it in the flagged area. No, wait.

When the Maryland adopted a non-alcohol policy for all State Parks and State Forests their summer visitation rates dropped way off. A year later I had a conversation with the Chief Ranger at a park where we had camped for years and his policy was that “as long as it’s in a plastic cup and you’re not doing anything stupid I don’t care”. While that was reassuring I did not know if the junior ranger staff held the same beliefs. Not to mention the rural county cops who began cruising through the park a couple of times a day.

In Pennsylvania (also “No Alcohol”) the rangers in Ohioplye SP were infamous for their liquor raids, to the point of jumping out of the bushes at night at the sound of a can being opened and going through trash bags looking for empties and writing tickets.

My favorite beer-busted story was friends Ben and Kathy and kids, camped at Lums Pond SP. Delaware State Parks each have their own rules. Trap Pond SP has a sign “No Kegs”. Lums Pond SP is “No Alcohol”

Ben and Kathy had set up camp at Lums Pond, had dinner and put the (young) kids to bed when Ben cracked a beer. A Ranger burst out of the darkness and nabbed him. Not just nabbed him, but confiscated the beer, the coozie it was in, the beer in the cooler, gave him a ticket. . . . . and kicked them out of the park.

They had to break camp, load the kids in the car, drive to another park (Trap Pond) and set up in the middle of the night. The denouement to that was that when the kids came out of the tent in the morning they asked “Where are we?”, remembering nothing of the midnight move.

The denouement to the Maryland No Alcohol policy: Soon after the new regs passed the legislators in western Maryland had the rules amended to allow alcohol in their State Forests. It seems the hunters who camp there in the fall raised quite a stink.
 
Living in Florida I am really interested in your soft sided cooler results. Something I tried with good results was to cover my drinks and ice with about 1"-2" of styroform peanuts. This helped keep the ice much longer because most of the ice was always covered all the time when I had the lid open. To keep from digging around in the cooler looking for stuff I keep beer on the left side of the cooler, frozen water bottles in the middle, Gatorade on the right side, and my Seal-Mealed food under all the drinks.
 
I was in Cabelas today. They have a nice green toned version of this wretchedly expensive cooler. I just couldn't buy it today. Close but no ceegar...
 
Final cooler test results

I’ll skip the daily weather report, which was pretty consistent over the course of the week, mid-day highs in the 80’s, night lows in the 60’s, mostly sunny and humid. I checked the cooler/ice status twice a day, noonish and dusk.

(The ice and any residual cool was gone from the El Cheap soft side cooler by the evening of day 2)

Day 3:
10L dry bag cooler. No longer a shrunken cylinder of ice, just a floating layer of cubes.
20L dry bag cooler. Still a shrunken cylinder, now free floating in several inches of water.


Solar Bear 24. Still a solid mass of near cooler sized ice, floating 6 inches down from the fill level.

Day 4
10L dry bag cooler. Not much ice left at noon. No ice by 8pm, but the water is still cold.
20L Dry bag cooler. No cylinder, but an inch of floating ice. 8pm, ice gone, water is dang cold.
Solar Bear 24. The large center floe is breaking up, but considerable ice remains. 8PM, a much diminished ice raft 6 inches below the topped off full line, floating in 5 inches of water.

(BTW, all of the coolers got smacked during day 4 by errant basketballs, so the ice floe breakup had help. dang the variables in my procedures and methodology).

Day 5
10L dry bag cooler. No ice, still cool, 64F water.
20L dry bag cooler. No ice, still cool, 66F water.
Solar Bear 24. No ice, still dang cold, 45F water. 8pm check, 55F water.

Time to dump and measure the water.

Totals
Cheap soft side cooler. Just under 3 quarts of water, so about 6 lbs of ice. Barely lasted 2 days.
10L dry bag cooler. A hair over 3 quarts, so just over 6lbs of ice. Ice/cool lasted through day 4
20L dry bag cooler. A hair over 6 quarts of water, so just over 12 lbs of ice. Ice/cool lasted through day 4+
Solar Bear 24. 11 ½ quarts of water, so 23 lbs of ice. Ice/cool lasted into day 5.

My take aways from this stupid shop experiment:

You get what you pay for with a cheap soft side cooler. The cheap soft side held the same volume of ice as the 10L dry bag, but barely lasted 2 days.

The quantity of ice matters, but less than I would have thought. All three of the well insulated coolers lasted through Day 4, even with considerable difference in ice capacity. Methinks the increased air space created as the ice melts in the larger coolers is a bad thing.

The extra layer of insulation on the 10L cooler helped (duh), it held half as much ice as the 20L and lasted about as long. Also see less air space in the 10L as the ice melted.

I think the reflective/protective material on the Solar Bear helped. I kinda wish the day packs for the dry bag coolers, which I didn’t use in the experiment, were not green and dark red. If I was using a DIY dry bag cooler without a day pack carrier I’d wrap the exterior foam in some reflective blanket, even an eventually sacrificial layer of taped on Reflectix or space blanket stuff. Or find a light colored day pack for disguise.

With better practices, moving the coolers into the shade and using the reflective wrap blanket I think I could have eeked out at least another day, maybe two.

I keep the reflective blanket in the cooler’s day pack pocket, so it is always available for blazing sun cover in the boat or in camp. That blanket is oversized, 54 x 40 inches, made to cover both our Igloo marine cooler and dad’s beverage cooler on family trips. It is some odd ripstop material, reflective on one side, urethane coated green on the other. With corner grommets it weighs 4oz and has lasted for years.


Living in Florida I am really interested in your soft sided cooler results. Something I tried with good results was to cover my drinks and ice with about 1"-2" of styroform peanuts. This helped keep the ice much longer because most of the ice was always covered all the time when I had the lid open.

I agree that keeping the diminished ice covered with something insulating would help. I am going to make an auxillary inner circle that fits tightly down inside the stovepipe of foam in the coolers, for use when the contents are reduced enough to leave that ice-deadly air space.

For sunny Florida a reflective blanket would be a help as well.

The essentially leak-proof dry bag coolers would be a boon in kayak use if they fit through the hatches or behind the seat.

Hmmm, one more simple experiment. I’m going to put a couple quarts of water in the dry bag coolers and rest them upsidedown to see how much they leak.
 
Cooler Dry Bag Leak Test

Well that didn’t take long.

I filled the 10L dry bag cooler up about half way with water. There is enough material at the top for four fold-overs before the buckles are connected. I was careful to assure that the folds were flat and tight.

As an acid test I set the dry bag upside down between two sawhorses. It began to leak water at a drip per second within minutes. Well crap.

I added more water, so the bag was ¾ full and place it on its side. Still leaks, albeit more slowly.

I know roll top dry bags are not actually waterproof and will leak if held underwater. But dang that was fast. I realize that was worst case scenario with water dripping out, but it probably wasn’t much different from a fully submerged or pinned bag leaking water in.

I guess I usually set the dry bag coolers upright, or maybe sideways when the ice hasn’t melted. I always have some water in the boat from wet foot entry and paddle drips, so maybe I just didn’t notice.

But as a kayak hatch cooler, unless you use ice packs or frozen water bottles, not so much.

I have never pinned a gear laden canoe, and the capsize stuff that has yard sale floated was always quickly retrieved, but it does make me reconsider my usual dry bag and stuff bag routine. Watershed dry bags are looking better all the time. Or I’ll go back to using an internal kitchen garbage bag in the sleeping bag stuff sack, even inside the coated compression stuff bags.
 
You can also use a wet towel over the cooler for some evaporative cooling.
 
Yes, air space is a bad thing in coolers and freezers. Incidentally that's why we downsized to a small chest freezer at home. With just the two of us at home we couldn't see the need to keep a big one half filled (and guzzling hydro) when a small one usually filled ( and sipping hydro) would do just fine. I figure that translates to soft sided coolers too. A dry bag cooler is a good idea, allowing you to roll up the bag day by day to purge the air space. I'll keep this experiment in mind if I ever want to trip with a few days of frozen steaks and beer. Seriously. Prime ribs and beer on day 4 might be nice.
My wife came home this past week with a picnic basket type soft sided cooler. She's clearing out her office junk readying for a move. I laughed when I saw it, and had to explain all about ice experiments and dry bags. I'd show you a photo of this cooler but we no longer have it. Our daughter borrowed it.
 
My wife came home this past week with a picnic basket type soft sided cooler. She's clearing out her office junk readying for a move. I laughed when I saw it, and had to explain all about ice experiments and dry bags. I'd show you a photo of this cooler but we no longer have it. Our daughter borrowed it.

Your daughter “borrowed” another cooler? Did you get the good soft side cooler back in return?

I’m thinking you need to add something to your coolers so your daughter won’t borrow them. This keeps my wife from wanting to borrow my truck:

https://www.google.com/search?q=Tru...=SmB6V9-fJ8js-QHdn6LABw#imgrc=7UjcpczTWeCl3M:
 
I was reminded that our group of boating and camping friends used to enjoy an annual 'canvas and wool' campout each late fall up in the ADKs of NYS. One year we pushed the weather a bit too much and that sent most folks packing, more or less permanently. It was all for fun and neat to see various tarps, tents, cots, bed setups and packs (not to mention a HUGE variety of old clothing) that were cotton, canvas, wool, leather, as opposed to the bright nylons and polyesters that typically decorated most of our camps. *
I had this setup then for two soft coolers that I could easily walk into camp with. The little haversack would hold a standard sized double foam wrapped Nalgene, a single foam wrap 64oz metal bottle or a vacuum 64oz growler style. (no fair guessing which option got used the most.). The larger pack held cuts of blue foam to add extra insulation and then to repurpose somewhere else (hidden of course) in camp.

That last trip was the real spark that got me back into the true hardwater season activities after taking a 5 year break from 'winter sufferings...'

*Unlike historical re-enactors, we tried to minimize needless suffering and discomforts (Thermarest covered by a wool blanket was just fine, fleece under a cotton parka, fine, nylon rope on a Whelen tent, fine, etc...).

Props to anyone who can ID the white canvas webbing item draped over the packs. DSC03354.JPG


DSC03358.JPG
 
Back
Top