• Happy International Museum Day!🏛️ 🖼️🏺

Solo expedition build

A couple weeks ago when the weather was really hot I took this boat to a gravel pit behind my house and spent some time intentionally dumping it and practicing reentry. I was happy to find that secondary stability remained solid until the knuckle went under water, just like the software said it would.

I was not happy to find that the wide seat I built had a tendency to trap one of my legs when I capsized in the kneeling position. It was easy to free the leg and I don't think I'd ever find myself married to the boat but I can see myself wrenching a knee going over unexpectedly in a real life capsize where I'm not consciously paying attention to whether or not my leg is hanging up.

So I built a new seat:

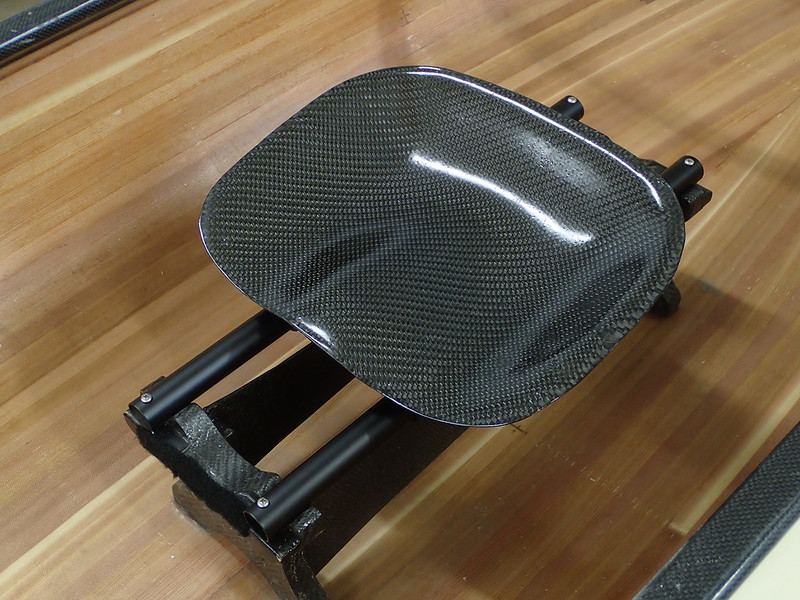
20150725_001 by Alan, on Flickr

I have this seat in a couple of my other boats and while it's quite a bit narrower I still find it quite comfortable. It helps that I'm pretty narrow too.

Clearance on the new seat:

20150725_003 by Alan, on Flickr

The wider seat sitting on top for comparison:

20150725_004 by Alan, on Flickr

The naked hull as it sits now weighs 48.2 pounds:

20150725_002 by Alan, on Flickr

Alan
 
And now we enter the Mike McCrea portion of the build. Time to start getting some outfitting installed. Mine will be very basic compared to his but hopefully it will get me by. No doubt by the time I've spent a month in the boat I'll have a better idea of what I should have done differently.

First is a way to carry the paddles in the canoe when portaging. I like to tie them under the foot brace weighted blade heavy and blade toward the bow. All it takes is one bungee to cinch up and hold them in place. Once the canoe is turned over the blade starts to fall but then the handle hits the hull and stops the blade before it reaches below the upside down gunwale.

20150725_005 by Alan, on Flickr

I was ordering bulk bungee and on a whim decided to buy a couple different styles of cord lock figuring I'd find a use for them somewhere. I think I'll need to order more soon, they're great!

Detail of the paddle bungee'd to the foot brace:

20150725_006 by Alan, on Flickr

I'm also going to need a way to keep my gear tied in. I decided to lace the hull since it seemed the most effective and has the side benefit of being the easiest, cheapest, and lightest.

Put down some masking tape to make my marks and drew a line 1/2" down from the gunwale. A block the correct thickness to use as a guide made drawing the line easy and then I marked the hole spacings:

20150724_002 by Alan, on Flickr

20150724_004 by Alan, on Flickr

Then I started to fret that maybe 1/2" below the gunwale was too high and that it should be lower. So I drew another line 1" down from the gunwale, scratched my head some more, and went to bed to think about it until the next day:

20150724_005 by Alan, on Flickr

Today I kept looking at it and scratching my head before finally deciding on the holes 1" down from the gunwale. Main reason for this decision was that the lacing on the outside of the hull could be used in the future for attaching a spray deck and I'd probably want the cord down a little lower for that. It would also do a better job of tying down packs that were below the gunwales.

After all that thinking it was a relief to finally punch some holes. In the bow I only went a couple feet ahead of the thwart, just enough to tie in my gear pack:

20150725_007 by Alan, on Flickr

In the stern I did the whole thing in case I ever wanted to tie in a float bag behind my food pack or if I end up with two packs back there:

20150725_008 by Alan, on Flickr

The edges seemed a bit sharp so I hit them lightly with a small counter sink bit both on the inside and outside of the hull.

Before:

20150725_010 by Alan, on Flickr

After:

20150725_011 by Alan, on Flickr

Lacing on the outside:

20150725_013 by Alan, on Flickr

Lacing on the inside:

20150725_014 by Alan, on Flickr

I've got some 1" stainless rings ordered and the plan is to install them on each loop on the inside of the hull. This way the lacing will stay in the hull permanently and when I want to tie in my packs I can just run cord through the steel rings.

Just before coming in tonight I sealed the inside of each hole with a light coat of epoxy.

Alan
 
I like that lacing. You will have more tie off points than you'll know what to do with. Don't make me ask again. How are you making those seats? Are you vacuum bagging them or open layup? I have a kevlar wenonah seat and it is too small for even my scrawny frame. I like their ABS tractor seats and have been thinking of using one of them as a mold for a carbon version. What's the layup, oz's, number of layers, etc?
 
I like that lacing. You will have more tie off points than you'll know what to do with. Don't make me ask again. How are you making those seats? Are you vacuum bagging them or open layup? I have a kevlar wenonah seat and it is too small for even my scrawny frame. I like their ABS tractor seats and have been thinking of using one of them as a mold for a carbon version. What's the layup, oz's, number of layers, etc?

We had a couple of glass tractor seats we removed from a w/c canoe you can have. I'll see if we haven't already sent them to the dump.

Alan, that yellow rope clashes with your colour scheme, so I figure you'll be getting some black rope to replace it with? Or white even to blend in on the outside.
 
How are you making those seats? Are you vacuum bagging them or open layup? I have a kevlar wenonah seat and it is too small for even my scrawny frame. I like their ABS tractor seats and have been thinking of using one of them as a mold for a carbon version. What's the layup, oz's, number of layers, etc?

I like the small Wenonah seats and that's what this one is based from. I never found the large Wenonah seats comfortable without a pad. Good thing we all get to choose our own. ;) The large seat I didn't end up using came from a seat in my old Sawyer Cruiser, which is the most comfortable bucket I've ever sat in.

I've been vacuum bagging this time around but previously I've just laid them up normally, both the small buckets the large Wenonah buckets, which I also made a mold of. Non-vacuum bagging seems to work fine but it's harder to keep the cloth tight against the mold. A bag of sand would probably do the trick. On all those I was using fiberglass leftovers and it takes a lot if layers when using 6oz. glass, probably 10 or so. But the nice thing is you can lay down a full layer first for aesthetics and do the rest with scraps.

Vacuum bagging is nice but it's not exactly an easy button and I'm still trying to get the kinks worked out. First of all you'll want a mold with a flange around it and making that is pretty time consuming. Modeling clay or plumber's putty helps seal and ease the transition from seat to flange. Make the flange large, wider than you think you'll need, because it still won't be big enough. You have to trim some of it off when you make your plug, then trim some more when you make the mold, and then you lose more space when you put down the tacky tape. I learned my lesson on the first one so when I remade the small mold last week to do this seat I knew I needed to make the flange much larger and I still wound up making it too small!

Forty ounces of cloth thickness (carbon) seems to be about right. The large seats take a bit more because they have relatively large flat sections which are pretty weak. The small ones are nothing but curves so the shape is stronger. I bought some 21oz. twill weave carbon from Express Composites and it's been working very well and is a great price when compared to the 10oz cloth (only a few $ more/yard).

I tried one layer of 21oz cloth on a large seat and it was not stiff enough and needs to be beefed up.

I made another large seat earlier this week using 10oz. cloth. I started with two full layers. The third layer was two large scraps that overlapped in the center. On top of that went a fourth layer make up of small pieces of scrap only on the bottom of the seat where it tends to be the weakest. That seat felt nice and stiff and is probably as light as you can get away with for a large bucket. Total weight was around 14 oz.

The small bucket pictured above was just two layers of 21oz. cloth and it's plenty stiff. On the small buckets you could maybe get by with less (one 21oz+one10oz layer) but since 10oz glass is nearly the same price as 21oz you're not really going to save any money and the weight savings would be negligible. My seat weighed 8.5oz when it came out of the mold.

Alan, that yellow rope clashes with your colour scheme, so I figure you'll be getting some black rope to replace it with? Or white even to blend in on the outside.

It certainly does but for now yellow is all I have. If I run across some black I'll switch it out. Until then I'll just have to hope the fashion police aren't out patrolling the waterways.

Alan
 
Thanks for the info Alan. I've yet to do any vacuum bagging myself, but I'm looking to make some paddles soon. I have a nice pump that I rescued from my old lab. I originally got it to make a vacuum distiller before I even had an interest in composites. The padddles should give me some good practice before I move to curvy seats.

Mihun, I'll pm you about those extra seats. I like to try on as many as possible.
 
And now we enter the Mike McCrea portion of the build. Time to start getting some outfitting installed

I dunno Alan, I don’t see BarcaLounger comfort minicel foam glued all over the dang place.

I was ordering bulk bungee and on a whim decided to buy a couple different styles of cord lock figuring I'd find a use for them somewhere. I think I'll need to order more soon, they're great!

Yeah buddy. Quality bungee is wonderful stuff, and cordlocks are useful in a variety of applications.

There are cord locks, and there are better, sturdier, stiffer springed cord locks. And stuff that’s not exactly a cord lock, but provides the same function. ITW Nexus, makers of dang near every plastic doohickey ever seen has a bewildering assortment of cord products. The best one for the job is somewhere in that bundle of joy.

http://na.itwnexus.com/products/cate.../cord-products


Today I kept looking at it and scratching my head before finally deciding on the holes 1" down from the gunwale. Main reason for this decision was that the lacing on the outside of the hull could be used in the future for attaching a spray deck and I'd probably want the cord down a little lower for that. It would also do a better job of tying down packs that were below the gunwales.

I am a big fan of having at least a bow spray cover, for a variety of reasons enumerated elsewhere.

Is the dog coming on this trip? If not, how’s your sewing skills? With that kind of under-outwale lacing available I’ve made bow covers using a simple toggle that slips tightly under the lacing. Just loosen the lacing a bit to slip the toggles under and then draw the ends tight for a taut spray cover fit.

In open water with oppositional winds a bow skirt helps with both wind and wave, and might be as useful as a rudder. Have you made a decision on the rudder? I’m looking forward to seeing what you can do with a custom sub-1 lb rudder.

Just trying to help keep you busy Alan. Idle hands are the devil’s workshop. Wabi-sabi Boatworks Gogetch?


I've got some 1" stainless rings ordered and the plan is to install them on each loop on the inside of the hull. This way the lacing will stay in the hull permanently and when I want to tie in my packs I can just run cord through the steel rings.

Are the rings easily removable, without unlacing the length of hull? Dangling SS rings left in place under the inwale may produce a lot of dingaling ping rattle clank when roof topped.

I don’t use the AC in vehicles and prefer to drive with the windows open in clement weather. Anything flapping or whapping on the roof racked canoe is hugely annoying while driving, even with all the windows open and the radio turned up to 11.
 
Last edited:
The lacing is a great idea, functional easy and light. I'd consider using bungee instead of rope marine grade 5/16 is very strong and long lasting. You can also get it with reflective tracing so it could be a safety feature as well. When kayak guys put holes in the hull they typically drill a larger hole, fill with epoxy let it harden and drill a smaller hole. This gives a larger ring of epoxy to protect the wood where the rope is chaffing. Not sure if it's worth it in your application or not. I'll be applying a lot of your ideas as I finish out my build hope you don't mind.
 
I dunno Alan, I don’t see BarcaLounger comfort minicel foam glued all over the dang place.

Whoa, whoa let's not go and get all carried away here. I'm still young enough that I have to pay some dues before I can have that sort of comfort. Though maybe a little something along the gunwales where my knees hit wouldn't be the end of the world.

There are cord locks, and there are better, sturdier, stiffer springed cord locks. And stuff that’s not exactly a cord lock, but provides the same function. ITW Nexus, makers of dang near every plastic doohickey ever seen has a bewildering assortment of cord products. The best one for the job is somewhere in that bundle of joy.

http://na.itwnexus.com/products/cate.../cord-products

Oh geez, my wallet didn't need to see that. DIY paradise!

Is the dog coming on this trip?

But of course. The main reasons for designing so much flare in the bow was to give her shoulder room ahead of the front pack and to shed waves knowing that I wouldn't be able to use a cover.

A rear cover would be nice just for shedding wind and keeping out the rain. Even a small front cover over the pack, maybe with a porch awning just big enough the dog could crawl under for sun/rain protection would be pretty nice too. But I'm not much for sewing and time is running short so probably not for this trip.

Have you made a decision on the rudder? I’m looking forward to seeing what you can do with a custom sub-1 lb rudder.

I put that project on the back burner for now. I realized just how much other stuff had to be done before the trip and figured I better attend to them first and worry about the rudder if time/ambition permit. I'm afraid future Alan might be upset with me over this one.

Are the rings easily removable, without unlacing the length of hull? Dangling SS rings left in place under the inwale may produce a lot of dingaling ping rattle clank when roof topped.

They won't be removable without undoing the lacing and I've had the same thoughts/concerns. Also worry about them jangling away on the water when the packs aren't tied in. One thought is a line of velcro stuck to the hull with a little tab for each ring to hold it still. Hopefully it won't be an issue.

When kayak guys put holes in the hull they typically drill a larger hole, fill with epoxy let it harden and drill a smaller hole. This gives a larger ring of epoxy to protect the wood where the rope is chaffing.

Great idea, I'll have to put that in the quiver.

I'll be applying a lot of your ideas as I finish out my build hope you don't mind.

Help yourself. I stole them all from someone else in the first place anyway.
 
No work on the boat today. Play time instead. Carried to the gravel pit behind my house for some paddling and swimming to cool off (re-entry practice). The new seat feels good and no more leg entrapment issues. I think I actually feel more comfortable leaning the boat with the smaller seat as it holds me in place better. The larger one let me slide around and was more difficult to lock in place.

The paddle holding itself in position while portaging:

20150726_001 by Alan, on Flickr

Some pictures on the water:

P7260002 by Alan, on Flickr

P7260005 by Alan, on Flickr

P7260009 by Alan, on Flickr

And, if I can get it to work, an embedded video showing capsize and re-entry practice:


I'm very happy with how easy the boat is to empty of water when flipping. It's completely empty after flipping it upright which is something I can't do with my Bell Magic, which is 15 pounds lighter, unless I add extra flotation (paddle float) to the bow or stern. The float tanks flush with the gunwales are to thank for this. They keep the boat floating very high when upside down so all it takes is a quick throw to flip it without scooping up any water.

On the Magic the float tanks are much lower and this keeps the boat riding low when upside down. A life jacket doesn't provide enough lift to keep my head out of the water when trying to lift the stems clear and even a hard scissor kick and flip leaves the boat about 1/4 full of water.

Hopefully I'll never get the chance to try it out for real as I don't think it will be quite as easy as these conditions.

Alan
Alan
 
Last edited:
Just a thought on the SS rings, will you be adding them to every point along the lacing? Or just a half dozen or so in needed places? One ring doesn't weigh that much, but a whole bag full on the other hand....

I added a 1" Web strap along the perimeter of my Northwind to attach a storm cover using aluminum rivets and washers. I didn't think anything of it until I shouldered it. I must have added at least a pound - pound and a half

Jason
 
Though maybe a little something along the gunwales where my knees hit wouldn't be the end of the world.

A fraction of an ounce weight for a ton of comfort.


They won't be removable without undoing the lacing and I've had the same thoughts/concerns. Also worry about them jangling away on the water when the packs aren't tied in. One thought is a line of velcro stuck to the hull with a little tab for each ring to hold it still. Hopefully it won't be an issue.

Perhaps some kind of clip or snap hook that could easily be install and removed, without unthreading the length of lacing. There are some really sturdy plastic snap hooks like those made for attaching shoulder straps on packs. Lighter than stainless too.

http://na.itwnexus.com/content/wingless-snaphook-0
 
Geeze Alan, you're a real trooper, way to take one for the team! I don't think I've ever seen anyone voluntarily make a capsize video. Looks great!
 
An alternative to the st/steel rings would be to run the cord through short lengths of plastic pipe to form small semi rigid horseshoes along the inside of the hull. Or how about running a length of tensioned bungee cord through the inner lacing all the way along the inside.

I have found those snap hooks quick to clip things into but a real pain to un-clip.

If you are looking for ITW Nexus a good online store is- hudson4supplies.com or I also have a pretty good stock as I have a wholesale account and tend to buy a lot of buckles, d-rings and cordlocks for making packs and other gear so am happy to mail out small numbers within Canada at cost.

Nice video. We need the G-Pro head cam version next to see the close up!
 
Nice job on the video, amazing re entry imho, I have never really seen it done, Thanks for posting it.
 
Nice job on the video, amazing re entry imho, I have never really seen it done, Thanks for posting it.

Thanks. The hardest part is getting the water out without having to use a bailer. Thankfully the float tanks on this canoe make it pretty easy.

When it comes to actually re-entering I think the key is to pull the gunwale down to the water and to get it planted as low on your torso as possible before you start trying to climb aboard. So when the canoe is rolled back upright it kind of pulls you out of the water with it. Otherwise you have to drag the gunwale all the way down your chest/PFD while you're scrambling and it tends to hang up.

And then, once you're hip crosses the gunwale, you need to roll over and plunk your butt down on the floor. Otherwise you find yourself laid across the gunwales in a very tippy position.

If we get a warm and windy day I'll have to head over to the big lake to see how the boat handles the waves and how much more difficult re-entry is, if it's even possible at all.

Alan
 
I have found those snap hooks quick to clip things into but a real pain to un-clip.

On some of the plastic clips the gate is too small, and too straight, making it hard to thumb the gate open while leaving enough clearance to unclip. Dammit there’s a thumb pressing down right where I need to unclip the line. Like you said, easy on, struggle off.

For applications where I need to clip and unclip and tie off these are probably my favorites. Scotty No 590 snap hooks (made in Canada)

http://topkayaker.com/index.php?main_page=product_info&cPath=2_19&products_id=1401

Those have a long curved gate that is easy to thumb open with a half inch clearance for easy removal.

Oh geez, my wallet didn't need to see that. DIY paradise!

The Top Kayaker on-line shop is another dangerous place to enter with a credit card in hand. Small business, fast shipping and Tom is wonderful to work with. Don’t let the “Kayaker” part fool you; a lot of those hard to find parts and pieces work equally well for canoe outfitting.
 
Well Alan ! Now you've done it ! Now I'll have to put a few of my hulls to the test !

There are other methods to empty, and reenter a canoe, but that is the most common.

The seat didn't appear to trap you, good !

Nice video !!! Thanks !

Jim
 
Last edited:
Thanks to all the links posted for snaps, buckles, latches, cords, and other doo-dads I had a very unproductive day at work. When I got home tonight I found my stainless steel rings had arrived. I guess 1" is bigger in real life than in my head as I think they look too big and heavy. The bag of 35 rings weighed 11oz, which was less than I thought after picking it up. I don't like the way they look installed:

20150727_001 by Alan, on Flickr

I shook the boat and they weren't too clanky, just a little from the ones that dangle freely under the tumblehome. I don't think I'm going to use them for this project.

So I just ran the tie down rope through the hull loops and that seemed to work fine. Even with the cord drawn tight through the hull it was easy enough to slip the line under the loops. Maybe I over thought the whole thing.

20150727_003 by Alan, on Flickr

20150727_002 by Alan, on Flickr

Lots of great comments and suggestions the past couple days. Sorry for not responding to more directly but I've been quite busy. I'm ready for bed but still have some more cooking to finish up before loading the dehydrator tonight. I suppose I should eat some supper too.....:rolleyes:

Alan
 
Back
Top