Glassed the front side of the float tank pieces. Hung the glass over edge for weight to help it make the corner.
Three coats on the patch, first one with a Bondo scraper then two more with a roller. Started sanding the bow tumblehome section. Starting to feel like the home stretch.
After doing some sanding around the edges to get everything lined up properly I put 4 big globs of hot glue to lock the vertical piece in place.
While the glue was cooling off and strengthening up I went to work feathering out the patch I put in.
I taped a seal/dam around the front face then made a filet joint with a mixture of wood flour and 410 microlight. I cleaned up the joint with a disposable spoon then put a bunch of pieces 4 oz s-glass scraps cut to about 1.5"x4". I stuck them all into place then wet them out with a paint brush.
I didn't get any pictures of the next part since I was rushing a little working against pot life. I was using some old epoxy on the inside. It still sets up nicely but it's a little yellow. I wet out all around the the small cedar bead I had hot glued in place to be a shelf for the top plate. I then got some new expoy and mixed it with just wood flour. Using the icing bag I put a bed along the top of the bead shelf. I then slid the top plate into place and gave it a wiggle and few taps settling it in and seeing the schmutz come up the outside a little. I put tape with tension on it to try to close the gap and level it as much as possible. I still need to glass the joint between the pieces and do a filet joint around the whole thing but it feels pretty permanent.
I put a patch over the seam with a couple of fill coats. I also drilled an oversized vent hole at the top of each tank. When I did the fill coats I dripped some epoxy in the vent holes sealing them up. I'll drill a pin hole in the center after varnish. I made a mistake by forgetting to remove the masking with each coat and shift it down. I wound up with quite a ridge but it sanded out easily enough.
I feathered out the patch then mixed up some epoxy with straight wood flour and put a thin bead around the outside of the float tank. I used the handle end of a wood spoon on the vertical and the end of a coffee stir stick up top to clean up the fillets. Once they've hardened I'll lightly sand them and go over them again with epoxy to help seal and make them smoother to the touch.
Before work tonight I got my wife to help me flip the boat over and I started level sanding the outside. I sure like that long board with the 80 grit abranet.
it's looking great! you must be starting to think about when you'll be able to get it in the water. Where did you buy the longboard sander? That looks like a really handy unit. I've always just tight wrapped and stapled sandpaper to a straight clean board for that purpose, but it's a bit hard on the hands and definitely does not include dust collection!
Cheers!
@ThatPaddlingGuy It feels like its getting close to taking it for a test paddle. Lakes don't thaw here until the 1st week of May though. I finished level sanding yesterday. I used that longboard with 80 grit then went over the hull with 120grit on the RO with an interface pad. After that wiping, tacking and masking. To find that longboard go to Amazon and search "Adjustable radius longboard" then look through them for one with the red vacuum attachment (fits Festool dust collector perfectly). Lots of them don't have an attachment. Mine is 15.75 x 2.75 but no longer available. They all look the same though and you only seem to pay more for an earlier delivery date. Likely all from the same factory with different resellers.
I read a quote a while ago by Rob Macks that went something like this: "Level sand the boat then roll on 2 thin coats of epoxy, one's not enough". So that's what I do. Here's the boat level sanded with the first thin coat on there. I started too thick but was able to roll it out thinner.
Edited to add: I used the Wooster Tiz R730-7" rollers that I cut in half with my pull saw. They seem to last a lot better than the pricier West System ones.
I put a little time in on the boat today. Flipped it over and cleaned up the masking line with 180 grit on the RO with an interface pad. Cleaned up the flat edge with 120 grit and no pad. I masked it off with the tape right at the bottom of the walnut for the first coat. After the first coat I peeled the masking off and re-masked 1/4" to 3/8" below that so when I rolled on the second coat there won't be such a big edge to sand off later on.
After that I dug out the rivets I ordered and tried mounting them with and without a backing washer.
Back to work tomorrow so it can cure for a bit now.
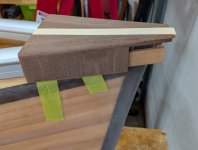
After some running around this morning I fought the gunnels into place. It really helped using the strap and paddle to pull it up and angle it into place while gently hammering on the padded 2x4 further back seating it.
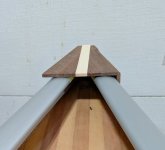
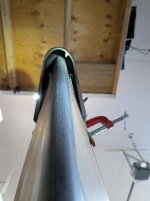
After getting them into place I put the end cap on and could see that it wasn't going to work like I was hoping. I shouldn't have bought anything before building the boat. I'll see if I can make something quickly that looks the same but fits a bit better.
The gunwales look like they fitted up nice once they were "persuaded". Very clean look. I'd be very tempted to do the custom end cap in walnut, but YMMV.
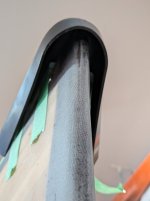
Well I made an attempt at a wood end cap. After spending a few hours I could see it wasn't going to look right with the rounded aluminum. If I can't find a pointier matching plastic end cap I'll likely try making some out of glass. The end caps I originally purchased would have worked had I followed the plans. I didn't have wide enough material to make the tapered stems it called for so mine are too narrow for the caps as a result. Something for me to keep in mind for the next one, make sure the build fits the caps you have on hand.
I have aluminum decks on one of my boats. They don't protect the front stem as well as a true cap, but it might work given the aesthetic of your gunwales.
Looks nice—it’s exciting to see this coming along, and I look forward to seeing the final results and hearing your impressions after your test paddle and your trip! As for your question about kneeling: I alternate between the two positions you describe. I think I find myself with my feet...
I ordered some fiberglass end caps that the folks at Clipper thought might work after sending in some measurements. I kind of like the idea of the aluminum decks Pseudonym suggested. I'll have to see what I have on hand for scrap aluminum if the fiberglass ones don't work out.
I did consider making some but the purchase cost was low enough that it doesn't justify taking the time to make a custom piece. If the store bought option doesn't work out then I'll have to go custom. Your build thread/tutorial is excellent BTW. The wooden plug idea is a great one. I was applying tape over the bow seeing how I could do it but a wooden plug would be a much cleaner practical way.
Measure twice, cut once. I put a level across the top and measured everything out height wise for the seat. After calculating it out on paper in mm I trimmed then propped the seat up at 8' under the front and 9" under the rear. I then measured the sides to see if my calculations for the drop hanger were correct. The seat hanger I ordered from Clipper. It is black gelcoated fiberglass 3mm thick. After trimming it with a zip cut I cleaned it up with my sander with 120 grit and rounded the corners.
Good grief! Prefacing that with "measure twice, cut once", I was expecting to read that you'd forgotten that advice and cut it too short (I did that on my Raven). Glad you're smarter than that.