• Happy Weed Appreciation Day! 🌱🌿🌻

K19 sailboat build

Joined
Feb 29, 2012
Messages
2,192
Reaction score
829
Location
Schenectady, NY
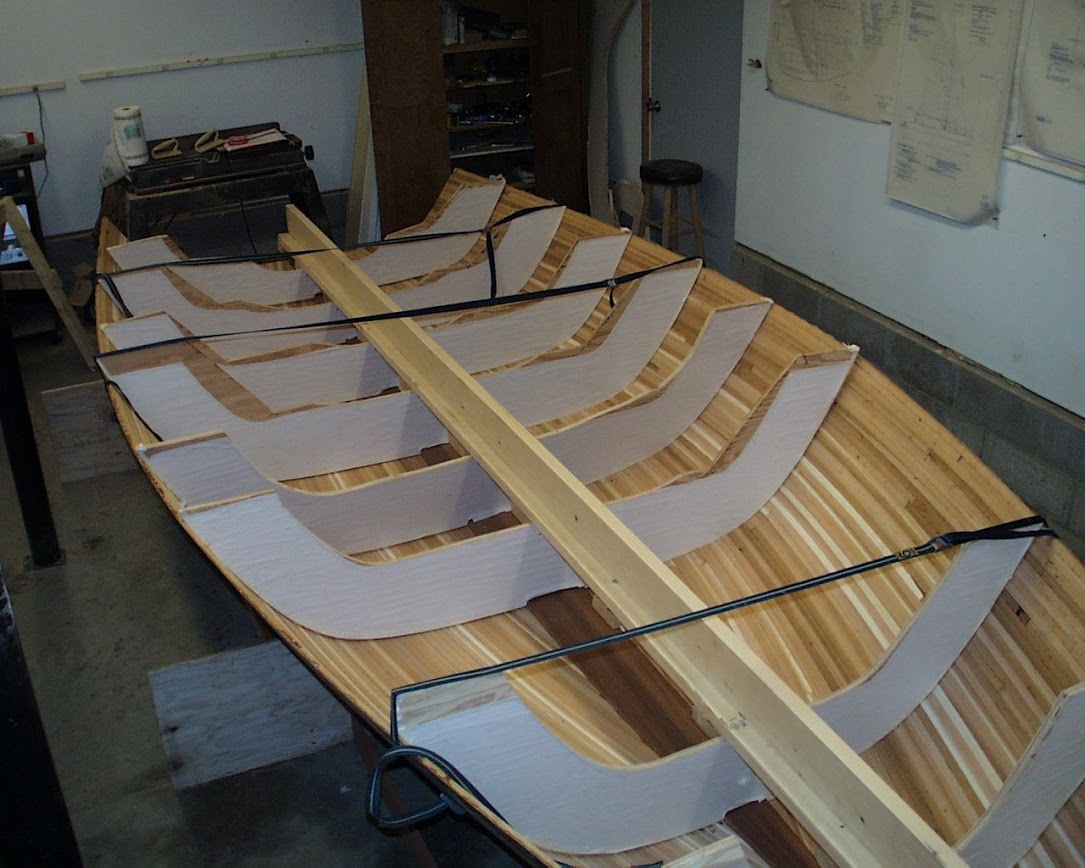
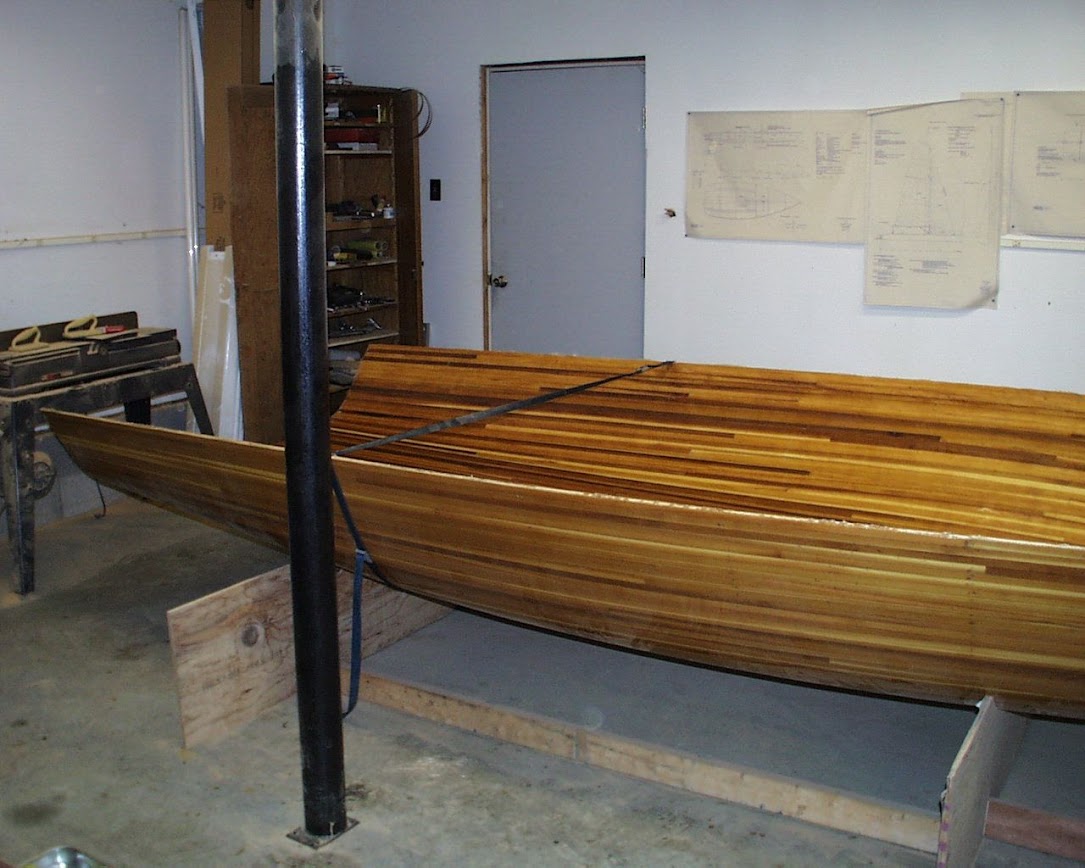
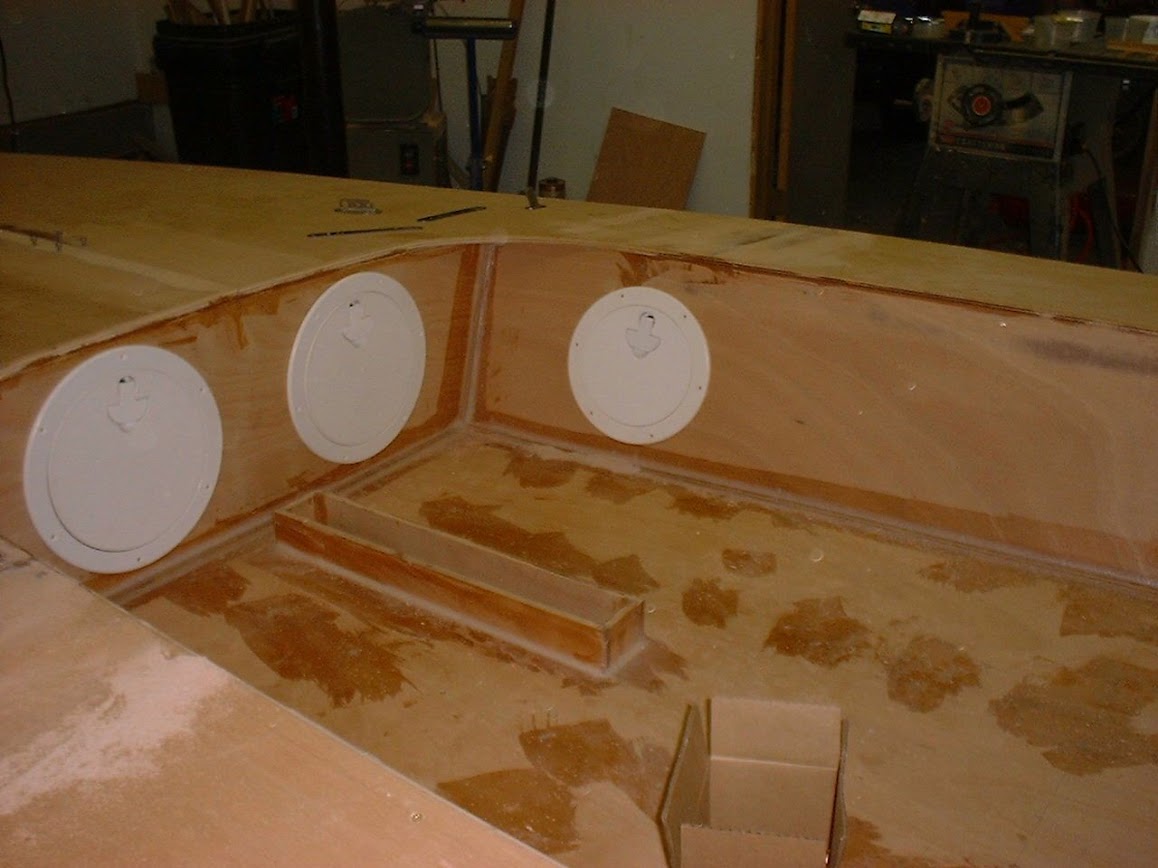
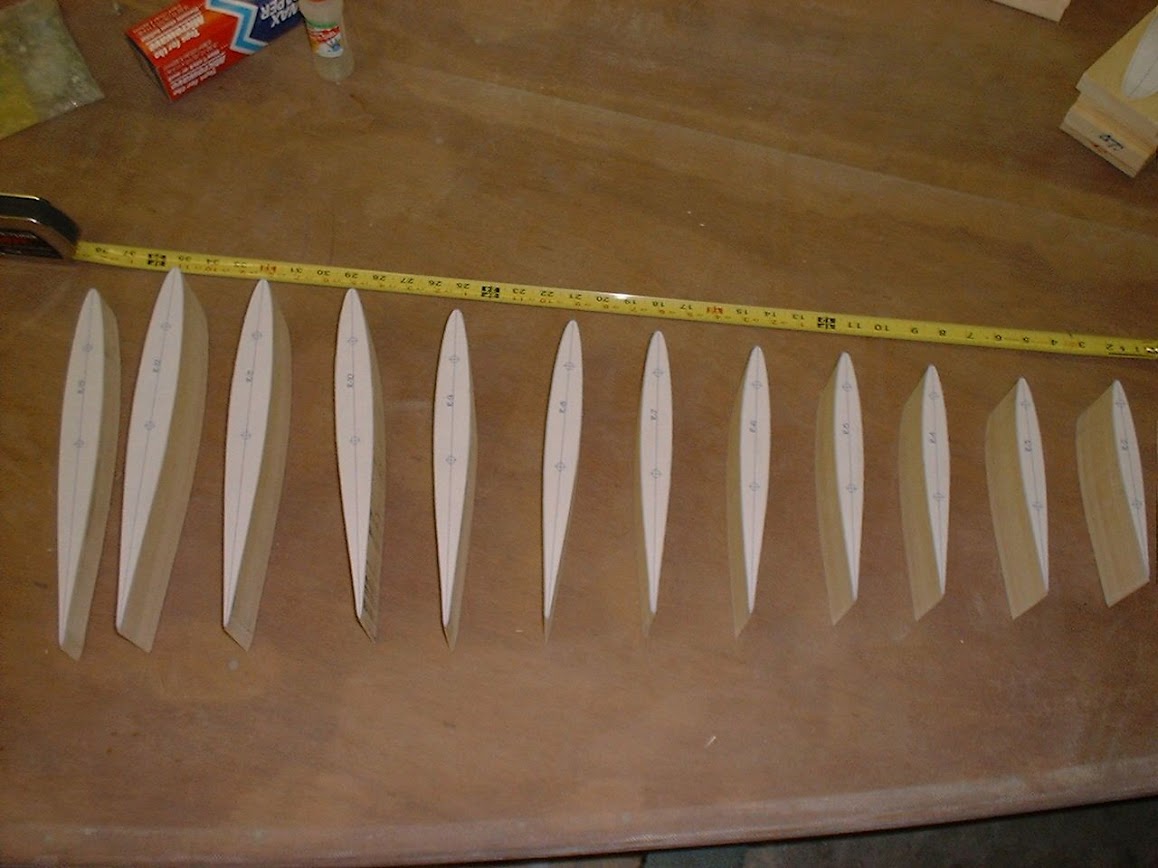
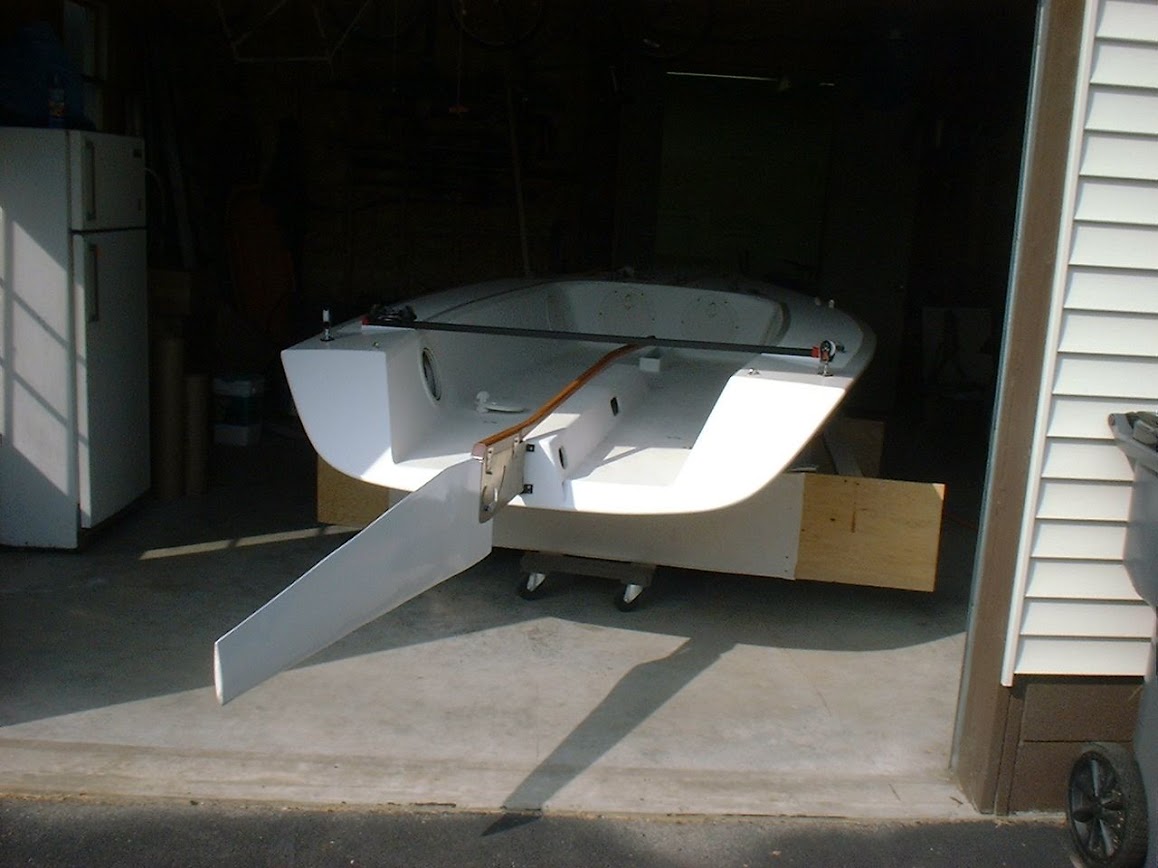
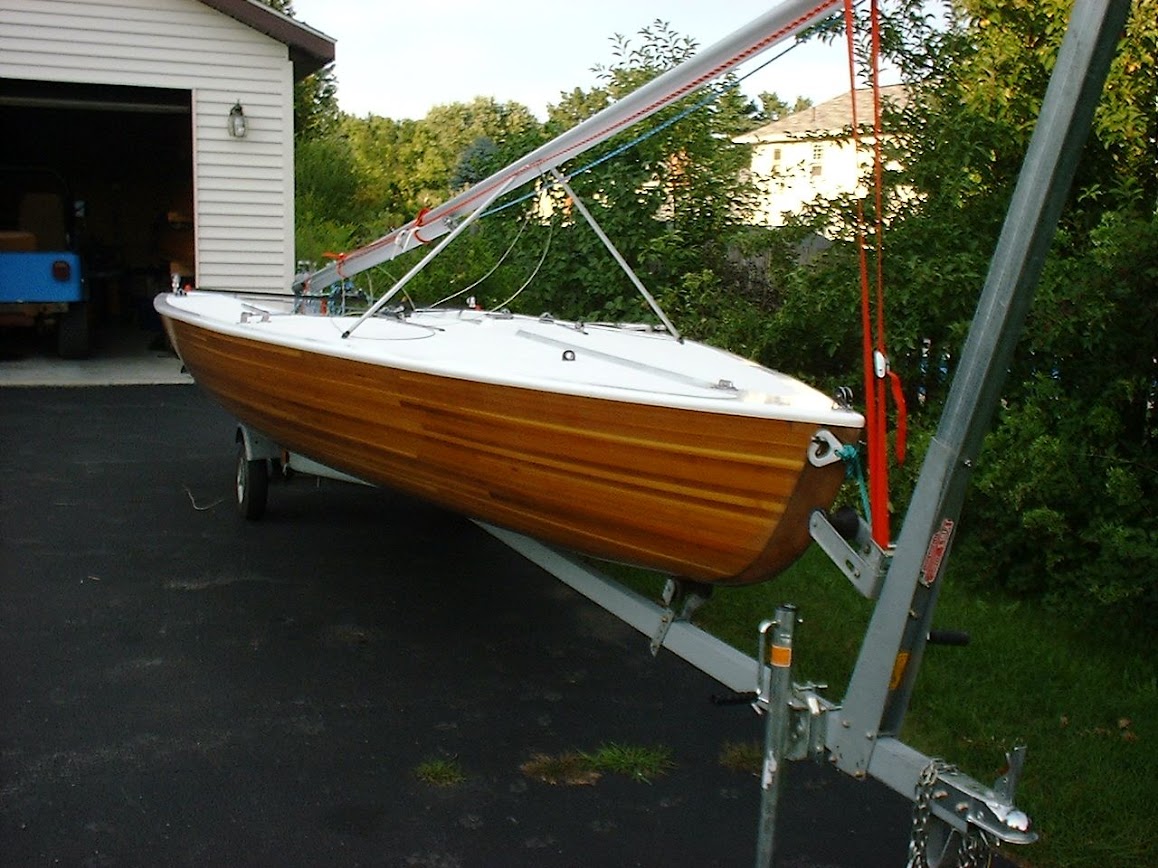
The boat build category has been a little slow lately, so I guess I'll share my K19 sailboat build.
The construction is cedar strips, with 10 oz glass inside and out, so it's quite similar to a strip canoe build, but on steroids.
I bought the plans from the now defunct Northwest Marine Design Co., headed by Anthony C. Gondola, N.A.

The build took about 400 hours, mostly because I had never built a sailboat before, and I wasted much time worrying in advance about issues that became self evident and easily overcome.
Total cost (in 2004 dollars) was about $4,000, give or take. A similar design and weight high performance dinghy production boat was selling for $19,000 around the time I finished the build.

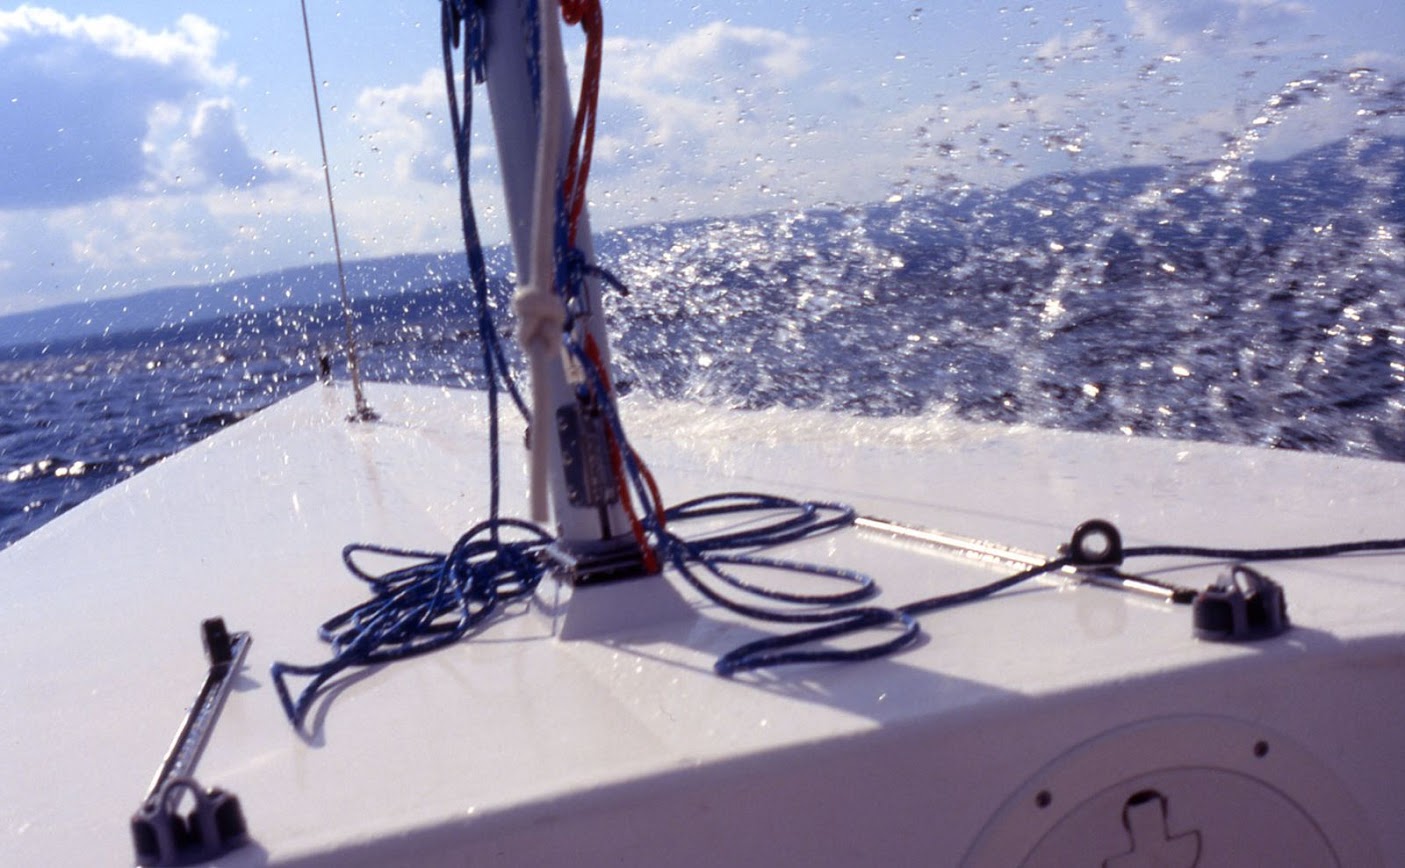
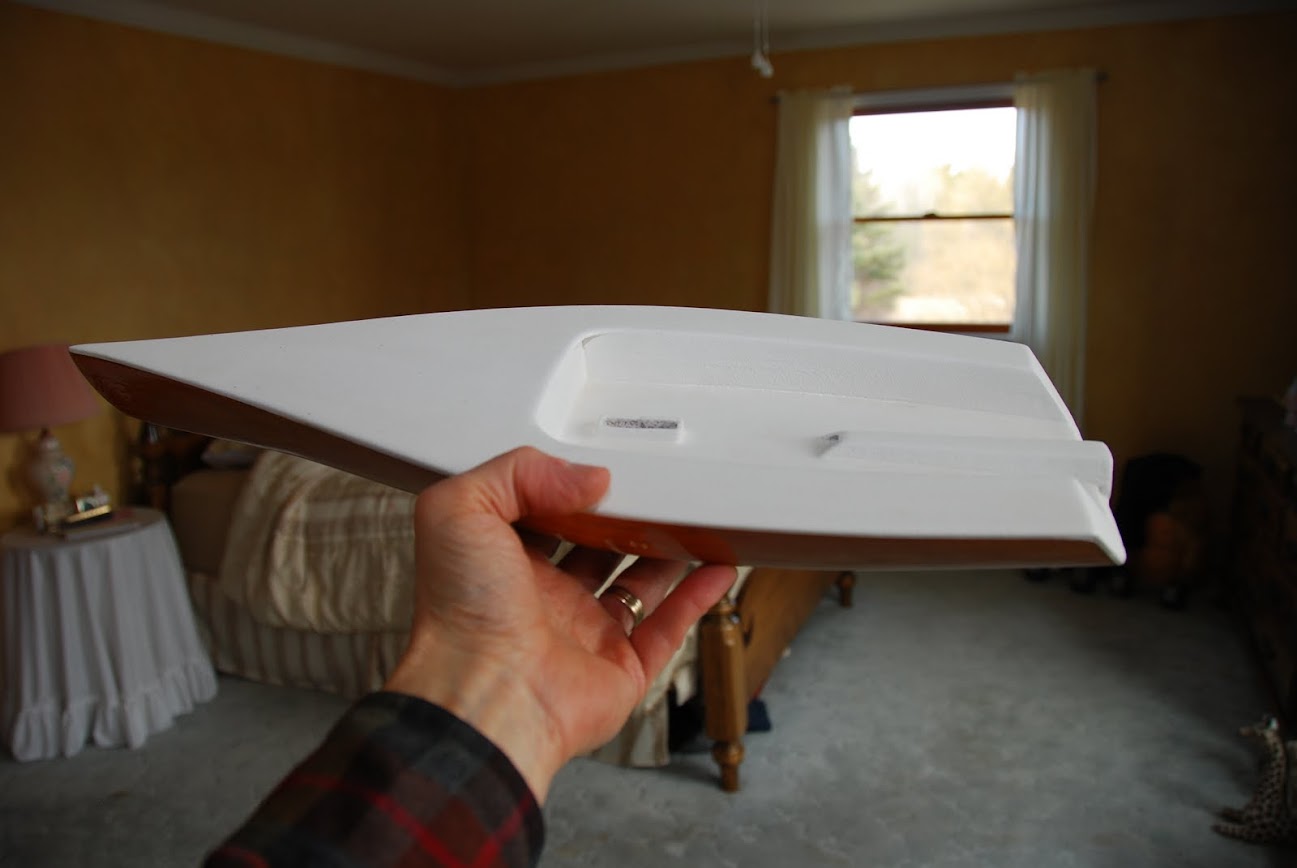
I don't have time just now for a fully detailed step by step, but I'll post a few teaser pics now. Fear not, I'll add plenty of pics and descriptions, just not tonight.
Oh, almost forgot, for those of you that need specifics, OAL 19'2", Beam 7'1", weight 350 lbs, sail area 350 sq ft (175 main and jib, 175 asymmetric spinnaker). It planes upwind, if I can keep it flat.

AL9nZEUZBHREqNa9aGLUcWV8Bub_kgb9hSoF94UDhdAEO8-EeNLThgUQGEKFMPPvK9VbL58MEGM_P5H3HiPxX8zhTJGYrfOPvixX5DV0vbIR6Ik8Y7Z9iY0-azssmR0szpqnpYwK3B-kF8Yvkk54o2k1IvUb8Q=w1297-h868-no


AL9nZEUg0N6GAjwlQ_3ZFlwNRIYjpHgA-WYVZj0N1qSjsGibam80SWmEU34AtMetrfzCSDzcuV8YZkLEYxkYqtzUgVI-6miv3bR91wiBamKjLJyMRRBHiTlONB1dU-peaGpE0m8HY-Ew3W-iM3u0mUUT-jT0og=w1158-h868-no


AL9nZEUId7gG7d2_TPK1-P0VD7-b8cNcalDqm-KatM4bfShvgmAlUR_KjzSuitqnHBZ1kLjj_IbEyuZOYUdEU4xfaazFqVIsbxwqV9u8ERaEBfFT348k0eecqD5kjMbEoCMrNkJGAynPbu7I4wgt7TzKFadwqQ=w1297-h868-no
 
OK, so the construction is similar to a strip canoe...temporary forms on a strongback, covered with strips.
Here's a look at it when I was mostly finished stripping.

AL9nZEX4v_ovxEg6PeKt6tMgxl4jtGo4l1LIBJljoKuU6BSN4vukLUA69Ot4fqQSvWH2bTKFbErBjGbCf57gCndGTkEbSdrAoIhPYtD1KXNXoTuOlgLKAKZ9PNrdoz6MKmnNeyrCUsE9VGFRZXFYHoQf2ApBFQ=w1085-h868-no


Strips were 1/2" thick x 1" wide with straight edges. The plans called for a keel plank and internal stem made of mahogany.
I had to buy a crown stapler to hold the 1/2" thick strips to the forms.

I'm sure you've noticed that the finished boat has an open transom. The transom is cut to profile after all stripping and glassing is complete.
Here's a look from the rear.

AL9nZEX8Ss-a-5Hc9Tlc9emN7dzgwGAZKD-WS9DqUtYmrzOERyZszCUVTu41d2GOh42gfDt-o2wblgEXV3Z5nZIjglqK-qju5KuEdyqqopHEbI1uLH0ddIVEvNcm5JxHP197EoVDZ7436HFkeOEeb6eTC06QFA=w1085-h868-no


The entire hull was glassed with 10 oz cloth and epoxy resin, a single layer.
Let me tell you, flipping the hull to work the inside was not as simple as when building a canoe!

AL9nZEUwKamWmAEdBFAVN9Lzlh5b-DqbVB3yUvMDN7sLGZ2s0LCQ2ivUEqVJ7hIZ76AjP-62cJhVFYkDbr3mt198iiWtt_zx7378YUY6OT5N_ox-ldbl-KcyokMIT5Iy_dDujSm1vcclbrJnqqXH-iwOO9PMMw=w1085-h868-no


I cut female profiles of the hull to temporarily support the boat while I worked the inside.
No, I couldn't just plop the hull on a couple pieces of left over carpeting...
 
Once I had the inside glassed, the fun really began.

AL9nZEXGa4GfWQWeD7wikMo1OUOYXTLZpuHDmx18OtvtpwpV8HGuXHAiuo87Tp7Yc2oppPzx3-msT5y7Crk3jrGOon7SUVRhFZVPksBnsS_5Iw_y94ENP_MTaZeAolwfj7fP5BM7xu-2QoonLmhPWrbNmaG9aQ=w1085-h868-no


AL9nZEUS1qXgN-7WG5SvUPZ_Ltwb3c9YDj0-AOWJ7Dhh96vKUSVzR1eo1CdFgp_t1daQz4U230CB89yjeAKEDDA1fG68npYSGvvSDUqp7-tpstMO4UEuplFNKqpPjUoYaxrf7LCyWBZ0xOv9lXfOPyefW090tw=w1085-h868-no


Lots of Cabosil filled epoxy for fillets.
Then cutting and fitting the bulkheads. All bulkheads, decking and transom are made from 3/4" Okuome plywood. For those that don't know, Okuome is french for "costs 3 times as much".
The bulkhead at the cockpit was doubled up for strength, per the plans. Original plans called for a keeled stepped mast. No way was I gonna teeter a 23 foot mast while trying to drop in in a little slot. I also wasn't fond of having a large deck penetration that would allow water ingress.
So I talked to Anthony, the designer, and he altered the plan so I could deck step the mast.
 
You can see in this pic the first few bulkheads fitted in place, as well as the previously mentioned internal stem and keel plank.

AL9nZEVKQVX8CtYcNPQC_a3KxUTQGaTx0TtAHdoPT0CLJXK0_YP-a7J86R2xjZoQmqaGLTswVQPzyx8sicL4tvtS5iSMTCeBh2KsCXpB2XvtnDjcfhtwLHHWW-mZl5iipgjF7nIukj6P4LStVFbDA25lYHCblg=w1085-h868-no


All of the bulkheads are ultimately epoxied in place, then filleted with filled epoxy, then glassed on place all along the joints on both sides.

In this next poor quality pic (sorry, a borrowed camera) you can see the added supports to withstand the loads from the deck stepped mast. You can also see most of the other bulkheads, that support and shape the cockpit floor and sides.

AL9nZEWfTYwcTv0KBkHp-D7w8RYkAxLBhHmzpJk6rykV4AtTLNCVC4D_dGxOs6AG5sO53gr1HsZGP8Vvg6JPoKEJ2lsLjOibBEXtg9J-71bMgu5digOu7cZN9hDiUJ6SCPpMMhFWZ-CuVjrE32WAbrXlqzgV_w=w1158-h868-no


Another poor quality pic showing the cut out and framing in of the centerboard trunk.


AL9nZEWndjzgf3pYvlC2gwZZ5q9VGrSzQ5kLDH3Bf4KiYuXNTs3yoc-eQx3wBB2VVfb3MBVfLAAxyB9PZAqV3kowvQe79tCHV_Jtw9Q4D8lp7qP84CH5Y8ydf600qh2gQeGNOIEckE6QCZI2rsrpcGiIZU_KDg=w652-h868-no


And here's a look at the open transom, hmmmm, I thought I had more views of this part of the build. It was a difficult part of the build to get the transom cut at the angle you see and keep the cut planar, so that the transom piece fits well.
Anyway, this pic shows the fitted transom, and the screwed in place and epoxied cockpit sole and sides too.


AL9nZEUm998SV7cIaLfOauebxIjt6zeB_WDoYuhLTbMR4V5_f0TgYhUH0_6rFnh7ADgyFX2vGxxOooIw_eC_hXYvDUJU2dTZXA1o_dk6c5Nm_wYY_7Ar9qKktJWqHjt-TEmkRyAZ0IC56CcSyvDosJ8xVgataA=w652-h868-no


While adding the decking, I had to install the chain plates (they takes the loads from the shrouds) and added supports for them. I also had to be sure that other deck fittings would not interfere with any under deck reinforcements.


AL9nZEUm6yHCw_EPzdM1VC6oqxVa7s8DBc-R3LoRrqhlLpBRL36UHLxdl53Yx_PUji36iaWHM5xWDHoQ8KN0Ibgt2XkhnnW0DNX5mB0rb1BdsVNS7i2oxOaYSCW11b9LspHh2Htmdo3PgyX-oj2ksFL2ugLuww=w1158-h868-no
 
Last edited:
All of the Okuome plywood decking had to be seamed together. I rough cut most of the parts, seamed them with a simple scarf joint and Cabosil filled epoxy. Once the deck parts were all scarfed together, I screwed them in place per the plans and filled all the holes with epoxy.


AL9nZEX0UFx55j2bLndl0Ho8LLdqRj1uD8hMmkQoNoYtOn81sNDy7J_MRGbKJcHeKfgi8QLw_tfpQb9A_XhA8xxy-xFbI6CNnUjCa8Aa_CoflHWHgupXQV8cZaXuMLpXdRJ8AKWUIzhxTD5CEdH5VpHwrh-UcA=w1158-h868-no


Then I sanded all surfaces, and cut a 1/2" radius roundover on all of the deck edges.


AL9nZEWN00aDFl1_NEdsnnGe0bhz86BpctjmyS3MH0HOmaHtp7fGVnUBRvam1htO3ZrDtIJBbqqNnS_CXSHs2Mle063nuLzPJS0bq6C4enVFC0ngt-jejEtrhQM34tzij_s9MPSeCDvJ39ZzJdctQKYobugmXw=w1158-h868-no


Again, you can see the filled epoxy fillets at all joints.


AL9nZEXRjzfQI4erh7wS07DtjqV0Mk0FZsTAiQBPBoMh6RM7UC29UeCZOW--6EP_Hku4IV5P8TNyBinZoa5VzREpTnBAWbpdAw90xdxNE0n_SZnW-ssTRStstvtOqy1-ztPkbElxYmgkaOuFWjViVtj5gqS_ng=w1158-h868-no


Now that I had everything assembled, I sanded the decks and cockpit, and the deck/hull interface.
Then it was time for glassing. All surfaces got a single layer of 10 oz cloth and epoxy resin.
All edges were reinforced with 10 oz glass tape.
I was getting pretty excited at this point, you can see I kept staging the photos with the hatch covers.


AL9nZEXyB-LtDxcs-UXpi7TJU_i7pkLZ1V02IcGHR8A-oL22fNhWVXUwlDTc_4rIfOQl6nfKyx-mlwf7hl61GAbJR-g0Dr0PMEi1ShO47DrO-i3sCt3qOu9L-RKbceHT5OUDhRatRKIkTwDm-Ym3xmNPgpe_gA=w1158-h868-no


AL9nZEWf9pbwf6U04dJH1FVIAbsD1F83OTFm-yCDLBdH78lvmXk8Ya4o-cs5noTSBTWW5ehf5uRKc7cyqjYkD8mApgt6JmGRowfHw0yNZFY3pjh5O6HXCWJnPlPAt7PVjB5a6ZFk4X_BjOpABZpNdQSSdT9G5w=w1158-h868-no


At this point, it was time to build the rudder box, to hang the rudder on.
I had been in contact with the only two other guys that had built this design (up to that time) and they both had rudder box failures.
So I took it upon myself to deviate from the plans. I also had been crewing on some larger boats and had recently sailed a production boat of similar design and performance.
I was initially attracted to this design because of the expected performance, as well as the open cockpit. Well, after sailing that similar production boat, I realized there was no easy way to hike out when healed, because of a lack of purchase for my feet. I also wasn't fully convinced that the as designed cockpit floor would be stiff enough.
So, here was my solution. I redesigned the rudder box, extending it nearly to the center board trunk. This provided plenty of strength for the rudder, stiffened the cockpit floor, and gave me (and anyone else sailing with me) something to push off from when heeled and hiking out.
Here it is in process.


AL9nZEUkm80qQnm54tM0OQydkYVbZV1hQ_k0BKdjy149yoQpgaOBAv_DxVGzXU8e5nhcjdBsh_55hJ0SQZyqD5lQyVNBDQUT_XzKm6Y4WgS6sYrfARIcIeqCDuQu1sDSPYMQtPhn_Oy9eZunT4-EHwxZE07yXQ=w1158-h868-no


And here it is glassed in place.


AL9nZEXL9zw5zb4ENNu2-fUc2q2KeU32MB-nkWTA1Hc7xBGpurIcTF5Odtf-38uqPAzbWiO0vC6RBczDVXo5ZngDPvv7vvIUUs_AN3iLfb5Aa7kL1iJK20_J_jAbIzqJjVeRhA0z5ckjoesd5oi7ShiI8sov5A=w1158-h868-no


From this point on, it was pretty easy going, just a matter of deciding which hardware to buy. I ended up using all Harken fittings, including a Harken windward sheeting traveler.
Because of the sloped deck/seats, I had to add some wedges under the traveler rail.


AL9nZEXDIb2UqOxY1TGVSzb_tTbxZGgTmIFc10bw6kJO1gSmlYjCr6qwbhj2KegKE2WbbLu6bRnpE-Nt2XheCi3zbzLf0_3Mcih7cG2YtgXEv11vQjsXiKiXDONhu64kylMMeLcXLDCCp9AcOmDZHTZk0xcj8Q=w1158-h868-no


AL9nZEXC_vQttjVTD3pUSj-5IdlRB1TYMWGbCsOXq0hVqrAs1NYEXpxjmJg60aTOZf_I4pj2a-SxD9xDAWDIOGrUfwj_HIRPBX_vD78RhtqTaVhGhqmfLnecJmO8m4QxtBdiKkTcPzR4EGWxSsOUpqYN-3CXew=w1158-h868-no
 
Next up were the rudder and centerboard. They both were built of yellow pine with hardwood dowels inside for alignment and strength.
The centerboard has a hollow section near the top that I added some lead shot ballast, if I recall it was about 20 lbs worth. It was imperative to have negative buoyancy for the centerboard, since gravity was all that's used to keep it in place.
The following series of pics show about 3 weeks worth of effort, from initial glue up through shaping and finally glassing.

AL9nZEUtSCFV99T3T4VugPuigzlIG8PIZoKh_LvQwbyj5_RQF5AKw6wrtP0CNe52HvLcRSVnL08CQ6oVjEibi_bB4ofIBd1BI1FmmoBSYA7DkTO4GEJqSLl3OsMGAM6k_Awv4VAw6x38TMYaL-xl7aZDk9R-fg=w1158-h868-no


AL9nZEUk4Q_Rb8dryxx-Bd8m3BriIw3XR7g5935HHWKMsSEYRklTjCEm-mA4z1WOaENXBW_JwCYFNhsdc0krf59xqFKbROR_xjw0RbkqOGJMewFX2JX_A7MphA35-fLSszK5PWYMJP97XytLWkj0eCYzS1tGmA=w1158-h868-no


AL9nZEW0Gj3QctJIu6reftJvE-hqiIq1z8XL5q1tVgLyymt7tnr4bgn3o7G4tNILJDNb8rHjffDmKAqxDPrX_ZfLemraElM7_biuRtrzpJ5sYkLWaif75qKS4Z9KKivIuL83wcLVM2ky6B4SiXGBZkO7r0ARIw=w1158-h868-no


AL9nZEWXAf5wmb7dWqXyQun39Vr4vB5U_CRDZoKtGksEmAIr6Rvdq35y5l6akA_TfTzIZG62uZ1IdWsfsN2nllFvWneEdA8-_OA4I6b4osonQrer1rvnUwUXvKD_V1iuh5Icxo8AKyzWZ6J6a2r9g01dqbmpJQ=w652-h868-no


AL9nZEXxKNoYpiBqDePyZXRHHUWUMx6udFv3wbk3DKhlxhQW7eDJ5SfN11HaotNL2ZZZQmARgpe2B5ViJf2mdgDUVr-j6zCYWeeznk8_3Ut1tVXwuF8kWtP0ef4x_01SibI-EDF9VK-3Bb-nAvR1vKQ3JnJFhw=w652-h868-no


AL9nZEVC4PK0MsvkvzxDWqmor7xb7QdbUtlGBKpJIUZXFqhnxgNGrOpH11u_emt50QDs6Fdif4m8cGHqSdNtVt_zzi14ZyLXRY4XuNHLlWijwYOqVmXDVNDExqussb44Ir6Rx_qys3bkqOJHJnTp29Kz43jVAw=w652-h868-no


With the centerboard and rudder complete, it was time for paint.
I applied two coats of primer and two coats of paint over the entire deck and cockpit.
I then masked off a pattern on the deck and seat area, and applied two more coats of paint with some anti slip polymer beads mixed in.


AL9nZEXOSOlD9U95OpFFoESlAhdIXlEE0Yq13RMqc2gaSpiSKjkZAWuPjd227wOV_-Kjv-BaPHhfdIZXeAtK6tSeha8fSfD0y7ihjzSQWL2A6JbPRcZDzG7y1ylez-prrUKsyWaThF0JaT5PTn5eaGZ74zDGAw=w1158-h868-no


AL9nZEU1us-1roe_cQP6H3Yl4B8xTEzjwfZRVb_qTtCSva5zPb_SbhPdmywteRj3Z3MF3RiC6aeyS0zGqzDp6r8gUhwKXN73Fusmvy8PEvSaB-lz5gGGGBaxlI7LpxeYi9dJddmro52BJmNrwa5d6vS1ySO-DA=w1158-h868-no


AL9nZEWk1GUg-4c3sblLbOL8DdvdvR_UUtbTt9WkF9GeyJnRNsRP57JmyIAUCyHoaSr3v3mSyc-JOErHG32TvDG2eNt93b43e_D5mDtVs-yF4sdoAO9Hw-p6PRmzIGbz-QG-D54adHnxQW3F0wq8_qERQP-PpQ=w1158-h868-no


AL9nZEUJZp0bAgLUZDgh0cn0ExzENrIql2AYg6IMnSPS_tHlCDyfFro229pZUtBR2e-L3aj7JHaFb1wHLnwFDmNrYUD59-7w33GRdg10efO0Do9CqauFNESfg6JN2z4rcUYqEEXmeOQaAFEPs9qVD-aCKT7Gmw=w1158-h868-no


AL9nZEU1C5Y7Cw_l0NIc4VojpTBczsrjim5f5fsrImupUcROvDwA4EHBSdjavNS6PnDJ4fBR_oM5b9AouAcVWPPrSJ_wvC31PK2lEIyMRkY9XkzJvqgIdxy78KJ7jwjDHd6P2nwM9kApxeFzLxZ7yRFpCbzrTA=w1158-h868-no


AL9nZEVj9QdEvQXZSd_VsRhqSZszY-UfK5TjYorOrV2ShLw-8eE-8ZC-NkS8Pfk9vvMkspjJQCJ5dUjd014ag2eF2z7p-TRWFjOt_Bm4l5el6wnnyV4PU5741QguURIOCUJfU2yNi3RIXqgyGIJY2y44NcOnpg=w652-h868-no


In that next to last pic, you can see most all of the deck fittings and the mast step.
I had to make a riser for the mast step because the downhaul loop on the mast was gonna stab into the deck as I rested the mast on the traveler, in preparation for setting the mast in place.
Oh, I should have mentioned from the beginning, one of my criteria for choosing this design was that it was to be used as a day sailer. So the mast and rigging would be set up every time I would sail, as apposed to leaving it all set up and beaching or docking (or mooring) the boat.
 
Only a few little efforts left...
This pic shows the plates for the rudder, I built this out of some scrap 304 stainless from work, and TIG welded it together. I used a mountain bike seat clamp (cam action) to hold the rudder in place.
In retrospect, I should have asked the designer to alter the plans to include a swing keel, rather than the drop in centerboard. The centerboard is cumbersome to handle, and with it fully in place the boat drafts nearly 4 feet!!

AL9nZEVCCnFTYVgdLK_sd3QOslkVKgx1opwLkzD3hjIiC13SQQ76QDixIzoxo3a96jAxSuXD5F5thpEzv02dvUXRPgLlca0tfnXFH4m8rTJqyR18lq49Qe72Ah6Zk2TUZW5QrmxsPvYDsuMVX4hd2EIguKTCfw=w1158-h868-no


Here's a look at the rudder and tiller in place. Yes, I had to make the tiller too. I did buy a Ronstan extendable hiking stick for the tiller, an absolute must when hiked out.


AL9nZEXPUrwogN3era6pPCsbb0vYtpv4Odpe4jfqKSzQyYAGdcPRVcsaXTOweeo0F0HeHryTvqK4yWHvHaPUIOxtKVtF-5PcBiHdgu2xGAhMQ3T5rdolDRk3NSSofSEDM2D5BKPya6bcWxgkecK5sH2HK7UUAw=w1158-h868-no


Here's a look at the K19 nearly finished, with my faithful assistant holding the boom. BTW, his 33rd birthday is next week...


AL9nZEV9D0CnDKqnqjcX9jdTIuLl6PfDgIk1k9gtMdFfDNyTphtvyfsd_JPiszJ9D87WmDG3tXPHMZ_AxX3uitXGLGEzbRxh8q7ApZm_KPwzQtbfKTe1gIxFfzHiHJKYCOHHRuGipSZXU2D5sKg4r7Vc9pwJhA=w1158-h868-no
 
It's probably too late now but you should have used side to side Hiking straps.
Take a look at the Lightning Class One Design boats.
With side to side straps you can go from sitting inside with a foot under a strap
to letting it all hang out over the side.
I sailed and raced Lightnings in California for about 20 years.
Larry
 
It was finally time for the maiden voyage, even though I hadn't yet found a suitable used jib.
I bought a nearly right sized used main sail, and sailed it that way until I bought an unused sail from a failed production catamaran business.


AL9nZEVwmUsOfGdYRgIHcbqYwriJ5sGs6cAUGKSV4z6XFe7YwMJ4URxgDEq4iiV76yxfpm561kZAKaQdZawBNwWXt8tzE2z9eRK4SyQTKCfsdba5a8fg5sQF8vLBhqGrrXhAswdEzv_WoMpLGkdwQb8UajVv0Q=w537-h868-no


AL9nZEXfrwE3xcIX7df1GvY7XjAt6TpYE5kVZczwnnNyZ5X7F1J-4c4ehaXJSOZbYzOIAQUP5wUexLnzWdSg-YlancVN0gemFqPTwzOT5SvLK-Grbq8g4eTQWyUxxOi9Ea4VdwjEQtWwOR4kdDtsuUmP3QH0_w=w1405-h868-no


It turned out to be a very powerful boat, extremely responsive, with plenty of room. Built almost entirely for performance, no concessions for comfort, it's often a wet ride, but never boring. It planes easily, even upwind if conditions are good and I can keep it flat. 3 or 4 men, fully hiked out, on a plane is quite exciting, I'll tell you.
I took nearly 4 years on the calendar to build this, with a couple long gaps.
It's still a pretty boat, gets lots of attention, whether I want it or not.
A few years ago, I repainted the topside an off white color. When the boat was clean and it was sunny out, the glare was intolerable.


h7zhxzrXtDcjP9pbFalbqdoVaqwRT_fF0Mtw_t21K2ynBm269W9gxS6O7sTnD5RWOun2Trvs3op4qjuQhioavyV9Dbw5ieMK4sIqOLEmkpyLFxrYg_4rAGFVdgVqNcFIq2om3c8S3QDdlFRmVXnO7kWiF_y3HoHfDpaFIPzYfoa2WMA-DYbwDdR2zkP41t7O5AZjwTQBlSrm4sj3JNs4dN_yYKa5-4la43eKN_Ld1neXBXS18t5pNQq50dM0B0XwRRwFFKEY56_jE5rS-V16dgSZDbHqztFKP9PPQArcke4TU13TZ_p5n1vzD9irXFKFLM_qhkyZrawLW6navpqJ54DJxjAcrmD7B8dVONousxxixGA4xiUVGHbU_E92QpyAWeYa6fMVM7iv0rmLPYQGTwnqMoGiFdt6XkXiK7Ty5YWmbFgTo-EIfIrix1pW-48eSTs9qTimOA0eiAE5fkoZkFI2e0cg7LsaPJZK-suY_MEQSdZhNyfNrZYSGviRFviGdheI6iNtpp16_m4bugPyS1inTltso4Ac_fRrRZ3zj2jEMUSRqGA2WH0ETMefQJp0WjRdiGh0YtT62Sp5n38NJ5Y0icmVgpKwuW4Vb-79TeubkcnfAePlFDFBvlbSsJCtabg86kiOiSirgtiAAEd_BmZJMLSe02NVbg1U6cw6C1Nhvv49oPNlnEpArf51pRWd8DPxmcYcprQeUsgq2M6V4mGpGPh6O_naKAUwXniyqzc4ERUUzBVYC4up6XoGA2caQo4iyDS10bDkws277zwhwHwqTQBPaFzf2ibVGyMne_bQUPvTlei_XakVQN7aX-3gh2nT6lOikCxVGGTXMIED9sDi9S8n9jzDxViv_leDguDBo-N_Nu_UYKWpV5YP364BmmAZ3cFj1HvMNXrA4etkFVFgqWI7mhBKxGWumYBlJCaC=w1297-h868-no
 
What is the total weight of the boat ?
How many Sq. Ft. In main and jib ?
The jib looks a bit oversized in relation to main. It looks like a nice build.
Larry
 
Larry,
Those details are in post #1 upthread.
Sails are sized per plan as designed by Anthony C Gondola, Naval Architect.
And although not seen in the pics (I’ll look for a better view) I have port and starboard hiking straps.
It’s vital to keep at least a toe under a strap at all times, as I said, it’s a very dynamic and responsive ride.

The poor K19 is currently in wraps behind my garage, waiting for repairs after striking an unseen submerged erratic. Centerboard trunk was breached and centerboard cracked. Just now I’m deciding how to move forward…just repair the damage or convert to a swing keel. A swing keel would lower the risk of damage and make launching and landing much easier.
 
Last edited:
Back
Top