• Happy Marine Mammal Rescue Day! 🐳🐬🦭🦦

Helping some young people out dip net fishing

Joined
Sep 25, 2022
Messages
249
Reaction score
419
Location
S. Central Alaska
As some of you know, we are moving into dip-net season. Some of you saw my offerings while outfitting my own “dip ship”; and now i have a young family who are excited about the prospect of putting up a bunch of red’s and i‘m getting to mentor them along the way.
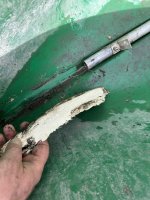
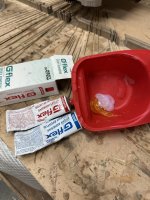
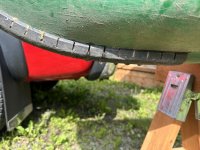
I knew a lady with an old Coleman 17ft canoe that had a pretty good leak in the bow, so we bought it right and right now we’re repairing and outfitting it for the soon to be season opener. These folks can spell canoe but that’s about it, so this is a lot of fun for both of us.
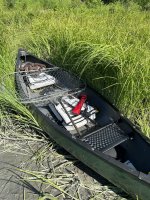
While trying to cover all the bases i realize how much i normally take for granted so i catch my self slowing down and backing up a lot. They are good students and we will be ready in time. I intend to haul all the gear to the lake and give them some hands on as well. Who would have though this old Coleman could be so much fun?
 

Attachments

  • IMG_0898.jpeg
    IMG_0898.jpeg
    155.5 KB · Views: 17
  • IMG_0901.jpeg
    IMG_0901.jpeg
    201.8 KB · Views: 17
  • IMG_0902.jpeg
    IMG_0902.jpeg
    154.7 KB · Views: 18
  • IMG_0904.jpeg
    IMG_0904.jpeg
    153.2 KB · Views: 18
  • IMG_0905.jpeg
    IMG_0905.jpeg
    166.4 KB · Views: 19
Sounds like a lot of fun! Did you have to heat the poly up before applying the g-flex, or did it adhere fine with just a sanding?
 
After scrubbing out the slit i blew it dry with air. On the outside a herking skid plate was used to seal the worn thru area and i didn't disturb that so all the prep was from the inside. A shop light was suspended above the repair for warmth and it stayed until the G-flex wasn't sticky any longer.

My confidence in G-flex is un-wavering and it was the go to all those years i had the salt water boat. There was a high pucker factor the day i hole sawed a 3 1/2 inch hole in the bottom of the hull and glued in a transducer but 20 years later it’s still in place and never a problem.
 

Attachments

  • IMG_0896.jpeg
    IMG_0896.jpeg
    135.2 KB · Views: 16
During todays opener i caught 9 Reds and my cadets caught 13. It was a slow day fish wise but we’ve still got plenty of time to finish up. It was a blue bird day and im guessing 600 people showed up. The cadets used 2 of the 4 carbon paddles i made last winter and i think i’ll just consider them gifted!
When you take folks who can barely spell canoe into this environment you’re never sure how it will turn out. I gave them Gold stars and call the graduates. The road on both sides of the bridge had folks parking in the ditch for several hundred yards each direction. Then the banks were lined with folks for 1/4 mile and of course “the boat people” had they’re regular S- -t show going on.
All the “dip ship” upgrades functioned just fine but i added 5lbs. to the anchor set up.
 

Attachments

  • IMG_0964.jpeg
    IMG_0964.jpeg
    309 KB · Views: 24
  • IMG_0971.jpeg
    IMG_0971.jpeg
    212.8 KB · Views: 25
  • IMG_0968.jpeg
    IMG_0968.jpeg
    129.3 KB · Views: 23
  • IMG_0966.jpeg
    IMG_0966.jpeg
    166.5 KB · Views: 25
  • IMG_0958.jpeg
    IMG_0958.jpeg
    133.2 KB · Views: 25
  • IMG_0960.jpeg
    IMG_0960.jpeg
    102.8 KB · Views: 26
Last edited:
During the introductory dip netting foray, i watched “Mom” as she attempted to make her way using a carbon bent shaft loaner. I noted what seemed to work and talked to her about what she liked about the paddle. It was obvious to me it didn't fit well and im setting out to fix that for her.
I have dad bring the 5 kids by once a week to work on “her paddle” and by Christmas she’ll have something that fits and carries 5 kids worth of refrigerator art probably! I will try to keep the embellishments tasteful but that will be the toughest part of the job; sorting thru they’re childish exuberance while not stifling they’re creative juices!

So i whacked the bent shaft blade off and am going “plain ole” this time. I’m pretty sure im having as much fun with this as the kids.
Knowing how floppy the foam gets, i slit this one and set a G-10 rib in G-flex which made all the difference in the world! At this point both blade faces have been skinned with carbon/innegra and the edges were hardened. (Not shown) After some serious sanding we’ll be ready for the final carbon sleeve and grip which was removed and re-machined, eliminating it’s directional posture!
 

Attachments

  • IMG_1360.jpeg
    IMG_1360.jpeg
    187.5 KB · Views: 11
  • IMG_1362.jpeg
    IMG_1362.jpeg
    145.1 KB · Views: 11
  • IMG_1398.jpeg
    IMG_1398.jpeg
    250.4 KB · Views: 11
We’re rounding the corner on this project. We still need to paint the back side but you get the idea. The kids are having fun and next summer i’ll get to watch them all with this when we converge on “the fishing hole” in July.
Once they’re done being artsy, i’ll go over it all with an automotive acrylic top coat, something new for me but this is a good project for an experiment. I’ll post some completed pictures then.
 

Attachments

  • IMG_1638.jpeg
    IMG_1638.jpeg
    160.4 KB · Views: 2
With a title change, Glenn has “expanded my borders” so i’ll include “the rest of the story too”.
Now, when im talking kids, we’re looking at at 15, 13, 9, 7 and a 5 year old. The oldest girl and the 9 year old boy are the fisher people but id like all of them to experience this experience so im also making a kid size net that any of them can handle.
Like others it’s Carbon fiber/kevlar, 38 inch diameter and will weigh no more than 30 oz even with the net bag installed.
Many of you probably have no interest in the net making part but from a “kid interaction standpoint” you might. The commonality we share is the fishing from a canoe part!

As i move along, i’ll update this.
1. I cut the top bulb off of a piece of plastic lawn edging which gave me an adjustable mold. For the first piece i run an electricians snake thru a piece of 1/2 braided carbon sleeve then pull a piece of round 3/8 EDPM (weather stripping) back thru. At this point i dip and slobber the epoxy on and strip off the excess before laying it in the mold.
2. After the first layer is hard the mold is no longer necessary. I sand the hoop making sure it’s smooth smooth so the next sleeve will slide easily. Think Chinese handcuff, and just keep adding layers as needed, wetting out and sanding etc.
3. Hanging from a grab loop your looking at a hoop with 5 layers of carbon with one kevlar partial serving as a rash guard. Today i’ll join the loop and move onto fashioning the handle.

Finished diameter is .550 so my radial wall is roughly .080 and plenty stout. With each new net i learn something and im starting to feel pretty good about the end result. The finished net for lack of a better word is Lively, they are sort of a bridge between a net and a rod. I can feel all the little bumps as fish swim in or by and they still have a bit of flexibility which at first took some getting use to until i determined “you’re not gonna break this thing”!
 

Attachments

  • IMG_1587.jpeg
    IMG_1587.jpeg
    145.7 KB · Views: 3
  • IMG_1573.jpeg
    IMG_1573.jpeg
    200.8 KB · Views: 3
  • IMG_1572.jpeg
    IMG_1572.jpeg
    170.5 KB · Views: 3
  • IMG_0710.jpeg
    IMG_0710.jpeg
    175.7 KB · Views: 3
Last edited:
Some of todays progress. Before closing the hoop i slid on a pair of carbon sleeves to serve as joint hardners and a longer one to provide some “shoulder” in the area most loaded when lifting fish.

1. Here’s one of the cut ends which had the foam backer removed to roughly 2 in. Deep.
2. The spigot dryfit. This joint was made with G-flex.
3. Support sleeve‘s on handle top and where it joins the hoop were wetted and formed a bit. They need final shaped and dry fit before joining the pieces.
 

Attachments

  • IMG_1609.jpeg
    IMG_1609.jpeg
    107 KB · Views: 3
  • IMG_1614.jpeg
    IMG_1614.jpeg
    222.5 KB · Views: 3
  • IMG_1615.jpeg
    IMG_1615.jpeg
    185.7 KB · Views: 3
With the hoop complete i started the handle attachment today. Everything was dry fitted and a small tuft of sheep wool was used to plug the end 0f the tube enough to keep the G-flex in place. Tomorrow i’ll wrap this joint with tow before adding a carbon sleeve full length to the handle.

2 supports are dry fit and ready next. Im doing this one a little differently in that every step is it’s own. I’m spending roughly 20-30 minutes a day but between step’s i can file/sand to form every joint, which will be noticeable in the end. A rough weight guestimation was made and allowing long for the net bag it’s still going to come in around 26 oz!
 

Attachments

  • IMG_1657.jpeg
    IMG_1657.jpeg
    178.8 KB · Views: 3
  • IMG_1659.jpeg
    IMG_1659.jpeg
    145 KB · Views: 3
A few really exciting things from today. (For me anyway). Today a lot of wondering was alleviated by rigging up a dead lift test. This was done before the 2 gussets were added so i was testing the torsional strength of the hoop / handle connection. To do this i used some left over mechanical seal parts that weighed 11 lbs. I couldn't hold it all up and take a picture but i did capture the “good stuff”.
A line was run thru the weight and hooked to the far end of the loop before lifting the weight. I was quite nervous as i didn’t want to destroy anything but i did want a base line.
I can tell you lifting that much out at the end is about all i’d want to try it, the hoop showed roughly 6-8 inches of deflection ~ which i believe is plenty for Carbon! And, not a sound; no creaking, no signals; nothing but silence, Im happy! Typically fish are not brought aboard in that posture, most of the time the net is simply lifted straight up and i did not try a straight lift but im fully confident it will handle anything i’ll ever ask of it.
Both Gussets were then added and i’ll finish wrapping these joints with Carbon tow tomorrow.
I believe i used the word “lively” earlier describing these nets; I can hold this thing up by the handle with the hoop straight down and drop it; and it will bounce 4-6 inches!

I spoke with ADFG delving into the particulars of “Allowable” twine for the net bags and learned there are no regulations on the actual twine just the stretched dimension of one mesh. (4 1/2 inch)
Tomorrow i speak with a net maker in Cordova for advice on the “most sticky” type of mesh.

Im stoked and looking forward to this! Tenkara, move over
 

Attachments

  • IMG_1681.jpeg
    IMG_1681.jpeg
    160.9 KB · Views: 2
  • IMG_1680.jpeg
    IMG_1680.jpeg
    159.4 KB · Views: 2
  • IMG_1684.jpeg
    IMG_1684.jpeg
    148.9 KB · Views: 2
Last edited:
During the introductory dip netting foray, i watched “Mom” as she attempted to make her way using a carbon bent shaft loaner. I noted what seemed to work and talked to her about what she liked about the paddle. It was obvious to me it didn't fit well and im setting out to fix that for her.
I have dad bring the 5 kids by once a week to work on “her paddle” and by Christmas she’ll have something that fits and carries 5 kids worth of refrigerator art probably! I will try to keep the embellishments tasteful but that will be the toughest part of the job; sorting thru they’re childish exuberance while not stifling they’re creative juices!

So i whacked the bent shaft blade off and am going “plain ole” this time. I’m pretty sure im having as much fun with this as the kids.
Knowing how floppy the foam gets, i slit this one and set a G-10 rib in G-flex which made all the difference in the world! At this point both blade faces have been skinned with carbon/innegra and the edges were hardened. (Not shown) After some serious sanding we’ll be ready for the final carbon sleeve and grip which was removed and re-machined, eliminating it’s directional postu
 
From #5 - Here’s the end result’s of “Mom’s” Christmas present! It’s certainly a collection of compromise but me an the kids are happy! Once i get the last top coat and the knob i’ll post one more photo. It weighs 19 oz.
 

Attachments

  • IMG_1751.jpeg
    IMG_1751.jpeg
    157.9 KB · Views: 4
  • IMG_1750.jpeg
    IMG_1750.jpeg
    171.7 KB · Views: 4
This net is shown against the first two. I‘m finding it interesting watching them progress. The big one is 84 oz., the mid one is 45oz. And the “Mongoose” is 22oz! Bag size is 60, 48 and 40. Im still evaluating net bag materials.

The big one looks hulking in comparison and see’s no use these days; the mid size is excellent to fish as i imagine the Mongoose being. It was conceived as a kid net but im beginning to see an added bonus to dipping with lite wt. Gear? More primal, not quite jump in the stream and stab em with my spear but darn near!
 

Attachments

  • IMG_1736.jpeg
    IMG_1736.jpeg
    129.8 KB · Views: 3
  • IMG_1747.jpeg
    IMG_1747.jpeg
    155.6 KB · Views: 3
  • IMG_1737.jpeg
    IMG_1737.jpeg
    122.5 KB · Views: 3
Last edited:
Here’s the Kid’s paddle, ready to go. I used a Sassafras otter tail for the pattern.

I have one more paddle im finishing up then i need to get away from the epoxy for a while! My sensitivity level can only endure so much these days.
 

Attachments

  • IMG_1785.jpeg
    IMG_1785.jpeg
    136.6 KB · Views: 3
  • IMG_1784.jpeg
    IMG_1784.jpeg
    139 KB · Views: 3
  • IMG_1782.jpeg
    IMG_1782.jpeg
    121.1 KB · Views: 3
Back
Top