• Happy (Ancient) May Day! 🎀💈💃🏼🧺💐🍴

DIY Canoe Skid Plate Install

I agree completely with Canotrouge. The OP's video is a very good one if you want to put on Kevlar felt skid plates, as are many of his other videos I skimmed. However, I think skid plates are complete waste of time, money and hull performance.

I put Kevlar skid plates on my first canoe, a Mad River Royalex Explorer. Never again. None of my 15 or 16 canoes have gotten damaged on the stems, not even my aggressively paddled whitewater canoes. Those have worn under the central seat, gotten wrapped, had gunwales broken, but no significant wear on the stems.

I shudder in horror at adding skid plates to an expensive and light composite canoe. The skid plates will alter the smooth, laminar flow of water around the bow, and they will add weight in the worst possible place for maneuverability -- inertial swing weight at the ends of the hull.

Skid plates are ugly. I don't like my canoes deliberately made ugly.

In general, preventive lamination makes no sense to me. The bottom of every canoe will definitely get scratched. Does it make sense to put a layer of Kevlar felt (or Dynel) all over the bottom of a canoe before you even start using the canoe? Not in my opinion. Add "fix-up layers" of material after your canoe is damaged not before, and only where it is damaged.

Finally, treat your canoe with respect and care so it doesn't become damaged on the stems or anywhere else, if you can avoid it. Don't ram your canoe onto the shore. Get in and out of the canoe while it is in the water. In other words, "wet foot" your entry and exit; canoeing is a water sport. Don't drag your canoe unless absolutely necessary. And learn moving water paddle skills and still water freestyle skills, so that you don't hit hard objects in the first place.

Man that is well said and I've been saying that for years but people don't seam to get it. Partly because canoe companies or retailers tell you that you need this for your new expensive canoe you just bought and then they charge you a premium to instal them for you.... I'm with Glen 200%, they are a waste of time, a waste of money and waste of performance!!
 
Mike, why'd you go so wide on those.

It is a wide boat, still beamy at the stems. The Live Aboard, packed with food, water, fuel, tent platform and motor will not be riding high. The solo motorman in the stern is positioned 18 feet from the bow, and unlikely to see a barely submerged obstacle before he is upon it, perhaps not struck exactly bow on.

Given the effect of oyster bars, lime stone and worm rock on Royalex that size and shape just looked right after I made a few paper templates, but it was a guess. I would usually wait until the stems had plenty of scratches and use that area to determine the size and shape of the Dynel

Having seen what a single season on oyster bars and limestone can do I thought it would be easier to install the skid plates on stems that did not include curly cues of vinyl dangling like Medusain locks.
 
To parse Glenns distain for skid plates

However, I think skid plates are complete waste of time, money and hull performance.

Time. Installing those Dynel skid plates took but a few hours, some of that wait time.

Money. I could probably calculate the materials cost of the various Dynel, peel ply, epoxies and graphite powder. That might take more time than the actual installation. Since I keep all of those materials available in the shop, probably less than $20, most of that in Gflex cost.

I do agree that a thicker, heavier, uglier 100 dollar skid plate kit is a waste of money.

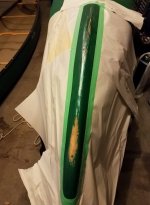
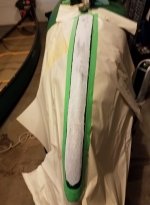
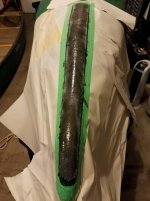
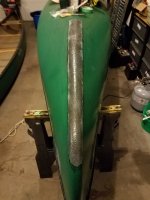
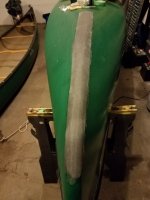
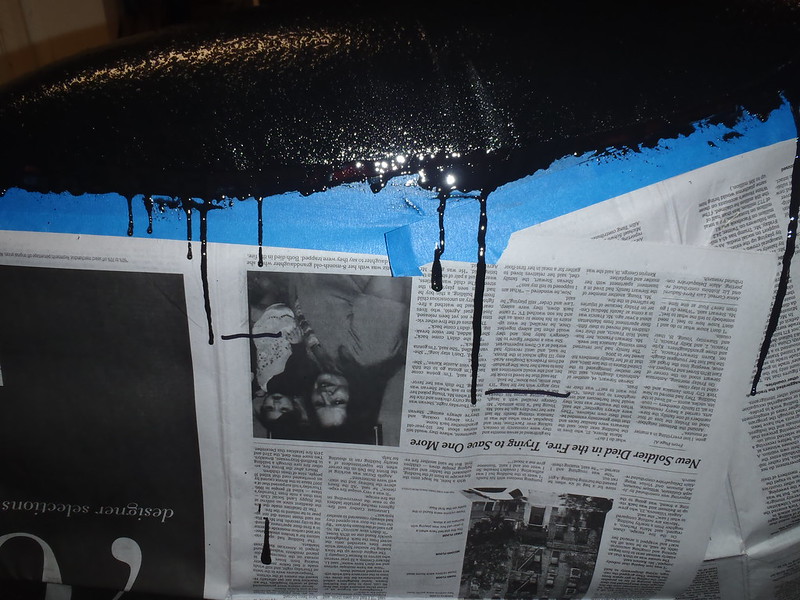
Hull performance. A single layer Dynel skid plate, compressed under peel ply, is dang near flush with the hull, and may add a couple of ounces to each stem. The Dynel cloth and spoonful of graphite powder weigh almost nothing. Just to check I filled a mixing cup with an epoxy equivalent amount of water. Approximately 1 cup, or 8 ounces. The epoxy and graphite mix is lighter than water, and after subtracting the drips on the newspaper and the more considerable volume of epoxy that comes off on the two tape layers, maybe 4 ounces per skid plate.

I put Kevlar skid plates on my first canoe, a Mad River Royalex Explorer. Never again.

Me too, never again. But a single layer of peel ply compressed Dynel is quite unlike a swollen kevlar felt beast.

None of my 15 or 16 canoes have gotten damaged on the stems, not even my aggressively paddled whitewater canoes. Those have worn under the central seat, gotten wrapped, had gunwales broken, but no significant wear on the stems.

Most of my 15 or 16 canoes had shown wear at the stems before I installed skid plates, even my unaggressively paddled Class 1 boats. The Royalex ones especially.


The skid plates will alter the smooth, laminar flow of water around the bow, and they will add weight in the worst possible place for maneuverability -- inertial swing weight at the ends of the hull.

See hull performance above regarding altering the laminar flow to any significant degree. The scratches on the bottom of most of my boats have more effect. See an estimated couple ounces added to each stem above regarding inertial swing weight.

Skid plates are ugly. I don't like my canoes deliberately made ugly.

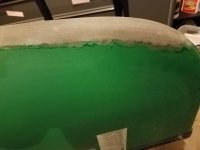
Some skid plates are ugly. Poorly installed, untinted kevlar felt skid plates come to mind. A skid plate does not need to be that ugly. Dynel tinted white on a white bottomed hull will be nearly invisible, especially after topcoating with white paint.

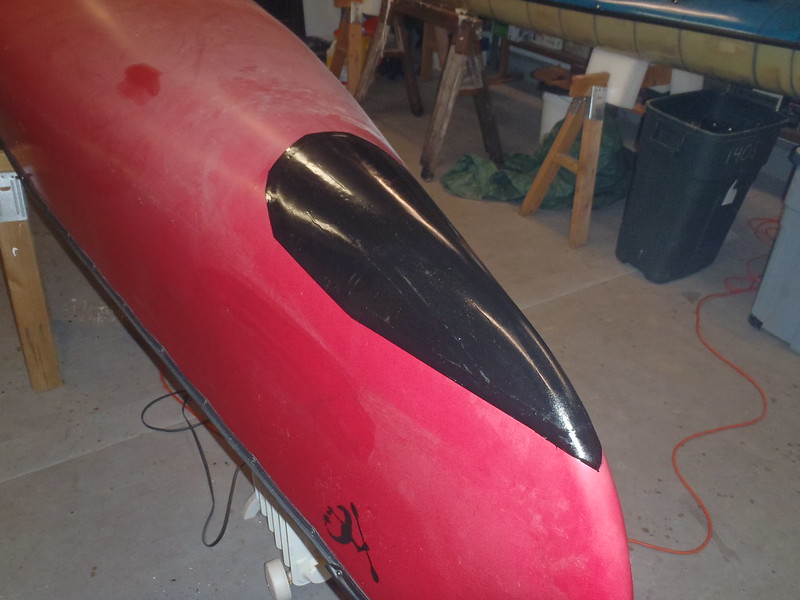
I usually do not try to color match red or green hulls, but use black pigment and graphite powder for black skid plates. Once topcoated with black paint and sharp edge line those skid plates are not unappealing to me, even though black shows every imperfection.

Finally, treat your canoe with respect and care so it doesn't become damaged on the stems or anywhere else, if you can avoid it. Don't ram your canoe onto the shore. Get in and out of the canoe while it is in the water. In other words, "wet foot" your entry and exit; canoeing is a water sport. Don't drag your canoe unless absolutely necessary. And learn moving water paddle skills and still water freestyle skills, so that you don't hit hard objects in the first place.

I do treat my canoes with respect, which is why I outfit them and maintain them. They get used, and show it. I try not to ram my boats onto shore, but landing in wind and wave sometimes necessitates sacrifices. My knees are not what they once were, and my back never was. If it is a choice to sacrifice scratching the paint on a durable skid plate or sacrificing my mobility for a week the skid plate loses every time.

I do not drag my canoe unless it is necessary, that would be silly option for moving a canoe. Necessity is in the eye of the beholder. I behold it to be necessary when the waves are pounding the boat and I against some windy shore. I know of no other way to haul the canoe ashore at a ledge landing site, especially adjacent to deep or fast moving water. And when I come to yet another beaver dam or speedbump log I am not unloading the gear, getting under the yoke, walking 10 feet, reloading the gear and paddling another 100 yards before doing it all again.

I have some moving water skills, though perhaps a complete lack of style, free or otherwise. Even with polarized sunglasses I have not managed to see every rock in the river, especially in silty or muddy waters.

I have scraped rocks even while paddling my typically crystal clear local trout stream, sometimes when the gauge is at or near Canoe Zero. Sometimes below Canoe Zero.

For me the advantages of a lightweight, flush fitted, abrasion resistant skid plate far exceeds the penalty.

Suum cuique.
 
Kevlar isn't my choice for skids either. I just used fiberglass tape for the boats that needed it (stems already worn - that's what you get with the used boat market). But my Prospector had been prepared with kev skids by the dealer because it was supposed to be a rental boat - which ended up never being used until I bought it at a discount. Anyway - I found that those rough kevlar skid plates can be smoothed with the right tool - a farrier's file. That smoothed out those kev plates nicely. But you have to be very careful around the edges. That file will eat pretty much anything a canoe has been made of - except maybe those cement boats that engineering students experiment with. ;)

Funny thing about those skid plates. They would be pretty effective protection from blunt impact on boulders in the right circumstance I suppose, but the only time I would yet have put that to the test (my bad), the boulder in question connected with the stem just above the plate. Left a small but noticeable dent there, where it really doesn't matter. Might have been different on another boat with more vertical stems, such as the Penobscot that had a pretty ugly dent right at the waterline when I got it.
 
Hey Mike, nice job. I just picked up a Penobscot yesterday that has some bottom damage (mostly bow, but some on the stern) that I'm going to cover with skid plates. After reading the opinions here and elsewhere I've decided to try a single layer of Dynel with peel ply, and use g/flex epoxy. If each skid plate ended up being one square foot of Dynel, how much epoxy would I need for both? I'm guessing a 32 oz kit would suffice?

I've done some fiberglass repair, but never worked with Dynel. I watched this video on applying Dynel to a boat hull: https://youtu.be/WdaPecHY4VQ.
In it, they stressed how important it was to somewhat "starve" the Dynel of epoxy to keep the fabric from floating on the epoxy. Is that a concern in your experience with applying skid plates? I plan to use the peel ply, as well, to get as smooth a finish as possible, but expect I'll have to put a thin coating over the top to get it ultimately smooth? I plan to use graphite powder, as well. Should that be mixed in to the original wetting epoxy, just the final application layer, or both? Does it make sense to thicken the g/flex for either layer? Is sanding required between layers?

I apologize if you've covered this before. I've tried to scour the posts, but may have missed some details.
Thanks.
 
I'm sure Mike will chime in at some point with better info then I can provide. On several of my hulls I used the Dynel. I added the graphite to the first batch as well as any other batches I might have haded to mix. After get newspaper and tape down I laid a fairly thick layer of resin and laid down the Dynel and smoothed it out some. Then added enough resin/G-Flex mix to wet out the cloth. Honestly I'm not sure how much resin I used. Peel Ply ontop of that and worked until all the "white" spots were worked out, this can take some time, at least it did for me.

I didn't find any need to thicken either the resin or G-Flex, just mixed them together and since it is a one layer application I didn't feel any need to sand especially using the Peel Ply which really aids in making a smooth finish. The only drawback I found was that anytime I've used the graphite powder it came out a little "milky", didn't really darken the resin as much as I thought it would which is why I paint over it after it's cured. The G-Flex/resin mix makes for, IMO, an incredibly rock solid barrier. In the New England rocky rivers I run I've taken some really hard hits and to date the only damage is some of that paint cover gets scrapped off. After about 5 yrs? or so my Courier is now do for a touch up on the paint! Hope this helps.

dougd
 
Terry, I will take them one at a time for clarity.

I've decided to try a single layer of Dynel with peel ply, and use g/flex epoxy. If each skid plate ended up being one square foot of Dynel, how much epoxy would I need for both? I'm guessing a 32 oz kit would suffice?

A 32 oz kit should be plenty. Gflex is more viscous than regular epoxy resin and it helps to warm the bottle a bit before mixing. I just stick the bottle in a shallow tub of warm water or, if I remember the night before, put them in a warm room in the house.


In it, they stressed how important it was to somewhat "starve" the Dynel of epoxy to keep the fabric from floating on the epoxy. Is that a concern in your experience with applying skid plates?

I watched that video. Fascinating, I had no idea how a giant pre-epoxied piece of glass or Dynel was laid onto a hull, I had never even seem wetted out cloth applied that way.

But I am not sure the applications transfer, giant piece of Dynel vs skid plate sized piece. Although when laying a precut piece of skid plate cloth evenly inside a tape bow on a stem a helper holing the other end of the cloth makes for much better aim. Even just a couple feet of skid plate cloth is easier to align with two people sighting up the keel line.

After lightly scuffing and cleaning the area I tape and paper it out, paint on a coat of epoxy inside that tape box, lay the cloth atop that and then saturate it with more epoxy, to the point that there is always some drippage onto the mask.

I do not put the peel ply on top until the drips have stopped running. I pull the second layer of tape and paper mask first, wait to make sure all drips have stopped, pull the perimeter tape, then lay the peel ply atop and compress it with a spreader and with my gloved hand.

It is still a mystery to me how the painters tape is removed after the epoxy has set. Maybe a careful razor blade run along the tape edge? I would not trust myself to do razoring on the vinyl skin of a Royalex boat.

I plan to use the peel ply, as well, to get as smooth a finish as possible, but expect I'll have to put a thin coating over the top to get it ultimately smooth?

Probably not. The peel ply should leave the faintest of weaves visible. I always top coat with enamel paint, and even spray paint will fill that weave.

I plan to use graphite powder, as well. Should that be mixed in to the original wetting epoxy, just the final application layer, or both? Does it make sense to thicken the g/flex for either layer?

Yes, mixed in both layers. Graphite powder or color agent pigments have to be added to the initial epoxy coats to fully impregnate the cloth.

Is sanding required between layers?

There are too many application variables for a yes no answer, depending on what the layers are intended to accomplish, when and how they are applied.

I doubt you will need a second coat of epoxy on peel plied Dynel skid plates. If for some reason you do need a topcoat of additional epoxy I would try to get it on no later than the next morning, when the first epoxy coat is still green. Which would be unsandable in any case.

The only drawback I found was that anytime I've used the graphite powder it came out a little "milky", didn't really darken the resin as much as I thought it would which is why I paint over it after it's cured.

Interesting. When using graphite powder I have always added a dab of black color agent pigment and the epoxied cloth comes out as black as could be. I do that without the graphite powder when using just pigment, and a dab of color agent will thoroughly color the cloth.
 
Thank you both for your quick and thorough replies. You've given me a lot more confidence to give this a shot. I'll go with the 32 oz kit of g/flex and if I use more than half of it on the bow end, I'll know to order more - though it doesn't sound like I'll need to. I'll be sure to post my epoxy consumption info here for future readers. Now, if it would just warm up a bit...
 
Thank you both for your quick and thorough replies. You've given me a lot more confidence to give this a shot. I'll go with the 32 oz kit of g/flex and if I use more than half of it on the bow end, I'll know to order more - though it doesn't sound like I'll need to. I'll be sure to post my epoxy consumption info here for future readers. Now, if it would just warm up a bit...

Terry, yes please, post back the length and width of the Dynel skid plates you install and, hopefully, remainder of the 32 oz Gflex kit used.

32 oz should be enough, and you will find the remaining Gflex amazingly helpful around the house.

Our broken plastic refrigerator door handles were reattached using Gflex. Cracked plastic trash can lids. Busted D handle on trenching shovel. Cracked snow shovel blades. Decorative ceramic flower pots. If I can think of nothing else I slather leftover epoxy on the feet of my outside sawhorses.

The most enduring acid test has been a decorative ceramic lid for a cast iron humidifier pot on the wood stove, dropped and broken into three pieces, and glued back together 5 or 6 years ago. That thing sees brutal heat and steam exposure throughout every winter and is still going strong.

I have the drivers side power window and door lock control panel from my sons 2001 Corolla in the shop now. That remote control panel was held in the door armrest by five teenyweeny molded plastic posts that eventually snapped off.

No diss on Toyota, it took 17 years and 200,000 miles for all of them to snap off. Those plastic posts got flame treated and raised dotted with thickened Gflex on both sides before being snug smushed together. That oughta hold until the hooptie Corolla until it qualifies for antique tags.

Seriously, I can not imagine sundry household repairs without Gflex, especially in the age of plastic planned obsolescence. Nothing else so universally sticks to various plastics. I seem to mix teeny weeny pencil eraser sized batches of Gflex every month for some household repair.

For winky batch household repairs it is hard to beat disposable 2 oz shot glasses for Gflex mixing. When making a pencil eraser sized batch of Gflex for some repair those shot glasses are still 50X too large, but I have not found anything smaller and cheaper.

https://www.walmart.com/ip/Drinkmate-2-oz-Mini-Red-Disposable-Shot-Glasses-20-count/51436373

And disposable nylon craft brushes at the same place, 30 tiny craft brushes for 97 cents. Both are handy as heck for wee dab of Gflex work.

One last suggestion for mixing Gflex, or for mixing a pot of any epoxy. I usually end up with a little extra epoxy in the pot, despite some experience in estimating the correct volume for the task at hand.

Having a secondary project, cleaned and prepped and flame treated poly plastic if necessary, laid out at the ready, is a wonderful thing.

Less wonderful is when I forget and have leftover epoxy, and have to scurry around the shop looking for somewhere to use it

I am Dumpkoff successful at that a good 50 percent of the time. Half the time I forget and wander around the shop while the epoxy sets up in the pot, trying to find some place to smear the resin remainder.

Think ahead and prep something for leftover epoxy use.
 
Good advice, thanks. I have some T88 epoxy. I haven't experimented on such a vast array of items yet, but it is pretty amazing stuff. I built a camping "adventure" trailer box a couple years ago. I didn't listen to the advice to use epoxy for all the wood joints and screw heads. I thought I could cheap out and use outdoor wood glue and filler instead.Saved $30 or more. So, after it all started to go to heck, I still bought the epoxy (now in addition to what I paid for the cheap wood glue and filler), and instead of having a beautiful box with perfect seams, I'm now using the epoxy to try and repair delaminating plywood and other imperfections on a box that doesn't look so great any more. There's always a spot on there to dab any extra epoxy. Lesson learned - use epoxy the first time.

With that said... just trying to be thorough in evaluating epoxy options. I found the Raka site while looking for the dynel and peel ply and their proprietary epoxies are a lot cheaper. Hard to tell if they have anything comparable to g/flex. The closest, based on description, is their 350 hardener with their 127 resin. I have a question in to them to ask how it compares, and for the particular application. It would be *significantly* cheaper than g/flex. It's their only combination that mentioned "flexible", though.

I also heard back today from Jamestown when I asked them about how much g/flex I'd need. The response was about 12 oz per square yard of dynel or 6 oz s-glass. Do they charge hazmat shipping for epoxy? That could be a deal breaker if they do.

I guess one option might be to mix g/flex with the Raka epoxy. I think I ran across one person who tried that - maybe on this forum? Trying not to get too spread out with orders everywhere, though, or the shipping costs will eat up any product savings.
 
Terry, I mix the G-Flex right in with the resin, not straight G-Flex on the Dynel. Save's a lot of GF and seems to work very well for the skid plates I've put on hulls. I wouldn't be able to afford a straight GF application. As for how much I use while mixing it in, I'm old school, eyeball it and count it out like a shot glass full of my favorite hard stuff. So far it's worked. Besides, I suck at math so the old school approach works for me.
 
....It is still a mystery to me how the painters tape is removed after the epoxy has set. Maybe a careful razor blade run along the tape edge? I would not trust myself to do razoring on the vinyl skin of a Royalex boat....

Its quite easy when working with transparent epoxy like when adding the football & stem patches during a build. When the resin is green just lift the tape with fingertips to about 90 degrees to the surface and then trim with a blade run at a 45 degree to the surface. Leaves a very nice beveled edge when applying 6 oz S cloth and such. I use a large Exacto knife as I can control it better than most utility knives. I also use a headlamp and grandpa glasses to assist my old eyeballs.

Once the tape is removed you can go back with a small carbide scraper and dress the beveled edge even further while its green. Saves a lot of sanding before the final fill coats.

The problem when doing pigmented skid plates is you can't see the tape edge. I did one by lifting the tape carefully and running the knife but I had several areas I had to go back and remove small slivers of tape that I missed. Haven't tried it again since then, just pull my tape while the pigmented resin is still wet but no longer mobile. Like you mention it takes some babysitting to catch it when its just right.
 
I also heard back today from Jamestown when I asked them about how much g/flex I'd need. The response was about 12 oz per square yard of dynel or 6 oz s-glass. Do they charge hazmat shipping for epoxy? That could be a deal breaker if they do.

I guess one option might be to mix g/flex with the Raka epoxy. I think I ran across one person who tried that - maybe on this forum? Trying not to get too spread out with orders everywhere, though, or the shipping costs will eat up any product savings.

Jamestowns hazmat ORMD charge is something like 5 bucks per order no matter the quantity of epoxy shipped.

Like Doug I mix Gflex and West 105 206 in about a 50 50 ratio. In part to help stretch the Gflex I keep on hand and in part because the 105 206 is less viscous wets out better.

I know from West System literature that Gflex can be mixed with their regular epoxy in any proportion.

I do not know if Gflex will cure properly if mixed with other epoxy resin brands. I would sorta think so, but would hate to find out too late that it does not via a gooey mess of a skid plate.
 
"For winky batch household repairs it is hard to beat disposable 2 oz shot glasses for Gflex mixing. When making a pencil eraser sized batch of Gflex for some repair those shot glasses are still 50X too large, but I have not found anything smaller and cheaper"

Mike, I save the plastic sheet that comes inside and on the bottom of my bacon package. I lay the sheet on the scale and measure out 1 gram at a time of each, then mix together much like I would when mixing J-B weld. Scrape off the mixed epoxy with a stick, tooth pick, or what ever and apply it to the small repair.

Jason
 
When the resin is green just lift the tape with fingertips to about 90 degrees to the surface and then trim with a blade run at a 45 degree to the surface. Leaves a very nice beveled edge when applying 6 oz S cloth and such. I use a large Exacto knife as I can control it better than most utility knives. I also use a headlamp and grandpa glasses to assist my old eyeballs.

Once the tape is removed you can go back with a small carbide scraper and dress the beveled edge even further while its green. Saves a lot of sanding before the final fill coats.

The problem when doing pigmented skid plates is you can't see the tape edge. I did one by lifting the tape carefully and running the knife but I had several areas I had to go back and remove small slivers of tape that I missed. Haven't tried it again since then, just pull my tape while the pigmented resin is still wet but no longer mobile. Like you mention it takes some babysitting to catch it when its just right.

I appreciate the mention of headlamp, grandpa glasses and Exacto blade work. Sounds mighty familiar.

Working in either consideration with still green epoxy makes sense. And certainly with pigmented and graphite powdered resin, waiting until the epoxy is still pliable but no longer mobile in drippage.

P1050349 by Mike McCrea, on Flickr

Not much chance of razoring the precise tape edge under that mess of black pigment and graphite powder.

I do the baby sitting bit, marking the drip ends on the newspaper mask, and when I think the resin is finally immobile pull the newspaper and second ring of tape.

P1050352 by Mike McCrea, on Flickr

About the first and second perimeter boxes of tape. The first tape box is laid on the hull a quarter inch away from the fabric. I use a couple little pieces of scotch tape to hold a newspaper mask near the bottom of that tape surround, and then overlap the transition another length of tape.

That is probably 2X tape overkill, but I know how sloppy I can be, and know I want to rush things pulling epoxy mask tape. The secondary perimeter run of tape affords me an Oh crap, the resin is still drippy, wait some more reprieve.

When the epoxy is drip immobile down the initial 1 inch wide piece of tape I know I am good to pull that tape and begin compressing the peel ply into the pliable green epoxy.

The two layer taping and mask papering takes longer than the actual Dynel and epoxy mix application, but I have accepted that the better, and more time consuming, the prep work the better the finished product.
 
Awesome two-layer tape tip, Mike!

The 2 layer tape bit and newspaper mask has a couple advantages. When I pull the overlapped tape layer along with the attached newspaper the epoxy line left on the first tape layer is a wonderful straight edge. It is really easy to tell if there is still any sag or drip, which I can catch with a brush, or just fold up the bottom of the clean tape edge to contain.

That provides a second chance, and more babysitting, which is sit and watch the easiest part of skid plate installation.

When all sags have ceased that initial length of tape perimeter is easy to cleanly pull off. Anyone who has bundled up handfuls of epoxy dripped newspaper off a skid plate install knows that is a messy job. Having that last tape layer largely continuous and easy to pull is a boon. Just remember to leave convenient fold over tabs at the tape ends.

With skid plates there is an uptilt curve to masking off at the stems. That curve is tricky to get Goldilocks just right when rounding off a corner of newspaper, but with the second layer of tape it is easy to cover any miss cut paper gap. I do not bother to get that scissored curve in the paper more than Eh, close enough, the second run of tape will cover most gaps. If you are really off just stick another short piece of tape over the exposed hull area.

I notice things in photos that I paid no attention to at the time. In that first photo there is a lonely drip several inches below the Sharpied drip ends. No doubt dripped unnoticed off the paint brush during the initial or fill coat of epoxy. Fortunately dripped onto the newspaper mask, not onto the hull.

I know I can be sloppy. One epoxy rule of thumb in the shop is to ALWAYS have acetone and a clean rag at the ready. Getting that savior solvent out, opening the acetone can and finding a rag, all while wearing resined gloves is foolish when it would have taken 10 clean handed seconds to get it all ready before starting.

Hmmm, that is where the epoxy on some flathead screwdriver handles comes from. It must have been sloppy shop visitors, eh.

I know I can also be inattentive. The can of acetone at the ready would have been little help when noticing that errant epoxy drip stuck to the hull a day or two later.

Masking everything in the area is worth the couple minutes time.
 
Mike, thanks for your detailed instructions. I completed my first skid plate today. I ended up using Dynel (or maybe it was Xynole - the website product listing had both for the same item) and Peel Ply from Duckworks Boat Building Supply. The Peel Ply was a gracious almost 2-yard cut, while the Dynel was closer to a yard. Both items, with shipping, were about $24. I ordered a 32-oz kit of G/Flex from Amazon (which got fulfilled by Jamestown) for $55.

Just a few notes from my experience.
1. I used a total of 4 oz of g/flex. I would say this was close to the perfect amount for the size of my plate, which was pretty large. It's nice to know I can get many more out of my 32 oz kit. Same with the Dynel/Peel ply. Should be able to get at least 8 plates of normal size or smaller out of the materials I purchased. Comes out to about $10 each.
2. I put powdered graphite in my mix, but it wasn't enough. I didn't measure, but really had no idea how much I was supposed to use. So, I stopped when it looked black. To get really black, I should have doubled or tripled the amount. I used maybe a teaspoon in 4 oz of epoxy. Should have been closer to a tablespoon? I don't mind the color. Maybe I'll get charcoal paint to match instead of going for gloss black... I can definitely see the Dynel strands in the final product. I'm guessing this is also because of the lack of coloring.
3. I did not cut my Dynel on the bias. It's too much of a pain to order this stuff, and while affordable it's not free. I didn't have any problems with it laying down on the hull.
4. I only waited about 4.5 hours for the expoy to set before pulling the peel ply. Seems to have put a nice almost smooth surface on (very slight texture). Maybe waiting overnight would have smoothed it further naturally? I ran some 220 sandpaper over it, and it smoothed it right out with little effort.
5. Probably the most disappointing thing for me is the edge where the epoxy meets the hull. It's pretty uneven to the eye. I know when I paint it, that will largely disappear. But, I was expecting something a bit more tidy. I think maybe I just didn't have quite enough epoxy applied to consistently fill the void? Or maybe the 100% g/flex mix wasn't runny enough to flow into this area? Since I have nothing to compare it to, I'm not really sure if I should adjust anything on future plates. I guess I'll withhold judgment until I get it painted and see how it turns out. And, I need to keep in mind that it's a skid plate on the bottom of a canoe. :) Compared to the kevlar ones I have on a couple of my canoes, it's already a huge improvement.

At this point, I'm going to count on the spray paint to cover any shortcomings, unless you recommend a topcoat of epoxy. Even with the imperfections, I'm really quite happy with the results.

Thank again for all the pointers. Couldn't/wouldn't have attempted it without your tutorial!
 

Attachments

  • photo9565.jpg
    photo9565.jpg
    74 KB · Views: 2
  • photo9566.jpg
    photo9566.jpg
    66.4 KB · Views: 1
  • photo9567.jpg
    photo9567.jpg
    451.4 KB · Views: 1
  • photo9568.jpg
    photo9568.jpg
    576.8 KB · Views: 1
  • photo9569.jpg
    photo9569.jpg
    478.7 KB · Views: 2
  • photo9570.jpg
    photo9570.jpg
    531.2 KB · Views: 3
  • photo9571.jpg
    photo9571.jpg
    202.2 KB · Views: 3
Back
Top