• Happy 54th Wedding Anniversary, Maggie!👰🏻‍♀️💒

Canoe ID and restoration

Joined
Jun 13, 2023
Messages
13
Reaction score
30
Location
CT & NY
I'm trying to ID a canoe I acquired a couple of years ago (ah, the "free" canoe). Actually it was a swap; my brother in law gave us a cheapo Coleman plastic canoe (the kind with the aluminum tube frame). I never did much with it as I had another [ancient] fiberglass canoe, but I found that a YMCA camp down the lake where my daughter works as a nurse had an old canoe needing woodwork but otherwise solid... and they also had a bunch of the Coleman canoes, and agreed to swap.

Anyway, it's a Royalex hull with wood gunwales, thwarts, and cane seats, just over 16' long. I suspect it's a Mad River, from the place where there was once a long rectangular sticker amidships, but it could be a We-no-nah as well? There are no other markings that I could find.

1686699141108.png

1686699193908.png

As you can see, all of the wood needs to be replaced. I originally intended to buy everything from Ed's, but when all the ash trees started dying we (at our camp) bought a sawmill to cut them up for lumber, and as ash is traditional for canoe parts, I'm going to make the gunwales and thwarts from the trees that once grew around the lake it'll mostly be paddling on, just seems appropriate. I'll still buy the seats from Ed's, probably the contour bucket, at least for the back.

The other question is about refinishing the hull. It's solid, a couple of minor gouges but no cracks, but large parts of the surface have crazed, almost like orange peel from a bad spray paint job, but it wasn't painted that I can tell. Presumably it's UV damage to the outer layer. What's the best way to refinish a Royalex hull? The outer layer is vinyl, is it not?
 
png photos dont seem to download alas

latee they do
Like most of you i hate computers!
 
Last edited:
I can see the pics on my iPad. There should be a hull id number on the stern in the right side near the gunnel. That will help a lot in determining the builder. I can’t help with the royalex care as I don’t have much experience with it.
Jim
 
It does look like a Mad River. Shallow V hull, on-top decks, wood rails on an Rx hull (not really a good idea, but the Mad River people loved the wood).

Yes, the outer layer is vinyl. You might try touching it up with the fancy 303 protectant, or just some automotive products (Armor All and friends) intended for old vinyl. You could probably sand it lightly to reveal brighter/smoother vinyl, but that would be tough love. I'd try just a green scrub pad.

Good luck with it, looks like a nice hull. Do post pictures as you work on it, people here like to watch.
 
Looks like a Mad River to me also. What's the beam at the widest spot in the middle? The popular Explorer model should be 35"-36" depending how you measure.

The serial number should be scratched under the gunwales probably at the stern. The last two digits would be the year of manufacture.

You could put a wide cane seat in that canoe about 8" aft of center so you can paddle solo with level trim. I did that with my Mad River Explorer, which was my first canoe and which I still have.
 
The deck plates do look like those used by Mad River Canoe. If so, MRC embossed a hull identification number into the hull material of their Royalex canoes on the outside stern but you often have to look very closely to find and decipher those embossed characters on an old hull.
 
Made some more measurements last night, looks like 37" beam measured inside the hull... but it's so wiggly without intact wood that could be off a bit. The thwarts are 31 and 34.5". No center thwart or yoke, I may decide to add one.

No numbers anywhere I can see.

Has anybody used the bucket seats from Ed's? I like the idea, but I'm guessing it wouldn't be suitable for the front seat if one wants to sit backwards in the front seat when paddling solo?

This is a closeup of what parts of the hull look like. Sanding smooths it out nicely, so I'm hoping it will be a decent base for new paint... but what kind of paint?

1687433487319.png
 
I thought I posted an update last week, but it seems to have disappeared... anyway, I got it all apart. Getting some of the screws out was a struggle; they're square drive, but it looks like somebody tried to tighten them with a phillips screwdriver and trashed the heads.
1689165991395.png

I did find a number, 4117, written in magic marker on the inside of the hull inside the deck plates, but nothing embossed.

Under the deck plates, there are blocks that look like Trex plastic deck boards, which reinforce the nose and also support the carry ropes. Not sure if that's original? I'll be remaking these, if I can find some Trex scraps laying around (probably).

1689166891579.png

I edge rounded the boards that will be the gunwales, and cut and shaped the thwarts. I had to buy a new router as the old one's collet was shot and no replacement was available. No pix yet.

Next us to rip the gunwales to width, but I came down with covid which pretty much trashed the rest of my vacation. I'm hoping to get those done tonight, then to cut them on an angle for a scarf joint in the middle. I'm planning on Titebond III for that, but could use epoxy... thoughts?
 
Slow progress continues. Got the gunwales ripped and scarfed last week. Saturday I glued them together to get the required 16' lengths using West System epoxy reinforced with microfiber (I decided against Titebond as that needs a perfect glue line with no gaps, epoxy is a little more tolerant). I drilled for two dowels in each joint to keep things aligned. I only had enough clamps to do two at a time; the first two went great but that last two I did in the evening after the mosquitos came out so the second two were a bit messier, with a bit more sanding of the squeezeout needed, which I did on Sunday, followed by final sanding of all the parts.


1690313130718.png

1690313324472.png

Hopefully this weekend I can get everything drilled and assembled, then back apart for finishing. The seats came prefinished with polyurethane, I plan to use teak oil on the gunwales, but I'm not sure about the seat hangers and thwarts... poly or oil?
 
Here are some pics of one that sold here in CNY for 300$.. states is was MR
 

Attachments

  • IMG_3596.jpeg
    IMG_3596.jpeg
    199.3 KB · Views: 12
  • IMG_3594.jpeg
    IMG_3594.jpeg
    224.4 KB · Views: 12
  • IMG_3595.jpeg
    IMG_3595.jpeg
    210 KB · Views: 12
The canoe is probably an explorer, if it's 16 feet it's the most likely. That closeup of the hull looks like peeling paint. If so, just sand it off like you said and use rust paint if you want to go the inexpensive route or go with a marine topside paint from interlux or petit. If you stick to green, you might be able to get by with 3 coats and only use one quart. Others on here have painted royalex canoes with these paints and had good luck. I'm surprised it has two thwarts instead of a yoke and a thwart or just the single carry yoke. All the explorers I've seen have a carry yoke.

Mark
I think we have a winner! Pictures in this advertisement look identical to what I have, so circa 1985. Only the thwarts are different. Although, the ad says 17' and mine is 16'.

1690422830568.png
 
Another ad for an Explorer mentions the number written in permanent marker, just like mine. I guess the design changed over the years; that one shows a single thwart and carry handles, which mine doesn't have.

1690424346309.png
 
Wow, two years later... life got in the way. But finally this summer, after a couple of years of dealing with family obligations and my own health issues, I retired and finally had time to work on the canoe.

First was sanding and painting the hull (7 rattle cans of Krylon Camouflage olive), followed by cutting the drain notches in the inner gunwale. I omitted the center notch, as it would compromise the scarf joint between the two lengths. Next, a couple of coats of Watco teak oil on the gunwales, seat risers, and thwarts (the seats came already polyurethaned, all I had to do was varnish the ends where I cut them). I've never used teak oil before, I liked working with it despite the mess.

1756331835134.jpeg

At this point disaster struck when I was bending the inwale to fit inside the hull and heard a sickening "snap" as it broke starting at one of the drain notches. Fortunately it broke on a long shallow angle and I was able to epoxy it back together almost invisibly. I think I was pushing it too hard and it twisted and snapped. Then when I was screwing them to the hull, an outwale broke, a more square break but I epoxied that back together too and hoped for the best. With some additional screws reinforcing around the breaks, the glue joints held and I think it'll be OK.

Then drilling for and bolting the thwarts. I was surprised to find that the hull stayed significantly wider than the deck plates, requiring it to be squeezed together when screwing them down, resulting in a reverse curve... but that seems to match the pictures of other canoes above. I don't know what's up with the roughly cut pointy ends of the deck plates, somebody must have hacked them but I don't know why. Perhaps the same person who installed the blocks made of Trex deck boards under the deck plates, which although I made new ones I decided not to use as I don't think they were original. I think the gunwales were already replaced once, as there were extra holes in the hull at some points where a screw apparently had been moved so as to not go through the drain slots.

1756335267705.jpeg

Then the seats, which although I originally cut and drilled them exactly matching the old ones, they didn't match at all, requiring further cutting and redrilling, but it came out all right in the end. Here I made one change from the original, using one piece end risers as I'd seen in a photo of a later model, instead of the skinny original ones.

1756335581336.jpeg

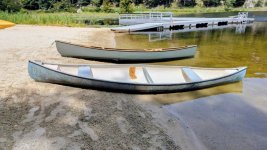
Finally today everything was finished, with the last bolts being tightened just as it started to rain. It's not perfect but overall I'm pretty happy with the way it came out, despite a few minor goofs that probably only I will ever notice. It'll get banged up soon enough anyway, I'm not one to baby my toys.

1756335829752.jpeg

I haven't yet decided whether I'll order the replica Mad River "bunny" stickers for it.

1756336071380.jpeg

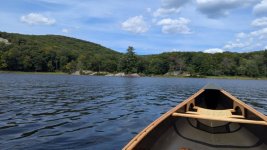
Tomorrow I'll finally bring her down to the lake and see how she paddles!
 
Back
Top Bottom