Would adding a patch of kevlar composite to the hull of an UL canoe before adding lining holes be worth the effort for strength?
-
Happy National Scotch [Whisky] Day! 🏴🥃🚱
You are using an out of date browser. It may not display this or other websites correctly.
You should upgrade or use an alternative browser.
You should upgrade or use an alternative browser.
Bolstering Lining Holes
- Thread starter Black_Fly
- Start date
That material oil cans awful easy.
I've always drilled a slightly oversized hole through the hull, fit a short length of PVC pipe through the hole and epoxied it in place, both inside and out, with epoxy putty, the two part stuff that comes out looking like grey silly putty but sets up rock solid. I fillet the putty into a pleasing shape around the PVC and then round/smooth out the inside of the PVC so it doesn't abrade the line. Comes out pretty bombproof and I don't see why this wouldn't work on pretty much any composite layup. Between the two of them it can't add but several ounces and can't help but strengthen the area.
You can get an ok look at it in the two photos below.
Monel


You can get an ok look at it in the two photos below.
Monel
Bear at NS said there's foam inside their float tanks. Air in Wenonahs.
Monel, this is an ultra light Kevlar installation, with float tanks - no access to inside of joints,
Monel, this is an ultra light Kevlar installation, with float tanks - no access to inside of joints,
Last edited:
Here's the flange epoxied (marine epoxy) to the reinforced vinyl tubing. Takes some real force to create that short bend that will be necessary. Think I'm going to design a Kevlar apron to distribute the stress better.
Attachments
Last edited:
G
Guest
Guest
That is an interesting approach.
When you mentioned adding material to help bolster the area I assumed you would epoxy the material, then drill the holes through that bolstering material, then install/epoxy the flanges in place, let that set up, then install the tube or pipe through the flanges, trim any excess tube/pipe flush and epoxy the tubing in place.
I’m not sure why you epoxied the tubing to one flange. Was that just a test or do you plan to somehow insert it that way?
To hold the flanges in place while the epoxy set up I just used a small clamp; the flange openings provided enough grip area to seat/hold the small clamp ends while it was tightened, even with the vee of the stem. Alternatively you can cut some custom angled wedges out of a scrap of 2x4, so that instead of trying to tighten against a clamp slipping / \ you can tighten the clamp against |/ \|
Is that circular bulge in the kevlar the flange installed underneath the felt? I hadn’t expected to see the flange underneath the material, nor kevlar felt as a material choice.
Hell, I’m curious about how you got the resin & hardener ratios correct using (cans of?) skid plate kit epoxy? Most of the skid plate kits I once used did not have a 50/50 resin to hardener ratio, and were “Dump smaller can B into larger can A and mix”. I didn’t use every ounce of that skid plate epoxy, there was way more included than necessary. But I never tried to save the dregs in a mostly empty can either.
If you open an unused skid plate kit, cut up some of the kevlar felt and used a bit of the epoxy that is at least a good riddance. Kevlar felt skid plates had a time and place; the time was 20 years ago and the place was in the hands of people who had never before used epoxy and fabric. And even then people did a horrible job of it.
A couple things with kevlar felt, other qualities aside. Kev felt will come out much smoother, without the rough raspy texture, if you cover it with release treated peel ply and smooth/press/roll atop the peel ply while the epoxy is setting up.
For such a small area you can use wax paper instead of peel ply, although if you plan a top coat of paint or etc you will need to be sure to remove any wax residue first. Wax paper on larger areas, with more complex curves, will result in a disaster of wrinkles and crinkles. Too late now on that application, kev felt does not sand well.
About top coating with paint. I have never cared for the fugly yellow color of kevlar felt. If that kev felt color bothers you it could be painted, maybe black to match the deck caps. Kevlar felt will color through the material if you add pigment to the epoxy mix, and unlike a top coat of paint the pigmented epoxy will not simply scratch off, it is embedded within the epoxied fabric.
Test patches of kevlar felt tinted with red and blue pigment. Black pigment works just as well.
 P3190008 by Mike McCrea, on Flickr
I’ll be curious about how cleanly the kevlar felt comes out when you hole saw the openings through it. Unless it is really epoxy rich all the way through kevlar felt has a tendency to fuzz.
I appreciate using what I have on hand in the shop, but for those bolstered areas I would have used a different material, fiberglass tape or Dynel sleeve if I could live with a square shaped bolster, or later painted a circle around the square for aesthetics. Or perhaps Dynel fabric if I wanted to cut out a circle; Dynel does not fray nearly as badly as woven glass when cut in a curve. And probably have used regular (for me West System) epoxy, maybe with a little G/flex added.
And some pigment to eliminate that fugly baby crap yellow felt color. And used peel ply.
If you continue to do boat work you will eventually want some more easily measurable epoxy, and better fabric materials. And some release treated peel ply, and maybe some color agent pigment.
A quart of West 105 resin runs $36
A pint of West 206 slow hardeners runs $22
Yeah, that is $70 or $80 with shipping and ORM-D hazardous materials charges for the Hardener, but that stuff lasts dang near forever.
Maybe add to that a yard of easy-to-cut without excessive frays material, one that is especially handy for DIY skid plates. A yard of Dynel fabric runs $17
https://www.jamestowndistributors.com/userportal/show_product.do?pid=4214
Peel ply/release fabric, $18 for two yards. I will never again epoxy any fabric without using peel ply atop.
https://www.jamestowndistributors.com/userportal/show_product.do?pid=3754
Maybe a 1oz tube (a little dab will do ya, enough to last for years) of black color agent pigment, another $12
https://www.jamestowndistributors.com/userportal/show_product.do?pid=7886
Yeah, I just spent $120 of your money at Jamestown Distributors, but you’ll have almost everything you need for a variety of boat work and repairs for some years to come.
If you can drop coin on a used Prism and Magic, and have other boats, $117 in proper materials will be money well spent.
G/flex is the best adhesive invention in the last 30 years. I use a pea sized batch of G/flex around the house at least once a week. Used some yesterday to repair some window trim.
https://www.jamestowndistributors.com/userportal/show_product.do?pid=8694
If you want me to spend any more of your money just say the word. I am recently smitten with Dynel sleeve, and 2” or 3” rolls of fiberglass tape are always handy.
https://www.jamestowndistributors.com/userportal/show_product.do?pid=2072
When you mentioned adding material to help bolster the area I assumed you would epoxy the material, then drill the holes through that bolstering material, then install/epoxy the flanges in place, let that set up, then install the tube or pipe through the flanges, trim any excess tube/pipe flush and epoxy the tubing in place.
I’m not sure why you epoxied the tubing to one flange. Was that just a test or do you plan to somehow insert it that way?
To hold the flanges in place while the epoxy set up I just used a small clamp; the flange openings provided enough grip area to seat/hold the small clamp ends while it was tightened, even with the vee of the stem. Alternatively you can cut some custom angled wedges out of a scrap of 2x4, so that instead of trying to tighten against a clamp slipping / \ you can tighten the clamp against |/ \|
Is that circular bulge in the kevlar the flange installed underneath the felt? I hadn’t expected to see the flange underneath the material, nor kevlar felt as a material choice.
Well I found some two part skid plate epoxy and hardener in my basement.
Hell, I’m curious about how you got the resin & hardener ratios correct using (cans of?) skid plate kit epoxy? Most of the skid plate kits I once used did not have a 50/50 resin to hardener ratio, and were “Dump smaller can B into larger can A and mix”. I didn’t use every ounce of that skid plate epoxy, there was way more included than necessary. But I never tried to save the dregs in a mostly empty can either.
If you open an unused skid plate kit, cut up some of the kevlar felt and used a bit of the epoxy that is at least a good riddance. Kevlar felt skid plates had a time and place; the time was 20 years ago and the place was in the hands of people who had never before used epoxy and fabric. And even then people did a horrible job of it.
A couple things with kevlar felt, other qualities aside. Kev felt will come out much smoother, without the rough raspy texture, if you cover it with release treated peel ply and smooth/press/roll atop the peel ply while the epoxy is setting up.
For such a small area you can use wax paper instead of peel ply, although if you plan a top coat of paint or etc you will need to be sure to remove any wax residue first. Wax paper on larger areas, with more complex curves, will result in a disaster of wrinkles and crinkles. Too late now on that application, kev felt does not sand well.
About top coating with paint. I have never cared for the fugly yellow color of kevlar felt. If that kev felt color bothers you it could be painted, maybe black to match the deck caps. Kevlar felt will color through the material if you add pigment to the epoxy mix, and unlike a top coat of paint the pigmented epoxy will not simply scratch off, it is embedded within the epoxied fabric.
Test patches of kevlar felt tinted with red and blue pigment. Black pigment works just as well.
P3190008 by Mike McCrea, on FlickrI’ll be curious about how cleanly the kevlar felt comes out when you hole saw the openings through it. Unless it is really epoxy rich all the way through kevlar felt has a tendency to fuzz.
I appreciate using what I have on hand in the shop, but for those bolstered areas I would have used a different material, fiberglass tape or Dynel sleeve if I could live with a square shaped bolster, or later painted a circle around the square for aesthetics. Or perhaps Dynel fabric if I wanted to cut out a circle; Dynel does not fray nearly as badly as woven glass when cut in a curve. And probably have used regular (for me West System) epoxy, maybe with a little G/flex added.
And some pigment to eliminate that fugly baby crap yellow felt color. And used peel ply.
If you continue to do boat work you will eventually want some more easily measurable epoxy, and better fabric materials. And some release treated peel ply, and maybe some color agent pigment.
A quart of West 105 resin runs $36
A pint of West 206 slow hardeners runs $22
Yeah, that is $70 or $80 with shipping and ORM-D hazardous materials charges for the Hardener, but that stuff lasts dang near forever.
Maybe add to that a yard of easy-to-cut without excessive frays material, one that is especially handy for DIY skid plates. A yard of Dynel fabric runs $17
https://www.jamestowndistributors.com/userportal/show_product.do?pid=4214
Peel ply/release fabric, $18 for two yards. I will never again epoxy any fabric without using peel ply atop.
https://www.jamestowndistributors.com/userportal/show_product.do?pid=3754
Maybe a 1oz tube (a little dab will do ya, enough to last for years) of black color agent pigment, another $12
https://www.jamestowndistributors.com/userportal/show_product.do?pid=7886
Yeah, I just spent $120 of your money at Jamestown Distributors, but you’ll have almost everything you need for a variety of boat work and repairs for some years to come.
If you can drop coin on a used Prism and Magic, and have other boats, $117 in proper materials will be money well spent.
G/flex is the best adhesive invention in the last 30 years. I use a pea sized batch of G/flex around the house at least once a week. Used some yesterday to repair some window trim.
https://www.jamestowndistributors.com/userportal/show_product.do?pid=8694
If you want me to spend any more of your money just say the word. I am recently smitten with Dynel sleeve, and 2” or 3” rolls of fiberglass tape are always handy.
https://www.jamestowndistributors.com/userportal/show_product.do?pid=2072
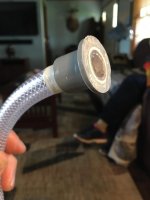
I'm more interested in functionality over aesthetics, but I don't find the look of cured, properly finished Kevlar objectionable. THIS lining hole installation is more butt ugly to me. The lack of symmetry is so disturbing that I avoid looking at this end of the canoe. You'd almost have to try to get the holes that far off. The rubber looks clunky and who knows if it's really water tight? I'll take water tight 3lb Kevlar circles, feathered into the finish anytime. As far as weight goes, the vinyl tubing seems to be the real offending material. I only need about 4", but it's not lightweight stuff. Still looking for something lighter with 5/8" OD.

Last edited:

Similar threads
- Replies
- 6
- Views
- 724
- Replies
- 0
- Views
- 250
- Replies
- 0
- Views
- 377
- Replies
- 3
- Views
- 1K