G
Guest
Guest
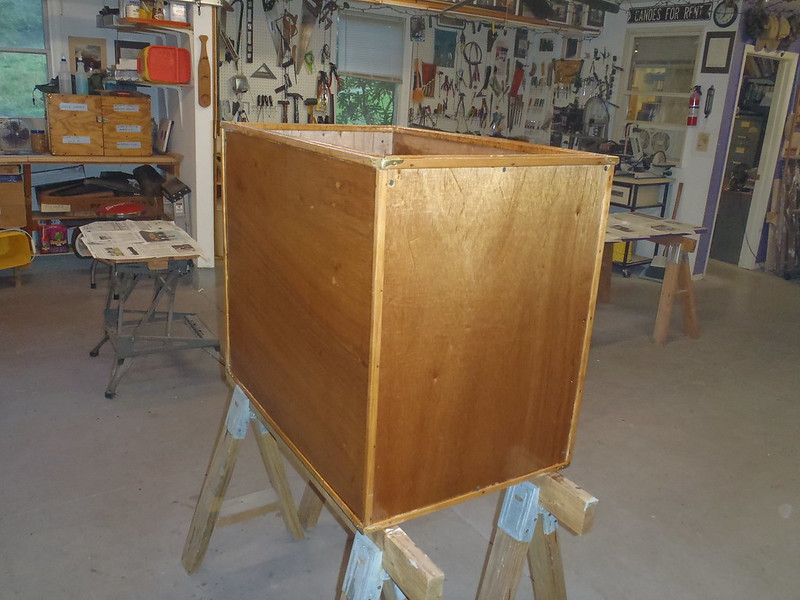
Friend Ed called a week ago and asked “How do you build those folding barrel tops you use?” The build makes a lot more sense with photos, and with the previous build photos held for ransom by Photobucket I started again from scratch.
¼ birch plywood “game” boards this time.
Day 1
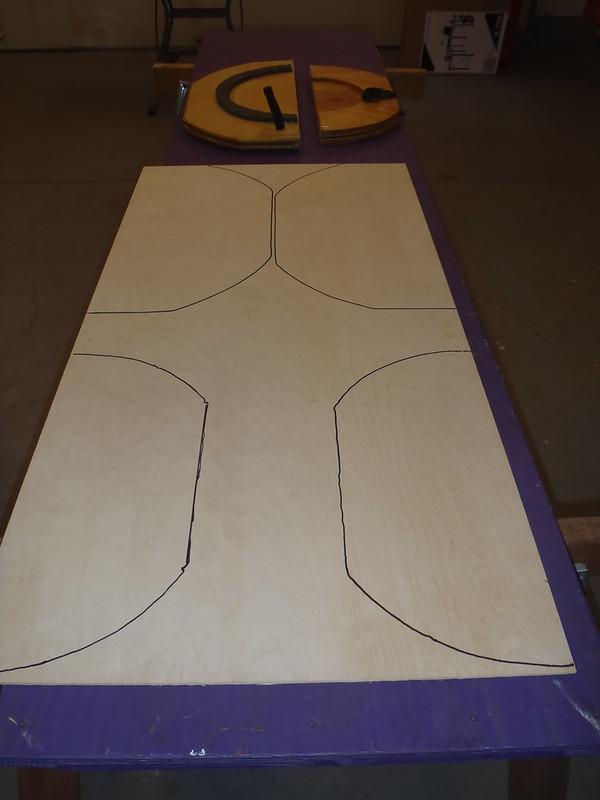
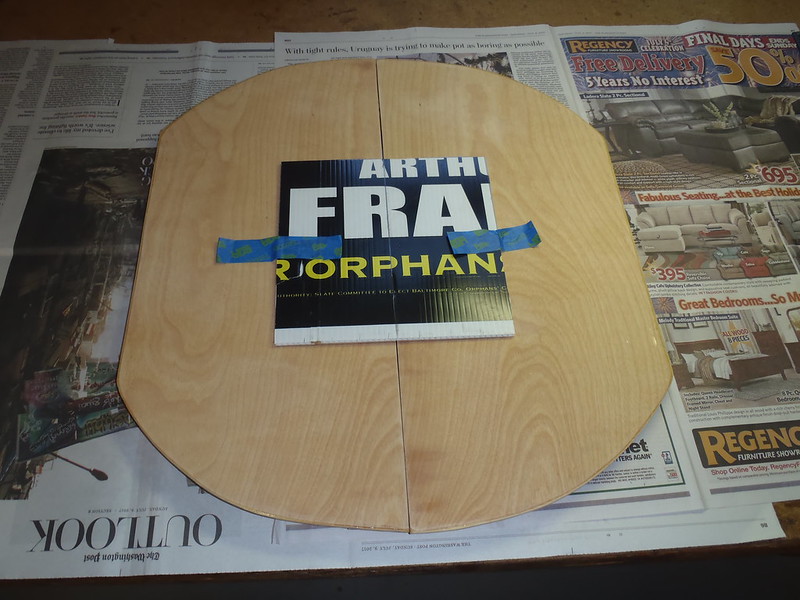
I like the half sheet of ¼ inch birch plywood as a lightweight everyman folding tabletop better than any of the previous tops. That half sheet is enough for a 30L and a 60L top. Easy to cut and shape, and no need for a router on the sides, it is thin enough that a little hand sanding quickly rounds off the perimeter edges, so one less shop tool needed.
 P7063771 by Mike McCrea, on Flickr
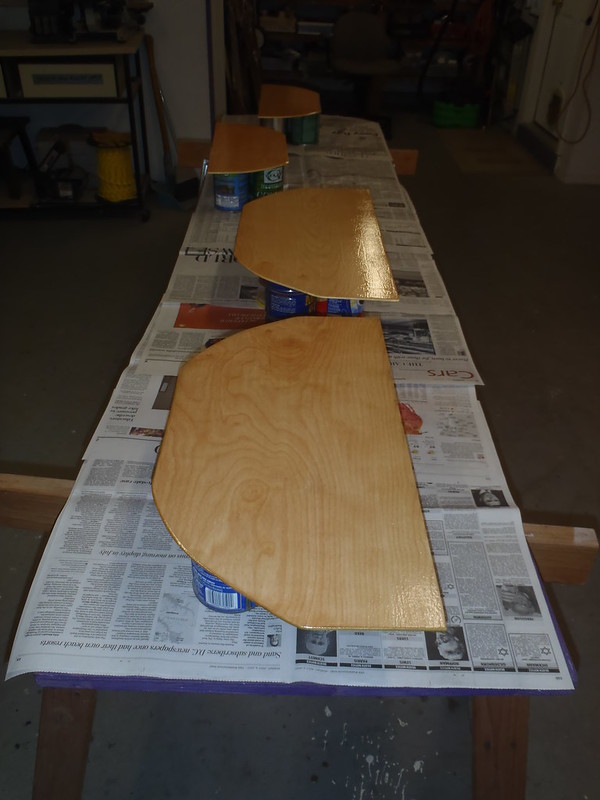
Towards that everyman objective of least tools and easily available materials construction I didn’t lay any fiberglass on the tops, just epoxy resin and top coats of Spar Urethane. With three or four coats of Spar Urethane built up the epoxy resin could be skipped for an inexpensive materials-at-any -Home Depot build.
I cut, shaped and sanded the tabletop halves. Two coats of epoxy resin on the tops and bottoms, more on the edges. While I was at it I epoxy coated the leftover birch plywood scrap with the epoxy left in the rollers, for use as a future test painting and top coating experimental piece.
 P7063776 by Mike McCrea, on Flickr
 P7063775 by Mike McCrea, on Flickr
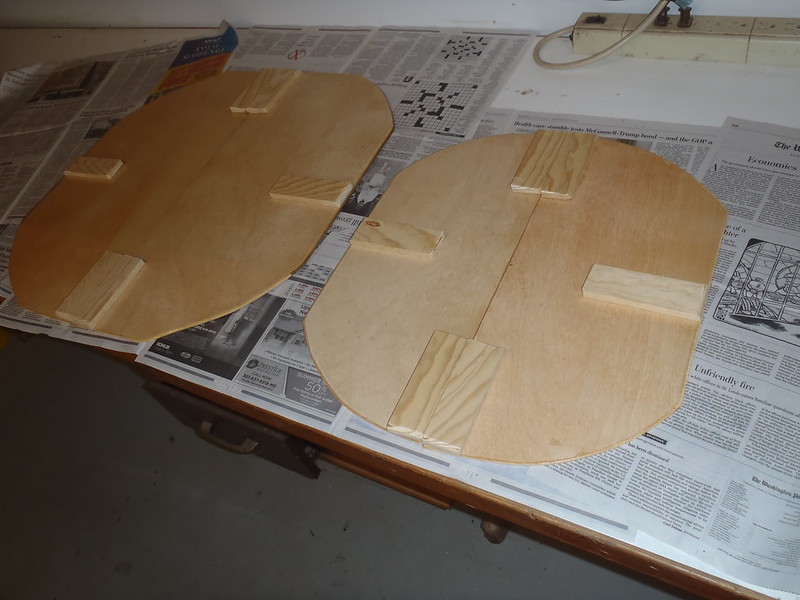
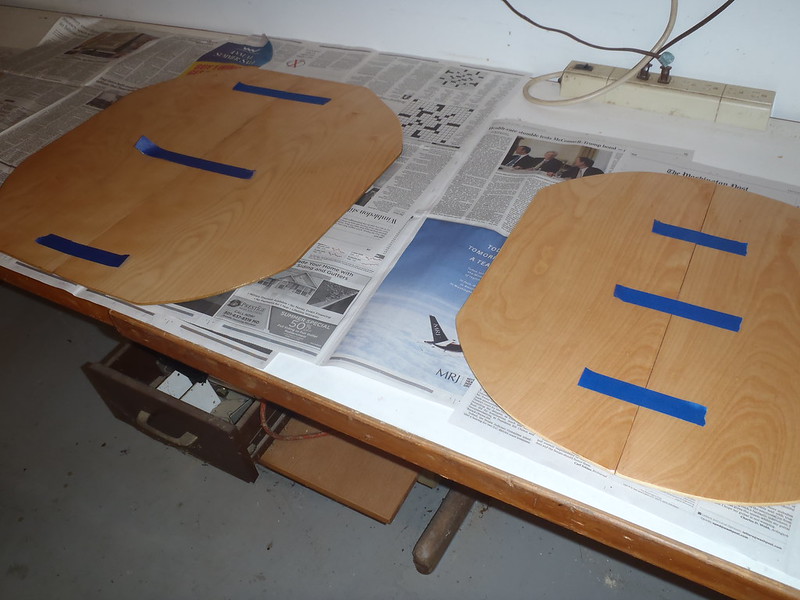
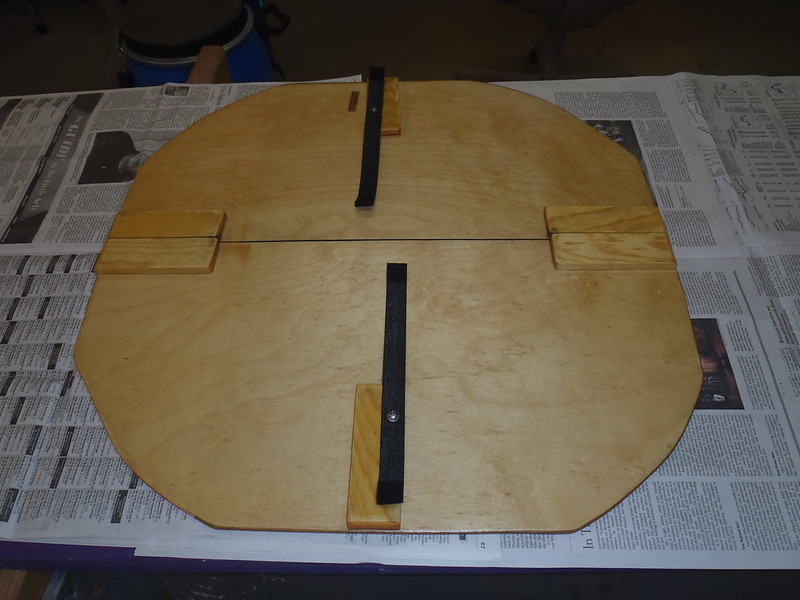
Before the bottom coat of epoxy went on I cut hinge-side butted end “stiffeners” for each piece from 1 ½ inch wide x 3/8 inch thick Home Depot trim wood. I think that extra depth helps the hinged tops lay flat when opened; ¼ inch thick birch ply doesn’t leave much butt end, nor enough wood depth for screwing in the Home Depot brass hinges.
I added side overhang stiffeners as well. They may be superfluous for added rigidity, but those small wood stiffeners replace the previous solution of a fugly minicel donut used to keep the tabletop centered on the barrel lid.
 P7073781 by Mike McCrea, on Flickr
Three stiffeners on each half of the folding tabletops. Six per top. Twelve total for two tops. Math really is not my strong suit; I only cut 10 and had to whip up two more just when I thought I was done making dust. And had already put everything away.
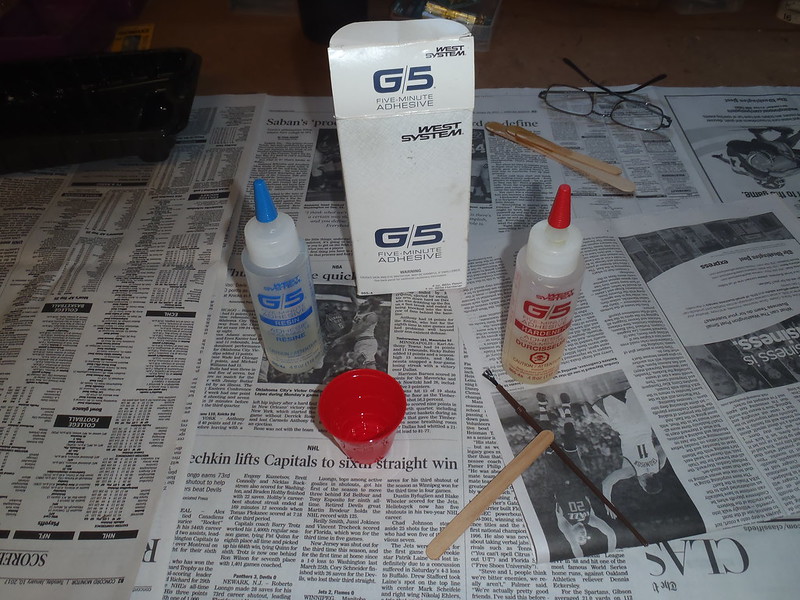
I do love G-5 (5-Minute G/flex) for that kind of hold in place application. I glued and seated the stiffeners and in minutes they were tightly adhered and I could roll epoxy resin on the bottoms. BTW, G-5 five minutes epoxy in summer heat = G-3.5 epoxy. I mixed a half thimble sized amount and it went gummy in the plastic shot glass pot before I could paint it on. Time to turn on the shop AC.
 P7073777 by Mike McCrea, on Flickr
I am still figuring out the construction of these folding tabletops. One thing have oopsie I learned is to temporarily tape the two halves together before gluing on the butted hinge stiffeners, so the two glued down pieces are pressed tightly together at the split top halves. That taped tight together is even more important when drilling and installing the hinges.
 P7073779 by Mike McCrea, on Flickr
Or if pattern painting the tops so any graphics align side to side (more on that later).
3.5 minutes later the stiffeners were epoxied in position, and I could roll a coat of epoxy on the bottoms and call it a day.
Day 2
What the heck, a second coat of epoxy on all sides. It’s freaking plywood and needed a good weather/water seal.
205 fast hardener again. Amine blush again like bacon skillet grease, despite running the shop AC for temperature and humidity control. That is the last West 205 I’ll ever buy.
Some days later
After a few days epoxy cure I removed the amine blush with soap and water Scotchbrite action, rinsed and dried. It’s really not that onerous a task, and I wash and wipe any West System, even slow 206, just to be sure. I’m gonna sand it, and then rinse off the dust anyway, so why not go ahead and wash it first.
Blush free, final epoxy coats sanded smooth, re-rinsed and on to graphics, experimenting with the previously epoxied scrap piece of leftover birch first; I didn’t want to screw up the partially built tabletops trying to paint on and then top coat graphics, and needed some reassurance that my strategic taping and top coating plans would work.
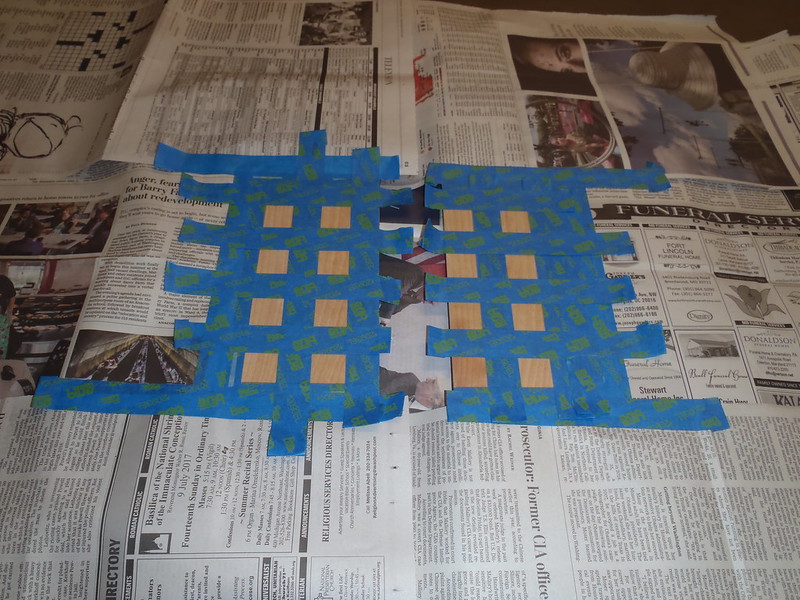
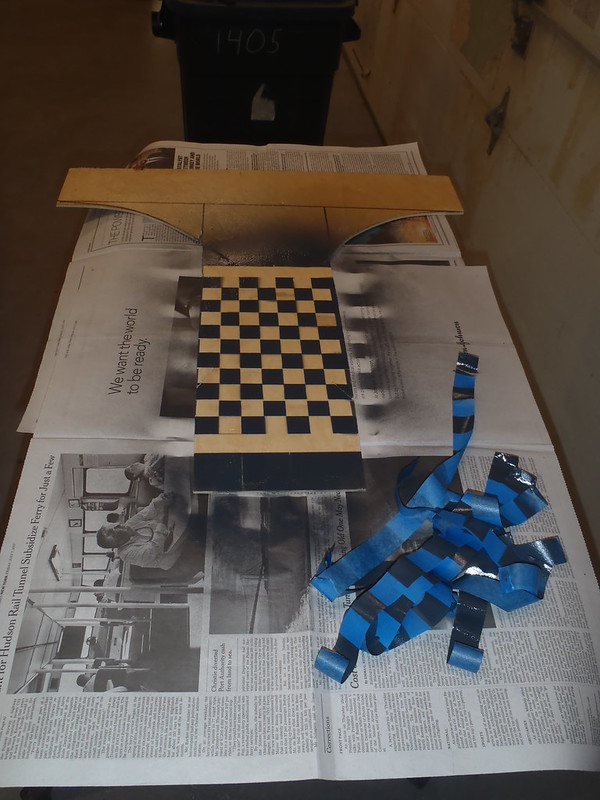
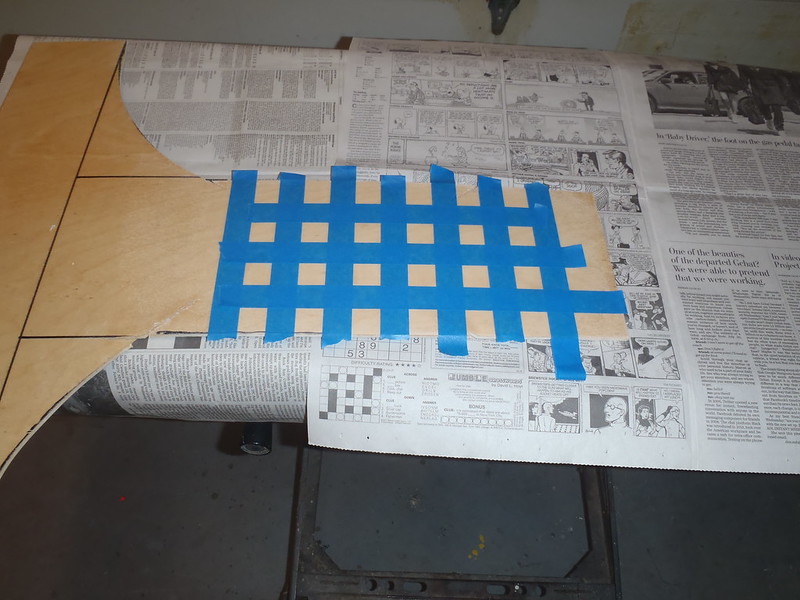
An 8x8 square chess/checkerboard pattern should be easy enough to tape out and spray paint on the barrel tops. Time to tape and test spray a bit of checkerboard on the epoxied scrap piece first.
 P7093783 by Mike McCrea, on Flickr
This is a test. This is only a test. In the event of a real screw up I would have had another beer and thought about what went wrong.
Drumroll please . . . . . . .Oh yell yeah, no paint lift on the test piece when I removed the 2d run of tape, and nice clean squares. That’ll do, aside from some smears on the clear wood squares from an initial Sharpie mis-dotting of which squares should be black.
 P7093791 by Mike McCrea, on Flickr
Before moving on to crosshatch taping the 30 and 60L barrel lids I made two square templates. 192mm square for the 30L, 384mm square for the 60L. (Another good template use for old political yard signs)
 P7093792 by Mike McCrea, on Flickr
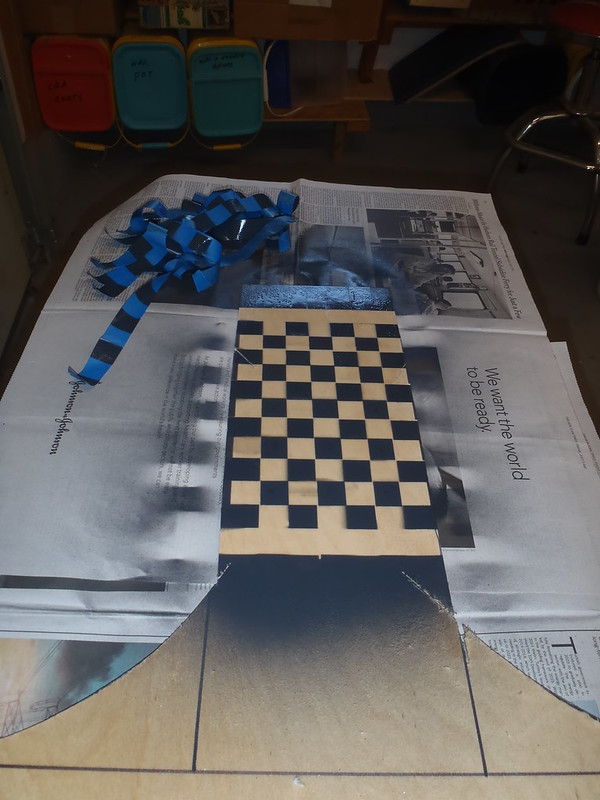
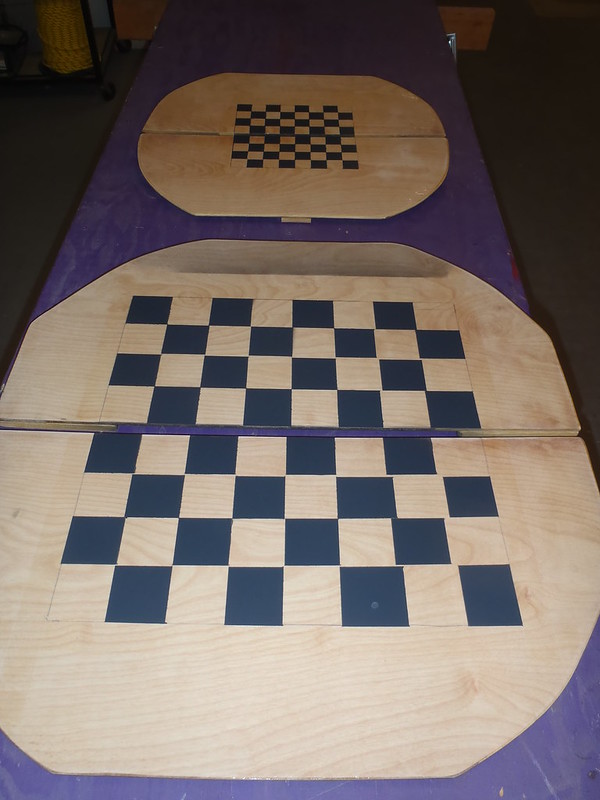
A small box pattern on the 30L barrel top first. Eight “rows” of 24mm wide painters tape gives me a 192 mm square, a wee little thing centered on the 30L top, but usable for river pebble vs acorn cap checkers. Lots of pretty wood grain left visible, including the unpainted “white” spaces on the board.
The 60L lid accommodated a larger chessboard made with wider painters tape.
With the square centered I pencil marked and tape boxed the perimeter, masked the rest of the exposed tabletop with newspaper, and laid down the first set of alternating rows, spray painted the Deep Slate Grey. Let that dry overnight and then taped & painted the alternate rows and let the spray paint cure for a couple days.
BTW “An 8x8 square chess/checkerboard pattern should be easy enough to tape out and spray paint” Easy for me to say, not so easy for me to do.
 P7113797 by Mike McCrea, on Flickr
A day later, and a day after that
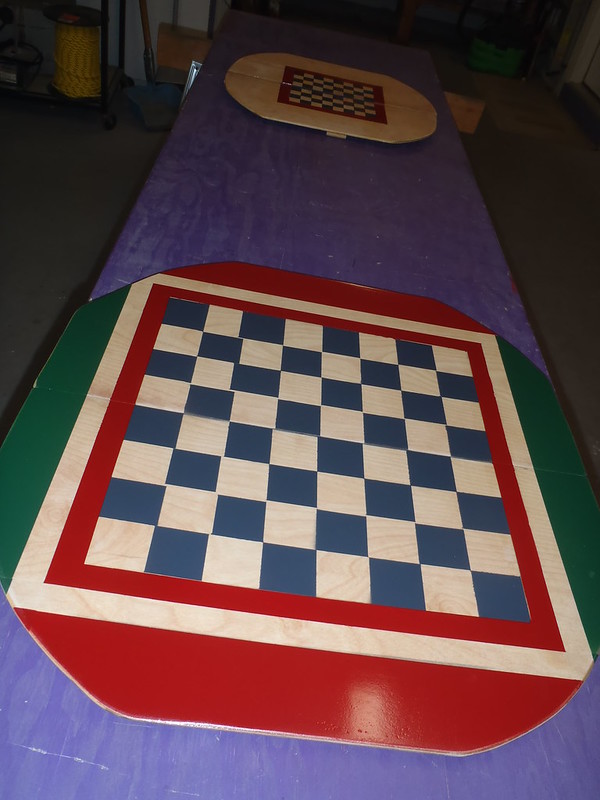
The checkerboard patterns were done and dry. I added a thin red border on both chessboards for better definition. The reveal on pulling the tape and paper is always a mystery; what did I screw up where in my taping pattern?
 P7133802 by Mike McCrea, on Flickr
I had a couple missed taping connections on the grey squares and forgot to fully mask off the paper one side of the 60L board, resulting in some under spray oops. I fixed the former to some degree, and I had a decorative game board side edge solution to hide the latter.
 P7133804 by Mike McCrea, on Flickr
Not a bad spray paint patch job. The unconnected grey squares now join up better and the corners of the red & green partner pair sides are at least sorta similar. I should have measured for that red and green edge trim instead of eyeballing.
The tape crosshatching is at about the limit of my ability to pay attention, especially when the tabletop becomes so covered with tape and paper that I forget exactly what coverage pattern I was going for.
Red border around the chessboards for definition, red & green partner pairs around the big 60L game board to cover the under spray oops, all using leftover spray paints. Time to walk away from diddling with those sprayed tops for a while.
The spray paint pattern on the epoxied scrap piece had had a day+ to dry and served its next test function, the top coating over enamel spray paint experiments; one side rolled and tipped with spar urethane, the other coated with clear enamel spray . . . . . . and I waited for the next day’s gatoring/smearing/incompatibility test results.
Top coating results: Little to no difference. The rolled and tipped spar urethane looked good, the clear enamel spray had a couple tiny fisheye dimples from shop dust or contaminates.
I’d much rather use the cheaper and simpler roll on/tip out urethane and can alternate rolling top, bottom and top again for multiple coats with less wait time than enamel spray. Helmsman Spar Urethane top coat it is.
And another couple days on
Most of those couple days and couple days later were waiting for epoxy to cure or paint to dry, so part of the build fun is that it’s an hour here today and an hour there tomorrow. It was finally time to roll and tip Helmsman Spar Urethane top and bottom. After a light sanding.
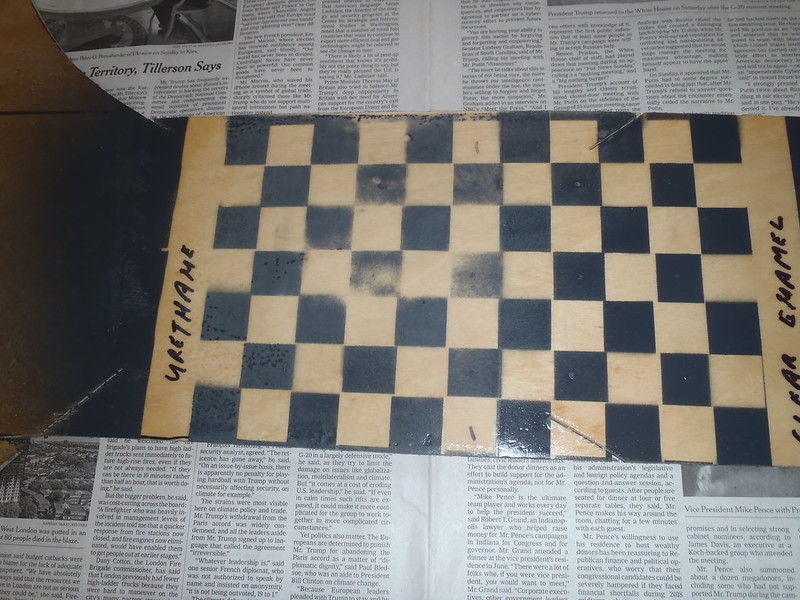
The scrap test piece came in handy again for sanding experiments. The 1[SUP]st[/SUP] coat of urethane top coat on that test board, despite being slathered on thick, proved to be a micron thin; even using a fast, light-touch pass with an RO sander and worn out 220 paper I quickly cut into the paint. I wet sanded the test piece by hand with 600, and even that needed a light touch lest I scuff into the test pattern.
 P7163807 by Mike McCrea, on Flickr
That made me wonder how thick a top coat of Helmsman urethane I have actually achieved in the past, even using a couple coats, given that I sand the urethane with 220 before before recoating, or wet sand vigorously before a final coat
I’m thinking at least 3 coats of urethane on the painted tops, lightly 600 wet sanded between coats. Same for other spar urethane coated projects; no more RO sander and 220. I may have been taking off dang near everything I put on.
Another day, another wet sanding, another coat of urethane. To paraphrase America’s first hippie (Benjamin Franklin) “Time like a petal in the wind flows softly as I wet sand and recoat, wet sand and recoat”
Several coats of Spar Urethane, wet sanded in between later
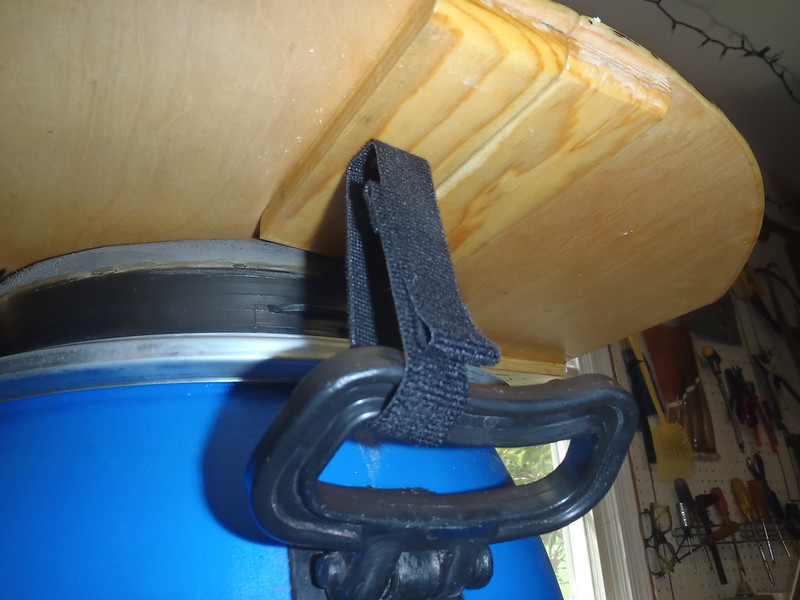
Hinges and Velco restraint straps for the barrel handles installed. 11 inch double sided Velcro straps with 1 inch at each end folded over and G/flex’ed together to form a pull tab. Screw hole melted at the 4 – 8 inch mark.
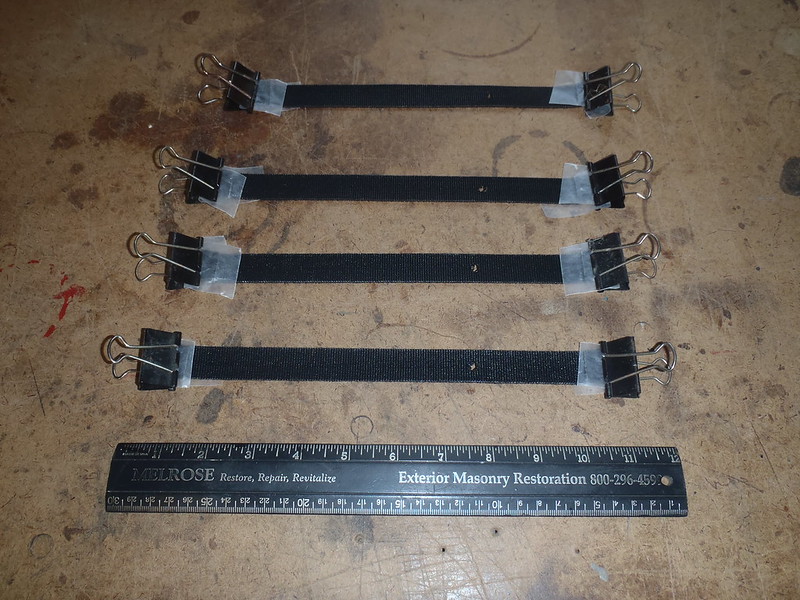 P7203808 by Mike McCrea, on Flickr
 P7203810 by Mike McCrea, on Flickr
 P7203813 by Mike McCrea, on Flickr
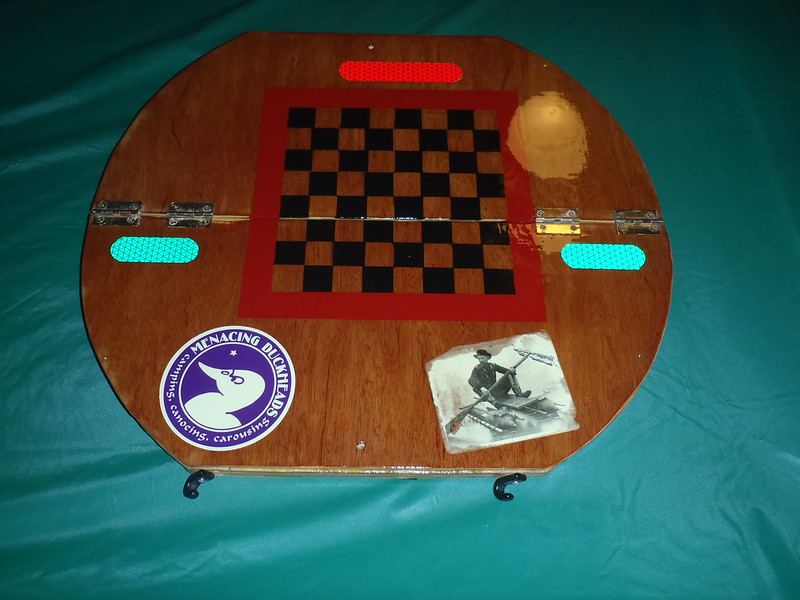
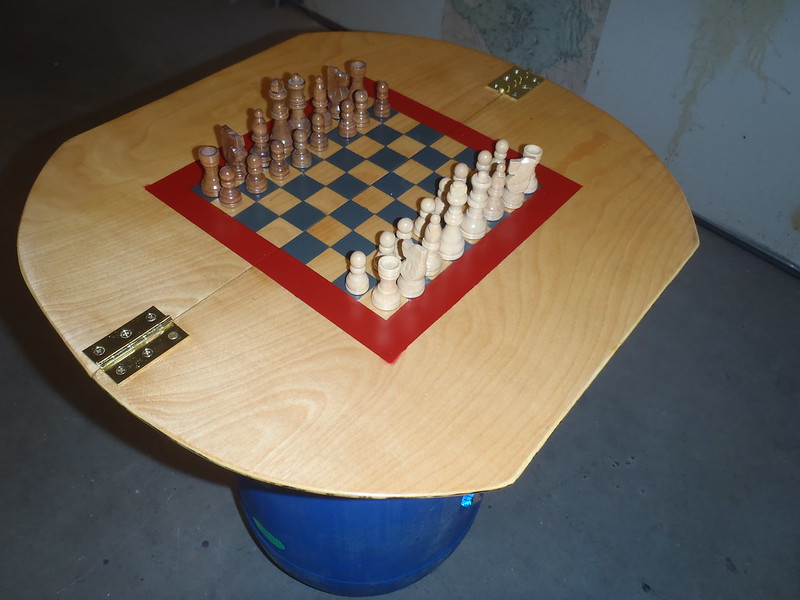
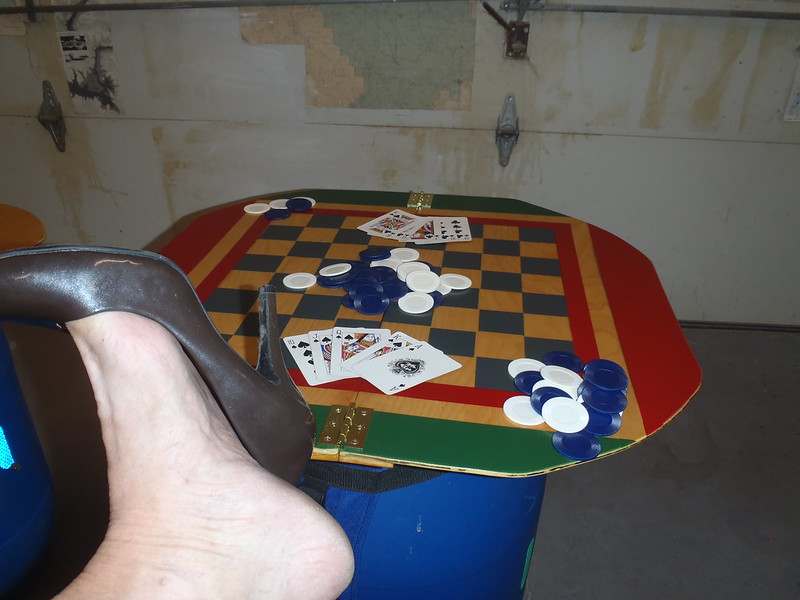
Finished and ready for a shop trial. This is the moment of truth. Is the ¼ inch birch plywood stiff enough to support some edge weight? The no-center-weight acid test meets with my approval.
 P7203814 by Mike McCrea, on Flickr
Yes, the bar is open.
And what do they weight? Some previous finished weights:
Mark I 30 L barrel top, plywood and lauan weighs in at 3 lbs 8 oz
(Mark II was the somewhat unsatisfactory Coroplast experiment)
Mark III 30 L barrel top, ½ inch birch plywood, weighs 2 lbs 12 oz.
Mark III 60L barrel top, ½ inch birch plywood, weighs 4 lbs 9 oz.
Mark IV kevlar foam board 30L tabletop weighs in at 1 lb 2 oz.
Drum roll please. . . . . .Mark V:
¼ inch birch 30L tabletop = 1 lb, 11 oz
¼ inch birch 60L tabletop = 2 lb, 7 oz.
I can live with that. Checker and chess pieces extra.
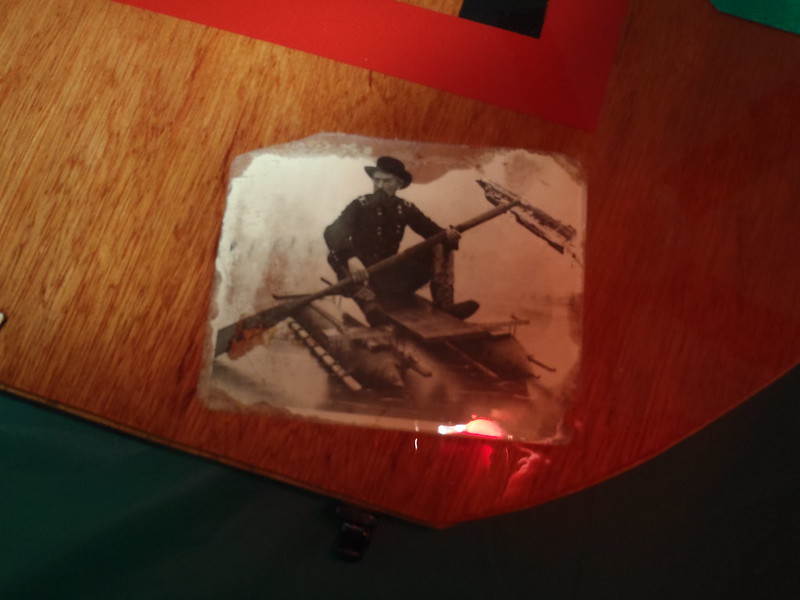
 P7203821 by Mike McCrea, on Flickr
Let the games begin.
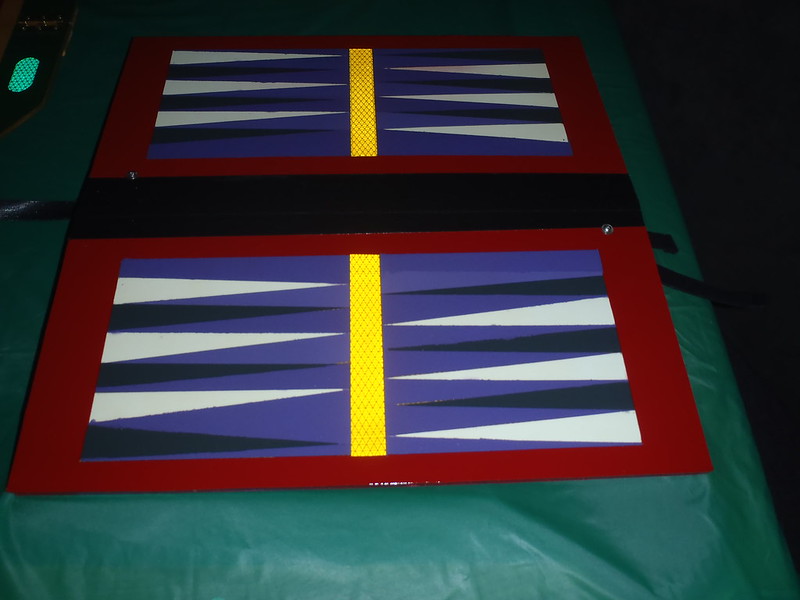
 P7203817 by Mike McCrea, on Flickr
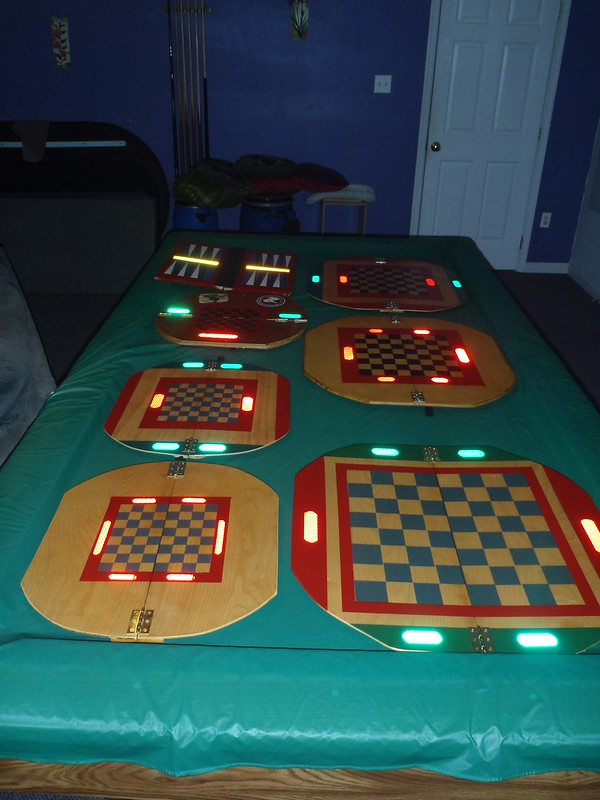
Final touch. Y’all know how much I like High Intensity reflective tape. Want to find your way back to camp after a night paddle? Just prop this up along the camp landing and scan for it with a flashlight.
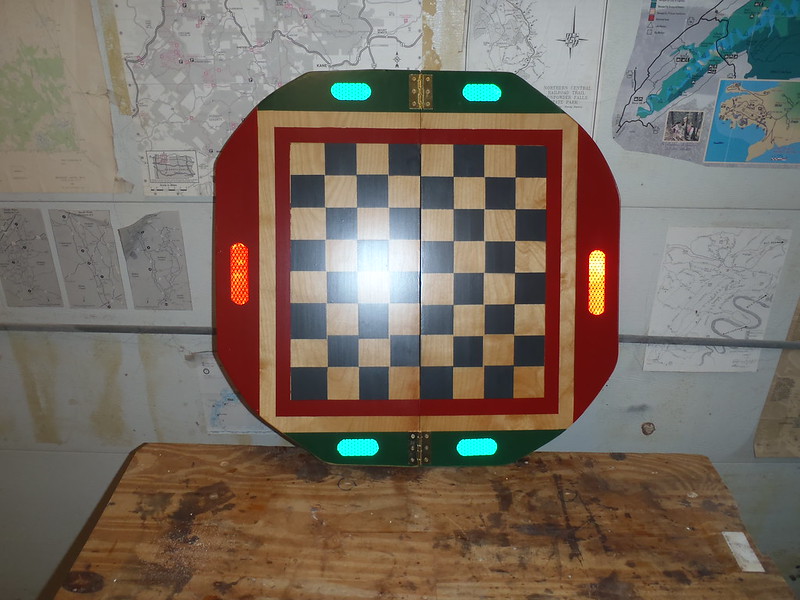 P7213822 by Mike McCrea, on Flickr
¼ birch plywood “game” boards this time.
Day 1
I like the half sheet of ¼ inch birch plywood as a lightweight everyman folding tabletop better than any of the previous tops. That half sheet is enough for a 30L and a 60L top. Easy to cut and shape, and no need for a router on the sides, it is thin enough that a little hand sanding quickly rounds off the perimeter edges, so one less shop tool needed.
P7063771 by Mike McCrea, on FlickrTowards that everyman objective of least tools and easily available materials construction I didn’t lay any fiberglass on the tops, just epoxy resin and top coats of Spar Urethane. With three or four coats of Spar Urethane built up the epoxy resin could be skipped for an inexpensive materials-at-any -Home Depot build.
I cut, shaped and sanded the tabletop halves. Two coats of epoxy resin on the tops and bottoms, more on the edges. While I was at it I epoxy coated the leftover birch plywood scrap with the epoxy left in the rollers, for use as a future test painting and top coating experimental piece.
P7063776 by Mike McCrea, on FlickrP7063775 by Mike McCrea, on FlickrBefore the bottom coat of epoxy went on I cut hinge-side butted end “stiffeners” for each piece from 1 ½ inch wide x 3/8 inch thick Home Depot trim wood. I think that extra depth helps the hinged tops lay flat when opened; ¼ inch thick birch ply doesn’t leave much butt end, nor enough wood depth for screwing in the Home Depot brass hinges.
I added side overhang stiffeners as well. They may be superfluous for added rigidity, but those small wood stiffeners replace the previous solution of a fugly minicel donut used to keep the tabletop centered on the barrel lid.
P7073781 by Mike McCrea, on FlickrThree stiffeners on each half of the folding tabletops. Six per top. Twelve total for two tops. Math really is not my strong suit; I only cut 10 and had to whip up two more just when I thought I was done making dust. And had already put everything away.
I do love G-5 (5-Minute G/flex) for that kind of hold in place application. I glued and seated the stiffeners and in minutes they were tightly adhered and I could roll epoxy resin on the bottoms. BTW, G-5 five minutes epoxy in summer heat = G-3.5 epoxy. I mixed a half thimble sized amount and it went gummy in the plastic shot glass pot before I could paint it on. Time to turn on the shop AC.
P7073777 by Mike McCrea, on FlickrI am still figuring out the construction of these folding tabletops. One thing have oopsie I learned is to temporarily tape the two halves together before gluing on the butted hinge stiffeners, so the two glued down pieces are pressed tightly together at the split top halves. That taped tight together is even more important when drilling and installing the hinges.
P7073779 by Mike McCrea, on FlickrOr if pattern painting the tops so any graphics align side to side (more on that later).
3.5 minutes later the stiffeners were epoxied in position, and I could roll a coat of epoxy on the bottoms and call it a day.
Day 2
What the heck, a second coat of epoxy on all sides. It’s freaking plywood and needed a good weather/water seal.
205 fast hardener again. Amine blush again like bacon skillet grease, despite running the shop AC for temperature and humidity control. That is the last West 205 I’ll ever buy.
Some days later
After a few days epoxy cure I removed the amine blush with soap and water Scotchbrite action, rinsed and dried. It’s really not that onerous a task, and I wash and wipe any West System, even slow 206, just to be sure. I’m gonna sand it, and then rinse off the dust anyway, so why not go ahead and wash it first.
Blush free, final epoxy coats sanded smooth, re-rinsed and on to graphics, experimenting with the previously epoxied scrap piece of leftover birch first; I didn’t want to screw up the partially built tabletops trying to paint on and then top coat graphics, and needed some reassurance that my strategic taping and top coating plans would work.
An 8x8 square chess/checkerboard pattern should be easy enough to tape out and spray paint on the barrel tops. Time to tape and test spray a bit of checkerboard on the epoxied scrap piece first.
P7093783 by Mike McCrea, on FlickrThis is a test. This is only a test. In the event of a real screw up I would have had another beer and thought about what went wrong.
Drumroll please . . . . . . .Oh yell yeah, no paint lift on the test piece when I removed the 2d run of tape, and nice clean squares. That’ll do, aside from some smears on the clear wood squares from an initial Sharpie mis-dotting of which squares should be black.
P7093791 by Mike McCrea, on FlickrBefore moving on to crosshatch taping the 30 and 60L barrel lids I made two square templates. 192mm square for the 30L, 384mm square for the 60L. (Another good template use for old political yard signs)
P7093792 by Mike McCrea, on FlickrA small box pattern on the 30L barrel top first. Eight “rows” of 24mm wide painters tape gives me a 192 mm square, a wee little thing centered on the 30L top, but usable for river pebble vs acorn cap checkers. Lots of pretty wood grain left visible, including the unpainted “white” spaces on the board.
The 60L lid accommodated a larger chessboard made with wider painters tape.
With the square centered I pencil marked and tape boxed the perimeter, masked the rest of the exposed tabletop with newspaper, and laid down the first set of alternating rows, spray painted the Deep Slate Grey. Let that dry overnight and then taped & painted the alternate rows and let the spray paint cure for a couple days.
BTW “An 8x8 square chess/checkerboard pattern should be easy enough to tape out and spray paint” Easy for me to say, not so easy for me to do.
P7113797 by Mike McCrea, on FlickrA day later, and a day after that
The checkerboard patterns were done and dry. I added a thin red border on both chessboards for better definition. The reveal on pulling the tape and paper is always a mystery; what did I screw up where in my taping pattern?
P7133802 by Mike McCrea, on FlickrI had a couple missed taping connections on the grey squares and forgot to fully mask off the paper one side of the 60L board, resulting in some under spray oops. I fixed the former to some degree, and I had a decorative game board side edge solution to hide the latter.
P7133804 by Mike McCrea, on FlickrNot a bad spray paint patch job. The unconnected grey squares now join up better and the corners of the red & green partner pair sides are at least sorta similar. I should have measured for that red and green edge trim instead of eyeballing.
The tape crosshatching is at about the limit of my ability to pay attention, especially when the tabletop becomes so covered with tape and paper that I forget exactly what coverage pattern I was going for.
Red border around the chessboards for definition, red & green partner pairs around the big 60L game board to cover the under spray oops, all using leftover spray paints. Time to walk away from diddling with those sprayed tops for a while.
The spray paint pattern on the epoxied scrap piece had had a day+ to dry and served its next test function, the top coating over enamel spray paint experiments; one side rolled and tipped with spar urethane, the other coated with clear enamel spray . . . . . . and I waited for the next day’s gatoring/smearing/incompatibility test results.
Top coating results: Little to no difference. The rolled and tipped spar urethane looked good, the clear enamel spray had a couple tiny fisheye dimples from shop dust or contaminates.
I’d much rather use the cheaper and simpler roll on/tip out urethane and can alternate rolling top, bottom and top again for multiple coats with less wait time than enamel spray. Helmsman Spar Urethane top coat it is.
And another couple days on
Most of those couple days and couple days later were waiting for epoxy to cure or paint to dry, so part of the build fun is that it’s an hour here today and an hour there tomorrow. It was finally time to roll and tip Helmsman Spar Urethane top and bottom. After a light sanding.
The scrap test piece came in handy again for sanding experiments. The 1[SUP]st[/SUP] coat of urethane top coat on that test board, despite being slathered on thick, proved to be a micron thin; even using a fast, light-touch pass with an RO sander and worn out 220 paper I quickly cut into the paint. I wet sanded the test piece by hand with 600, and even that needed a light touch lest I scuff into the test pattern.
P7163807 by Mike McCrea, on FlickrThat made me wonder how thick a top coat of Helmsman urethane I have actually achieved in the past, even using a couple coats, given that I sand the urethane with 220 before before recoating, or wet sand vigorously before a final coat
I’m thinking at least 3 coats of urethane on the painted tops, lightly 600 wet sanded between coats. Same for other spar urethane coated projects; no more RO sander and 220. I may have been taking off dang near everything I put on.
Another day, another wet sanding, another coat of urethane. To paraphrase America’s first hippie (Benjamin Franklin) “Time like a petal in the wind flows softly as I wet sand and recoat, wet sand and recoat”
Several coats of Spar Urethane, wet sanded in between later
Hinges and Velco restraint straps for the barrel handles installed. 11 inch double sided Velcro straps with 1 inch at each end folded over and G/flex’ed together to form a pull tab. Screw hole melted at the 4 – 8 inch mark.
P7203808 by Mike McCrea, on FlickrP7203810 by Mike McCrea, on FlickrP7203813 by Mike McCrea, on FlickrFinished and ready for a shop trial. This is the moment of truth. Is the ¼ inch birch plywood stiff enough to support some edge weight? The no-center-weight acid test meets with my approval.
P7203814 by Mike McCrea, on FlickrYes, the bar is open.
And what do they weight? Some previous finished weights:
Mark I 30 L barrel top, plywood and lauan weighs in at 3 lbs 8 oz
(Mark II was the somewhat unsatisfactory Coroplast experiment)
Mark III 30 L barrel top, ½ inch birch plywood, weighs 2 lbs 12 oz.
Mark III 60L barrel top, ½ inch birch plywood, weighs 4 lbs 9 oz.
Mark IV kevlar foam board 30L tabletop weighs in at 1 lb 2 oz.
Drum roll please. . . . . .Mark V:
¼ inch birch 30L tabletop = 1 lb, 11 oz
¼ inch birch 60L tabletop = 2 lb, 7 oz.
I can live with that. Checker and chess pieces extra.
P7203821 by Mike McCrea, on FlickrLet the games begin.
P7203817 by Mike McCrea, on FlickrFinal touch. Y’all know how much I like High Intensity reflective tape. Want to find your way back to camp after a night paddle? Just prop this up along the camp landing and scan for it with a flashlight.
P7213822 by Mike McCrea, on Flickr")