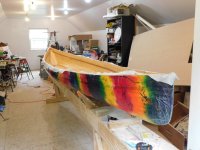
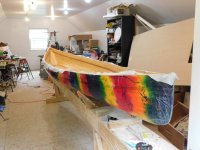
I used to take some flack when I would paint a stripper, red or green. Thanks for taking the pressure off, lol. I do like it quite a lot, it certainly is unique, I can honestly say I have never seen a canoe like it.
-
Happy Blueberry Pancake Day! 🫐🥞🍁
You are using an out of date browser. It may not display this or other websites correctly.
You should upgrade or use an alternative browser.
You should upgrade or use an alternative browser.
An extra trippy Merlin.
- Thread starter Gamma1214
- Start date
I'm not sure what you mean... The way I broke it, I put the glass toward the floor, put one end on a block & jumped up and down until it broke. I thought it would be most likely to pull away from the wood by bending in that direction. You think it would have been more prone to separation if bent to failure with the fiberglass layer up? (actually, I guess that's how a rock would bend it)
Yes
Your test panel was tested under tension, which is where fiberglass is the strongest. The results may or may not have been different if you'd flipped it so the fiberglass was under compression.
A rock would place the hull under both compression (outside of hull) and tension (inside of hull) since it's laminated on both sides (much stronger than your test panel).
If this hull was for running whitewater I might be concerned but for what this hull is likely to face I think it will endure just fine.
Alan
- Joined
- Aug 10, 2018
- Messages
- 2,117
- Reaction score
- 7,087
Interesting... I was primarily concerned with the ability of the epoxy to penetrate through the spit and attach firmly to the wood (which it seems to have done). I'll probably be over tomorrow evening. Maybe I'll see if I can rip the glass off the test panel with pliers.
If it's tearing the strips apart instead of separating from them, it should be just as strong as the glass layup will allow it to be, right?
As for color: I knew some would hate it and some might really like it... just the way things work. Personally, I like the look of wood (which is why my view will not include spit) but I thought the experiment was worth doing.
This one turned out to be a lot wilder than I thought it would and, in the future, I'd probably stick with fewer colors & larger spots. I really like red & white or blue & white w/ some grocery bag splotches mixed in. The white covers the strips really well and, with the splotches, it takes on an almost marble look. (I'll see if I can get pics tomorrow before I flip it over and see how much got past the tape but pics don't really give the 3D effect very well)
Upside of coloring this way is that the color coat can't scratch; downside is that the glass is not UV protected so I'll still need to varnish
The next hull is probably going to be Catalpa and the wood is way too pretty to paint or spit upon.
Flip the piece, glass side up, and test. That will test the bonding strength of the epoxy.I'm not sure what you mean... The way I broke it, I put the glass toward the floor, put one end on a block & jumped up and down until it broke. I thought it would be most likely to pull away from the wood by bending in that direction. You think it would have been more prone to separation if bent to failure with the fiberglass layer up? (actually, I guess that's how a rock would bend it)
You want to test the bonding ability, more than say a rock, from the outside.
Another way to test, is take a pliers and pull the edge of the cloth away from the wood.
I've pulled delaminated cloth from several hulls.
A good bond will be hard to get the cloth, to release with pliers.
If the cloth doesn't pulloff ? You are good to go !
I've been way behind in keeping up with this thread, but I love the Agatha Christie plot twist.
The next time I'm in Pennsylvania I'll hire you to paint my Magic Bus van, which no longer looks as sharp as my avatar. You can have 30 minutes for color application with fast drying psychedelic paints, after which I'll buy you a Maynard G. Krebs burger.
I'll almost certainly do another (Maybe green, brown, yellow & a little orange)
The next time I'm in Pennsylvania I'll hire you to paint my Magic Bus van, which no longer looks as sharp as my avatar. You can have 30 minutes for color application with fast drying psychedelic paints, after which I'll buy you a Maynard G. Krebs burger.
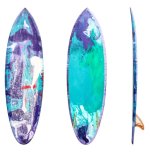
I've made a few surfboards that has similar color swirls as you have on your canoe. I've always had the best result using only yellow and red. Here's a picture of a board I shaped a few years ago. This has five colors on it; white, seafoam green, teal, dioxine violett and red. It's a bit different technique than what you did with the unicorn spit but I would agree that in general, bigger and fewer areas is the way to go. It is of course a matter of preference. On this board I prefer the way the underside came out with the bigger areas. I added the small but powerful contrasting red blotch on the deck. This made the other colors pop and look bigger (in this picture the deck also has surf wax smeared on it)....This one turned out to be a lot wilder than I thought it would and, in the future, I'd probably stick with fewer colors & larger spots...
.
Last edited:
OK, you guys have waaaay too much creative talent…
The trippy looks very unique and cool, and the surfboard? Should be in an art gallery, seriously cool.
The trippy looks very unique and cool, and the surfboard? Should be in an art gallery, seriously cool.
If you copy Jackson Pollocks's name somewhere in there, all these creations could be worth a fair bit of coin.
- Joined
- Jan 7, 2016
- Messages
- 960
- Reaction score
- 1,881
The quote of your brother-in-law “buncha hippies” tickled me this morning. Nobody is going to steal that one of kind canoe, nor the vehicle that is carrying it. All good man! As a teenager of the sixties, I can dig it!
In the Summer of Love, 1967, on my way to the war in Vietnam, I got to spend an evening at Haigt-Ashberry, in San Francisco, CA. I saw all the colors of the rainbow, plus some that the rainbows didn’t have. Also saw and heard Grace Slick and the Jefferson Airplane preforming on a street corner concert. I too, wanted to be in a group of a “buncha hippies” Uncle Sam had different plans, so I had to wait a bit then joined the back to the land movement, became a homesteader, spent some time at the Saum Farm commune, in Northern Minnesota.
My canoes have all been olive drab or forest green for creeping up on wildlife, stealth camping etc. but for your canoe tripping adventures, being seen in a distinctive canoe from the air could be a good thing.
Kaz has been making his Millbrook canoes in curly, swirly, enfurly psychedelic skin coat colors for decades. They are very popular color choices.

 www.facebook.com

MILLBROOK BOATS
MILLBROOK BOATS. 1,977 likes · 222 talking about this. The lightest, highest performance, most affordable composite whitewater canoes in the entire world.
 www.facebook.com
- Joined
- Aug 10, 2018
- Messages
- 2,117
- Reaction score
- 7,087
I fished some more Cherry out of the barn for gunwales, trim, more paddles, whatever and then stopped by the shop & flipped the canoe.
The tape & sawdust seem to have done a very good job of keeping the spit from seeping through and I am extremely pleased that there were very few areas inside that have color.
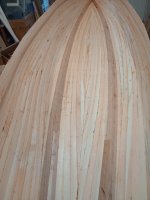
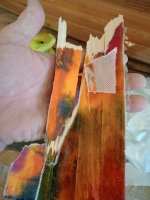
Out of curiosity, I also propped the test panel against one of the seat bending jigs (glass side up this time) & smacked it until it broke
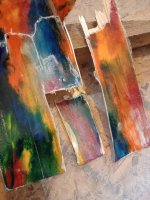
It did break more easily in this direction but, like the glass side down breaks, it seemed to tear the strips themselves apart and remain (for the most part) securely attached to the wood. As can be seen in the above picture, there were some small places where the glass seemed to pull away and, as I worked at these a bit, I was able to pull the cloth away but it didn't separate between the spit and the epoxy as I would expect it to have done if the spit was causing adhesion issues.
It appears that the epoxy is still stuck to the spit and the cloth pulled out of the epoxy... might this be caused by over-working the epoxy / spreading it too thin? (remember that the test panel only has the wet-out coat) Try as I might to get separation between the epoxy & the spit, I could not get it to lift anywhere that I tried.
I think I'm done worrying about adhesion and I'll cut & soak some strips for the seats, start sanding down the inside and get this (and the Raven) done so I can get both into the sunlight & onto the water.
The tape & sawdust seem to have done a very good job of keeping the spit from seeping through and I am extremely pleased that there were very few areas inside that have color.

Out of curiosity, I also propped the test panel against one of the seat bending jigs (glass side up this time) & smacked it until it broke

It did break more easily in this direction but, like the glass side down breaks, it seemed to tear the strips themselves apart and remain (for the most part) securely attached to the wood. As can be seen in the above picture, there were some small places where the glass seemed to pull away and, as I worked at these a bit, I was able to pull the cloth away but it didn't separate between the spit and the epoxy as I would expect it to have done if the spit was causing adhesion issues.
It appears that the epoxy is still stuck to the spit and the cloth pulled out of the epoxy... might this be caused by over-working the epoxy / spreading it too thin? (remember that the test panel only has the wet-out coat) Try as I might to get separation between the epoxy & the spit, I could not get it to lift anywhere that I tried.

I think I'm done worrying about adhesion and I'll cut & soak some strips for the seats, start sanding down the inside and get this (and the Raven) done so I can get both into the sunlight & onto the water.
Interesting concept canoe. Until recently I thought you were building a tippy canoe and wondered why. Having found and worn my reading glasses I see you're building a trippy canoe and still wondering why. But it could be fun so I'll hang around. Man. lol
I was born in the 50s so I was never really a flower child, and although as a young teen I just missed those hippy times, I lived thru enough of them to decide I never really missed them. I miss my paisley shirts but not the flares and bell bottoms. I miss the parties but not the pot. mostly
Now you're gonna have to think of an (in)appropriate truck makeover to match?
- Joined
- Aug 10, 2018
- Messages
- 2,117
- Reaction score
- 7,087
I seriously doubt that the truck will match this canoe but I am currently looking for a replacement. The rusty, trusty Ranger broke the crankshaft, I looked the truck over carefully and decided that the frame is too soft to justify dropping in another engine. A little over 338,000 miles and it's done.
It'll be hard to replace, especially as Toyota is the only company making manual transmissions in trucks and I don't care for the seating position in the Tacoma. Looks like I'll be buying an older truck or I'll have to get used to driving a stomp & steer transmission.
It'll be hard to replace, especially as Toyota is the only company making manual transmissions in trucks and I don't care for the seating position in the Tacoma. Looks like I'll be buying an older truck or I'll have to get used to driving a stomp & steer transmission.
This was not what I was expecting "trippy" to mean. It's a fun surprise and I enjoy looking at it - but I'm glad you will be one paddling it.
I did something similar in a kayak I built back in the mid seventies. More of a camo design, and definitely unique. But it was eventually stolen anyway. You'd think I would have spotted it at some point, but nah. I suspect that someone decided to do send the abomination to the depths.
I did something similar in a kayak I built back in the mid seventies. More of a camo design, and definitely unique. But it was eventually stolen anyway. You'd think I would have spotted it at some point, but nah. I suspect that someone decided to do send the abomination to the depths.
- Joined
- Aug 10, 2018
- Messages
- 2,117
- Reaction score
- 7,087
Got sidetracked a little coming up with transportation options but I've been picking away at the build here & there.
I "sanded" the inside with the surform shaver and then went over it again with an orbital sander and 60 grit. It made a pile of sawdust (which I saved for later use) and it seemed smooth enough for me.
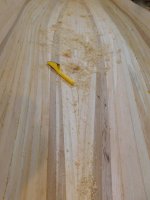
There were 2 places that the strips were well below the adjoining strips and one of those had quite a bit of spit that had bled through. I mixed up a small batch of epoxy, threw a handful of sawdust into it, mixed it up (about the consistency of creamy peanut butter- maybe a little drier) and spackled the low spots with the mixture. They sanded out nicely and covered the color well.
(Note: although the Unicorn Spit lady on YouTube claims that you can wash it off & try again, I didn't have any luck doing that. If you try this at home, my recommendation would be to get it right the first time or live with it. It did, for the most part, sand off OK but water merely smeared it.)
After that I fitted bow & stern float tank panels using the Raven patterns to start, then cutting the panels with the band saw and final shaping with the horseshoeing rasp.
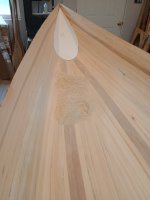
I then grabbed my 30 inch e-glass roll and found that 25 yards isn't enough for 3 canoes, especially when doing double layers on footballs. I contacted US Composites, opened my wallet and bought another 50 yards.
It arrived on Friday so I went over to the shop and laid out the glass. I, again, used individual pieces on each side of the bow & stern tucking the edges into the stems and overlapping on the keel line. Once those 4 pieces were tucked in, I ran single pieces of cloth side-to side while overlapping a couple inches on each piece.
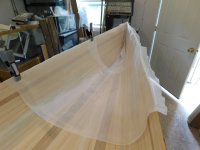
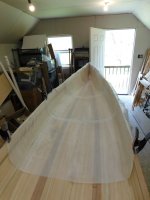
I probably didn't need to allow the glass to sit overnight as it was rolled instead of folded but I did and, when I finished with horses today, I went over and started mixing epoxy.
I used a paint brush to wet out and tuck the glass tightly into the stems and I did both ends before the brush started to get tacky. (the brush was used primarily with a dabbing / tucking motion rather than actually brushing. That would quickly pull the glass out of position)
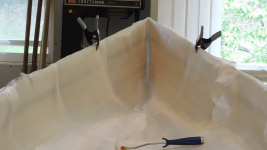
After the tight spots were wet out & sticking, I poured the epoxy on the bottom of the hull and used a foam roller to spread it across the bottom and up the sides.
I found that, using a roller, the epoxy wanted to kick much more quickly than I was used to, the roller started to lose its shape as I was working and I only had 2 rollers. My solution was to wet out the entire bottom with the 2 rollers that I had and then use a plastic spreader to work the epoxy up the sides.
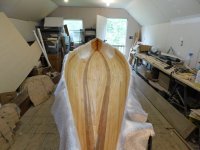
Another advantage to doing both ends first was that, by the time I had wet out the entire hull, the ends were kicked and tacky. I laid the float tank partitions in, smoothed the glass across the panel and up onto the tacky hull and then wet out both tanks.
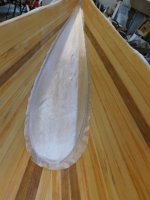
I then used the remainder of the epoxy to touch up any dry looking spots (like the areas immediately to the left of the tank in the above picture) and any areas where the cloth had pulled away from the hull (visible along the right sheer in the above picture). With the epoxy tacky, I found it pretty easy to work some fresh epoxy through the cloth and I was able to fill those voids pretty well.
Some here may also be pleased that it probably won't look terribly obnoxious on the water. On the roof during transport or flipped over at a campsite is a different story.
I "sanded" the inside with the surform shaver and then went over it again with an orbital sander and 60 grit. It made a pile of sawdust (which I saved for later use) and it seemed smooth enough for me.

There were 2 places that the strips were well below the adjoining strips and one of those had quite a bit of spit that had bled through. I mixed up a small batch of epoxy, threw a handful of sawdust into it, mixed it up (about the consistency of creamy peanut butter- maybe a little drier) and spackled the low spots with the mixture. They sanded out nicely and covered the color well.
(Note: although the Unicorn Spit lady on YouTube claims that you can wash it off & try again, I didn't have any luck doing that. If you try this at home, my recommendation would be to get it right the first time or live with it. It did, for the most part, sand off OK but water merely smeared it.)
After that I fitted bow & stern float tank panels using the Raven patterns to start, then cutting the panels with the band saw and final shaping with the horseshoeing rasp.

I then grabbed my 30 inch e-glass roll and found that 25 yards isn't enough for 3 canoes, especially when doing double layers on footballs. I contacted US Composites, opened my wallet and bought another 50 yards.
It arrived on Friday so I went over to the shop and laid out the glass. I, again, used individual pieces on each side of the bow & stern tucking the edges into the stems and overlapping on the keel line. Once those 4 pieces were tucked in, I ran single pieces of cloth side-to side while overlapping a couple inches on each piece.


I probably didn't need to allow the glass to sit overnight as it was rolled instead of folded but I did and, when I finished with horses today, I went over and started mixing epoxy.
I used a paint brush to wet out and tuck the glass tightly into the stems and I did both ends before the brush started to get tacky. (the brush was used primarily with a dabbing / tucking motion rather than actually brushing. That would quickly pull the glass out of position)

After the tight spots were wet out & sticking, I poured the epoxy on the bottom of the hull and used a foam roller to spread it across the bottom and up the sides.
I found that, using a roller, the epoxy wanted to kick much more quickly than I was used to, the roller started to lose its shape as I was working and I only had 2 rollers. My solution was to wet out the entire bottom with the 2 rollers that I had and then use a plastic spreader to work the epoxy up the sides.

Another advantage to doing both ends first was that, by the time I had wet out the entire hull, the ends were kicked and tacky. I laid the float tank partitions in, smoothed the glass across the panel and up onto the tacky hull and then wet out both tanks.

I then used the remainder of the epoxy to touch up any dry looking spots (like the areas immediately to the left of the tank in the above picture) and any areas where the cloth had pulled away from the hull (visible along the right sheer in the above picture). With the epoxy tacky, I found it pretty easy to work some fresh epoxy through the cloth and I was able to fill those voids pretty well.
Some here may also be pleased that it probably won't look terribly obnoxious on the water. On the roof during transport or flipped over at a campsite is a different story.

Last edited:
I've been away to long.... Excellent looking job!
Similar threads
- Replies
- 15
- Views
- 3K
- Replies
- 13
- Views
- 3K

