• Happy Birthday, Richard Feynman (1918-1988) 👨🏼‍🔬⚛️🏅🚀

Aluminum Rails for a Rob Roy

Joined
Jan 13, 2013
Messages
271
Reaction score
1
I have a Bell Rob Roy 15 in Kevlar that needs new gunwales. I am looking for aluminum round profile gunwales. I would prefer a one piece but a two piece would work as well. What I'm looking for is a manufacturer who'd ship them with a shipment of canoes to cut down on costs. If anyone has any idea where I could get these I'd be happy to hear from.

I've tried like heck to get wood gunwales on but that is not turning out well. After throwing to many swear words around, yeah I grew up a hair and don't throw tools anymore, I've decided to go with these kind of gunwales. Never had a gunwale repair kick my arse before. Many thanks if you have an idea that would help.
 
Western canoeing(clipper canoes) they have great aluminum gunnels, and also have gunnel guards...
 
I have a Bell Rob Roy 15 in Kevlar that needs new gunwales. I am looking for aluminum round profile gunwales. I would prefer a one piece but a two piece would work as well. What I'm looking for is a manufacturer who'd ship them with a shipment of canoes to cut down on costs. If anyone has any idea where I could get these I'd be happy to hear from.

Many thanks if you have an idea that would help.

Doug, I put a section of one piece Mad River aluminum gunwale in the mail to you this morning for your perusal. It is kind of oval (elliptical?), rounded on the top and outwale edge, with a flat lip under the inwale side. Pop rivet installation, with the head of the pop rivet seated flush on the inwale lip and the shank hidden inside the hollow of the outwale.

That MRC aluminum gunwale is very similar to Wenonah’s aluminum gunwale, but I can’t seem to find any profile photos on line.

I’m pretty sure those would work for your purposes, and since you need only to buy only one 17 foot length of gunwale to cover the two six foot lengths on the Rob Roy cockpit it might be a cost effective solution.

Here’s MRC “Aluminum Gunwale Replacement for Composite Hulls” tutorial. Note that MRC’s aluminum gunwales come “pre-bent on a constant curve to facilitate installation”, which might be advantageous with the short length curve needed on the Rob Roy.

http://www.madrivercanoe.com/us/experience/faq/content/aluminum-gunwale-replacement-composite-hulls

I know there are canoe manufacturers that use a two piece aluminum gunwale system, but I have never installed them. I have heard tell that they are easier, but don’t know which manufacturers use them.
 
That MRC aluminum gunwale is very similar to Wenonah’s aluminum gunwale, but I can’t seem to find any profile photos on line.

OK, not this:

https://www.google.com/search?q=alum...L3NYkq_kT3M%3A

Certainly not this, which would leave the pop rivet shank badly exposed:

https://www.google.com/search?q=alum...SFXNGh9aUgM%3A

I would absolutely find an aluminum gunwale with a profile that hides the shank ends of the pop rivets inside an outwale hollow.

What the heck, I can’t find any photos of the MRC style aluminum gunwale sent you, so I’ll take some.

This scrap of aluminum gunwale is part of my gunwale demonstration piece, using a chunk of Royalex to show how aluminum and vinyl gunwales are pop riveted in place (and webbing loops and snap rivets as well). Also handy for gauging the correct length pop rivet for the job.

That scrap piece is an older Mad River aluminum gunwale for a composite canoe. Note that the 3/8 inch thick RX doesn’t really fit in the 1/8 inch wide channel without some major force, but something like that should fit fine atop the thin kevlar cockpit edges of the Rob Roy.


I like the no maintenance aspect of using aluminum gunwales on the Rob Roy, and hiding the exposed sheerline without a frustrating rabbet. And a black anodized gunwale would still look sharp on that boat.

I’m sure you could figure out a way to make the cockpit bow attractive, maybe cut the wales so they meet at flushfitted angles /\ and add a small cap to cover the sharp marlin spike tip.

That style gunwale is designed to accommodate thwarts or yoke via small L brackets on the butt ends, so adding something like a short carry thwart would be easy.

EDIT: Dimensions. 1 1/4 inch wide, 7/8 inch deep.
 
Last edited:
I know there are canoe manufacturers that use a two piece aluminum gunwale system, but I have never installed them. I have heard tell that they are easier, but don’t know which manufacturers use them.

Bell is the only I'm aware of though I image there may be others. I'm assuming now that they're up and running as Northstar Canoes they're using the same aluminum gunwales but don't know for sure. They're a nice profile.

I've installed a set of them and they did seem to work nice but I also had two helpers to hold the ends in place while I started fastening in the middle. The only time I messed with single piece aluminum rails was removing a re-installing a couple sets and I had no extra hands. That was frustrating but eventually I got them on.

Alan
 
I've installed a set of them and they did seem to work nice but I also had two helpers to hold the ends in place while I started fastening in the middle. The only time I messed with single piece aluminum rails was removing a re-installing a couple sets and I had no extra hands. That was frustrating but eventually I got them on.

Frustrating eh?

That leftover piece of aluminum gunwale has a tale to tell.

Years ago friend Chip, who is an occasional participant on Canoe Tripping, wanted help putting new gunwales on a friend’s canoe, an old, once-red now-faded-to-pink RX Mad River Fantasy, a heavily rockered 13 foot Royalex solo whitewater canoe. I quote from an old MRC catalog “For women and smaller paddlers the Fantasy is ideal for class II-III waters.

Chip’s friend had ordered the wrong gunwales, sent them back, and eventually showed up with. . . . the wrong gunwales. Aluminum gunwales for a thin composite hull. Straight, not pre-bent, and the rockered Fantasy has some flare and stem rise to deal with. Errgghh!

Screw it, we forced them on. It took all three of us, 6 hands, four wide bladed putty knives as guide sleeves, a heavy rubber mallet to pound the wales down in place, 7 hours and 15,432 swear words, but we made them fit.

It soured me on every doing aluminum gunwales again.

And would have in no way been worth it, except that the Fantasy became the Reality, and the reality was Chip bought the boat.

Tall gangly Chip, paddling whitewater in a tiny and girly pink “small paddler & woman’s” Fantasy.

Chip’s version of that tale may vary.
 
I've installed a set of them and they did seem to work nice but I also had two helpers to hold the ends in place while I started fastening in the middle.

Alan, I have never installed two piece aluminum gunwales.

I’m kind of assuming that having two pieces helps with accommodating both the narrowing sheerline curves at the bow and stern and any stem rise. Using a one piece aluminum gunwale can present the issue of the thin channel that covers the hull material wanting to squeeze closed as the one piece gunwale is bent into place.

Is there some mechanical lip or catch that clicks into place as the two pieces gunwale are attached? Are two piece gunwales easier or harder to DIY install than one piece?

I think the two piece is easier but, like I said, I had extra hands when I did the two piece. Not so with the one piece. I had one person stand at each end and hold them in place while I started riveting in the center. It was no trouble at all and I don't think it really required any effort on their part.

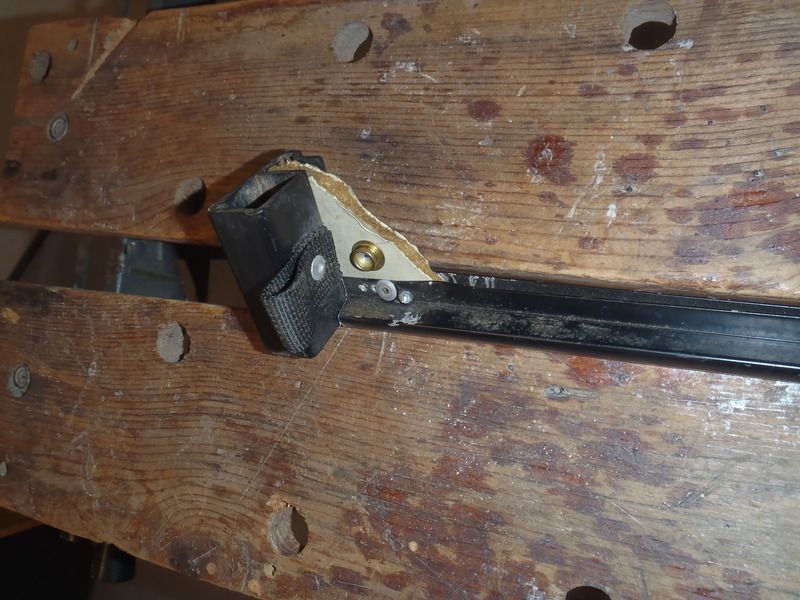
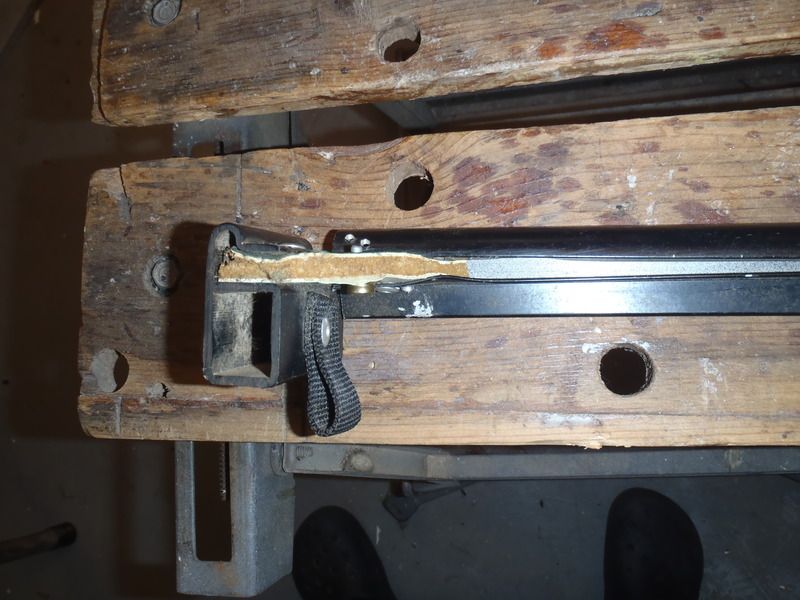
The two pieces do not lock together but they do fit together. The outwale is the main structure and the inwale is just a thin strip with a small lip that slips into a groove milled on the outwale. But nothing to hold them together until it's been riveted. The rivets are installed from the inside so the ugly end is hidden inside the rail. I've got the end scraps left, I'll try to remember to take a picture tonight.

While the install of those rails was pretty easy getting ready for it sure wasn't. They went on my first ever stripper and for whatever reason I thought wood rails would be too difficult, plus I wanted to save weight. Of course these Bell rails, which I picked up at Northwest Canoe in St. Paul, were meant for a thin composite hull, not a thick wooden one, which meant the lip on the inwale would not mate up with the groove in the outwale. I needed to trim off some of that lip so I put an abrasive blade in the table saw and took off about 1/8" from the lip. Not much fun running 15' pieces of thin and narrow aluminum through a table saw. Of course, being aluminum, the abrasive wheel didn't give a clean edge. It didn't so much remove the material as stretch it out into a thin fin which I then tediously tore off with a pair of pliers before running the edge over a wire wheel on a bench grinder. Fun times.

Chip’s friend had ordered the wrong gunwales, sent them back, and eventually showed up with. . . . the wrong gunwales. Aluminum gunwales for a thin composite hull. Straight, not pre-bent, and the rockered Fantasy has some flare and stem rise to deal with. Errgghh!

Screw it, we forced them on. It took all three of us, 6 hands, four wide bladed putty knives as guide sleeves, a heavy rubber mallet to pound the wales down in place, 7 hours and 15,432 swear words, but we made them fit.

I'd neglected to mention my one other experience with aluminum rails. I bought an old 18' prospector design really cheap that was listed as a homemade fiberglass canoe. It was in horrible shape with big blobs and sags of resin. I spent many hours sanding it down with a pneumatic orbital sander using a compressor that didn't have the volume to run it properly and cheap sanding discs. This was the first boat I'd ever done any such work on. When I got all the paint sanded off and started chewing away all all that excess resin I found a woodstrip canoe from the 70's with some sort of hippy design on the bow that I could barely make out through the nearly opaque resin. Wish I would have taken a picture before I repainted it.

Anyway, back to the rails. I decided to use aluminum single piece rails from Wenonah. Not pre-bent and not wide enough of a slot to fit the thick wood strips. After struggling for a while an extra set of hands walked by and with his help and lots of persuasion from a rubber mallet they were finally beat into submission and riveted. It turned into one of those jobs where you didn't know if something was going to break and you didn't really care if it did.

Alan
 
The two pieces do not lock together but they do fit together. The outwale is the main structure and the inwale is just a thin strip with a small lip that slips into a groove milled on the outwale. But nothing to hold them together until it's been riveted. The rivets are installed from the inside so the ugly end is hidden inside the rail. I've got the end scraps left, I'll try to remember to take a picture tonight.

I think I would like the part about having only a thin strip on the inwale side on that design; I usually glue minicel there as a knee bumper and the less depth of inwale edge I need to pad out the better.

If you have scraps of that gunwale left please do take some photos. I’m curious about the profile and if I ever find my unicorn lightweight composite solo canoe with rotted brightwork I’d considering doing the re-rail with aluminum.


I decided to use aluminum single piece rails from Wenonah. Not pre-bent and not wide enough of a slot to fit the thick wood strips. After struggling for a while an extra set of hands walked by and with his help and lots of persuasion from a rubber mallet they were finally beat into submission and riveted. It turned into one of those jobs where you didn't know if something was going to break and you didn't really care if it did.

What worked for forcing the 1/8 gap on the aluminum gunwales onto a Royalex hull was having two helpers, each holding a wide metal bladed putty knife flat pressed against the hull material inside and out, with the blades stuck up in the aluminum gunwale channel as guides.

Well, that and considerable pounding with a rubber mallet. We did dent the gunwale in one especially recalcitrant area, but we got them on.

I have to imagine it would be far easier getting a composite hull edge into that thin slot. And easier still if the aluminum gunwales came pre-bent.

But my oh my, where to find replacement aluminum gunwales in stock?

Blue Mountain Outfitters of course. They have both two piece Bell (Northstar) style and one piece Wenonah rails, in plain and anodized black. $115 a set, and they will break out a single gunwale for half the cost.

Gawd I love having BMO an hour away. Every dang piece of outfitting or repair stuff you could possibly need.
 
I believe I have a line on them from, hopefully, Charles River Canoe in Boston. Am keeping my fingers crossed as I was shocked by the cost of shipping a gunwale, like getting a punch in the stomach. Will know more in a day or so. It'll be good to get this done so I can back on the water!
 
I think I would like the part about having only a thin strip on the inwale side on that design; I usually glue minicel there as a knee bumper and the less depth of inwale edge I need to pad out the better.

If you have scraps of that gunwale left please do take some photos. I’m curious about the profile and if I ever find my unicorn lightweight composite solo canoe with rotted brightwork I’d considering doing the re-rail with aluminum.

I'm doing a poor job explaining, the pictures below will help. What I'm calling the outwale extends over the top of the hull and also gives the inside profile too, which is a sharp edge. The second piece, that I'm referring to as the inwale because it attaches the inside of the hull, is nearly invisible once installed. You'd definitely want to pad these out, most uncomfortable profile I've ever felt on my knees. But the inside profile does allow the use of standard seat drops, wood thwarts, and simple clamp-on removable yokes.

P3010009 by Alan, on Flickr

P3010010 by Alan, on Flickr

P3010011 by Alan, on Flickr

Alan
 
Thanks for posting those Alan, nice having a visual as I haven't seen those yet. Looks pretty simple and straight forward on installation!
 
Thanks for the two piece gunwale photos.

One piece Mad River style


Two piece Bell/Northstar style

P3010011 by Alan

I think the profile of the MRC piece is close to the shape of Wenonah’s aluminum gunwales, but I don’t have a scrap to compare.

A guess, from zero firsthand experience, is that the two piece would be less likely to pinch closed the sheerline channel while bending into shape and the one piece easier to manipulate and hold in place while pop riveting.

Somewhere, online or in a catalog I thought I had seem a profile photo of Wenonah’s aluminum gunwales.
 
Wenonah gunwale profile courtesy of the interwebs:

P1020994.JPG


If I remember correctly the side with the most overhang goes to the inside.
 
Last edited:
Wenonah gunwale profile courtesy of the interwebs:

P1020994.JPG


If I remember correctly the side with the most overhang goes to the inside.

Well, yuck. I had seen that photo but didn’t notice that it was a Wenonah gunwale. The big lip does go on the inside, and the shank ends of the pop rivets are exposed inside the hull below that inwale lip.

Maybe I’m making too much of having the shank end of the pop rivets hidden inside the gunwale, as with the Bell or MRC profile.

I’ve paddled, and worked on, a couple of aluminum gunwale Wenonahs and never paid much attention to those exposed rivet ends. I expect that the less complex profile of those Wenonah gunwales are lighter weight as well and probably bend easier, both of which might be of consideration on a kevlar Rob Roy.

My Penobscot has Old Town’s really simplistic L shaped aluminum gunwales with the pop rivet ends exposed inside the hull and they have never much mattered or been a nuisance.

There are a couple of practical reasons that the exposed rivet ends would actually be advantageous. When installing the pop rivets it would be easy to visually ascertain that the rivet was seated and compressed correctly during installation. It is impossible to check your work when that end is hidden from view.

And an exposed rivet shank would accommodate the addition of a P-clip or tiny D-ring using the same rivet. Or even a pad eye if a second pop rivet hole was drilled 1 ½ inches away.

For purely aesthetic reasons I would still prefer the rivet ends be hidden in some void within the gunwale. For a decked boat like the Rob Roy there might be practical reasons as well, so you couldn’t snag or slice a dry bag when stuffing it under the decks.

For either type of aluminum gunwale it would pay to cut off a section of the excess and install a couple of pop rivets through that loose piece first.

Stick a scrap of thin Lauan or etc in the channel to approximate the hull material, drill some holes and install some test pop rivets. That would reveal the best length and diameter rivet, where best to drill the holes so the nosepiece of the pop rivet gun can seat properly and provide a little practical pop rivet practice

The rivet-able lip of the MRC barely accommodates a 3/16 inch diameter pop rivet, and with the nose-piece placed as high as possible still leave a bit of the flat rivet head sticking out below the bottom of the aluminum inwale ( those were the only size rivet I had on hand in regunwale quantity).
 
Without an interesting boat project in the shop I am vicariously enjoying Doug’s Rob Roy re-gunwaling.

Some months ago Doug generously offered me first dibs on the Rob Roy when he found it, but that was back when it had (albeit poorly installed) gunwales and could actually be paddled.

In a humanitarian gesture I have offered him half what he paid and a case of Yuengling for the now gunwale-less Rob Roy remains, wishing only to spare him any further trials and travails. It simply pains my heart to see a fellow boat tinkerer suffer so.

I think aluminum gunwales are going to work. And I’m starting to like the simplicity of the Wenonah one piece gunwales, exposed rivet shanks be danged.

Aluminum gunwales will need a couple or four of those thwart end L clips, two for the thwart behind the seat and maybe two for a short carry thwart up front.

What to do with the aluminum gunwale transition at the bow and stern ends of the Rob Roy might get a little tricky

https://www.google.com/search?q=Bel...=RCDXVveSDcXimAHgzr64Bg#imgrc=otpd33hoCVyPMM:

On the front an inset deck plate is going to be dang near impossible, and a top mounted wood deck plate will rest poorly unless some curved reveal is routed out on the bottom, so the deck plate nestles on the curved top of the gunwales. In any fashion that would provide the perfect crevices to accumulate dirt and debris wood rot in an otherwise maintenance-free aluminum gunwale rebuild.

And, honestly, a wood deck plate on aluminum gunwales is just gonna look weird.

The easiest solution would be to find one of those winky (and near weightless) Wenonah end caps that approximates the bow gunwale angle of the Rob Roy, and simply pop rivet it in place, just like Wenonah does. That would happily eliminate any need to custom cut the ends of the gunwales so they fit precisely flush-angled /\ together below a top mounted deck plate.

I just poked my fingers in and checked, the ends of the aluminum gunwales on the Wenonah Wilderness are simply cut straight, and end a good three or four inches shy of the stem. Who cares, that little black plastic end cap hides all and looks nice. Easy peezy simple. Good enough for Wenonah, good enough for me.

https://www.google.com/search?q=Wen...ei=mCjXVrivGsnre9ferMgM#imgrc=5tHNh-PNXHKV6M:

When an end cap (or even a big plastic deck plate) has not been a perfect match I have slowly heated them up under a halogen lamp and used a heat gun, making them pliable enough bend inwards to a narrower fit, leaving a bit of arch atop. Once heated and bent they retain that shape.

Using Wenonah gunwales and a Wenonah end cap would guarantee that the profile of the outwale lip fits the profile of the cap.

Using an end cap would necessitate adding a bow carry thwart (via L brackets), but a carry thwart would be a good thing. I don’t especially like hauling or lifting boats via deck plates, and certainly not grabbing end caps. Plus a bow carry thwart would provide a handy place to store the painter line under a wider lateral run of bungee.

To estimate end cap sizing I’d try sliding a couple of short pieces of excess aluminum gunwale up at the bow end and measure/trace the angle of the deck cap needed. Just for funsies the deck cap on my Wenonah Wilderness is 7 ½ inches long by 5 ½ inches wide, outside edge to outside edge. I’d wager that Wenonah makes a narrower version for their longer, skinner hulls.

What to do with the transition of the aluminum gunwales at the back end of the cockpit is trickier. I believe that the OEM wood inwales slipped into slots in that odd (non-functionally designed – Doug knows what I mean) molded back “deck”, and the outwales just abruptly terminated thereabouts on the sides near the back deck.

https://www.google.com/search?q=Bel...=RCDXVveSDcXimAHgzr64Bg#imgrc=8yY66lxJ5qtyLM:

I would probably want to plug that inwale slot in the back deck, and would certainly not want to have the cut-aluminum gunwale ends nakedly exposed on the outside of the hull to rip my flesh in an out-of boat-experience or when walking alongside the boat in camp.

That would be the place for a couple of short, custom shaped wood gunwale sections. A short length of inwale, matching the profile of that slot to fill the hole and an outer piece matching the profile of aluminum gunwale outwale, screwed together in the traditional wood gunwale manner.

heck, if the outwale profile custom matches the black anodized aluminum maybe paint the wood black for a more seamless transition. The wood outwale piece would also provide an extended length lip to capture a spray skirt rand as well.

dang Doug, that seems like an awful lot of work, and we haven’t even gotten to improving the seat.

https://www.google.com/search?q=Bel...ei=uzHXVrW3OIu4ec2NvugK#imgrc=7DTKM3yg71-0-M:

Final offer. $400 and a case of Bud Lite, but you have to deliver the boat to Maryland.
 
The Wenonah end caps I've seen have been narrow and I'm not sure they have enough flare to fit the Rob Roy just from looking at the pictures. Maybe they have other designs with more flare.

I'm not sure about the requirement of L brackets to install thwarts and grab handles when using Wenonah's aluminum gunwales. I know it's not necessary for aluminum thwarts, they're riveted up from the bottom. Not sure about wood ones though, those may require brackets.

Without an interesting boat project in the shop I am vicariously enjoying Doug’s Rob Roy re-gunwaling.

At least one of you is enjoying it.

Alan
 
The Wenonah end caps I've seen have been narrow and I'm not sure they have enough flare to fit the Rob Roy just from looking at the pictures. Maybe they have other designs with more flare.

Hmmm, I thought the one on the Wilderness, sized at 7 ½ long by 5 ½ wide, would be too big. Maybe there is one that is just right.


I'm not sure about the requirement of L brackets to install thwarts and grab handles when using Wenonah's aluminum gunwales. I know it's not necessary for aluminum thwarts, they're riveted up from the bottom. Not sure about wood ones though, those may require brackets.

I think using wood would require the L brackets. But I hadn’t thought about using black anodized aluminum for the thwart behind the seat and the carry thwart. That would be pop rivet simple, maintenance free and aesthetically pleasing with black aluminum gunwales.

I just happen to have a couple of lengths of 1 inch black anodized aluminum tube in the shop. I just need to think about an embarrassing faux label to tape on the back of the box.
 
Hmmm, I thought the one on the Wilderness, sized at 7 ½ long by 5 ½ wide, would be too big. Maybe there is one that is just right.

I missed that measurement in your first post. That sounds longer and wider than the ones I've seen. I've had them on a couple Wenonah canoes I've owned as well as some I bought from Northwest Canoe in St. Paul. Those were all quite skinny for boats like the Prism or MN II.

I thought the cockpit of the Rob Roy looked it had a good deal more flare than the bow of something like the Prism:

wenonah-prism-canoe_6.jpg


Here's the Wilderness:

Wilderness-Large.jpg


And the Rob Roy:

robroy.jpg


I still think the Rob Roy rails look like they have a lot more flare.

Alan
 
Back
Top