• Happy International Cat Day! 🐈😻🐈‍⬛

Sawyer 17’9” Cruiser on a diet

Jim,
I forgot to ask
Did you do any of your composite copies with the stems closed?
The Sawyer has no tumblehome and slightly laid out stems, I think I don’t need to leave the stems open. Pretty sure it would pop off the plug with fully finished stems.
I went back and found the advice I'd received from Muskrat. It's on this page: https://www.canoetripping.net/threads/gp-build.37137/page-4

I also went back and read my build thread where I used a male mold for my composite tandem. I did leave the ends open but when it was time to close the ends I put the composite hull back on the male mold to give it the proper shape. And the dang thing stuck on me after wrapping the ends! I had a heck of a time getting it to release and was legit worried I wouldn't get it without damage. Eventually I did but it was close. I think, because there is no give at all in the rigid stems, that it makes it much harder to break even a light bond. On the main hull a few hits with a palm or rubber mallet will flex the hull and cause separation from the mold but not at the stems.

Alan
 
My first canoe was a Cruiser. It made a lot of other canoes seem slow.
You are doing some interesting alchemy here. This where new ideas come from. Keep it up.
 
Well, it's been a heck of a 2024...had to spend way too much time back at my R & D company. So much time, that I had no time to work on the SC-1 (Sawyer carbon copy #1).
Things have finally slowed down a bit, so here's an update.
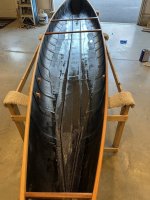
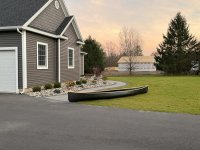
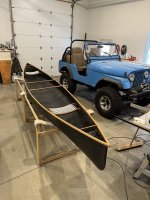
First things first, I had to retrieve the hull from my 48 ft box trailer. I know you guys study these pics carefully (as I do all of yours), in the background is my son and DIL's future detached garage and new house (house is hidden from view).

IMG_5635.JPG

I bought some mahogany planks, at least enough for a handful of thwarts and a couple seats.
Blanked out the thwarts.
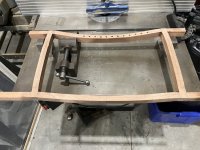
Then I laid out the curved pieces for the Dodd seats, IIRC, I used a 28" radius to give a 1" drop on the long parts, and used the same template to cut the crowned side rails.


IMG_5665.JPG

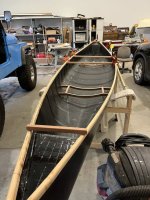
And here's the epoxy assembled seat frames and roughed in thwarts in the hull.

IMG_5666.JPG

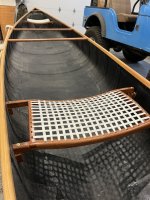
I ordered last week and just received today the same 1/2" fiberglass webbing (tubing actually) that Jim used for his seats.
Then I laid out the holes for the webbing, 7/8" on center.

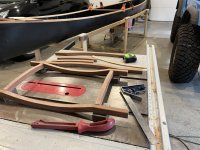
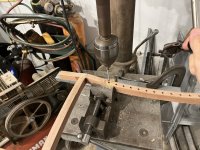
I supported the Dodd seat frames on a couple 1-2-3 blocks on my shaper table and clamped them in a small machine vise. That held the Dodd seats parallel to the bottom of the rails, so I could drill straight holes.
Yeah, I had to move the Dodd seat in the vise several times per rail...

IMG_5673.JPG

Lastly, I clamped a guide rail to my drill press table, so I didn't have to line up the drill in two axes for every hole, just had to line up to the 7/8" spacing for each hole. Drilling goes a little faster that way.
Drilled all the holes with a forstner bit.


IMG_5674.JPG

Thwarts are already shaped and cut to fit the hull. Gotta round over the edges of the Dodd seat frames yet. Then epoxy some cleats to the hull for the Dodd seats, sand, epoxy and screw into place. Then varnish and done!!
Not likely to paddle it this season, but it will likely be christened on a spring 2025 manly trip.
 
Not bad, but I bet you can knock another 10 pounds off that without too much problem. Might have to lighten up woodwork to make that. The next one is a full core rather than ribbed, right? Good luck with it.
 
To close the loop:
Maiden voyage of the Sawyer carbon copy 1 had its challenges. This was in May of 2025.
Upon arrival at our launch site (Big Moose Lake, ADK's) I noticed a problem.
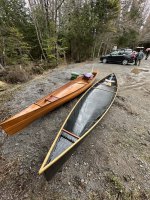
IMG_7069.JPG

Yeah, that was my reaction too! WTF is that seat??? In retrospect, it likely shook loose a mile from home. This was just the first indicator of a series of issues.
In my 40 years working in Research, we used to say that we learn more from our failures than from our successes.
Ok, I learned an awful lot...

Please take a moment to watch this video link below, maybe even watch it a few times, be sure you have sufficient sound


Yup, those unmistakable sounds of delamination.
We did finish the trip with that hull, not much choice unless we wanted to add 10 miles of bushwhacking.
I put the boat away and didn't look at it again until a month ago.

When I finally got around to moving the boat to my garage, I found that the remaining seat was barely attached.
Quick review, hull layup from outside to inside was as follows:
6 ox E glass
6 oz E glass
5,8 oz carbon
1/8" H80 Divinycell
6 oz E glass
This hull was built with all polyester resin, strictly a cost decision. Apparently, we did a terrible job of attaching the 1/8" H80 foam stiffener to the inside of the hull. At this point, I can't remember if we washed the interior to be sure there was no Partal left on the INSIDE of the carbon layer or not. More on that later.
Also, we did not use the finishing resin (with wax) when applying the inner layer of glass. (In another thread, I mistakenly stated that layer was carbon, it was not. It's 6 oz E glass)
As a result, the surface of the final interior layer remained ever so slightly tacky, and would likely remain so for infinity.

So I washed the tacky interior with acetone, removing that eternally tacky surface. Next, I set about removing the remaining seat cleats.
2 of them popped right off, clearly not adhered well at all. 1 cleat was a bit more difficult to remove, and while prying it off, I noticed that the inner layer of glass was separating from the carbon layer, a few sq in worth. I cut that delaminated piece away with a scalpel. The carbon layer under that was extremely smooth, fully wet out and fully cured. (this was the INNER most layer when we were laminating the hull on the plug)
So what went wrong? It seems that the foam to carbon AND the glass to carbon bond was inconsistent. Or is it just a bad idea to expect polyester resin to bond to fully cured polyester resin?
In any case, this is the final build with polyester resin. ALL future builds will be epoxy only.

In an effort to not throw away the hull, I came up with a salvage plan,
The interior now being completely tack free, I decided to add more stiffening on the inside of the hull.
Years ago, I bought a large amount of 3/8" H80 foam, all off cuts from someone else's production runs. This Divinycel was scrim cut from both surfaces to make it more compliant. even so, the 3/8" foam didn't really want to conform, but I imposed my will on it.
I used some Cabosil thickened RAKA epoxy resin to attach the 6-1/2" wide pieces of foam, then added Cabosil thickened epoxy fillets, and finally beveled the foam to allow better conformance of the subsequent 5.8 oz layer of carbon.
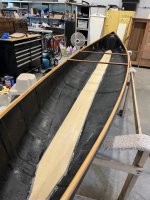
IMG_6910.JPG


And


IMG_6914.JPG

It seems that I may have salvaged this thing, I'llknow for sure once I get seats back in and take it for a test run.
Speaking of seats, I made a replacement Dodd seat from mahogany, same dimensions as the other seat.
I bought some 5/4" thick cedar for cleats. I plan to make the cleats about 12" long, epoxied to the hull, wrapped with 6 oz E glass, AND install a couple screws through the hull into the cleats. Sort of a belt, suspenders and rope approach.

Hopefully, this update might save some of you from traveling down the same errant path that I did...

 
Good idea. My first canoe was a Sawyer Cruiser. It had been wrapped and unfolded. I added a lot of fiberglass cloth and epoxy so it was heavy. A great boat but not so good in large waves. The bow is so sheer it cuts through waves instead of going over them. I paddled mine solo on a lot of river trips. I paid $25 for it and sold it for $400 in about 1995.
 
Back
Top Bottom