G
Guest
Guest
Most of our boats have skid plates. The UL kevlar Malecite does not, and I find myself using that light on the shoulders canoe more frequently. It is a dedicated lake boat, usually wet-footed entry/exit, but I know that delicate practice won’t last, and it was dragged up on more than a few sandy beaches before being repaired and painted.
The stems are so sharp, and carried back so far into the vee bottom, that I don’t need a bulbous downriver canoe skid plate, just a narrow strip along the vee stems. I had thought about using 2” E-glass tape, but E-glass does not hold up well to abrasion.
Time for some 1 ¾” wide Dynel sleeve, peel ply covered and roller compressed.
 P9070002 by Mike McCrea, on Flickr
30” long strips of 1 ¾” Dynel sleeve, longer strips of 4” peel ply. Having a roll of pre-cut 4” peel ply tape made that Dynel sleeve cover sooooo much easier. I am already loving that rolled, release treated peel ply. Enough that I ordered a 6” wide roll, some will surely be shared.
So much easier snip-snip cutting rolls of material to needed length, with no ugly strays and sloppy scissor cut frays along the edges.
https://www.aircraftspruce.com/catalog/cmpages/peelply.php
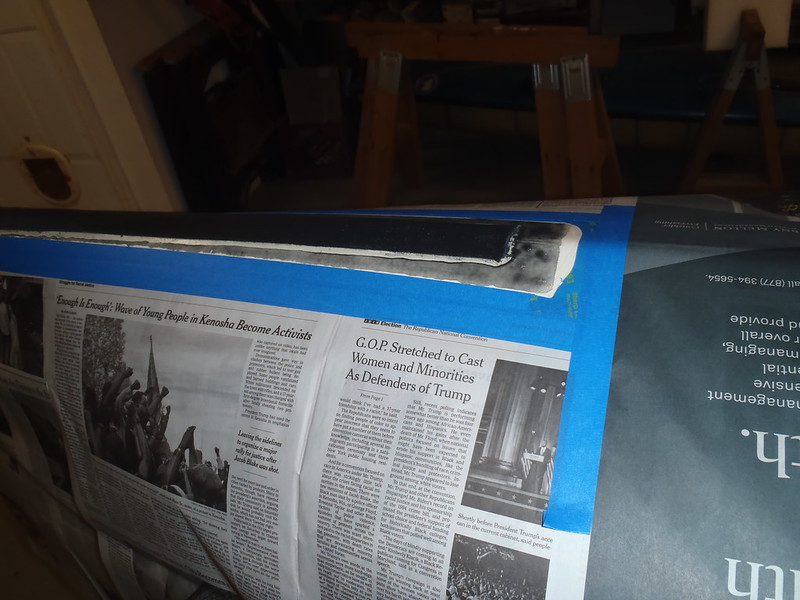
Dynel sleeve dry fitted on the hull for length/width and perimeter edge taped, then papered to catch my heavy hand drips.
 P9070004 by Mike McCrea, on Flickr
 P9070008 by Mike McCrea, on Flickr
The Dynel sleeve is from Sweet Composites, here in the catalog under Dynel sleeve and cord.
https://sweetcomposites.com/Polyester.html
What Sweets calls “light weight” sleeve is 1 ½” wide, the “standard” sleeve is 1 ¾” wide; the fabric weights and weave seem identical.
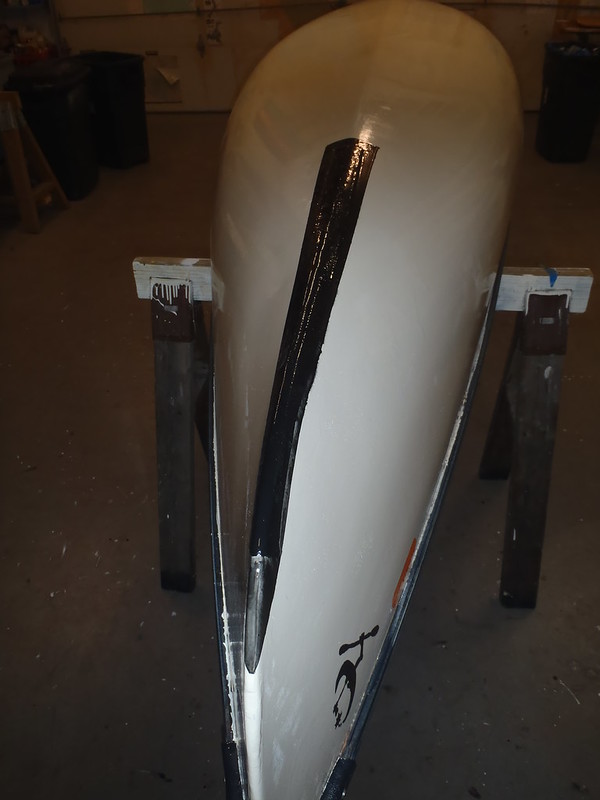
This time I remembered to apply a bottom epoxy coat with just 105/205 and black pigment, no graphite powder on that bottom coat. No reason for it on the bottom, and I don’t think the graphite powder penetrates the tight woven Dynel sleeve very far.
Dynel sleeve laid on, checked/shifted a bit so that it was even between the tape lines, heavy coat of 105/206/black pigment and graphite powder painted atop. Heavy because that is a 2-layer sleeve for the top coat to penetrate & saturate, and the sharp, near vertical vee stems don’t hold on to epoxy well.
The usually Sharipe marking of the necessarily heavy handed drips.
 P9070009 by Mike McCrea, on Flickr
Once the marked drips stop running the paper and tape comes off, the peel ply goes, on and it is time for roller compression, especially along the edges and ends of the sleeve.
 P9070013 by Mike McCrea, on Flickr
Even after some hard roller babysitting the cut ends of the Dynel sleeve, as always, want to rise up in rebellion, especially the sleeve end at the sharp stem curve. No amount to hard roller babysitting would prevent that, and in the past I just filed off or Dremeled down the offending protrusions once the epoxy cured.
This time I tried a DougD/DaveO trick. I laid a square of Stretch-Tite food wrap atop the peel ply and taped it down taut.
 P9080017 by Mike McCrea, on Flickr
There may be no one clumsier handling that cling-wrap type plastic that me, but it can’t hurt, and I can always file/Dremel/sand down any remaining rebellious end rises or wrinkles.
The hardest part is waiting for the peel ply pull reveal. Release treated peel ply; I’m not pulling it ‘til tomorrow. It’s like a kid waiting for Christmas morning.
The stems are so sharp, and carried back so far into the vee bottom, that I don’t need a bulbous downriver canoe skid plate, just a narrow strip along the vee stems. I had thought about using 2” E-glass tape, but E-glass does not hold up well to abrasion.
Time for some 1 ¾” wide Dynel sleeve, peel ply covered and roller compressed.
P9070002 by Mike McCrea, on Flickr30” long strips of 1 ¾” Dynel sleeve, longer strips of 4” peel ply. Having a roll of pre-cut 4” peel ply tape made that Dynel sleeve cover sooooo much easier. I am already loving that rolled, release treated peel ply. Enough that I ordered a 6” wide roll, some will surely be shared.
So much easier snip-snip cutting rolls of material to needed length, with no ugly strays and sloppy scissor cut frays along the edges.
https://www.aircraftspruce.com/catalog/cmpages/peelply.php
Dynel sleeve dry fitted on the hull for length/width and perimeter edge taped, then papered to catch my heavy hand drips.
P9070004 by Mike McCrea, on FlickrP9070008 by Mike McCrea, on FlickrThe Dynel sleeve is from Sweet Composites, here in the catalog under Dynel sleeve and cord.
https://sweetcomposites.com/Polyester.html
What Sweets calls “light weight” sleeve is 1 ½” wide, the “standard” sleeve is 1 ¾” wide; the fabric weights and weave seem identical.
This time I remembered to apply a bottom epoxy coat with just 105/205 and black pigment, no graphite powder on that bottom coat. No reason for it on the bottom, and I don’t think the graphite powder penetrates the tight woven Dynel sleeve very far.
Dynel sleeve laid on, checked/shifted a bit so that it was even between the tape lines, heavy coat of 105/206/black pigment and graphite powder painted atop. Heavy because that is a 2-layer sleeve for the top coat to penetrate & saturate, and the sharp, near vertical vee stems don’t hold on to epoxy well.
The usually Sharipe marking of the necessarily heavy handed drips.
P9070009 by Mike McCrea, on FlickrOnce the marked drips stop running the paper and tape comes off, the peel ply goes, on and it is time for roller compression, especially along the edges and ends of the sleeve.
P9070013 by Mike McCrea, on FlickrEven after some hard roller babysitting the cut ends of the Dynel sleeve, as always, want to rise up in rebellion, especially the sleeve end at the sharp stem curve. No amount to hard roller babysitting would prevent that, and in the past I just filed off or Dremeled down the offending protrusions once the epoxy cured.
This time I tried a DougD/DaveO trick. I laid a square of Stretch-Tite food wrap atop the peel ply and taped it down taut.
P9080017 by Mike McCrea, on FlickrThere may be no one clumsier handling that cling-wrap type plastic that me, but it can’t hurt, and I can always file/Dremel/sand down any remaining rebellious end rises or wrinkles.
The hardest part is waiting for the peel ply pull reveal. Release treated peel ply; I’m not pulling it ‘til tomorrow. It’s like a kid waiting for Christmas morning.