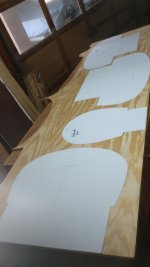
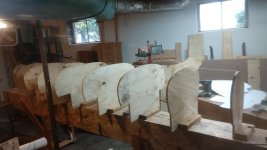
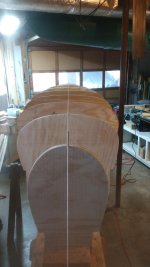
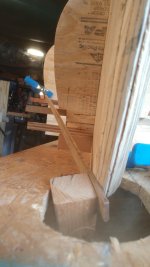
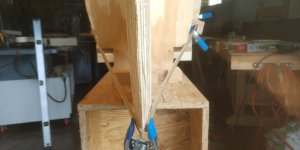
Making some progress. Sort of laid off this week, so I've had a little more time to work on my forms. One of my forms, #4 , has a flat spot in one of these pictures. I need to fix this problem. Another mistake I made was I ground to much off one of my end forms, I got carried away, I should've rounded the part of the edge. I think I'll have to remake that one. Wow! I'm running a little snug on space. Maybe I'll move it outside for a better eyeballing if it'll ever quit raining. Everything looks straight and true, but I don't want to proceed untill I'm comfortable with the forms.
-
Happy Marine Mammal Rescue Day! 🐳🐬🦭🦦
You are using an out of date browser. It may not display this or other websites correctly.
You should upgrade or use an alternative browser.
You should upgrade or use an alternative browser.
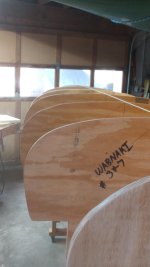
Roy's Mystery Wood Canoe
- Thread starter Roybrew
- Start date
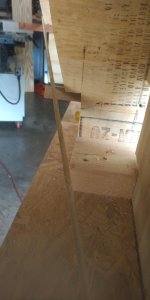
The flat spot on the form is no big deal. I'd staple a thin piece of wood in that spot and then finish building it up with tape. Of if you want to spend a little more time glue down enough wood that you can go back and sand it fair.
I remember this stage being very difficult on my first build. It's hard to know what's good enough and just how to check it. I lay a strip along the sheer lines, keel line, and the bilge on each side to make sure it's hitting all the forms with no dips or bulges. Bulges get fixed with the sander and dips get built up with tape. I don't check all these spots at the same time but rather I move the strip from location to location.
As for tapering the edge of the stem forms I used to do it a little bit at a time as I stripped the hull but now I do the full rolling bevel before I start stripping. Here's how I do it:
Draw a pencil line vertically on the front edge of the stem form, dividing it in half (3/8" assuming you're using 3/4" material.
Use a ROS with 50 grit or coarser paper to sand something like a 60 degree angle on each side of the stem at the sheer line that tapers to no, or very little bevel, at the bottom of the canoe. The angles will meet at the center line you drew on the stem form. This is just to get rid of a majority of the material with no thinking or measuring.
I use a short strip that's long enough to contact the first couple forms and the stem. I just hold it in place along the sheer line and look to see how it contacts the stem form. When done it should lay nice and flat on the bevel you're sanding but at this point it shouldn't. Slide the strip 4" up and down the hull and you'll probably see there is little to no appreciable difference in the angle it contacts the stem form. Now use your sander to sand off more material until the bevel is correct for that 6". You won't be sanding any more material off the tip (you're already down to the center line). You'll just be making the angle larger until the strip lays pretty flat along the bevel.
Now go up another 4" or so and do the same thing. Continue all the way to the top and then switch over to the other side.
You'll find that you can't just do 4" at a time. You'll need to sand off some material higher up as well but it's that 4" patch at a time that you're worrying about getting perfect. Just make sure you don't take the bevel down too much in the next area before you get there.
As you get closer to the top of the upside down hull it gets harder to figure out the bevel as it can be hard to figure out just what angle the strips will be running. I often leave this area untouched until farther along in the stripping process. Then I can see how the strips will be coming in and I can use another short piece as a guide to set the last bit of bevel.
I don't know if that makes much sense or not but it works for me.
Alan
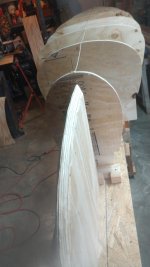
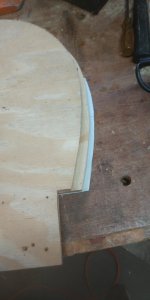
I was looking for a pic, of how I tapered the leading edge of my stem forms. I just used a disc sander on a drill..
Using the layers of the plywood helped to gauge the amount of taper. I also used the strips as Alan describes above.
This was the best I could find.

Jim
Using the layers of the plywood helped to gauge the amount of taper. I also used the strips as Alan describes above.
This was the best I could find.
Jim
You all are great! Thanks for advice. I did just what Alen said and added a piece on top of the flat spot, glued and screwed, till it dries then I'll sand it smooth. I'll have to re-read how you said to do the stems, that's going to take some thinking for me. I cut the top parts off of my stem, the part I tapered instead rounding, and glue a piece on. I'll reshape it in the morning. Thanks for the picture Jim. I was wondering how everything is supposed to look. The more pictures the better. You wouldn't believe all the pictures of finished strip canoes I've looked at, so I could figure stuff out like strip color orientation, how the strips lay and all that other stuff. I've only seen 1 wood strip canoe in person. Sad ain't it?
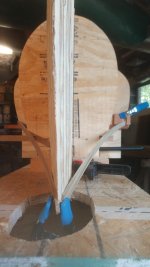
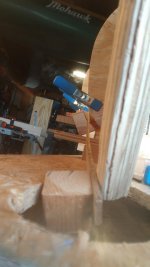
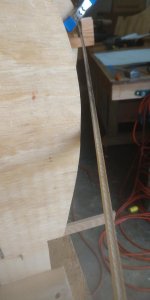
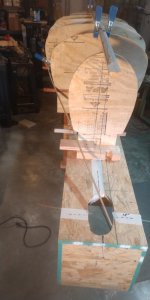
I need some advice. My 1st and last station, that mount to my stem forms, look like they are to narrow. #1 and #9 forms pull my strip inward giving it a concave look. I have all 9 stations on 18 inch center, squared and straight. I have rechecked my forms with the print, and everything looks correct. I am using 5/8 thick plywood, and I laminated two pieces together, for the stems, according to instructions. I know I have something off, but I can't figure it out. Both ends are the same. Any help is greatly appreciated. I hope the pictures help
Attachments

I would say by looking at your pics. And they are helpful !
Your stem forms are a little long.
I'd remove the stem forms, and cut 1/4" off the edge that mates up against the station. Remount, and check. Repeat until you are happy with the fairing.. Also check the Fairing at the bilge area, as you adjust the Stem forms !
You are on the right track !
Jim
Your stem forms are a little long.
I'd remove the stem forms, and cut 1/4" off the edge that mates up against the station. Remount, and check. Repeat until you are happy with the fairing.. Also check the Fairing at the bilge area, as you adjust the Stem forms !
You are on the right track !
Jim
Last edited:
Some canoes have a bit of cheek in them toward the bow and stern. Perhaps someone who has built this model before could answer. Some of the J. Winters designs I have built had noticeable cheek in them in the last station, it was disconcerting for sure until I realized it was part of the design. Are you saying that the distance between forms is 18 inches? That is quite a stretch, and you will probably need to do some extra clamping between stations to get tight fits with the strips.
Do you just have the station molds from the plans or do you have a set of ‘lines drawings’ too? They would tell it there is supposed to be a hollow entry. Also it looks like you are bending the strip down to follow the shear. If so run it straight and see how it looks.
Jim
Jim
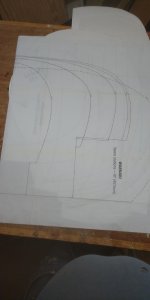
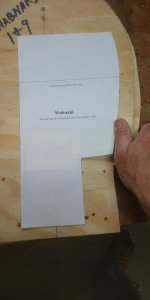
Ok, attached is copy of print that came out of the book. Jim D, I thought about shortening the stems. I would estimate 4 inches? Eww that looks like alot.
Memaquay, I don't think this one is supposed to have a cheek? DC Loots has completed his exterior fiberglass, and I didn't see a cheek on his. I'm doing the same canoe, Wabnaki by Gil Gilpatrick.
Boatman53, the strips are supposed to follow the shearline, as far as I understand.
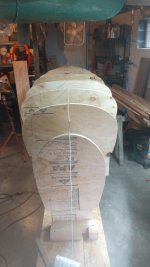
It almost looks like my station before the stem is to narrow about 3/4 of an inch on both sides. On the right side I moved a strip up, I estimate, about 10 strips, and keeping it even distance from the shear, and it still looks out about about 3/4 of an inch.
Could the print for this one station be off?
Thanks Y'all, in Tennessee thats you all, thanks for the advice.
Roy
Memaquay, I don't think this one is supposed to have a cheek? DC Loots has completed his exterior fiberglass, and I didn't see a cheek on his. I'm doing the same canoe, Wabnaki by Gil Gilpatrick.
Boatman53, the strips are supposed to follow the shearline, as far as I understand.
It almost looks like my station before the stem is to narrow about 3/4 of an inch on both sides. On the right side I moved a strip up, I estimate, about 10 strips, and keeping it even distance from the shear, and it still looks out about about 3/4 of an inch.
Could the print for this one station be off?
Thanks Y'all, in Tennessee thats you all, thanks for the advice.
Roy
Attachments

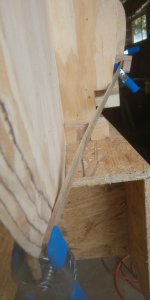
Did some adjusting and modifications. I hope I'm not screwing up anything else. The shearline looks great now! I'll add my add my full size strips in a day or so, and take a long good look at it. I still don't understand where I went wrong. Got to go back to work tonight. Ha want to hear something funny. My wife came down to the basement to check on me, and she said "I just thought you'd enjoy reading that canoe book. I didn't know you were serious about building one".
I greatly appreciate y'alls input on this.
As always Thank You
Roy
I greatly appreciate y'alls input on this.
As always Thank You
Roy
Attachments

Sorry I missed this earlier. When I built my Wabnaki, Mr. Gilpatrick (whom I was emailing) told me there was an error in the drawings. Either the last station or the stem -- I can't remember which. Anyhow, he emailed me a pdf of the correct form and I used it.
Here's what the Wabnaki looks like.

Here's what the Wabnaki looks like.
Ah ha! Yes I just got mail from DC Loots about the plans. Alsg, I remember you building that one in your sun room. Something about women just don't understand. Must be universal?
Got to get to work now. Thank you
Roy
Got to get to work now. Thank you
Roy
Ok, attached is copy of print that came out of the book. Jim D, I thought about shortening the stems. I would estimate 4 inches? Eww that looks like alot.
You miss read my post Shorten the stem for a 1/4" at a time.
I found my old correspondence with Mr. Gilpatrick. It was the last station before the stem form (at both ends since the canoe is symmetrical). It was too narrow. I don't seem to have the pdf file he sent me with the corrected drawing.
Thanks Aslg, but Dcloots sent me the revision. Many thanks to him for that. I printed it up and placed it under the station I modified yesterday, and I laid the original station on top of my modified one. Big difference! I came close, but not close enough. Maybe some time this week I'll get to work on it, maybe.
Roy
Roy
Attachments
Yes many thanks Aslg for your time and input.
Wow, that's quite an error, perhaps you have mentioned it already, but did you buy the plans? Wonder how many people have built that canoe as a "cheeked" version?
Similar threads
- Replies
- 14
- Views
- 631
- Replies
- 138
- Views
- 9K