• Happy Marine Mammal Rescue Day! 🐳🐬🦭🦦

(Finally) starting from scratch.

Thanks Alan. I did tape some of the larger gaps (& one small knot that fell out after I'd glued the strip in place) but I did that as I was stripping it. Next time I'll have to look up from underneath. Maybe it won't be so bad... I like being pleasantly surprised.
 
Being so close to getting it off of the forms, I swiped a couple of hours between work & work today (made me late for my evening appointment but SOOO worth it!)

I'd picked up a 10 foot long White Oak 1x10 from the overhead of the barn on Sunday so I cut about 10 strips from it using the stripping saw. I also inspected the seat rails that I'd made after breaking the one the other day and noticed that the top strip of Cherry is already cracked on the front rail. I believe I've got 2 problems. 1) the transition from the top to the 2 inch drop is too abrupt (and I doubt I need 2" of drop anyway) and 2) the Cherry, cut that thin, is a bit brittle for being bent dry.

I'm hoping to solve this by soaking the Cherry and Oak strips in water for a few days, clamp them in the jig for a few more and then epoxy them and reclamp in the jig. I'll also cut new jigs to make a more gradual transition into the drop. I'm even considering building a steam chamber but, if I'm that far down the rabbithole, I guess I should have listened to the Bear Mountain lady and steamed some stems! (ugh! where does it end? ;))

I wiped the dust off the hull, spent an hour scuffing it with a scotchbrite pad and then quickly went over it again with 120 grit. Satisfied that the epoxy is roughed up enough to have tooth for the spar, I unscrewed the remaining forms & knocked them loose. Literally, as I had to, in most cases, reach up inside & whack the form back & forth a few times to break the seal of the hull to the tape. I then twisted the form so I could remove them around the tumblehome.

I was surprised by how hard I had to pry on the forms to get the bow and stern loose and I'll have to paper the strongback next time as well as the floor (I slopped a fair amount of epoxy around the base of the forms). I'd come too far, however, to be denied at this point and, besides, I had a prybar...

image000000 (38).jpg

I pried up on the end forms to break them loose, lifted the canoe off, laid it on the floor and beat the bow & stern forms loose with a spare hunk of Hemlock 2x4 (honestly, those things are almost as useful as Ducttape).

I was very pleased when the stern form popped loose with only a ton of tape stuck to the stem instead of having glued the form to it when I sliced the strips to reglue them.

image000001 (1).jpg

I then attempted to build a cradle using the #4 & #13 forms

image000002 (1).jpg

but I'll need to revise the design and get something that sits on, or nearly on, the strongback as these are elevated and it will be much easier to sand if they are as close to the deck of the strongback as possible.

image000000 (39).jpg

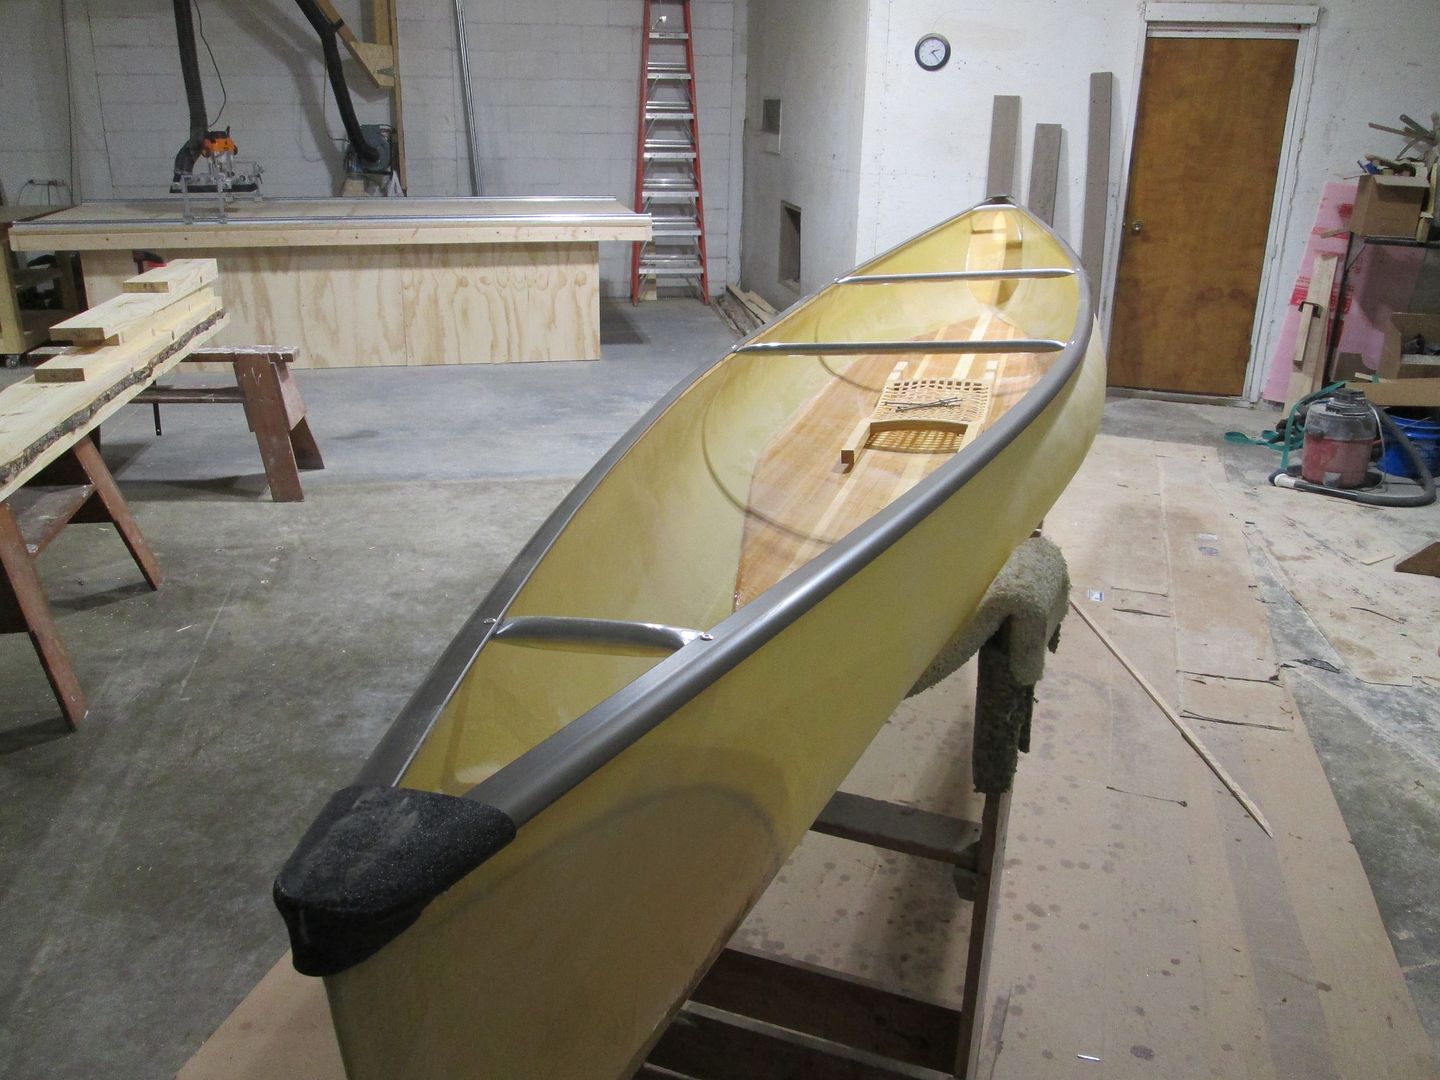
One thing that I was ecstatic about was the condition of the inside hull. As I said previously, I love being pleasantly surprised and, perhaps because I had expected the worst, I was shocked by how clean it appears to be. Maybe I'm a slow learner but I'm really feeling I'm going to merely do a cursory run at the "sucky sanding part" again and just glass it.

image000003 (1).jpg

One thing that will have to happen, however, is that I'll need to remove this.

image000002 (2).jpg

It's a small piece of aspen that I'd used to help align strips during some creative clamping. I'm not really sure how securely it's attached but it's not in a place where I can hide it under the seat or inside a bulkhead. Not to worry; I'll knock it off of there. Afterward, if I think of it, I'd like to get a weight. (I wouldn't want that piece of Aspen scrap throwing the scales off. Maybe I should lose the 3 pounds of tape too...)

When lifting it off, I was pleased with the stiffness and I was pleasantly surprised at how light it is but I also realize that I've got a fair amount of weight to add before it's seaworthy. I'd considered having my buddy come up & help flip it but stairs are difficult for him right now so I managed (actually far more easily than I expected).

Next up: fashion better cradles, soak the seat wood, (possibly haul my wallpaper steamer over... like it's not hot enough up there already) and clean up the inside. With any luck at all, I'll glass the inside (just a wet-out coat) this weekend.

Can I throw 2-3 coats of spar varnish on the epoxy the same day I wet it out?
 
That white Aspen is pretty. I like the cherry accent strips. I wouldn't haphazardly try to beat the chunk of wood off. You might crack the hull. Maybe shave it away with a sharp chisel.
Your build is looking great.
Roy
 
If it were me, I would probably put the varnish to the exterior now. You might need one last coat after you finish everything else, but it is nice to have that out of the way.

Lots of people use a sharpened paint scraper with the ends rounded off as a first method of attack on the inside. I have used this before too, it is somewhat effective.

I'm assuming you are being sarcastic about varnishing the same day as wetting out, lol.

I used cherry for my trim this time, and I forgot what a brittle wood it is. It looks nice, and it's light, but it wouldn't be my first choice for durability or strength.

Anyway. looks great, and you are speeding right along!
 
Thanks Roy. I like the white of the Aspen as well although I am a bit concerned (because it's so white) about bright sunlight. I think all the dark Aspen will reduce glare also but I may have to haul extra gear to cover some of it up (or look for muddy landings). And don't worry, I'll carefully knock off that chunk but I doubt it's glued on very securely.

Mem, I really don't know how long I should wait to varnish but I do know it's more than 2 hours. One reason I had for waiting to varnish the exterior was that I'll probably epoxy the gunwales to the hull. Will the epoxy stick better to epoxy than varnish or is it basically superglue with a longer set time?
 
You're making great progress and your hull looks really nice. On my build I used clear packing tape on the forms and had no tape transfer to the hull. Thanks for taking time to post your build in such nice detail.
 
Ya, epoxy probably doesnt like varnish. You could always screw the gunwales on, lol.

This is good advice. I always glued my gunwales on. I think I thought I was doing it to save weight or just to be different. On the last hull I built I decided to screw them on and, wow, it's so much easier! If I get back into building I'll be screwing for sure.

Alan
 
Don't glue your gunnels on ! They will last too long, and seal our Rotting moisture !

Use a Nail gun ! It's much faster ! When your gunnels rot ? They will come off easier !

There are many things you can do, building a canoe, that will save you more time, than the time it takes to glue a set of gunnels on !
Do it right the first time, or do it again sooner.

In reality ? Glue ( Epoxy and filler ) Will make your gunnels part of your canoe, and sealing out rotting moisture, and will add years to the life of your canoe. A fact you can take to the bank.

Fit your inwhales, and screw them into place with # 6 screws. Remove screws. Coat the hull side of the inwhale with mixed epoxy. After the epoxy has soaked into the inwhale, a few minutes, add epoxy mixed with filler.
The screw holes in the inwhale, will aid in aligning the inwhale to the hull.
Far fewer clamps are needed.
I cap the hull with my outwhale. Sealing the hull and gunnels .

You have put a lot of time making the hull !
Why not ? Even if it takes a little longer, would you not want seal the gunnels, giving it longer, stronger life ?

If you want to save time ? Buy a set of Aluminum gunnels, and rivet them on !

IMG_4168.JPG


Sorry for the Rant ! It's been one of those days !
 
Last edited:
For the forms, especially the stem forms ! Next time, try taping the forms with clear Packing tape ! Forms will release easily, and leave nothing to clean up .
 
On my build I used clear packing tape on the forms
...try taping the forms with clear Packing tape
Sounds reasonable and 2 votes is always promising... I may try it (I'll be building a few more). Another suggestion, made by my "landlord" as he's done gunstocks this way, is to wax the tape with car wax after taping the forms.

I may try it that way on the next one just to let you guys know how it worked. I know for sure I'll have to do something... the tape tucked into the stems is gonna be a mother to get out and the pieces I put over holes peeled right off while the tape on the forms left a lot of residual stuck to the hull. It's just stuck with wood glue though so It should come off more easily than if it were epoxy (judging by my experience with the bulkheads).

I stopped over briefly tonight & pulled off what tape I could, stuffed 14 3 foot long Oak & Cherry strips into a 10' piece of 2" pvc filled with water and I cleaned the shop floor (yeah... I know... I wasn't gonna clean til done... I'll blame my friend Cathy... she's encouraging civilized behavior... not to worry though, I'm still plenty feral so I'll be ok...)

Use a Nail gun !
Careful, I might.

Actually, my plan for the gunwales, thwarts & seats will make them all integral to the structure of the hull. Unless I miss my guess, the boat will be completely disposable in that it will last as long as it lasts but, in the event that any one piece actually fails, it will be such a PIA to repair that nobody will bother. I'm ok with that.

I was also told that it's likely to take a severe beating on its maiden voyage... I'm good with that too. I'd much rather beat up something I built than to whoop on something professionally done or (in the case of my Sawyers) something that isn't made any more.

I'm figuring on soaking the wood for 2 days & bending when I get home from a trip to Morgantown. Next test lamination will be 4 Cherry strips & 3 White Oak per cross rail, revised jigs to make the transition from flat to drop more gradual and front drop of only 1 inch. Still undecided whether to make the rear crossrail drop an inch also or leave it flat but I'm soaking 14 pieces... I guess I could make a straight back rail and use the other soaked strips as a tester to see how tough it is...
 
Last edited:
I agree with Jim Dodd. I epoxied my gunnels on. No screws and no drilling holes. I figured I would have to clamp the gunnels on either way whether I used screws or epoxied them. Epoxying them on seemed like it would be more solid. But I'm no expert cause that was the only one I've built, so far.

But the gunnels stayed in tact when my air compressor blew up and it blew the twin air cylinder thru the basement garage door, and it struck the gunnels and landed in the bottom of the canoe. It tore a chunk out of the inner gunnel, cracked the top two shear strips. It didn't break the gunnel off tho, so I figured it is a solid way to attach them. Wasn't to hard to remove the damaged sections and splice in new pieces. No screws on repair either, epoxied sections back in. I have to look to find where I've repaired it.2022-10-14.jpg2022-10-14.jpg
I took no pictures of the twin cylinder laying in the bottom of the canoe, in a big oily puddle. My wife cried when she saw it.

I will epoxy my gunnels on when I build another.
Roy
 
It just seems like if a person doesn't run a screw in properly, or maybe splits part of the gunnel when tightening the screw, or any other damage a misplaced screw mistake can cause, it would require repairing the damage that you have just created. Epoxying the gunnels on allowed me to slide them a little in place before securing with a clamp. Clean up was simply wiping the squeezed out epoxy up with my finger then using a paper towel to finish cleaning up.
Roy
 
I wouldn't wax the tape . No need to add more possible contaminates to the hull.
Plastic packing tape is all you need.

As for the blue tape sticking to the hull ?
You didn't fill your staple holes before wetting the hull. This step, many over look.
After the first initial sanding ? I apply wood glue to the staple holes with my finger.
Really doesn't take long, but fills the holes, preventing epoxy seeping through the hull via staple holes. It works. Saves time sanding, and scraping the inside.

Roy's regulator, likely stuck open on the compressor. Happened to my youngest son ! Luckily no one was there !
They can be little Time Bombs !

Jim
 
Wow Roy, that's quite the scrap pile! Any idea what caused the detonation?
What Jim just said. Yes an old compressor tank is a time bomb. The explosion blew all the windows out in my basement. Shook some picture frames off the walls upstairs and some of my wife's porcelain animals fell off shelves.

Your canoe is looking great. That canoe may end up being your favorite one, last the rest of your life and maybe end up with a descendant who cherishes it because you built it. Life gets busy and complicated you may never get a chance to build another. You've got to give it a name too.
Roy
 
You've got to give it a name too
LOL Possible but doubtful. I've got over 300K miles on my Ranger & hope to get 100K more and, although I sometimes call it dirty names, it's never actually gotten one (it won't come when called and I doubt that it cares any way).

I expect the canoe to be the same; I may feel fondly towards it but it will be a tool and not a pet.

One possible exception is if I can get the Sumac stripper done. Trimmed in Hemlock, I might dub it "Poison". To be true to my Pittsburgh roots, I may even build a Sumac & Hemlock tandem and then I'd have "Big Poison" and "Little Poison" (aka Paul & Lloyd).
 
I got a little more done this past week and weekend.

I bought another paint scraper & rounded the edges enough to knock off the sharp corners then scraped the hull. It worked pretty well to remove glue that squeezed out and got rid of most of the tape.

IMG_20230729_145609014.jpg

I used a combination of a half round rasp, razor blade, utility knife and sandpaper to get it all off and I wound up sanding the hull a lot smoother than I had intended by the time the tape was gone.

Sanding is tedious and gives plenty of time for introspection (which, in turn seems to help keep you from hating your life during the interminable sanding) and it occurred to me that there is no reason to try car waxing the blue tape. Not only would it be an extra step but I really respect the accumulated knowledge on this forum as well as the willingness to share that knowledge. I've got 2 builders on here telling me that clear packaging tape works well (and, at this point, a complete loathing of blue tape) so I'll try that on the next one instead. Sorry if I offended with my earlier assertion that I'd try something different... honestly, hand sanding tiny specks of blue in the upstairs of a garage when it's 94° F and relative humidity is 93% can change your opinion on lots of things. (I mentioned that the next one gets built in the winter, right?)

DSCN1391.JPG

Anyway, It's now 4 weeks to launch and, although I've got the inside prepped, I decided not to glass this weekend in hopes that I can have (at least the inner) gunwales ready to go before glassing. The reason for this is to get a chemical bond by slapping the inner gunwales on before the wet-out coat is cured. My plan is to get the bulkheads, inner gunwales & thwarts all cut and prepped, then epoxy the inside and, 3 hours later, epoxy the bulkheads & trim onto the hull. I'd like to epoxy the seat supports at the same time but I'm still undecided as to how far back the seat should be. (probably further back than "normal" but I'm just not sure how far) I'd also like it to be adjustable and I plan to use it as structural hull support. (Still working on the logistics of all of that and I may not have time to figure out the geometry for this boat so that might have to wait for the Raven)

I had soaked some 36 inch White Oak and Cherry strips and pulled them out mid-week. I'd made 2 more seat jigs with more gradual tapers so I stacked the soaked Cherry & Oak in them & clamped them tight. They conformed nicely and I didn't hear any cracking so I moved both downstairs into the a/c to dry. I'll likely take them apart and epoxy them back together tomorrow so I can assemble the seat this weekend.

IMG_20230727_192923092_HDR.jpgIMG_20230727_193107149_HDR.jpg

I added another minor screw-up to the list when I'd trimmed the excess glass from the sheer before I put the last 2 coats of epoxy on. This resulted in drips hanging down and I needed a good way to remove them. I tried a pair of dikes and they worked ok but it was slow work that still required a good deal of filing so, once again, I attacked the situation using tools I with which I am familiar. Yep; I grabbed my old farrier's rasp.

DSCN1393.JPG

I found that, by coming up while holding the handle close to the hull, I could sneak up on the wood and create a paper thin edge which could then be snapped off and I could finish with the (far less aggressive) half round to clean up the edge of the hull. In all, I think that took about an hour and a half once I figured out how to do it quickly. (sorry, no pictures of that as I needed to support the hull with my left hand and rasp with my right)

I also brought the boat downstairs for my buddy to help cut templates for the bulkheads. His knee has been killing him from a previous injury and I wanted his input on fitting the bulkheads. He couldn't go upstairs so I took the boat down.

IMG_20230730_152836444_HDR.jpg

We made templates out of cardboard, transferred the pattern to the Aspen bulkhead (I'd made 2 but we got both pieces out of the same one), then filed, planed & sanded until they fit. At one point, I cut the one side a bit too far on the rear bulkhead so I took a little more off the bottom to increase the angle and tried again (with better results). I did like having the extra bulkhead blank available as the backup piece meant that I could cut and sand more fearlessly.

IMG_20230730_194436628.jpg

I'd estimate the resulting air space to be a little more than the area within a 5 gallon bucket so it should help float if I swamp but, angled as it is, I expect that it might help strengthen the hull as well. Worst case, it hides the mess in the (missing) stems quite nicely. Again, I'm lax on pictures but I did manage to take one of the front bulkhead pattern.

IMG_20230730_184526855.jpg

I finished the weekend by gluing up some thwart material for grab handles and a center(ish) thwart by laminating Cherry and White Oak strips. I suppose I should find the plans and see where Bear Mtn recommends putting the thwart(s) but I'll probably just wing it. We'll see...
 
You gotta be happy with the way it looks, very nice so far.
I wouldn’t worry about a chemical bond for epoxied on gunnels, seat supports or anything else like that.
I’ve epoxied components on hulls that were finished 10 years prior, never had availed epoxy joint. Most epoxied have around 5,000 psi shear strength, plenty enough for any canoe related stuff.
And clearly you’ve realized the bulkhead trifecta, flotation, strength and hiding the messy stems.
Betcha ant wait to get it wet!
 
I trimmed my first flotation chambers the same way.

Glass the inside first of course !

Put a sharp bevel on the bottom edge, to make it easy to glass, and blend with the hull.
Glass both sides of the insert also !

IMG_1014_zpsq40bm4dx.jpg
 
Back
Top