• Happy May Ray Day! 🌞😎🌻🩳🇩

Carbon Copy Kite

I have to agree, it looks sexy, especially in the Nude so to speak. ! Hoping to see a complete Expose, in "PLAY CANOE" MAGAZINE soon ! :eek:, I'll be look for the fold out ! ;)
Seriously ! Getting it outside really improves the view !
The Stem looks great !
I'm planning on some Dynel, for a skid plate, on CF Nokomis as well. Then cover with another layer of carbon.

Any secrets to removing the PVA ! Maybe soap, and hot water ? Seems like alcohol is used as a solvent also.
Again Nice !

Jim
 
Sven,
The wiggly sheer is a combo of operator error and stiff carbon cloth. I wasn't fully prepared when I wet out the two layers of carbon, it didn't want to follow the sheer completely (the existing gunnels didn't help) and I didn't have any suitable clamps to force the laminate to shape while the epoxy cured.
Live and learn, right? I'm confident that I can straighten out the gunnel profiles, but some of the crease will be wavy. MDB keeps asking if I could just add some filler to those sections, but I don't want to sacrifice light weight for vanity. Performance first, aesthetics last.

Jim,
The PVA just rinses away with some water and a brush. Too easy as long as you have adequate exchange...my attempts with a rag and bucket were woefully inadequate!
Not sure if it shows in the photos, but the shell not only took the form of my Kite, it also took some of the paint!! There are splotches of red all over the inside of the shell, which tells me that the PVA wasn't quite working as well as I initially thought.
After I stiffen up the bottom, I'll scrape those red spots out of the shell, a lot of them will be forever encased between carbon and foam.
 
No Title

On the subject of getting your carbon copy off your nicely finished hull here is something to consider if you were to use one of your canoes as a mold. Cover the canoe with PVA as usual, then wrap it with lightweight Dacron fabric. Secure tightly inside gunwales. Sew the ends shut and shrink the Dacron with heat until it lays tight without any wrinkles.
There are a couple benefits to doing this. The main one being that the Dacron leaves a nicely uniform micro textured surface for secondary bonding. Also leaves a nice non blip surface which some prefer on the inside.
My first canoe was a 1/2 scale model of a pack boat designed by Sam rizzetta. I made it entirely from 6oz s glass (3 layers) using what Sam calls this the fabric form method. That model now resides in my parents house as a mantel.
 

Attachments

  • photo6214.jpg
    photo6214.jpg
    289.1 KB · Views: 1
  • photo6215.jpg
    photo6215.jpg
    239.5 KB · Views: 1
Forgot to mention the Dacron basically works like peel ply. Takes some effort to remove, but isn't that bad.
 
but the shell not only took the form of my Kite, it also took some of the paint!! There are splotches of red all over the inside of the shell, which tells me that the PVA wasn't quite working as well as I initially thought.

I suspect the PVA layer was torn in places during the process of laying out and wetting out the cloth. I've had that happen before and is why I still give the mold a couple coats of wax before applying the PVA.

I used a light coating of PVA on the composite hulls I did and not a whole lot seemed to stick to the inside. I gave it a wash and wipe with a bucket and rag and then sanded until the kevlar started to fuzz before adding more layers to the inside.

Sven: The dacron idea is interesting, I like it. No need to clean the PVA from the inside of the hull or scuff sand it for adhesion before adding other layers.

Alan
 
Sven.
On my first composite copy, I used Window Heat shrink film. The canoe was a tumblehomed solo, not much different than the Merlin.
The thin film conformed nicely to the hull, but the weight of the wetted cloth pulled it away from the hull.

Won't this happen with the Dacron also ? What adheres the Dacron to the plug, on like a shouldered tumblehomed hull, used as the plug ?
This is getting fun !!!

Jim
 
One might use double sided tape maybe. This I'm not sure of as I have no experience with this severe changes in direction. Otherwise if a guy wasn't too worried about a slightly different angle on said shoulder the fact that it shrinks might hold it close enough that it may not matter?
 
Lots to think about for next time!
If I copy another Kite (if, such a huge word for only two letters) I would still use the PVA on the plug, but I think I would wax the plug too!
And I think I would do the 2 layers of glass 1st, then release it from the plug, flip it around, then add the 2 layers of carbon to the inside. I think I could better replicate the crease that way, and have a more uniform inside texture. Probably would need a few forms to hold the outside in shape and maintain the correct rocker.
 
One might use double sided tape maybe. This I'm not sure of as I have no experience with this severe changes in direction. Otherwise if a guy wasn't too worried about a slightly different angle on said shoulder the fact that it shrinks might hold it close enough that it may not matter?

I've been using double sided tape with the window film. Really hard to deal with the wrinkles. Might work better with Dacron.

Jim
 
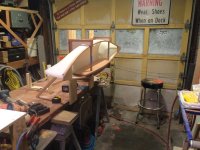
The 1/8" thick Divinycell arrived yesterday. It was rolled for shipping, pretty dramatic unleashing! Here's a look at the left over chunk. BTW, it feels about as hard as cedar.

qYb0hIGuIai8uRueFJI9HdphlkzOremrt4gLKcF594NvsohiylmhjIU6wX1aJ2403riqfAGZuEu-Q0L6p4HWMYX6ECOm1dZbQ13Wuqn2yQKEDD7B7Z9fqsMh0HX6AWoP-bUPGo9g_PIToBPj_U01v3QBp-AfYTSR3fC1ytTP_SmEo0ppZTwYXrvOzH_e7DN1G80AFCUCqg7AQZ8KjXvlYOuayZH0AgCpofAXw9YmWmpj30U2DlI7TWwb-Y-wbq31uPvRIJbUkyH0CXfQ-IV3lPoERVRjFqGYnACzBRfMTAdZIDfFKizBTqn6BdPMITNKop3OaFoQBvEzwmDrohMERRHYgmL_ur4JnWkgB9aTvGpp7340SxIA5bfHv-PypNdBkDROx6U7nGkjP6t9QY_30aXayjunok4r7o5hgf62VZZ_6Na9F-QSuNJtYwlD9ax4SJK6ViFd7H4GHAhhzXpP3PVpVE42Xqgn0JRxu9GgWZkWqix5Y8JvM4tasldt8NA2AhS1ffvbI-UEBDwNqhH1o1c75u6Ww1KfU04s1XPKaEmZA8N2bQGOVrD1XHLqvTAjrurpizUtNQ3vmPCYg-DpO0bG0R9uO-3vKTJFNinnxIeC8IFrkLJrV0-W0Zvq6nJiQa58de65u91aAZHMWheaJX2dif6hkRWrJfwwDlf40Yc=w1410-h944-no


I laid the foam into the bottom of the shell, and penciled in a trim line a little ways above the bilge. I trimmed the foam with a utility knife, and marked the location of the foam in the shell with a red Sharpie so I reposition the foam in the same spot. And also so I could apply just enough epoxy.
The foam was a bit stiff. I played around with the heat gun to thermoform it, but that was taking a lifetime. I also filled many zip lock sandwich bags with water, to use as a conformal ballast. Every bag leaked, so that was out too. So, due to excess excitement and a shortage of forethought, I decided to wing it!

y5zLlkFX7_l6wfxMAMLzofNGZKl5CHxHMJNMFqijvp-1hAPfSrEkQHe2LnvPcAq6F-RxpRGpLU4eDbMj8lSA1KzFo3xfx9A5j-6nZDV85XDw6H52p8nKGiArVC18T0M6xpDXAjyaWTnyjL0S9qY__2XMWN_qQt9twLxypRtt-0LeXyGRrM3dMdGe0EFjdjFxX4ebERB5Guv_PVR1xJeWeGOHynLXKuiuBEwsSY1BOZk083kCf9NO4uayfSJf5HpIVW7zCNW-keDWyKYkQcHVm-KUq3oMvSqv99o_p4mf9KkowxIqSeFZCEZUs43JaK5nN_yvi8Sp0GzEN7Rcw33PtQBKMzi10xWICRpDlN5U15jYENxWhsHkGrj2cJOvHk0lkKSqC1jinX01IJ9aQJDXDQcRLG5ZmiVKzG1HTC-ymom9tjJvdt5kpmC89YVA5gSxqov5wVHJm3xnRjpSoTXTmwopYW7lTcOFHDurMQk6naMjP67zBcJ52Fxc1hiNZJ4ybKxFA1raDXxChTMB5wVkNEpBUpaXsKpeZt7nNEE1TGr2ApqoB3fW9lFfB0W0_urrpuUE8QzdWITvG3d3dakXmuFJIZols6L9JLow8F75p9qOyriNNnz5P2UIDrFatmBM4UCZ3RtNX8Z3fLCzBuTO5S7SMT8E5Nd67iIloboEd9E=w1410-h944-no


I mixed 12 oz of epoxy and added Cabosil to give it some body. I poured the thickened epoxy directly into the shell, and spread it out with a squeegee.
Here's a look at the partially spread out epoxy, you should be able to see my red traced line, and the poured in epoxy.

QeDsNai_SSqDaaTRMWp1a0na63JfRdEckhzxndK2j9afhH87fj6hyoKitKVf6tIJUcdONj3CTQq5cJGrf_9Vy1tduhUkvD324KSM-O-oNQXjFU8Zm9imlSsdwy5gUJ8E97sxzn9Fw8me7EiNaT6TUzZmV7O1uokhI7JhBlzx3ovB3NsWLBJIPlLykOL0adBRYaEkLnng6WY535KZ3vn3IWX-vucyMuzKg-4uBGGpCFD_h_Ww83jVWalmKFT_FLhf9Kw9b6eZi9lynx1DfzYyimR6WVTdH0kNFohtKlHODyVJtOssE1fB7wgECN9bNUf6OOyMsEd_EI6d0U14w05L0cjg4-Q3UYANPR8Obo3UxLZs6Tvxw3YbAkjilfK7gD6NXs7pjMJfSt4Xdw45amNnqZWJAUgTqz63hkvO3c-tc2tHwsEgUy1QFYVdWWJbXt_OUDjhUONGvCVjd3JgzrV3jtz4kYYjASBaePthpZnmEFdN_qyViz_9-d5hi6fUesZQis0qHBCKhGwSSG7cAnLkzgW4cj4nURBlSciDRXUlxMuUHFNICVGdk2ykXMg-RnYZ26HWC6vjREOUtGqodz5bgSkpfbjpkojdq5rqI_9aotC9FpYx_bw-AxY3sIX_ttwr2rOJZCHeQUupmh5hmPMBXf_K2KWroSLg02I-yrG07sQ=w1410-h944-no


From there it was a simple matter to place the foam back in the shell, lining it up as it was before. And....wait for it....yup, I paid the price for my haste!
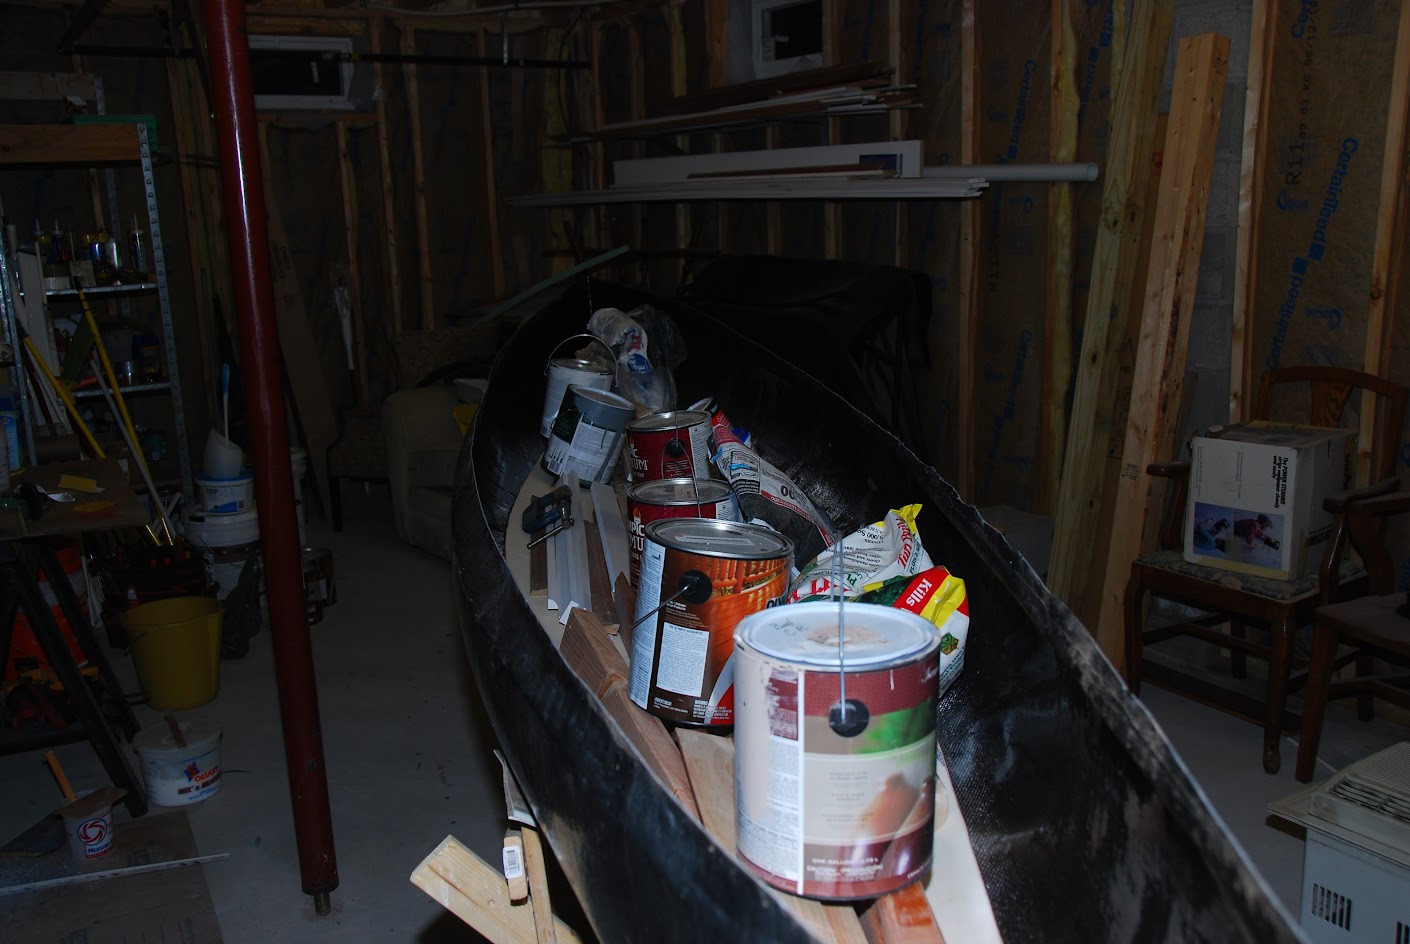
While the Divinycell laid in the shell nicely, it didn't fully conform to all of the contours. For the next 30 minutes, I was scrambling around, looking for every piece of compliant (and not so compliant) ballast that I could find. Window casing, baseboard, short 2 x 4's, paint cans, 6 ft level, bags of grout, bags of plaster, more paint cans, yup, I even have a bag of Weed n Feed in there...It wasn't pretty.
But, I think I have all of the foam intimately in contact with the shell.

Here's a look at my near disaster

zBut5E5mua0nIn-1gv9huNgnVcfM9u4s2ZseTgIcJSy475unluDCtl3i1Roza6ZL1fefQXhSfdm5cg2xynbkHZL6YR8obkSHVgc8btE-RMb8eopHaACU1dBT9rz5hf-nCX5Sn5ame7cROPOMGF2fE7mTjm_U-bkt_T9Xd7_maWd_PTUNw2-CA1NWeOarTN6Cbpcibr4R7ByyFo4Z6xCeqYAkD_3zbKA2HQtvq2GQOECmJn_O_qwjspgM9U2f9jJiC-SPlI5lzmEcLEzsXXWSe4lA2OYQXWGMW8U8ljmhSK3LgbjjlW9dMKdpJdDa5n9XJo6EK-Tf50yM9cSUtrrFjTE-hRz4UihNYdI8m49luTywY3QTq3tSLMPEttVD3SGa33Ir7hgVxG1aBJwLBMngzT6bAhI0DgspiOHp9aUoX87ovJO2-uksffhz0aC_jFW2mD3Zmy3gdEv8l9f8d6QmJbj1zstllvwPJN3wnuJCns6HIOBtVcPsd1j0hFfxVnhKBektNxkq0RhHpsZdl0RLLWsWFtZJXB7Z6anzp1D_U6IG138V-NBXdzOsH1OeK5oT5wWetBw76F8V1K50ca7qe-dpVAmDg5ZXyO5q1Ur35VpvhgDHYG80LhcnQHD5m26JtShoNojcxn0epc49FIFpH8F9e5GEGkKZMkp1kHfpPGk=w1410-h944-no


Once the epoxy is firmed up, I'll add a layer of carbon and a layer of glass.
And that should stiffen the bottom adequately. The rest of the shell has enough curves and creases to provide plenty of stiffness. The stems are particularly rugged.

Side note for Jim: I'm expecting the 1/8" Divinycell will provide the same bump in stiffness as did your 1/8" cedar strips. Even more so, since I'm planning to add a layer of carbon as well as a layer of glass.
MDB has been bugging me for a few years to build something using foam instead of cedar. If I could imagine a simple way to make a complete 1/8" foam shell, I could wrap that in whatever and be done! Like I said in my hijack of your thread (sorry man) 22lbs/cu ft vs 5 lbs/cu ft ain't much of a contest!
I'll leave it to you and Allen to devise a way to spit out foam shells. Once you had a foam shell, you could laminate the same way as the average stripper, and have a sturdy, lightweight hull.
 
I call it the Poor Mans Vacuum Bagging alternative ! I used sand. I also supported the bottom VERY well ! I OOPSed ! that one once ! Not again.

I'll harass you more later ! Ha !

Jim
 
So, due to excess excitement and a shortage of forethought, I decided to wing it!

Oh yeah, that's the only way to roll!

You guys are getting me so excited I might have to get back to work on my canoes I've been neglecting.

Alan
 
With regards to making a one off foam core canoe, I've seen it done well, but can't seem to find it now. I think they were making a small sailboat, maybe an outrigger sailing canoe. Anyway, they cut out their station molds as negatives, so female instead of male. Staple in a series of battens that run fore and aft just like making a mold for cold molding. Next, they cut the divinycell into 10" or so strips and laid it into the mold, glueing neighboring pieces together. Once the foam is all in they glassed the inside, pulled it from the mold and glassed the outside.

Ah ha! Found it!

http://outriggersailingcanoes.blogsp...-mold.html?m=1
 
Last edited:
With carbon and glass over the foam. You should have plenty of strength !

I don't know if a complete bond between the foam and the bottom is necessary. Preferable for sure !
My insert was preformed to the hull, as I made it on the same forms the hull came from.
Wonder if you could have thermoformed the Divinycell, on your Kite ?

I had a lot of sand bags available for mine. Supported the hull, making sure the hull wouldn't buckle under the weight. Mixed resin with fillers. Ground glass, and cab o sil. Spread that as even as I could. Used masking tape to outline insert location.
Then laid the wetted insert in, Covered it with plastic, and started pouring sand. Well over 200# of sand. I was very happy with the result. Again it's hard to tell, without cutting into it to see how good a bond I got. A simple vacuum bagging would no doubt be better !

I think, once you have the gunnels on, you will notice things get more ridged. It did with mine.
How many thwarts are you going with ?

Great progress !

Jim
 
Muskrat,
Thanks for those links...I think I saw that you tube one before, but I watched it again. I'm thinking 1/4" foam would be more than enough for a canoe.

Jim,
I did try thermoforming. I used a heat gun set at its lowest setting, about 450 F. Took about 10 minutes to shape a 12" long sample. The foam doesn't transfer heat very well, which will be an advantage when paddling in cold water!
I like the sand Idea, but lacked a quick way to support the shell.
Vacuum is definitely the answer.

Thwarts? Probably 3, one at each end for tying down and another a little aft of center, far enough back that it won't interfere with seating.

Oh, and the foam is on the hull maybe 95% contact. I can tap and flex and rub the foam, and a few spots are obviously not in intimate contact with the shell. But I will say that the increase in stiffness is already apparent, and I don't even have any cloth on it yet!!

I'm really getting excited about the possibility of an all foam and glass hull.
 
Last edited:
I am joining the discussion late, but you carbon guys have piqued my interest. It looks like you wetted out both layers of carbon at the same time. Is there a reason for this? I was thinking it might be advantageous to do one layer at a time. Also is there a rule of thumb for the curing time between layers to insure a bond with green epoxy?
 
I did two laminations. The first with two layers of carbon, the second with two layers of glass.
Why? Because I could! The carbon was a little tricky, but otherwise OK.

Back when I was using System 3 epoxy, their publications specificallystated that a through cure would occur if it was more than 3 days between laminations.
Most formulations are similar, although I've never tested the laminations.
Also, I have never had an epoxy resin lamination failure!!
 
Back
Top