• Happy Marine Mammal Rescue Day! 🐳🐬🦭🦦

JW Kite build - ready for Gunwales

You can peen the head of the threaded rod as you would a rivet.
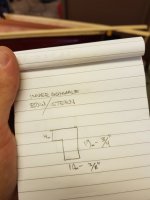
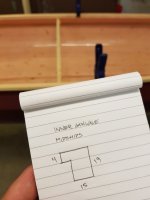
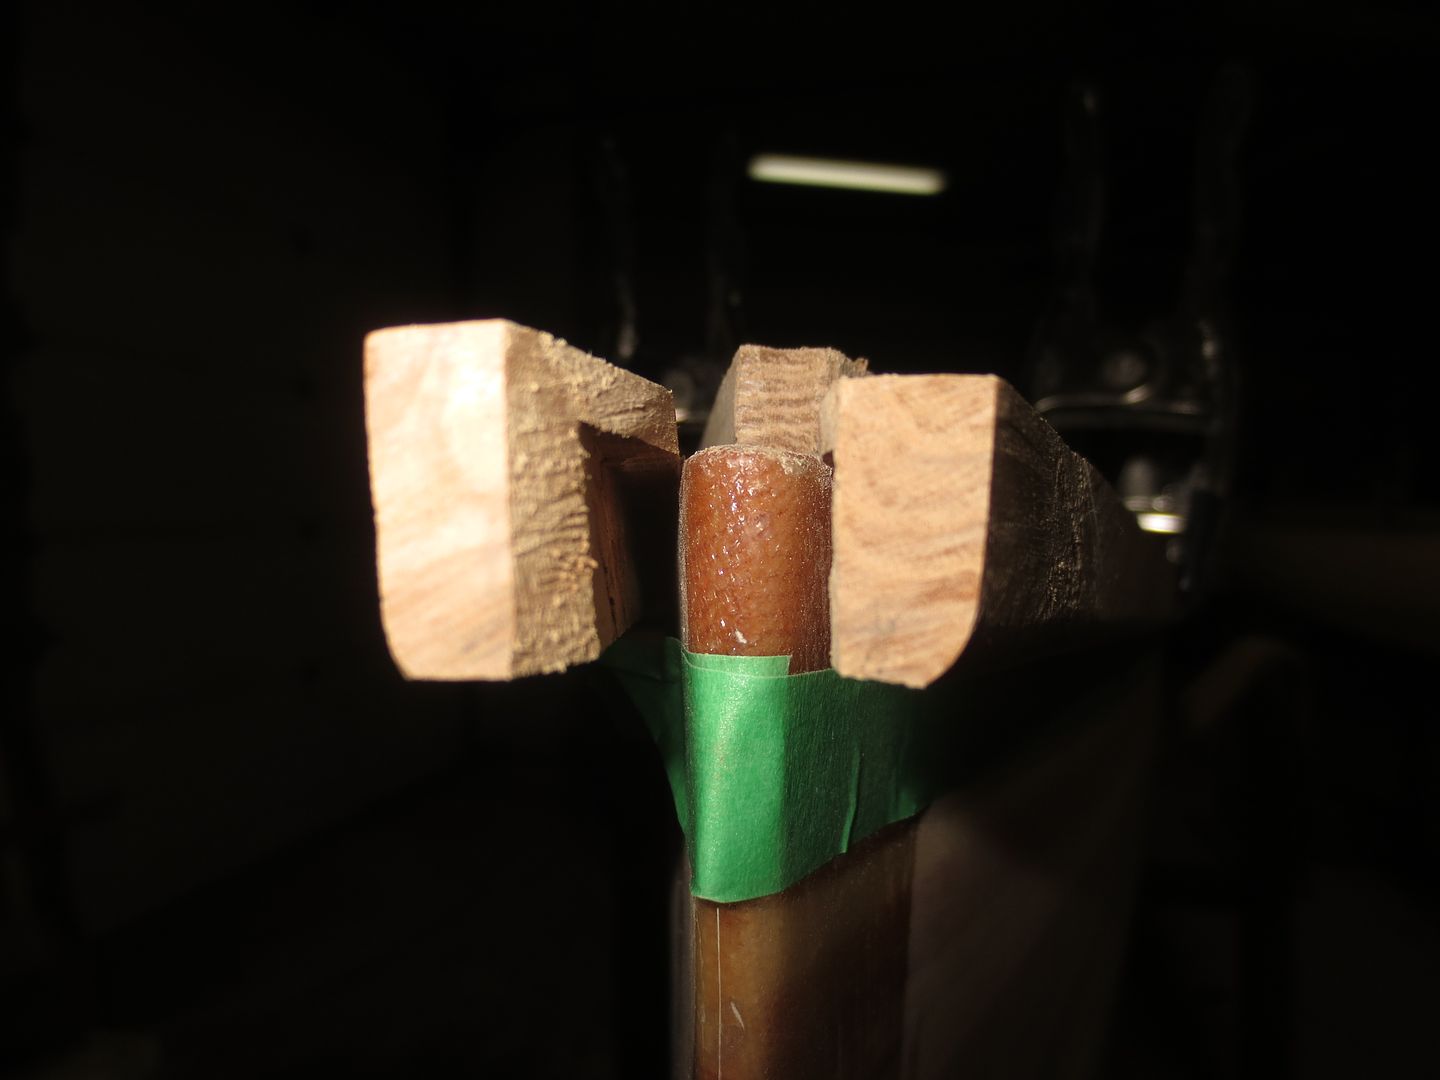
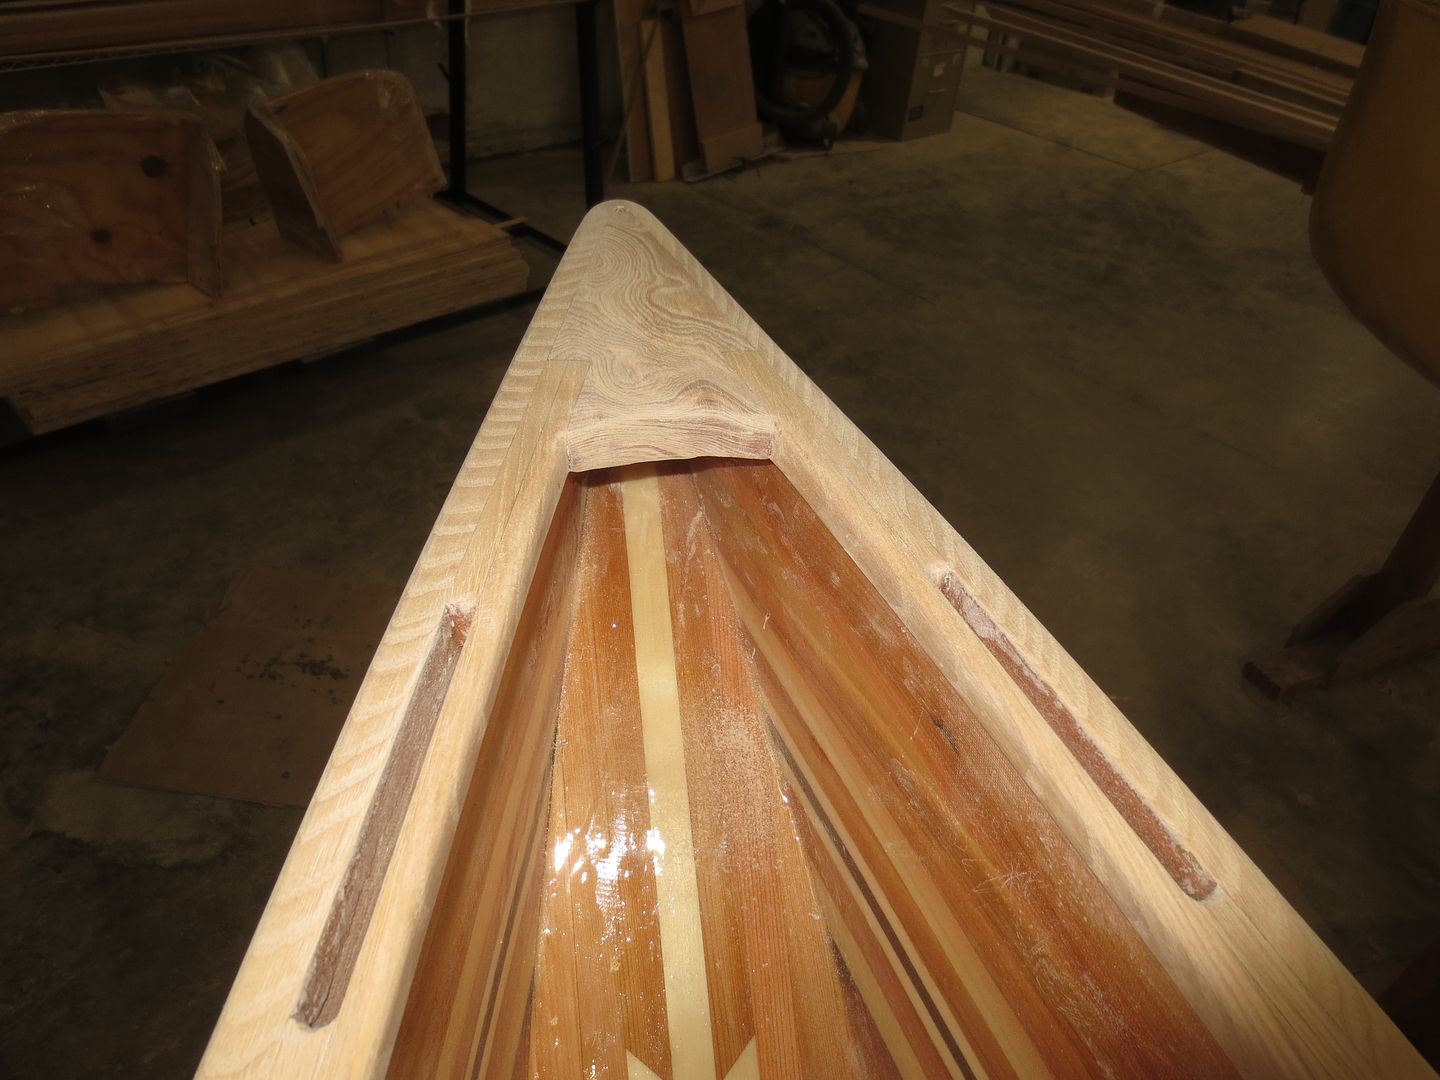
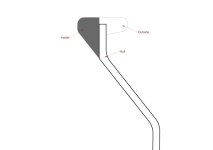
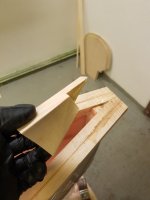
Do you mean drill the gunwale in the exact inner diameter of the threaded rod and then just peen it against the wood?
Edit: You probably meant I could use a washer and peen the rod over that.
 
Last edited:
Copper rivets in boatbuilding are peened over a rove in place, that would work here too. Some roves are crowned, but you want a low profile. You might also try peening it in a vise in advance. Heating with a torch first will soften bronze.
 
I have uses threaded rods before to hang seats, I got my welder buddy to weld a head on one end of the rod, think he built up a washer or something, worked pretty good.
 
I have uses threaded rods before to hang seats, I got my welder buddy to weld a head on one end of the rod, think he built up a washer or something, worked pretty good.
I have thought of this too. It should work to just cut the head of a coutersunk screw and weld it on to a rod. Countersunk is good with the finish washers/countersunk washers because it gives a bit of wiggle room for the washer to lay flat if the gunwale is a little bit tilted or the drill hole is not perfectly drilled perpendicular to the gunwale.
I like the idea of peening though.
 
Last edited:
I'm catching up on lots of threads. This certainly has been a very informative one with lots of intelligent discussion. As a non-builder, I even understand most of it.
 
Hi everyone.

I need some more moral support and expert advice on gunwales, again.
The last few days I have been dry fitting, eyeballing, planing a little, dry fitted again and again many times. I think I might still be able to take quite a bit away but I thought I would collect some of your opinions before doing so.

The inner gunwales are running the same thickness from center and 1.6' towards the bow and stern, so same thickness 3.2' at the center of the boat. Then I have done a gradual taper all the way to the stems. I think I might be getting close to the width but I suspect I could take some off from the height.. or depth.

I get a little tricked by the ledge that covers the top of the hull which makes the gunwales look wider than it actually is. I'm not sure how much strength the little ledge gives. It's mostly there for looks and to cap the top of the hull sides so no water will get in there. I expect to sand away almost half of the ledge thickness when rounding off the top after outer gunwale is also mounted.

Just like someone said earlier, I could slim them down quite a bit and then glue on pieces to widen the inner gunwale where the seat and thwarts will be mounted. In that case it would be much easier not to round off the inner gunwale before gluing it to the hull so that the glue on pieces have a flat surface to attach to. Will it be difficult to get a nice rounded profile after they are glued on?

Am I making any sense? The summer heat is relentless here.. too hot to sleep past 5.30 am. and the blazing sun is making my head a bit fuzzy. Or is it the gunwales?

The weight of both inwales are now 1.6 kg/3.5 lbs (before rounding off the edges) Outwales are just over 1kg/2.2lbs before tapering and rounding off. So should land around 2.4kg/5.3lbs total. Harware, small decks, thwarts and seat will probably double that.


These are the current dimensions and a few pictures:
 

Attachments

  • 20230629_144139.jpg
    20230629_144139.jpg
    65.6 KB · Views: 30
  • 20230629_144207.jpg
    20230629_144207.jpg
    57.7 KB · Views: 28
  • 20230628_145214.jpg
    20230628_145214.jpg
    70 KB · Views: 28
  • 20230629_141608.jpg
    20230629_141608.jpg
    73.1 KB · Views: 27
  • 20230629_143008.jpg
    20230629_143008.jpg
    105.9 KB · Views: 31
Last edited:
You might be over thinking it a bit, there really is no right or wrong way. My inners on the Raven are 5/8 by 3/4, more or less, all the way from bow to stern. Took me about 5 minutes to slap them in. I never cap the part between the inner and the outer either, just looks like a good way for water to get in and never leave. Guess it depends on how quickly you want to get it on the water, but I'm a wood butcher.
 
You might be over thinking it a bit, there really is no right or wrong way. My inners on the Raven are 5/8 by 3/4, more or less, all the way from bow to stern. Took me about 5 minutes to slap them in. I never cap the part between the inner and the outer either, just looks like a good way for water to get in and never leave. Guess it depends on how quickly you want to get it on the water, but I'm a wood butcher.
I certainly am overthinking it. Remember this is my first strip build. If I had built as many boats as you have I could probably slap them on, feel like a wood butcher but still be presenting a top notch build and a thing of beauty. I think I've done pretty good thus far, I'm just a bit worried that I will mess up here towards the end where things really matter.
 
Last edited:
I think you can keep tapering until it pleases your eye, keeping everything square and sharp until you've added necessary thickness at seat and thwart locations. Rounding over is the easy part and with the skills you've demonstrated so far you won't have a problem. Nice work!
 
Trimming the hull varies with every builder. Do what pleases you.
Your configuration is different than what I do.
I cap the gunnels with the outwhale.
My inwhale sits higher than the hull, about 3/16". It matches the height of the outwhale.
maybe a pic or two of mine will either help, or add confusion !

Note. My decks are higher to allow me to shape them later.


IMG_3439.JPG


IMG_3446.JPG


IMG_3442.JPG


IMG_3479_jrTsd3MANiYM73AXb8mHXP.JPG
Thank you Jim!

Yeah I see what you did with the decks. That way makes sense. It should be pretty easy to shape it once the gunwales are in place. I might abandon my original plan of how to go over the stems in favor of something similar to what you have done. My idea is good in theory and it will look pretty if I can pull it off like I first planned it. Since I am capping the hull with the inwales, they are very thin where they protrude over the stems and meet. This is a weak point and untill I get permanent thwarts in, any flex in the hull will either break the glue joint at those tips or... or it wont hehe. We will see. If it breaks I'll try something different.
 
Last edited:
Thank you Jim!

Yeah I see what you did with the decks. That way makes sense. It should be pretty easy to shape it once the gunwales are in place. I might abandon my original plan of how to go over the stems in favor of something similar to what you have done. My idea is good in theory and it will look pretty if I can pull it off like I first planned it. Since I am capping the hull with the inwales, they are very thin where they protrude over the stems and meet. This is a weak point and untill I get permanent thwarts in, any flex in the hull will either break the glue joint at those tips or... or it wont hehe. We will see. If it breaks I'll try something different.
Are having any scuppers, on your inwhale ?
I think capping with the outwhale would be easier if you are having scuppers.
 
Are having any scuppers, on your inwhale ?
I think capping with the outwhale would be easier if you are having scuppers.
No scuppers.

At first I thought I would use scuppers, even though I agree with John Winters (or was it Martin Step) that scuppers on a strip built canoe looks a bit out of place and is really a synthetic artifact from boats with ribs, such as the classic ribbed wood canvas canoes.

Scuppers do have their advantage in that they offer many points for attaching stuff. They also drain water well when turning the boat upside down or even when trying to "shake out" water after a capsize far from shore.

Making scuppered Gunwales is more work than making solid ones. Sealing or protecting the inside of the scuppers is important though difficult (especially with less rot resistant wood types). Weight is maybe less with scuppered gunwales, maybe.


The "shake out ability" of a boat is something I think should get more attention. Sure, you rarely have to resort to it. I've never had to. Some people are strong enough and have a canoe light enough to swim under it and throw-flip it right side up and empty of water after a capsize. I can not do this alone with a 16' Royalex boat. I might be able to do it with the Kite, we will see. Should the need arise for a "shake out" it could be the determinig factor between returning to shore cold and wet or not returning at all..

I've tried the "shake out" with my Old Town - Charles river RX with vinyl gunwales that stick 2" in to the boat. If you are on a calm lake that is not too cold and you are full of energy, it is possible to empty it enough to get back in the boat and empty the rest with a bucket or something. In cold and windy situations, I would not succeed though. The flat underside of the gunwale will slosh the water back into the boat rather than emptying it out over the gunwale in a "shake out".

The knuckled tumblehome of the kite presents an opportunity to make a gunwale that could be flush with the inside hull (see drawing). I have thought of this, only too late on this build.
 

Attachments

  • Gunwales alternative.jpg
    Gunwales alternative.jpg
    21.1 KB · Views: 13
Last edited:
Photo update from the last week. Slapping on the gunwales, in my case, is a long process and I have done some mistakes along the way. Over all it's looking pretty good. I forgot to scrape away the thickened epoxy squeeze out on the underside of the inside gunwale though so I'm in for some precision scraping today. I did mask off with tape and plastic pretty close so that will save me some work in this area at least.

In theory I should have enough thickness to the inner gunwale to hang seat and thwarts from it but it looks like the drill holes will hit the thwarts too close to the ends so I will add some spacer blocks to the gunwales in the areas where I will drill through to get further in. Other than that I just have to round off everything, add some weep holes in the decks and I should be ready for a test paddle in a day or two. I should get a better idea of where to place the seat after that.

After seeing the slider seats in Alans and Stripperguys boats I think I might try to build something similar but that will have to wait. Going with a webbed fixed seat for now.
 

Attachments

  • 20230704_213325.jpg
    20230704_213325.jpg
    65.9 KB · Views: 25
  • 20230702_172242.jpg
    20230702_172242.jpg
    58 KB · Views: 20
  • 20230702_172140.jpg
    20230702_172140.jpg
    86.4 KB · Views: 21
  • 20230701_181446.jpg
    20230701_181446.jpg
    133.5 KB · Views: 19
  • 20230705_152302.jpg
    20230705_152302.jpg
    53.4 KB · Views: 20
  • 20230705_152241.jpg
    20230705_152241.jpg
    76.6 KB · Views: 21
  • 20230705_143708.jpg
    20230705_143708.jpg
    80.5 KB · Views: 22
  • 20230629_142955.jpg
    20230629_142955.jpg
    101.3 KB · Views: 23
  • 20230629_141608.jpg
    20230629_141608.jpg
    73.1 KB · Views: 26
  • 20230629_141524.jpg
    20230629_141524.jpg
    114.7 KB · Views: 26
Last edited:
I've been working a lot on the boat in the last few days and finally got it on the water yesterday for a quick test paddle.

I haven't fastened the seat yet so I was sitting on a Festool systainer and a piece of XPS foam that made a total seat height of about 9"
The front edge was 8" behind center in this first test paddle.

First impressions of the boat is that I'm very pleased with how it feels. The closest thing I have tried and can compare it to is the Wenonah wilderness. Kite seems to accelerate faster and stay faster once up to speed. Feels like Kite has more "glide" than the wilderness while it's also easier to turn. The Kite might have a little less tracking but it strikes me as a better shape over all and a very good balance of characteristics. Should make a great one quiver canoe.

These are just my early impressions of course. I didn't have any gear with me so I'll give it some more test runs with more weight on board to feel out the trim. If I had to say anything about the trim it would be that in a slight side wind it felt like 8" behind center might be a little bit too far back while empty. This might be different if I put a day pack in front of me. The poodle in one of the videos has only been in a canoe twice before and she seems to like it. I can't say that I felt any difference to the trim when she jumped aboard though but she's a small dog and was sitting just in front of me.

The pine gunwales got 2 coats of boiled linseed oil on them with 24 hours between coats. After the short test run it was evident that the wood was swelling up where water had splashed on them. Pine doesn't soak up oil well so I think I will need to resort to something more like varnish. I'm going to apply a few a coats of Liberon finishing oil which is a thin oil mixture, sort of in between an oil and a varnish. After 3-4 coats it will start to form a layer on top of the wood. It will also take a varnish over it if I feel like adding that later.

Over all I'm very happy with the canoe and how it came out. I took my seat frame and the webbing and put it in the boat and put it on the scales.

The weight is 19kg/41.9 lbs (including finished seat but without carrying yoke arrangement). I was aiming to keep it below 20kg/44lbs so I'm happy with this.IMG_8404.jpg20230708_162047.jpg20230708_164452.jpg

When cutting out and truing up the forms for the Kite I was careful not to take away the slight crease along the keel line. Also when sanding the stripped hull I was mindful of this. The midships cross section is almost a continuous soft curve over the keel but if you look closely there is a very slight hard edge along the keel even here. Before the hull was painted with gloss paint I could not see this feature but the reflections in the hull in this video shows it well.


One of the videos doesn't seem to work on this forum if watched from a phone. This is because youtube now automatically turns vertical videos under 1 minute in to a " youtube short". If you only see a green screen you can click on the YouTube icon in the video frame to watch it on youtube.
 
Last edited:
Hey little stripper,
Really, really nice work! That paint job shows how fair you made the hull, absolutely stunning.
Happy to see you like the performance, I too consider that hull to be a great compromise boat, good at everything.
BTW, nice freestyle paddling too!
 
Hey little stripper,
Really, really nice work! That paint job shows how fair you made the hull, absolutely stunning.
Happy to see you like the performance, I too consider that hull to be a great compromise boat, good at everything.
BTW, nice freestyle paddling too!
Hi Big Stripper.

A big thanks to you for your help along the way on this one.
Also, thanks for the kind remarks.
I didn't know I was doing freestyle moves though. I've just watched Bill Masons movies and taken it from there.

I'm contemplating a carrying thwart design. I'll post my ideas with a sketch later, hope you'll chime in.
 
Last edited:
Looks great. I think mine came in at about the same weight. Your seat mockup looks pretty high, but as you can see, the Kite is quite stable even when empty. Enjoy!

Mark
 
Back
Top