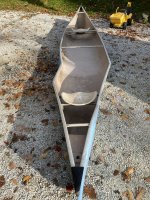
Once you get the gunwales off much of the shape may return.
Per Iskweo you will probably need to put some temporary bracing inside the hull to bring everything back into alignment while you patch the outside first.
Reprised from another post - Years ago we repaired a Royalex Dagger Caper that had been torn in half. Literally in half, with a tear at the center of the hull that went from the broken gunwale at the sheerline all the way to the keel line. Getting the two edges of the split held closely together required some Rube Goldberg engineering.
We had the hull on sawhorses, with a car jack on the floor and 2x4 pressing part of the split upwards, a car jack and 2x4 to a ceiling truss atop the hull pressing the other edge downwards and, most critically, a loop of rope tied between the carry handles, with a stick used a twist that rope incrementally tighter and tighter bringing the two edges together to near perfection.
You probably won’t need all up, down and end-to-end torquing action. Just some armature bracing on the inside may do the trick. I don’t think hitting it with a rubber mallet will do much good.
About the repairs/patches. If you are cutting cloth patches I would use S-glass. For the linear cracks you might consider using fiberglass tape (seamed edge E-glass available in various widths). Using tape you won’t have to deal with strays and frays on the sides, only at the cut ends. To lay multi-ply patches you can use different width glass tape, say 2” wide and 4” wide, although I think the conventional wisdom is to lay the larger patch first, so 4” then 2”.
If you do use tape I would absolutely lay release treated peel ply over the tape and gloved hand press down or hard roller the selvage edge on the tape, otherwise that seamed edge will stand tall and raspy and need sanding. Actually I’d use peel ply over any glass patches.
Depending on what you intend to do for new gunwales take special care that the split at the sheerline is as perfectly aligned as possible. Any off-set or bump of excessive cloth and epoxy at the sheerline edge will make regunwaling more difficult.
To help align that crack at the sheerline I’d use two short pieces of gunwale scrap or other slender wood and clamp them, one inside, one outside, at the sheerline line where the new wales will go, to help hold the split together at the critical top edge.
Put a little square of wax paper under each piece of gunwale scrap before clamping, so you don’t inadvertently epoxy them to the hull. Patch the first layer of glass up to the gunwale scrap. Let that set up, take the gunwale scrap off and lay the second interior patch all the way to the sheerline.
Even a seemingly wee 1/8” offset of the split at the sheerline or tall epoxy and glass repair will hold wood inwales and outwales apart, preventing the new gunwales from seating flush and fair. Trying to cram a one-piece aluminum gunwale over some mis-alignment or epoxy bump at the sheerline will be a nightmare.
FWIW I will never again install one piece aluminum gunwales. Replacement aluminum gunwales are not pre-bend for the sheerline curve, and as you by-necessity bend them during installation the channel the hull material fits inside squeezes tighter and tighter. There are some tricks to making that work, involving a couple of helpers, metal putty knives on either side of the hull material, a rubber mallet and a LOT of curse words.
But, there are now two-piece (inwale & outwale sections held together by the pop rivets) aluminum gunwales that should eliminate the issues with installing one piece AL wales.
Oh, yeah, mark the locations of the seats/thwarts before you take the hull apart.
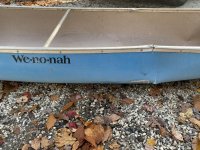
 I realize this would not be worth some folks time and effort, but I have some attachment to this canoe. 80’s fiberglass Wenonah Echo. I know the replacement gunnels are available. As far as keeping the shape while I replace the “dead” glass, do I fabricate an outer mold while I glass the inside first to keep its shape? If so, what materials would be best? Other ideas? What type cloth and epoxy would you use? I have done small fiberglass patches on boats and have worked with prepping and painting fiberglass cars, but no repairs of this nature.
