• Happy National Garlic Day! 🧄🚫🧛🏼‍♂️

Stern and Stem Repair - Royalex Canoe

Joined
Aug 20, 2013
Messages
427
Reaction score
179
Location
Eastern NC
Shortly after saying to my friends, "Sure I can patch the hole in your canoe" came............ "Oh do you mind replacing a cracked skid plate while you have the boat?"

And of course I agreed. But I did sense that any kevlar skid plate that was cracking was quite likely to have underlying problems. Well here they are:
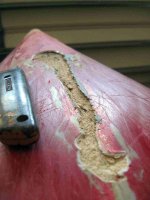
Stern Wear.jpg


It is the stern of this tandem that was getting worn down. It appears to have been patched once, then kevlar laid on top. I picked away the old patching material until I got to the foam core.

My plan is thickened epoxy and dynel to cover the area, perhaps 3 layers over the hull void.

Complimenting that patch would be a length of 6 inch fiberglass tape sufficient to span the exterior wear. The tape would be epoxied to the hull's interior and is intended to provide additional structural foundation at the point of wear. The internal vinyl showed some micro cracking, or perhaps just scratches, but most were centered directly above the external wear point. Reinforcement seems called for and the tape seemed a good choice of my on hand materials. I debated applying the fiberglass tape like two ribs, chose rather to run it straight down the keel which seems stronger(?)
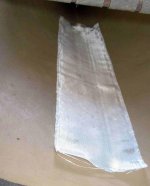
rear keel reinforce (4).JPG


STEM DAMAGE

I asked them to see if they couldn't remove the cracked skid plate to speed the repair process. Not sure if this damage was from the plate removal or if there were some problems before the plate was installed, But this is another problem that needs solving if this boat will float again.
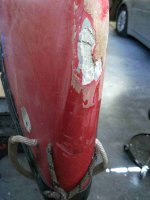

Stem Wear.jpg


STEM PICTURE FROM THE INSIDE


Bow001 (4).JPG


The stem problem vexes me. My first instinct is to fiberglass tape the inside before effecting an external repair. The internal patch will be an awkward affair.

Comments, thoughts, suggestions welcome.
 
Well, I have repaired the stems of at least a dozen Royalex canoes that had abraded into the foam core, although none so extensively as that one. I did, however, repair a three-layer polyethylene roto-molded canoe (Old Town Discovery/Allagash/Penobscot 174) that actually had worse damage on both ends than that boat does. Here is what I would likely do. I say "likely" because sometimes you have to see and feel the damage in person before deciding how to proceed.

I would start the repair on the outside, so long as the damaged area still has sufficient integrity to maintain its shape. If there are cracks that are somewhat offset, I would coax them back into position and hold them in shape with clear plastic packing tape applied inside the hull. I would first scrape, grind, chisel, and/or sand off the adhesive crap surrounding the damaged area that held on the skid plate. You are later going to cover all this up with a big abrasion plate, so the cosmetics aren't important. You may need to debride some of the Royalex around the perimeter of the abraded area if it significantly overhangs foam core that has separated from the solid ABS stratum. You want to make sure you don't leave any sizable air voids as you fill in the void. You can inject thickened epoxy into crevices of some depth using dental syringes which I think you would find very useful for this job.

After debriding as needed I would clean up the exposed foam core as best I could using isopropyl or denatured alcohol and a stiff scrub brush. Don't use acetone or MEK as it will dissolve the foam core. Let the area dry well before starting to apply epoxy.

I would definitely use West System G Flex epoxy to fill in the void. You may need to buy the the 32 ounce kit (16 ounces of resin and hardener each) for this job which will cost about $60. You will also need some colloidal silica powder (cab-o-sil) and the dental syringes already mentioned. I know G Flex is more expensive, but you will get a better bond to ABS. As you proceed with filling in the void, you will need to make up smaller and smaller batches of epoxy so that you can fill and fair the contour of the eroded area back to normalcy, and G Flex is very good for this because batches of any size can be mixed up 1:1 in volume by eye. Thicken the mixed epoxy with silica gel but not so much that you can't inject it through the dental syringes. Use the syringes to fill in any voids under overhanging intact Royalex. You will need to turn the boat this way and that to do this, and the epoxy will settle into the foam core requiring repeated applications. I find that I can generally make mulitple applications in a day, especially if I speed up the cure rate by carefully heating the epoxy with a heat gun.

If you have a deep area in the void to fill in, you may choose to use layers of 4 or 6 ounce/square yard fiberglass cloth along with the epoxy. This will reduce somewhat the amount of epoxy required, improve the resin/cloth ratio, and increase the strength. Before adding the first layer of cloth, however, I would get all the cells of the exposed foam core filled with epoxy and sand the area so the cloth lies flat. Eventually you will get to the point where you have filled in the void up flush with the surrounding hull. This will require some shaping and sanding, but cured G Flex sands just fine even when thickened with silica gel.

Once you have built the eroded area back up, I would cover the entire filled in area with at least one layer of 6 ounce fiberglass cloth, or two of 4 ounce cloth, extending this onto the adjacent intact Royalex by at least an inch if not two. Ideally, remove the outer vinyl layer of any intact Royalex that you are bonding to either with a wood chisel or by sanding so that you can bond directly to the ABS. Fiberglass is stronger than Dynel, although less abrasion resistant. After that is done, you can fashion a large abrasion plate out of 5 ounce/square yard Dynel to cover the repair and the area previously covered by the old abrasion plate.

After completing the external repair, I would consider the interior. If reinforcement looks wise, I would prefer using 5 ounce/square yard aramid cloth to fiberglass, although the latter will work fine. In order to get the cloth to lay down without pleats, you may need to cut some darts in the edges of the cloth. Start wetting it out in the center at the deepest part of the stem, and work toward the periphery. If the piece of cloth is cut on the bias, it will lay down smoother. I think for these reasons, plain weave cloth might be preferable to tape for this purpose.

Once everything is cured and washed, paint the inside and outside of the repair and abrasion plate for UV protection.
 
Back
Top