-
Happy 1st "10" in Olympic Gymnastics (Nadia Comăneci, 1972)!🤸🏻♀️7️⃣❎
You are using an out of date browser. It may not display this or other websites correctly.
You should upgrade or use an alternative browser.
You should upgrade or use an alternative browser.
Fiberglassing a hard shoulder chine on a cedar strip
- Thread starter Rex Stardust
- Start date
I'm glad it went well Rex.
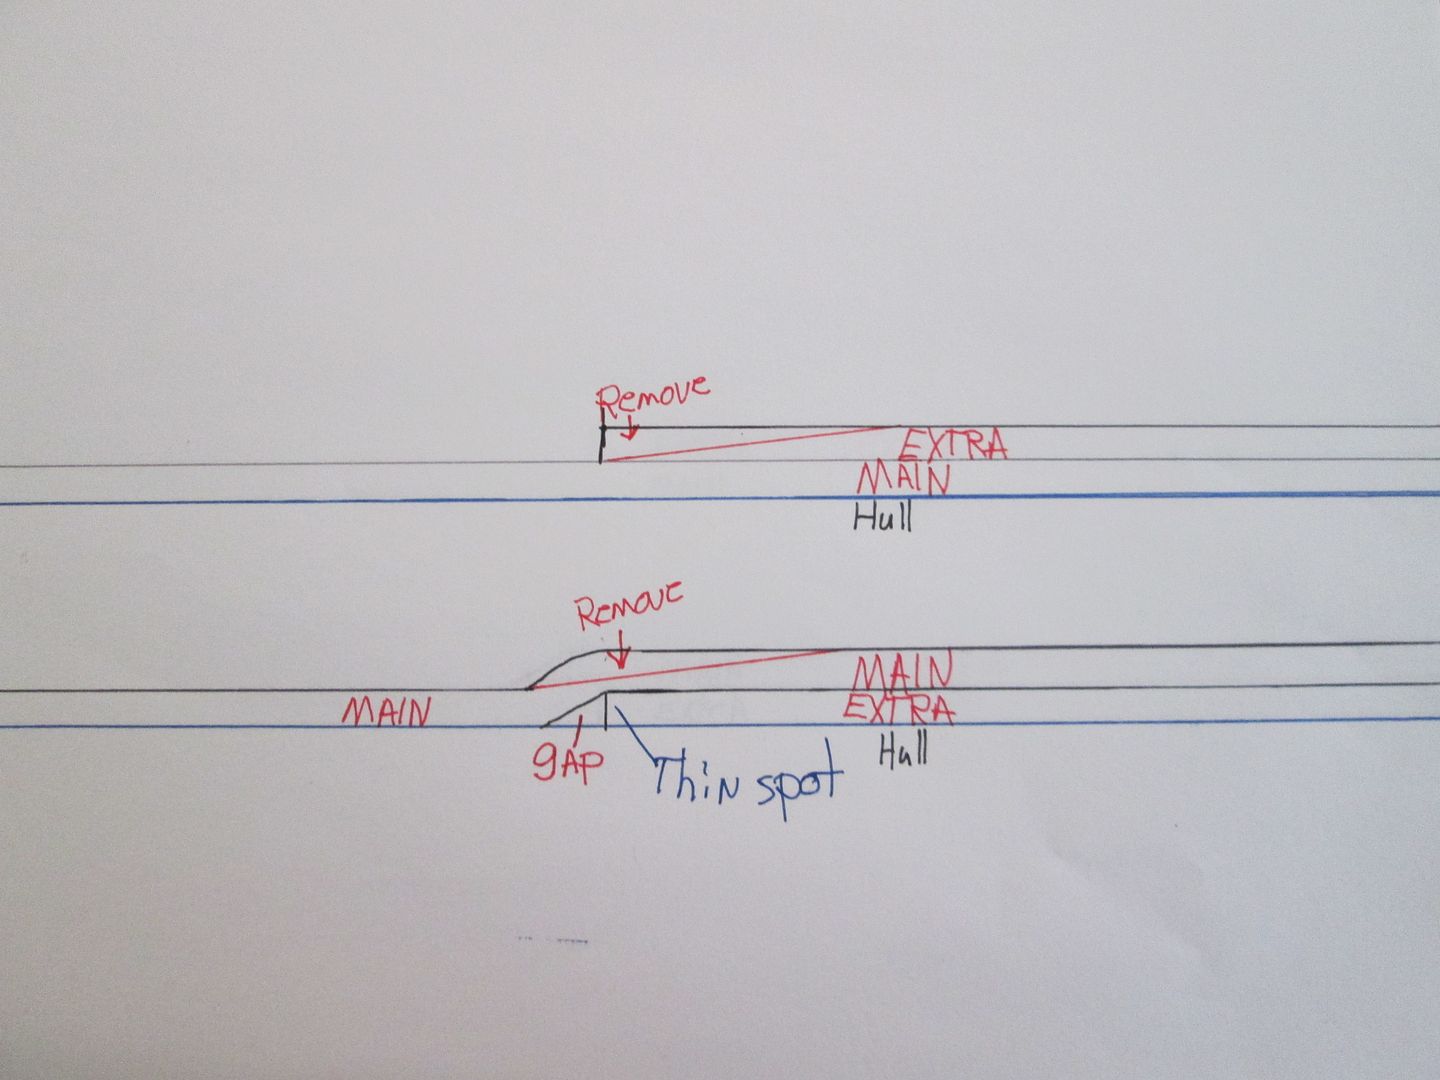
I know we have had this discussion before, but I am a fan of putting the football under the the main sheet of glass. There is no need to deal with naughty strands then, because they don't happen. I have done this with over 20 canoes. There is no thin spot, as shown on Jim's diagram, as the glass all tends to merge together once wetted out. Using a very thin wet out agent, like System three clear coat, makes the process of wetting out two layers at once painless as well.
For those who glass the football on top, I did see a neat video of someone who used painters tape along the edge of the football. I can't remember the exact process, but the result was a very clean edge, maybe someone else can remember the builder who does that.
In a similar vein, I will often completely glass my stems before applying the main sheet and the football. I just find the buried edges easier to deal with.
Rex, you are approaching the most enjoyable part of stripper building. Once you start sanding the inside hull, you will realize that it is the most incredible thing you have done in your life, rivalled only by Christmas morning.
- Joined
- Aug 10, 2018
- Messages
- 1,739
- Reaction score
- 2,622
Glad it went well, I remember how stressed out I was the first time.
As Jim said, use a scraper to cut off those loose strands while the epoxy is still green (like, no more than a day). You'll also, probably, pull loose strands out when you do the bias strips at the stems so scrape them off as well after the epoxy sets & then start your fill coats (most epoxies seem to allow 72 hours between coats so you'll still get a chemical bond).
BTW: I advise not sanding the inside very much but I'm a devout Tavernist and we shun bliss in all of it's forms.
I think I spoke a little early when I said it went well. I'm downgrading that to "OK". I got all the layers on and wet out but while doing fill coats I could already see some streaks and color variation in the wood. The streaks are where the epoxy dripped down the side before I could start moving it around. The close-up looks pretty bad with the way the light was hitting it. In reality, you have to look close to see it but it's there on much of the boat.
My assumption is that those streaked areas ended up getting a lttle more epoxy and wet out completely whereas the adjacent areas were a little light and left the weave showing through. I did end up getting my son to help with the mixing so I'm really hoping there weren't deficiencies there that could potentially be an issue under those cured fill coats. Everything seems to be hard and fully cured now so hopefully not a huge issue.
We had busy day yesterday so I didn't get all the edges feathered while it was still soft. That'll leave more work on that step but it's not the end of the world.
Attachments
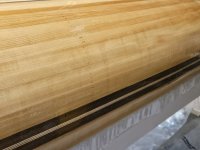
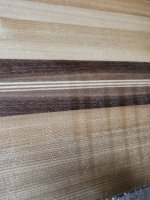
From what I can see in the photos is looks like the cloth may have been a bit starved. Especially in the last photo I can see a lot of white specks which I'm assuming is not just glare. When the cloth is fully saturated it should be nearly invisible. As you surmised the runs are likely where the cloth did achieve full saturation.
It will probably be fine and there's not much you can do about it anyway.
Alan
It will probably be fine and there's not much you can do about it anyway.
Alan
I applied with a squeegee and thought I was moving it around a lot before removing excess but I guess I needed to work a little slower and give it more time to soak in. I was running the garage warmer than normal but maybe bumping that up a bit would have helped as well. I don't see any large sections where the cloth looks dry - it's all small specks that are surrounded by epoxy.
Not much I can do about it so I'll move on, but quite the frustration after the time invested in the woodwork.
Not much I can do about it so I'll move on, but quite the frustration after the time invested in the woodwork.
I applied with a squeegee and thought I was moving it around a lot before removing excess but I guess I needed to work a little slower and give it more time to soak in.
I usually don't remove any excess until much of the hull has been coated. Often I do about 3/4 of the hull, except for the stems, and put the epoxy on pretty heavy so the glass is clear and and glossy. This gives time for everything to soak in, which is especially important if there wasn't a seal coat on the wood first. Then I'll go back and squeegee off the excess before finishing the stems.
Alan
Consistency of saturation is one of the reasons why I ALWAYS apply a seal coat.
It does look like you don’t have fully saturated cloth in that second pic.
There’s a time constant associated with cloth wet out, it varies based on viscosity, cloth weight, weave type, number of layers, etc.
It can’t be rushed. I generally try to apply resin in broad areas, the go back and work the resin through the cloth on areas that have had about more time soaking. I always squeegee the entire hull while everything is still wet, you’d be amazed how much entrained air gets trapped.
Once again, the worst critic will be the creator…
I wouldn’t sweat it, structurally I’m sure it will be fine, and aesthetically, well, none of us will judge you!
You’re still gonna love it when you get it out on the water
Sounds like more patience is in order. I felt rushed trying to get the hull wet out and squeegeed before the epoxy started to set up but I think I've got more time to work with than I thought.
I did buy enough cloth and epoxy to a 17' tandem once this one is finished so I'll be adding this to my list of things to do differently next time (that may end up being a long list).
I did buy enough cloth and epoxy to a 17' tandem once this one is finished so I'll be adding this to my list of things to do differently next time (that may end up being a long list).
Last edited:
Sounds like more patience is in order. I felt rushed trying to get the hull wet out and squeegeed before the epoxy started to set up but I think I've got more time to work with than I thought.
Yes. Once the resin is spread out on the hull the clock slows down. Epoxy generates heat as it cures and higher heat makes it cure quicker.
When left in concentrated area, like the mixing cup, this process can quickly feed itself and it can setup remarkably fast. But when spread on the hull the heat is easily dissipated and the "kick" is much slower.
Alan
- Joined
- Aug 10, 2018
- Messages
- 1,739
- Reaction score
- 2,622
I was the same. I was SO stressed out because I had to get done before the epoxy kicked... but I found out that I had plenty of time as long as I didn't mess around. You're doing great and it will be just fine.Sounds like more patience is in order. I felt rushed trying to get the hull wet out and squeegeed before the epoxy started to set up but I think I've got more time to work with than I thought.
PS: I'm unsure if it makes a difference but I did refrigerate my epoxy & hardener overnight before glassing. Might be just a placebo effect but I felt like I had more working time.
I would be careful refrigerating, the resin can actually crystalize and go solid under those conditions. You can "melt it" back, but it is a pita.I was the same. I was SO stressed out because I had to get done before the epoxy kicked... but I found out that I had plenty of time as long as I didn't mess around. You're doing great and it will be just fine.
PS: I'm unsure if it makes a difference but I did refrigerate my epoxy & hardener overnight before glassing. Might be just a placebo effect but I felt like I had more working time.
The streaks are definitely over saturation, from resin, running down. Yes, live and learn.
One of the reasons, I prefer a foam roller. I too noticed streaking, in my earlier hulls, caused by squeegee, working the cloth. The rollers eliminated that for me.
I prefer warmer temps, as most builders do for glassing. The resin soaks in better.
I'm with Stripper guy, when it comes to a seal coat. Especially for beginners.
Similar threads
- Replies
- 12
- Views
- 2K
- Replies
- 4
- Views
- 3K
- Replies
- 20
- Views
- 2K
- Replies
- 17
- Views
- 635
- Replies
- 14
- Views
- 941