• Happy Weed Appreciation Day! 🌱🌿🌻

Deck rot, weep holes and gunk removal?

In the “How smart am I” realm I have, uh, let’s just say numerous times, usually when wanting to beat feet ASAP away from a crowded landing after a peaceful trip , neglected to overturn the canoe to drain the bilge before hoisting it onto my shoulders and putting it on the truck racks.

Nothing like a head doused with muddy water, twigs and dead bugs to serve as a reminder. PFFFFTTT, PATOOIE, right in the face dammit.

Why I have needed that reminder multiple times is another story, but I am sure - truth be told - that I am not alone in that wearing of the day’s bilge accumulation running my shirtsleeves, hair and beard. That shirtsleeve action is especially awful, already hoisted and there, can’t drop the canoe now as water runs down my arms. HOW MUCH WATER IS IN THIS FREAKING THING!

What size drain holes are best in deck plates? Reading this thread, I’m thinking the bigger the better. Glen has taken this thought to the extreme, his holes are bigger than the plates!

To answer your actual question, for my preferences, as big as you dare. On a large vinyl deck plates I drill 1” holes as close to the tip as possible; it takes a lot of detritus to clog up a 1” hole. On functionally useless little 3” “deck caps” I might as well drill a big hole, those winky caps are good for nothing else anyway.

The bigger, within reason, the better. A 1/8” drain hole is freaking useless, a single spider egg sack, twig or pebble will occlude that drain hole.

On canoes where I have installed wood gunwales I lack the skill to make attractive, seamless inset scuppered decks, so I top mount them, leaving a drainage gap at the stem. Well, I use some deck plate overhang and a drainage gap; easy enough to unscrew a top mounted deck plate and refurbish or replace it.

Glenn’s “nothing at all” would have advantages, but given my druthers I’d opt for deck plates and large drain holes.
 
Mike

I have gotten by fine with a minimum of 1/4" Weep holes. no problems. I to hate a wet head !

Bigger would be better, but each builder has to balance his desire for usefulness compared to beauty.

wAAACH5BAEKAAAALAAAAAABAAEAAAICRAEAOw==


image widget
 
I have gotten by fine with a minimum of 1/4" Weep holes. no problems. I to hate a wet head !

Bigger would be better, but each builder has to balance his desire for usefulness compared to beauty.

Jim, while bigger is better, usefulness for me, on already ugly vinyl deck plates, is a giant 1” hole. On a vinyl gunwaled canoe there is a lot of complex, mud and debris catching structure and openings under those deck plates.

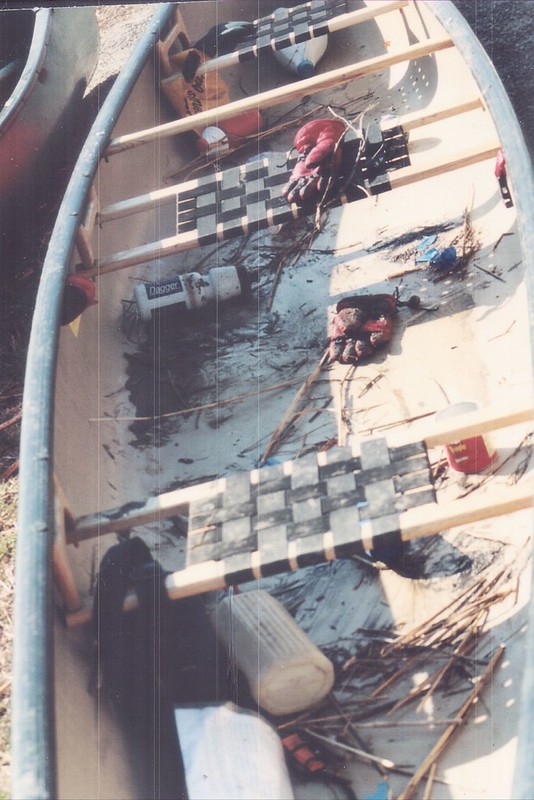
This was after multiple (I thought) thorough scrubbings. Gawd only knows what’s still alive inside the open ended gunwale channels and under the molded deck plate carry handles lips. I hosed out live spiders, and what looked like pale cave crickets.

PC150025 by Mike McCrea, on Flickr

On a shapely wood deck plates a giant hole 1” hole would be an insult. Scuppers on inset decks seems a more attractive remedy, but perhaps there are other design solutions without going deckless; smaller deck plates perhaps, and fewer hidey spots for dirt and debris.

Often, I do a mud and stick wash at the take out.

Chip is semi-local to me, and paddles some of the same coastal plain stuff I do; swamps and marshes, with occasional wet footing mud and muck in-&-out around obstacles and across shallows. Scenic, little populated and more seldom paddled areas, but sometimes just getting in the canoe at the (term used loosely) “launch” involved a slog through the marsh grass and shoe-sucking pluff mud.

EK_0025 by Mike McCrea, on Flickr

No drain hole is big enough, that accumulation might be a case for Glenn’s deckles approach. We do the scrape together and extract the larger debris, bucket (bailer) rinse and repeat. Folks who paddle more pebbly or rocky bottomed rivers may track in less gunk.

I try to hose, wash, scrub the canoe off on the first available warm day. Not only is dried pluff mud tenacious, but there may be some invasives waiting to spread in the crud. Phragmites is everydamnwhere, crowding out native marsh grasses, to the point that the DRN burns vast swaths of marshland in an attempt (haha) to control it.

https://dnr.maryland.gov/wildlife/Pages/plants_wildlife/Phragmites.aspx#:~:text=The%20Mighty%20Phragmites& text=But%20phragmites%2C%20also%20known%20as,grass %20often%20found%20in%20wetlands.&text=The%20exact %20abundance%20and%20current,increasing%20in%20abu ndance%20and%20distribution.

After the burn the resulting black stubble is a veritable field of fire sharpened punji sticks, do not trip and fall when walking across it. And do not accidentally schedule a marsh paddle for when the DNR is actively burning, the ash and soot carries for miles and you’ll end up resembling Dick Van Dyke in Mary Poppins.

Not just the marshlands; my local, once pristine, trout stream homeriver now has Didymo.

https://en.wikipedia.org/wiki/Didymosphenia_geminata#:~:text=Didymosphenia%20gem inata%2C%20commonly%20known%20as,temperatures%20an d%20low%20nutrient%20levels.

And teeny, tiny New Zealand mud snails, both likely from trout angler’s waders and felt soles.

https://news.maryland.gov/dnr/2017/09/21/aquatic-invasive-species-confirmed-in-gunpowder-river/

Long, ranty way of saying “Wash your canoe between different bodies of water”. And big arsed debris hoses out of big arsed drain holes easier.

At this point, crossing some State or Province lines, a clean canoe is no longer just a suggestion.
 
What a timely conversation. I ordered new gunwales from Ed's, for my Mad River Traveler project. I got the boat last year, and I thought I could save the original gunwales. What I quickly found though was, that the areas around the seat hangers (adjustable seat) had gotten so soft that they would just barely support my tender 210#. Two nights ago I took all the gunwales off. The deck plates seem to be glued (they were screwed also) to the gunwales, and I am not sure yet how best to get the decks away from the gunwales, other than cutting the gunwales off near the decks and then carefully work the gunwales down to the decks. But that is a different conversation (although happy to her you guys' thoughts on it).

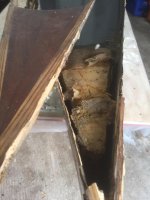
What should I do with the mess I found under the deck plates? It looks to me as though the glass was sort of just pushed into the space between foam tank and deck plate, but that area couldn't have been water tight by the looks of it. I believe that area was more or less constantly wet or at least damp which would explain at least some of the gunwale rot. Interestingly enough, the underside of the decks looks good. A bit dry perhaps but solid and no rot. Should I glass-cover the tanks and leave a little raised plug or something for breathe-ability, prior to installing gunwales and deck plates?

On the subject of glue vs. screw, I read the thread, but I am not sure how to proceed. The original gunwales were glued and screwed. I was thinking of sanding, oiling and screwing only, but now I am reconsidering that approach to sanding, glue and screw and then oiling. Thoughts?

Lastly, what would be a good way to get a nice fit at the gunwales ends (bow and stern)? I was thinking of using the existing wood work as a template. Thoughts?
 

Attachments

  • Under deck plate.JPG
    Under deck plate.JPG
    213.4 KB · Views: 3
Mad river uses the big decks to hide the rather shabby Flotation ! I noticed that on the last gunnel replacement I did.

It appears to be a glass hull. If you don't glue and screw your gunnels? At least epoxy coat the hull side of your trim, Let cure before installing.

As for the deck ? At this point it would be about as easy to make new. That would last longer, than trying to reuse the old, partly rotted..

My $.02

PS. Add a Weep hole ! :cool:

Thanks, Jim!
It is a Kevlar hull (per serial number), but I am sure they used glass as well. The canoe weighs just below 50 pounds. All Kevlar would be lighter I'd think. This may be a stupid question, but do you recommend dry fitting the entire trim and plates before installation? I am not clear on how one gets the gunwale ends right.
 
Lastly, what would be a good way to get a nice fit at the gunwales ends (bow and stern)? I was thinking of using the existing wood work as a template. Thoughts?

If the dimensions and (critically) end cuts on the old inwales somehow matches the Ed’s Canoe (knock-down?) inwale shape, I guess that could work. I wouldn’t count on that being the case though. But, in shaping new gunwales and an inset deck plate, I’d like to know how it is done as well, especially getting the tips of the inwales to fit precisely and seamlessly.

I can see how an inset deck plate can be designed and shaped once the inwale tips fit together perfectly, but marrying the tips of the inwales to present anything other than gapped and filled wood butchery is beyond my ken, so I just top mount wood deck plates on wood gunwales.

That simplistic solution doesn’t reduce the dirt and rot accumulation cracks and crevices the way an inset, flush mounted deck plate might, but it is the best I can manage.

Screwed atop, unglued, I can easily remove the deck plates for refurbishment or eventual replacement. Haven’t actually needed to make a replacement yet, and my simplistic top mounted decks are beefy/heavy.

How do you skilled folk pair up the stem ends of wood gunwales?
 
I make everything a touch oversized, then sand it until it fits snugly. Removing material is always easier than replacing it. I'd rather test fit a dozen times than try and fit a poorly shaped piece
 
Yes ! Dry fit first .

I hold my inwhales in place with small #6 screws, on my strippers.

This makes assembly easy when I have them coated with FILLED epoxy resin ( mixed epoxy with Cabosil, ground glass, and saw dust)

The screws reduce the amount of clamps needed also.
 
I am no expert, but have had tight fitting joints by the below method if I want the inwales to form a point and the deck in the middle.

Slide the longer than needed inwales into one end of the hull and clamp along the shear. I just use spring clamps. Let the long end on the other end run wild out the top. Lay a ruler or straight edge on top of the inwales at the end of the hull. That will give you the cut lines. I use a pair of dividers to make sure it is in the middle.

I scribe lines with a pencil and than with a thin sharp knife. This gives my hand saw a guide to follow. I use a dovetail saw or Japanese pull saw, but any crosscut fine toothed (24 tpi) or so will work.

Adjust the inwales together where the cuts were made. I use a “saw fit” to get a tight joint. Carefully sawing between the two pieces and re adjusting the pieces each time until it is tight.

On the other end it is a bit trickier, but basically the same. Cut the ends long using the stem end as your guide and a saw each piece at the correct angle. At this point the pieces will fit together only above the hull. As each saw cut between the two pieces is done it will move further down until it is precisely where you want it.

At this point you can secure them as you wish...- not touching that one.

For the decks, I lay a piece of stiff paper or cardboard on top and trace the shape from underneath to make a template. I cut the piece large and use a block plane and belt sander to fit the piece nicely. I will then shape the deck with whatever design I would like.

Not sure if this what you were looking for, but it is how I do it. As with everything boat building related, I’m sure there are more ways to get the same end result.

Bob
 
Filled epoxy resin. Got it!
So when you say you use #6 to hold inwhales in place, do you leave the screws in and place the outers over the screws?
Also, I did get the knock-down, kerfed gunwales. Does it matter whether the kerfed gunwales go in or out?

Re. deck plates, I am certain the old deck plates will not fit the new inwhales, no matter how great (not likely) I happen to get the gunwales to fit. That is sort of why I was thinking I could use the old gunwales, that have the deck plates till attached, as a template for the new setup. That way I could at least fit the new inwhales with the old deck plates (which look perfectly fine) and shave off the surface that meats the hull, rather than trying to get the inwhales to match the hull perfectly and then having to fight to get deck plates to fit nicely. Although knowing myself, I'll manage to get non of it right. Come to think of it, I might have just answered my own question as to which side (in or out) the kerfed gunwales should go.

Yes ! I glue and screw the inwhales, then glue the outwhales, I let the epoxy on the inwhales cure, then clean them up, before gluing the outwhales.
Take note of the lip on the outwhale, that Caps the hull.

As I remember, the Outwhale on the Mad River, had the kerf as you call it. ( Lip) on the Outwhale. If that helps ?


Jim
 
Thanks for clarifying, Jim.
Totally different process compared to installing new gunwales on a Royalex canoe. I am excited to get started.


If the dimensions and (critically) end cuts on the old inwales somehow matches the Ed’s Canoe (knock-down?) inwale shape, I guess that could work. I wouldn’t count on that being the case though. But, in shaping new gunwales and an inset deck plate, I’d like to know how it is done as well, especially getting the tips of the inwales to fit precisely and seamlessly.

I can see how an inset deck plate can be designed and shaped once the inwale tips fit together perfectly, but marrying the tips of the inwales to present anything other than gapped and filled wood butchery is beyond my ken, so I just top mount wood deck plates on wood gunwales.

That simplistic solution doesn’t reduce the dirt and rot accumulation cracks and crevices the way an inset, flush mounted deck plate might, but it is the best I can manage.

Screwed atop, unglued, I can easily remove the deck plates for refurbishment or eventual replacement. Haven’t actually needed to make a replacement yet, and my simplistic top mounted decks are beefy/heavy.

How do you skilled folk pair up the stem ends of wood gunwales?

Mike,
I found this video https://www.youtube.com/watch?v=Yg3P8mSE3XE about replacing gunwales on a Bell Magic. The first minute or so is about fixing gel coat, but the rest shows a pretty neat way to get the gunwale ends, and the inset deck plate right. He does not seem to use any glue in the installation, but he also states that it is his first gunwale replacement project. I might have to watch this a few times to get the mechanics right.

The part that has not formed a picture in my head so far, is the glueing of the gunwales. If I only glue (as some here seem to do), I can't see how I can keep the gunwales in place with clamps, during the glue drying process. Ed's knock-down gunwales are pretty thick and stiff. When I put a set on my old Royalex Legend, I remember nearly breaking them where they are joined. They want to bend to conform to the horizontal (belly) shape of the hull, but bending them vertically toward bow and stern, nearly did them (and me) in. I don't think there is any way I can clamp the gunwales hard enough to the hull to keep the gunwales in place. They will want to pop up in the middle of the canoe, as I apply vertical force to make them come up to the ends. Slippery glue would probably only exacerbate that problem further. I am thinking glue, followed by screw, as I go, would be the only way to do this, so the screws help keep things in place. That brings up two more challenges. A. I think I would need some sort of dowel or locator to make sure the dry fitted wood workings end up in the exact same place during the glue and screw operation. B Will I have enough time before the glue starts to set? C (thought of a 3rd item to consider) I would think that a fair amount of sanding will be necessary to make it all come together and look nice, at the end. Oiling gunwales seems to be the last part of the operation, even though I read (somewhere) that oiling is done prior to installation of the gunwales.
Am I over thinking this? Can anyone here provide a bullet point sequence?
Thank you!
 
I found this video https://www.youtube.com/watch?v=Yg3P8mSE3XE about replacing gunwales on a Bell Magic.
I might have to watch this a few times to get the mechanics right.

Neither a screwer or gluer will I be again, but that was a very well done how-to video. For a guy doing his first ever wood gunwale replacement he must have done considerable research, and his technique for getting that precise stem end gunwale fit makes sense.

Not sure about using the right angle drill adapter for every hole, I think I am straighter, more even and level without it, but there are tight-situation times when only that adapter will suffice.


Oiling gunwales seems to be the last part of the operation, even though I read (somewhere) that oiling is done prior to installation of the gunwales.

In the video he seems to be working with completely un-oiled gunwales. I’d rather have some sealant on the backside of the gunwales before screwing them in place, and have pre-oiled the wood gunwales I’ve installed. Multiple coats of oil, rubbed in, dried, and reapplied on all sides of the wales before installation. Re-oiling the exposed outside of the gunwales is easy enough, getting to the undersides not so much.

I am not sure how well glue (epoxy) would bond with oiled wood. Some folks have mentioned that they epoxy sealed the backsides of the gunwales, which seems a better route with “glued” gunwales, and perhaps wise even with screws. Epoxy on the underside, oil on the outside?

One “Please don’t” note on the video; when he showed leaving the gunwale stems bowsprit-long to serve as a protruding handhold I had an involuntary shudder.
 
Wish I could avoid screwing through that back of the gunwale epoxy seal though. I'll noodle a bit longer on it, but a picture is finally forming in my head :)
 
Back
Top