• Happy National Telephone Day! 🔔☎️📱📶

Carbon Innegra canoe build

Awesome meeting up with Jim and Steve last week, talking canoes and paddling theirs! I am already thinking about a solo build...

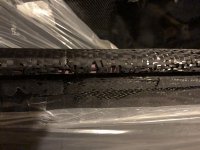
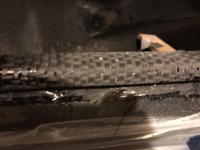
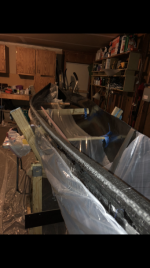
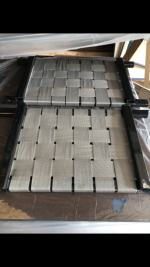
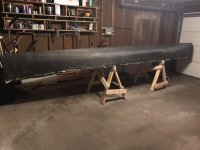
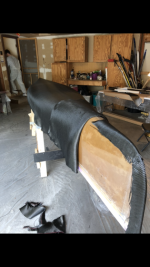
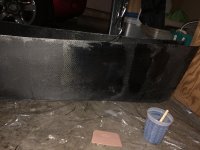
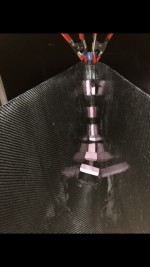
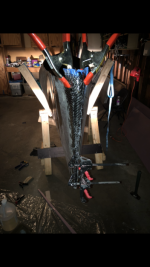
Anyway, we made a serious mess in the garage on Saturday laying up the canoe. To recap, we went with the shrink wrap film as a barrier on an existing 18 foot Jensen. I added about 5/8 inch freeboard around the hull and even more in the bow. Layup is 5.7 oz carbon-Innegra hybrid, 6 oz IM carbon fiber, 3.16 oz style 120 E-glass, 4 oz S glass football. We managed to squeeze an s-glass skid plate while we were at it too. The whole hull was covered in peelply at the end.

What went well:
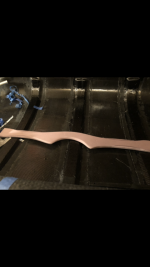
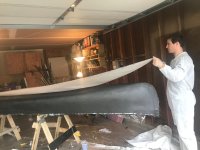
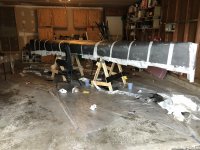
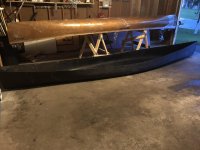
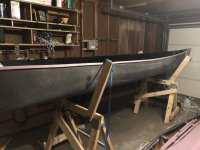
We sealed the bow end and left the stern open to pull it off the mold. The hull came off pretty easily and saved the hassle of sealing an end. I am laying up a stem piece now that will be epoxied and inserted to the other end when cured.

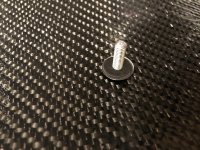
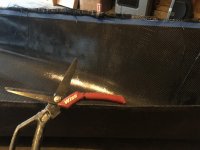
These shears! I picked them up at the Home Depot and they cut Innegra like a champ. One side is serrated, which grips the material well. They even trimmed the entire hull post-cure with minimal blisters.

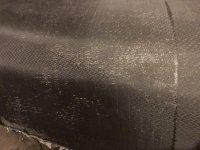
The Carbon Innegra fabric. It is a bit messier than pure carbon fiber but is easier to tell when it wets out and it did not seem to soak up a ridiculous amount of resin like I had read.

What did not go so well:
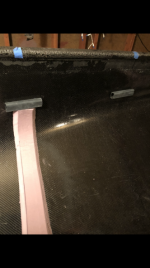
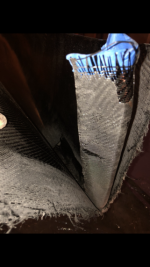
The carbon fiber is only 49 inches, about 3 inches too short around the middle. Partial pieces are a PITA and that part looks ugly.

Style 120 fiberglass. This stuff is so hard to wet out, it is almost as tightly woven as peel ply. My brothers gf commented accurately that the canoe looked like a dairy cow during this part. There are several spots throughout the hull. Hopefully it looks better after the full coat.

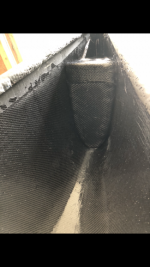
Next step is to seal up the stern end and figure out a method for the carbon-foam gunwales.
 

Attachments

  • photo9579.jpg
    photo9579.jpg
    263.5 KB · Views: 14
  • photo9580.jpg
    photo9580.jpg
    412.4 KB · Views: 13
  • photo9581.jpg
    photo9581.jpg
    259 KB · Views: 13
  • photo9582.jpg
    photo9582.jpg
    425.6 KB · Views: 14
  • photo9583.jpg
    photo9583.jpg
    341.9 KB · Views: 15
  • photo9584.jpg
    photo9584.jpg
    335.1 KB · Views: 15
Looks great!

Doing a show through with the high-tech weave is challenging, especially for a contact layup, every overlap, stray tow and imperfection shows through including any surface irregularities in the plug below.

Those high thread count fabrics are more suited to infusion so I'd say you did pretty good. Hard to tell from the pictures but depending on how dry some of the drier areas are they may not re-saturate too well for purposes of show through of the fabric below. If you're going for perfection you may have to sand out some of the drier areas and put another patch of fabric over and fair it in. For the relatively small amount of re-work you can warm your epoxy quite a bit to thin it out, precoat the hull and fabric too before applying.
 
I'd say it looks great ! The Peel Ply just doesn't let the air through ! I like the theory, but for hand lay up, it seems problematic !

You have me looking hard at the Carbon / Innegra ! How much resin did you use, and did you do any fill coats between layers ?

I'm glad you sealed up one end, and pulled it off ! I will next time !

Tightly woven cloth can be a pain !

It was a Hoot Thursday night ! We will have to do that again ! It doesn't get much better than meeting up with fellow builders !!!

Thanks for posting !

Jim
 
Thanks! Deerfly is right on - the inside looked great except for this stray thread that I couldnt seem to grab when clearing out the inside of the hull ;) We used Raka slow curing epoxy and non-blush hardener, got through a gallon of epoxy and almost a quart out of the 2nd gallon bucket (not counting hardener). We wasted a bit too when it started to kick, so maybe we only used a gallon on the hull? Seemed about right for an 18 footer. We just laid one layer on top of another without waiting for a layer to cure, so there was some resin from below on each layer.
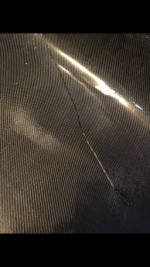
I am hoping the fill coat will make the dry splotches look better, here is a little test. Has anyone used tinted epoxy for a fill coat? Wondering if black epoxy would clean it up.
 

Attachments

  • photo9587.png
    photo9587.png
    211.2 KB · Views: 10
  • photo9588.jpg
    photo9588.jpg
    376.4 KB · Views: 10
Humming right along, I closed off the other stem with an experimental method. I absolutely hate closing stems, so I cured a piece of cloth onto the mold to insert into the hull stem opening for an exact shape. It worked pretty well and I didnt get a crooked stem. Naturally, another layer of carbon went on the outside of the stem, covered with S-glass and another s-glass layer on both stems.

Now time for the gunwales. I seem to have the same wavy hull issue Stripperguy had with his carbon build. Foam isnt stiff enough to bend it into place. Apart from trimming off some freeboard, is there anything I can do to fix it? Maybe put a bunch of brace thwarts throughout the hull to force the correct shape?

PS I also learned that polystrene foam hates Super 77. It loves double sided window tape.
 

Attachments

  • photo9614.jpg
    photo9614.jpg
    290.6 KB · Views: 12
  • photo9615.png
    photo9615.png
    238.7 KB · Views: 10
  • photo9616.png
    photo9616.png
    239 KB · Views: 10
  • photo9617.png
    photo9617.png
    261.9 KB · Views: 11
Bell Premakes their gunnels, to match the canoe design.

Maybe you could do the same, and then attach to the hull.

I'm thinking the form for the gunnel, might be a bugger to construct! If you were building a stripper, you could use the forms. Attach foam with hot melt glue, to the forms, and them just glass the foam.
Just thinking this over in front of my screen !

Have you given any thought to aluminum gunnels ?

Jim
 
...

Now time for the gunwales. I seem to have the same wavy hull issue Stripperguy had with his carbon build. Foam isnt stiff enough to bend it into place. Apart from trimming off some freeboard, is there anything I can do to fix it? Maybe put a bunch of brace thwarts throughout the hull to force the correct shape?

...

I believe my wavy sheer line was due to the stiff carbon fiber cloth, my existing gunnels on the plug (the Red Kite), and my inability to hold the cloth firmly to the plug.
As it came off the plug, the sheer line was fugly for sure. I cut away the worst sections, and fitted the foam core gunnels a bit larger than needed.

This photo shows the sheer line at its worst

View attachment u1abZcRQVrLCRU77tLsxUMSRoWpWBx2j08SRNHeIyVwzTyFCREWSfgtcpRfqOVhyrtO37PY8iVoyPKwMmNvH0R0nHTj27CD7f7Tc
 
Once I shaped the foam cores, the sheer line bobbles are hardly noticeable.
If I were to do another carbon composite hull, I would deficately find some way to force the carbon onto the plug...maybe ala Jim's plastic sheet stock and some blocking to reach over existing gunnels on the plug.
Here's a look at the end results, not my finest work, but not bad compared to the way it was when it came off the plug!!

View attachment y5Ma3BQ_aBuN-cyRwa4P1CeI-2PH86IfsYZ0L4-6OAob4MpMYMUxNabMCSOKZarEz1nEfeLii3Sh_WF2w2Ejk3ogmrlBuaJ2dvm1
 
Thanks for sharing your advice and experience, much appreciated. My hull has more of the longer waves, primarily near the bow where I added that extra freeboard. Im with you Stripperguy, if I were to do another boat id try to find a way to laminate at least outwales to the hull on the initial layup. Great save on your part, the finished product looks great!

Jim - that is a really good idea to laminate the gunwales on the plug then reattach to the hull. I might laminate the inwales with that 3.16 oz FG along the outwale line of the plug then attach the hardened part where it needs to go. I put a few braces in place inside the hull and it seems to minimize the waves quite a bit. Let me see if adding a few more helps. If not I will definitely be trying that method! Those Northstar gunwales are sweeeet. Upon examination at Demo Day, they for sure use carbon sleeve on a uni-wale. I can only hope my carbon gunwales reduce the weight as they do on that Northwind solo (only 25 lbs!!). Re: aluminum gunwales, im really not a fan, too many pinched fingers. If this experiment fails I have a buddy with 20 foot ash up in Superior WI he said I could use, thankfully :)
 
Through a combo of braces that pushed and duct tape that pulled slightly, I was able to get the majority of the shape and correct measurements on the first gunwale. Not pretty, but adequate. The cf tape is thick and would not stick in its wrap position without the peel ply. The bad news - the 12k fibers are so big, they leave pretty big gaps if the cloth gets slightly spread. Im going to have to add some patches to the open areas and give it a decent fill coat. Hopefully I still net some weight savings from the carbon foam method.
 

Attachments

  • photo9653.jpg
    photo9653.jpg
    312.5 KB · Views: 13
  • photo9654.jpg
    photo9654.jpg
    317.6 KB · Views: 13
  • photo9655.png
    photo9655.png
    257.5 KB · Views: 13
Your carbon fiber looks waaaay different than the stuff I used.
Mine was 13.something oz bias woven tape, 4" wide. Cost way too much and soaked up too much resin.
Even so, gunnels added 3 lbs or so to the build. (for comparison, a single mahogany gunnel on my son's recent build weighed 3.3 lbs). I will use glass over foam for the next composite gunnels, and paint them black.

Here's what my carbon gunnels looked like

View attachment yJ_Uo1frDIekWR-j6IgU02UTIeNyA7WRzT67lgtuCxJvqWoOMwJaTbJfhIFTc_l-226tEEHLtEV9aiaaTqKSiUFcMaxWNVE5JJYp
 
Oh wow that is a very different weave. Mine is 14 oz satin weave, 4 or 5 harness I think. 6 inches, cut down to 4, so that is hopefully why it spread apart in some areas. Im going to try trimming it after its wet out on the next gunwale. I did part of it with cabosil thickened epoxy, the other just normal and I think the normal, thinner epoxy wet out better. Good idea with the glass, SG. I bet you could stick an outwale with glass onto the initial laminate to get the correct shape and half the work done right at the beginning.
 
Through a combo of braces that pushed and duct tape that pulled slightly, I was able to get the majority of the shape and correct measurements on the first gunwale. Not pretty, but adequate. The cf tape is thick and would not stick in its wrap position without the peel ply. The bad news - the 12k fibers are so big, they leave pretty big gaps if the cloth gets slightly spread. Im going to have to add some patches to the open areas and give it a decent fill coat. Hopefully I still net some weight savings from the carbon foam method.

That carbon looks like a plain weave, a Twill should be tighter.
I wonder if your Carbon/Innegra would have worked better ?

Jim
 
I double checked, it is 4H satin weave. The other side of the cloth makes it much more obvious, but this side looks just like plain weave for some reason. 2x2 twill of a 3k or 6k would be much more ideal - I wish they made that Carbon Innegra in a tape! That would have been perfect. I hope I am not scaring others off from trying the cf gunwale method, but want to be transparent on all the potential struggles. From a few feet away they do look pretty sweet and should be very functional. We will see how the aesthetics turn out after a bit of clean up and sanding. Thanks for your interest, and I hope I can be a guinea pig for someone elses build.
 
Life has been busy and progress slowed a bit, but here are some updates. I filled in the really bad parts of the gunwales with thickened epoxy and graphite powder, covering with that 3 oz glass in a few places too. I will come back to the gunwales at the end, sand them down good and do a layer of that graphite powder epoxy to try and hide the ugly.

5 of the 9 ribs are in so far and I used unidirectional cf. The lines are clean but that stuff does not conform to complex shapes at all! They are quite stiff, however. With the little remaining peel ply, I just covered down the edges of the ribs to secure a more smooth finish.

Thwarts, handles, seat holders, and soon to be seats are made from sanded composite hockey sticks. To better support the seats, I am placing ribs flush to bottom of the screwed in seat holders. If time allows, I will try my best Alan impression and make a carbon fiber yoke too! Hoping I can wrap this up before our BWCA trip.
 

Attachments

  • photo9770.jpg
    photo9770.jpg
    360.2 KB · Views: 15
  • photo9771.png
    photo9771.png
    207.7 KB · Views: 13
  • photo9772.png
    photo9772.png
    233.7 KB · Views: 14
Here are a few pics of the updates. The composite hockey stick seats turned out pretty well and are really light. I epoxied some thin wood strips to the bottoms as a staple gun was not going to penetrate the bare carbon. Flotation tanks are in and the back layer of cf is on the yoke. I used the remainder of the 14 oz gunwale carbon and an outside layer of 6 oz carbon. I will have to do a layer or 2 of the carbon Innegra on the other side + the same cf on the outside. I see how vacuum bagging would be very beneficial for making these kind of parts. Hope this works!
 

Attachments

  • photo9797.png
    photo9797.png
    263.7 KB · Views: 11
  • photo9798.png
    photo9798.png
    249.5 KB · Views: 11
  • photo9799.png
    photo9799.png
    220.3 KB · Views: 12
  • photo9800.png
    photo9800.png
    265.7 KB · Views: 12
. I see how vacuum bagging would be very beneficial for making these kind of parts. Hope this works!

Even then it's not easy without a lot of prep work and probably a mold. Just wrapping a yoke or thwart with cloth and sticking it in a vacuum bag results in lots or wrinkles. In the end I decided that since either way a lot of cleanup (filling and sanding) would be required for good aesthetics I'd just skip the vacuum bag and do it by hand. Never tried it but maybe the easiest would be for the final layer to be very light fiberglass, preferably bias woven to conform better. This would be a much easier weave to fill than the heavy duty carbon.

Sometimes I'd peel ply the flat top and bottom so then all I had to worry about was the rounded edges. Trying to get the peel ply to follow the contours of the whole piece was an exercise in futility.

Alan
 
My S-I-L has made many carbon fiber parts for racing quads and motocross bikes. He would often use heat shrink tubing over his parts to achieve a strong, wrinkle free lamination.
He also would wet out and heat shrink no more than 2 layers at a time. It was time consuming work...

I'm still struggling with the best method for carbon fiber over foam gunnels. As Alan said, a mold is probably a requirement, ultimately, there are no shortcuts.
Reminds me of my years in automated equipment and manufacturing, with the right equipment and tooling, anything can be produced with a low per piece cost.
 
The shrink tube is awesome stuff and works great but if I remember right it's even more expensive than the carbon sleeve. Probably worth the price on simple shapes as opposed to all the sanding and filling it would take without it. In my experience it didn't work very good on complex shapes. Or on really long pieces either since it was hard to slide it over the gooey part without it getting sticky with epoxy and pulling the cloth out of shape. I suppose the key is getting the largest diameter shrink tube that will still shrink small enough to compress the part.

I tried heat shrink tape as well and had some promising test pieces but not so good results in real world applications (that were longer and more complex). It seems to be geared more towards shrinking and curing in an oven where steady temps can be maintained as opposed to a heat gun. It's easy to get it too hot and wrinkle the tape with a heat gun and without the constant temp of an oven it seems to lose pressure as the part compresses slightly.

Alan
 
Back
Top