G
Guest
Guest
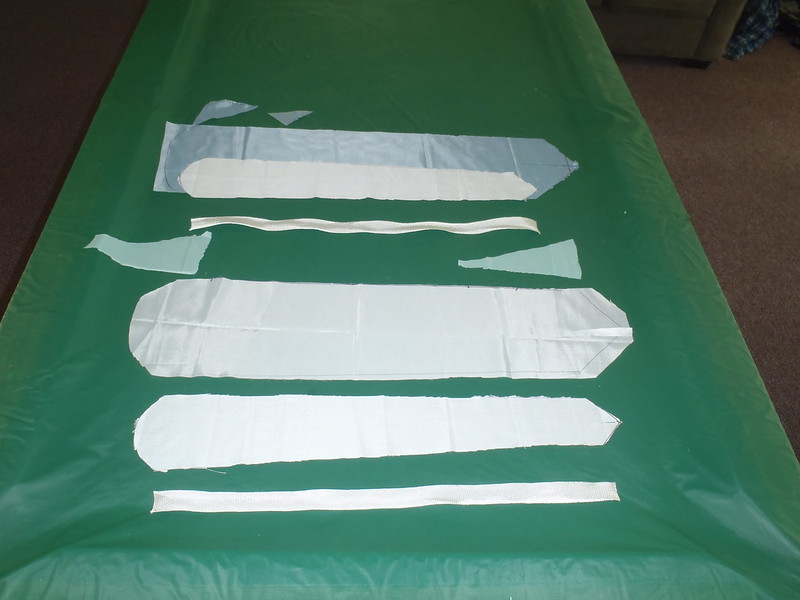
Using what I learned, and what I surmised, from the skid plate materials test it was time to lay up another skid plate, and I had one last RX canoe in the family fleet that needed stem protection, the Wenonah Wilderness.
I went with a 32” long Dynel top cover over a 29” long strip of 1 ½” wide bias woven tape (15oz, 12 ml thick). I have confidence that the peel ply compression will eliminate that tape thickness and selvage edge, and that the bias weave underlay will provide more impact resistance.
With an overlay of Dynel, and a piece of peel ply a couple inches larger all around, so I had plenty of perimeter overlap, just in case my peel ply placement was a bit off kilter.
 P4240027 by Mike McCrea, on Flickr
The blueish material is release treated peel ply from Jamestown Distributors, the other large whiteish piece is peel ply from a different vendor, both work equally well. At least I can’t mistake the blueish peel ply for 4oz fiberglass.
As always cutting the materials, taping the hull and staging all of epoxies and materials takes three times as long as actually laying the cloth and epoxy.
The narrow end of the Dynel pieces, which overlap the bias tape by a few inches, have a 2” slice up the centerline, so that end of the Dynel, laying atop the sharpest part of the stem curve, can be crossed atop itself to reduce fabric wrinkles and puckers. When crossed over a tiny triangle of X’ed Dynel can be cut off so the lapped ends still taper to a point.
 P4250031 by Mike McCrea, on Flickr
I laid out the thick bias weave tape and made a few marks on the hull so that my aim would be true while placing the tape along the stem vee and keel line.
 P4250034 by Mike McCrea, on Flickr
Time to set out the rest of the materials. Epoxy, G/flex, Graphite Powder, black pigment. Spoon to (slowly) dispense graphite powder into the epoxy mix. Acetone in case I have a boo boo. And multiples of things I’ll use several of, or want ready backups; gloves, mixing pots, brushes, stir sticks.
 P4250036 by Mike McCrea, on Flickr
Having seen how “thirsty” thicker materials were in the skid plate tests I epoxy the bejeepers out of that thick biaxial tape, a thick coat on the hull before laying the cloth, where the bottoms of thicker materials had experimentally proved to be thinly epoxied even with my heavy hand. Biaxial tape laid and generously top coated. And, as any visible weave appeared on the wetted tape, recoated in those areas just before the Dynel top layer went on.
The tape was easy to get aligned and perfectly emplaced. The longer/wider Dynel top layer went on with helping hands holding one end of the fabric while laying it evenly in place. I really didn’t want to do that part solo.
When the epoxy stopped dripping and (just) started to set up I pulled the tape and used the acetone to neaten up any wobbles along the epoxied edges. A little bit of acetone on a piece of folded paper towel works wonders. A little dab will you ya.
https://www.youtube.com/watch?v=o6F4GtyRfto
Peel ply laid on (I had helping hands for those pieces as well) I wanted a hard roller to help compress the thick tape and selvage edge under the Dynel. Had one, broke it a few years ago and need a replacement. Maybe one of these, except HD was sold out.
https://www.homedepot.com/p/Piranha-1-25-in-Seam-Roller-202314/203809609
I have an assortment of squeegies, but that multilayer skid plate, or any skid plate, even a single fabric layer, lays down flattest along the transition edges, or tape selvage edge/thick raised underlayer, when firmly rolled down.
I still wanted/needed a roller to knock down that uber thick bias tape under the Dynel, and the Dynel itself from epoxy swelled thickness. I wasn’t running out to Lowes while the epoxy was setting up.
What have I got in the way of a DIY roller? AKA why did I save those horrible drilled dowel seat drops?
Now I know. So I could stick a 20 penny nail through them and use them as rollers.
 P4260039 by Mike McCrea, on Flickr
I still want a real roller, but dang that drilled dowel and nail worked very well at flattening out the selvage edge transitions and Dynel swell.
 P4260041 by Mike McCrea, on Flickr
Release treated peel ply removed
 P4260046 by Mike McCrea, on Flickr
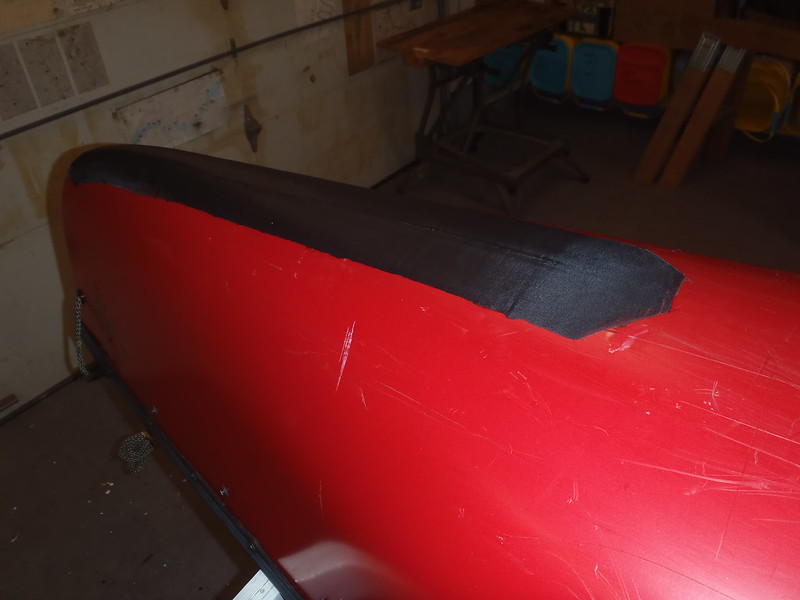
Not too shabby* for an afternoons work. The thick bias weave tape disappeared under roller compression. I’ll neaten the edges when I put on a UV coat of black enamel paint, and round out the wide end angles into a semi-circle at the same time.
*Confession: In the 17 steps before actually mixing epoxy I neglected one important task, drawing a centerline up the Dynel. That visible keel line mark on the fabric helps immensely with alignment. The bow skid plate is misaligned by ¼” at the wide end. Something else to fix at least visually when the enamel paint top coat goes on
Until I find a source for (thick) S-glass bias weave tape I think I have my chosen skid plate materials.
That thick bias weave tape is from Sweet Composites. Dynel as well.
https://sweetcomposites.com/Seamtape.html
I went with a 32” long Dynel top cover over a 29” long strip of 1 ½” wide bias woven tape (15oz, 12 ml thick). I have confidence that the peel ply compression will eliminate that tape thickness and selvage edge, and that the bias weave underlay will provide more impact resistance.
With an overlay of Dynel, and a piece of peel ply a couple inches larger all around, so I had plenty of perimeter overlap, just in case my peel ply placement was a bit off kilter.
P4240027 by Mike McCrea, on FlickrThe blueish material is release treated peel ply from Jamestown Distributors, the other large whiteish piece is peel ply from a different vendor, both work equally well. At least I can’t mistake the blueish peel ply for 4oz fiberglass.
As always cutting the materials, taping the hull and staging all of epoxies and materials takes three times as long as actually laying the cloth and epoxy.
The narrow end of the Dynel pieces, which overlap the bias tape by a few inches, have a 2” slice up the centerline, so that end of the Dynel, laying atop the sharpest part of the stem curve, can be crossed atop itself to reduce fabric wrinkles and puckers. When crossed over a tiny triangle of X’ed Dynel can be cut off so the lapped ends still taper to a point.
P4250031 by Mike McCrea, on FlickrI laid out the thick bias weave tape and made a few marks on the hull so that my aim would be true while placing the tape along the stem vee and keel line.
P4250034 by Mike McCrea, on FlickrTime to set out the rest of the materials. Epoxy, G/flex, Graphite Powder, black pigment. Spoon to (slowly) dispense graphite powder into the epoxy mix. Acetone in case I have a boo boo. And multiples of things I’ll use several of, or want ready backups; gloves, mixing pots, brushes, stir sticks.
P4250036 by Mike McCrea, on FlickrHaving seen how “thirsty” thicker materials were in the skid plate tests I epoxy the bejeepers out of that thick biaxial tape, a thick coat on the hull before laying the cloth, where the bottoms of thicker materials had experimentally proved to be thinly epoxied even with my heavy hand. Biaxial tape laid and generously top coated. And, as any visible weave appeared on the wetted tape, recoated in those areas just before the Dynel top layer went on.
The tape was easy to get aligned and perfectly emplaced. The longer/wider Dynel top layer went on with helping hands holding one end of the fabric while laying it evenly in place. I really didn’t want to do that part solo.
When the epoxy stopped dripping and (just) started to set up I pulled the tape and used the acetone to neaten up any wobbles along the epoxied edges. A little bit of acetone on a piece of folded paper towel works wonders. A little dab will you ya.
https://www.youtube.com/watch?v=o6F4GtyRfto
Peel ply laid on (I had helping hands for those pieces as well) I wanted a hard roller to help compress the thick tape and selvage edge under the Dynel. Had one, broke it a few years ago and need a replacement. Maybe one of these, except HD was sold out.
https://www.homedepot.com/p/Piranha-1-25-in-Seam-Roller-202314/203809609
I have an assortment of squeegies, but that multilayer skid plate, or any skid plate, even a single fabric layer, lays down flattest along the transition edges, or tape selvage edge/thick raised underlayer, when firmly rolled down.
I still wanted/needed a roller to knock down that uber thick bias tape under the Dynel, and the Dynel itself from epoxy swelled thickness. I wasn’t running out to Lowes while the epoxy was setting up.
What have I got in the way of a DIY roller? AKA why did I save those horrible drilled dowel seat drops?
Now I know. So I could stick a 20 penny nail through them and use them as rollers.
P4260039 by Mike McCrea, on FlickrI still want a real roller, but dang that drilled dowel and nail worked very well at flattening out the selvage edge transitions and Dynel swell.
P4260041 by Mike McCrea, on FlickrRelease treated peel ply removed
P4260046 by Mike McCrea, on FlickrNot too shabby* for an afternoons work. The thick bias weave tape disappeared under roller compression. I’ll neaten the edges when I put on a UV coat of black enamel paint, and round out the wide end angles into a semi-circle at the same time.
*Confession: In the 17 steps before actually mixing epoxy I neglected one important task, drawing a centerline up the Dynel. That visible keel line mark on the fabric helps immensely with alignment. The bow skid plate is misaligned by ¼” at the wide end. Something else to fix at least visually when the enamel paint top coat goes on
Until I find a source for (thick) S-glass bias weave tape I think I have my chosen skid plate materials.
That thick bias weave tape is from Sweet Composites. Dynel as well.
https://sweetcomposites.com/Seamtape.html


