• Happy Marine Mammal Rescue Day! 🐳🐬🦭🦦

Barracuda Build

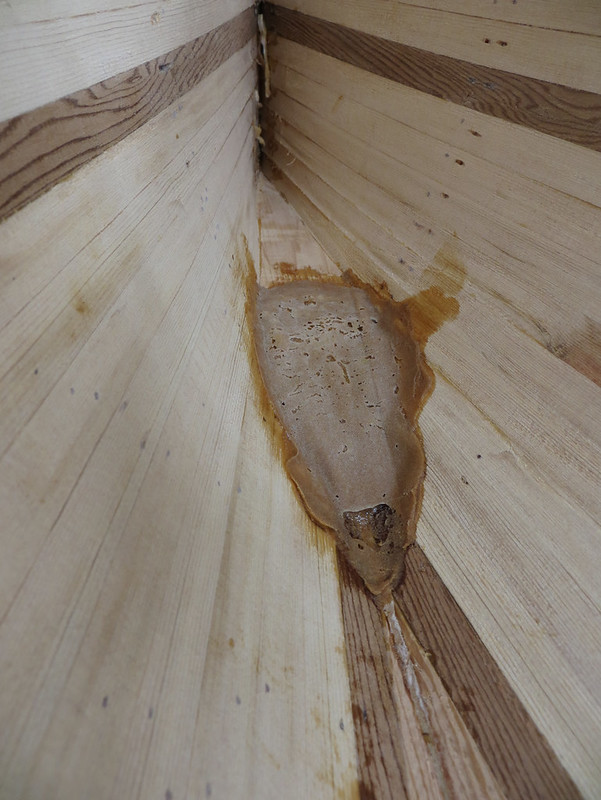
When home for lunch I sanded down the fiberglass stem patches I put down last night. Now it's all ready to be glassed:


20140723_001 by Alan Gage, on Flickr

Got home from work and went right to work. Draped the cloth over the hull, trimmed the excess, and slipped a few more pieces under the main cloth for stem reinforcement:


20140723_003 by Alan Gage, on Flickr

I don't know if everyone does their stems this way or not:


20140723_004 by Alan Gage, on Flickr

The cloth is slit up the center line to where it starts to curve. First one flap wraps around the stem and then the other wraps over the first, which gives you two layers on the stem ends.

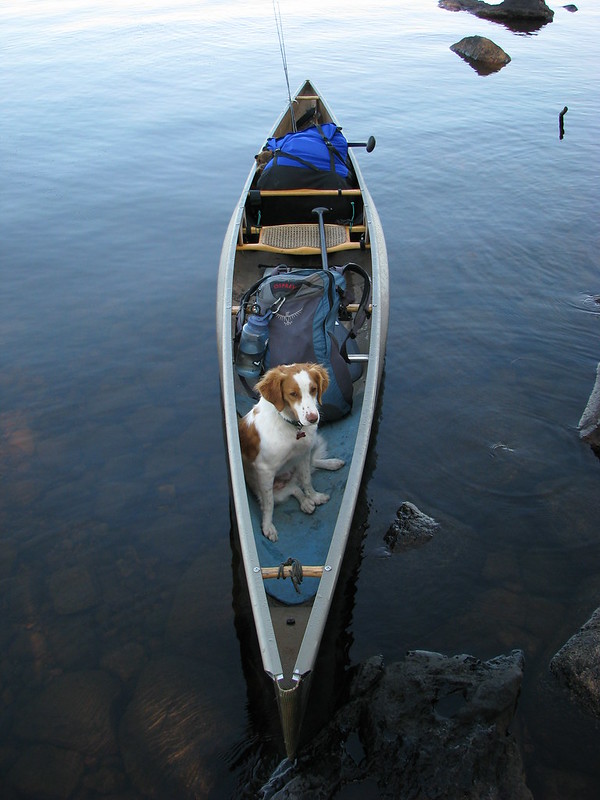
About 1 1/2 hours later it looked like this:


20140723_007 by Alan Gage, on Flickr


20140723_008 by Alan Gage, on Flickr


20140723_009 by Alan Gage, on Flickr

I used one of those little plastic hand squeegees for most of it and a foam roller where it turned vertical and under the tumblehome area. It went pretty smoothly. This was my first time working with 4oz cloth and it looks like I went a little heavier than I should have with the resin. I was trying to avoid starving the cloth but it looks like there are some spots that have completely filled the weave. I couldn't quite get the cloth to lay right at the stems at the top of the slit mentioned above without leaving a very small bare spot with no cloth. So I just let it be that way and cut a small patch to put over the area. Blended right in and laid fine. Will be invisible when done.

I used Raka's "slow" hardener (not the non-blushing) and I quickly learned to mix smaller batches. Mixing 10oz. batches was no problem when working on the center of the hull with lots of flat real estate where I could pour and spread liberally. But as I got closer to the stems with more vertical surfaces that needed to be rolled on things slowed down and suddenly I realized my pot was starting to kick. After that I did 6oz. batches without trouble.

Tonight before bed I'll go back out and roll on a second coat to fill the weave. I'm hoping with the 4oz cloth that will be the last one needed.

Alan
 
Up late last night but got another coat on. Up early this morning to touch up the final spots where the weave still showed. The epoxy was still "green" this morning so I sliced off the overhanging fiberglass with a razor blade.

Ready to flip!

Alan
 
Home for lunch. I was hoping to take the canoe off the forms tonight but it's still a bit tacky. So I turned on the furnace to help it cure.....in July.....I'm starting to think I have a problem.

Alan
 
I came home from work to a hard epoxy coating and hot shop. Thankfully it's cool outside so I just worked with the overhead door open, much to the joy of the dog and chickens who I had to keep shooing out (chickens, not the dog).

And then this happened!!!


20140724_001 by Alan Gage, on Flickr


20140724_003 by Alan Gage, on Flickr


20140724_004 by Alan Gage, on Flickr

Forms popped right off and the canoe got it's first weigh-in. And the results are...........18lbs. 4oz..... I was expecting 20 or just over so I guess I'm happy. A little worried about it being too light (fragile) but I think it will be ok. My old Stenso V1 I posted a picture of above was 18 1/2 feet and right at 30 pounds. The old woodstrip J-boats, if I remember correctly, were also 18 1/2' and were in the mid-20's and they all seemed to hold up fine to similar duty this boat will see so.... fingers crossed.

And now this has to happen....:(


20140724_005 by Alan Gage, on Flickr

So far I managed to take a lap around the inside with a long, skinny (and sharp) chisel that lets me keep a low angle and cleaned up the worst of the glue drips and runs. Then a quick lap with the orbital sander, quickly hitting the high spots, to see what I've got to go back over by hand. The sander cleaned up most of the blood drops from skinned knuckles.

So what's everyone using to smooth the inside of the hull. Not much flat area on this one so there's lots of places the orbital sander can't get to. Paint scrapers seem to be popular for this task so I bought a couple, one wider and one skinnier, and rounded to blades but my quick reshaping of the cutting edge seems to leave a bit to be desired. The narrow one isn't bad but it could be better. The wide one stinks. I'll try putting a better edge on it tomorrow.

Any tips on using the paint scraper or any other methods out there?

You know, the rustic hand-hewn look is kind of popular right now.....maybe I could just leave it as-is. ;)

​Alan
 
Alan,
Wow, really quick work!!
Is the sheer line at the final height and profile? I do like the looks of that hull.
On the inside, I use a 7" sander/polisher with a customized backing disk and 36 grit and 60 grit disks. I machine the backing disks to be very flexible, some of those tight radiuses are tricky to get into with a stiff backing disk. I generally don't sand too smooth on the inside, even light cross grain scratches are hidden by the weave of the cloth.
I also use some custom made (by me!!) scrapers, nothing too fancy, just some spring steel slightly bent then sharpened. The scrapers can used to cut aggressively, but I use them mostly for the glue drips and the tight spots inside the stems. Firewall here at work makes it too difficult to post photos, but I'll post something later tonight...but that may be way too late for you, seeing the pace that you proceed!!
 
Welcome to heck. My least favourite part of the process, sanding the inside. For those tight areas in the knuckle, I will usually use a full water bottle, with 50 grit wrapped around it. Just make sure the cap is on tight. My eyes are starting to itch just looking at it.
 
Sheesh, this inside the hull business is like real work! Finally got a good edge on one of my paint scrapers (the pull kind) and made two rounds around the inside. It's looking pretty good. Time to hit it again with the sander and sandpaper. Thanks for the ideas on finishing the inside. I like the look of the curved scrapers. Digging around I found some available that are multiple shapes and have a handle as well. Perhaps I'll pick some up for the next one. I'll be using the sandpaper and bottle tomorrow.

But before I got started working on the actual canoe tonight I first put my shop back in order (well, kinda) from when it was disassembled to cut the strips. Basically all I did was put the table saw back in place and reattach the side support table. Because now it's time to cut out the gunwales. I wanted to get them cut and glued up so they'd be ready when I was.

First task was to rip 4 10' lengths of Alder 5/8" wide. Why Alder? Because it's what I have. Then I had to figure out how to scarf them together, something I've never done before. It always looked complicated with all sorts of fancy homemade jigs. But then the other night when I actually took the time to study some pictures I realized it didn't look so bad afterall.

It didn't take long to find a piece of scrap that looked like it would be long enough and was wide enough to push comfortably with my hand and keep it away from the blade. First I screwed a small block of 3/4" stock to one edge but that looked too shallow. So I screwed another 3/4" block on top of that and that looked about right. We like to do things fancy here in Iowa:


20140725_001 by Alan Gage, on Flickr

Now the fence goes on the left side of the blade and an extension gets clamped to it to support the "jig" when it's slid all the way back (you'll see what I mean in a couple pictures). Set the fence so the jig just skims past the blade. See how it works now?


20140725_002 by Alan Gage, on Flickr

Now take the piece you're going to cut and lay it against the jig with the front of the stock just sticking out in front the jig. You can see that if not for the extension fence the back edge of the stock would slide off the fence and screw up the angle. I suppose another solution would have been to cut a couple inches of the length of the jig.


20140725_003 by Alan Gage, on Flickr

Slide the jig and the stock together through the blade. This is the kinda tricky part, they have to slide together along the table saw fence. You don't want to slide the stock along the jig. After a couple test pieces I didn't have any trouble just holding them together with my hands as I slid it through. But watch those fingers! I had a couple that moved just slightly when cutting and left somewhat deep saw blade marks. I just ran them through again but only shaved off about 1/2 the width of the saw blade. So less effort and less likely to slip.


20140725_004 by Alan Gage, on Flickr

And this is what you get:


20140725_005 by Alan Gage, on Flickr

I couldn't get them to come out perfect without some marks from the saw blade but a long block of wood with sandpaper wrapped around it (long enough so that it's covering the entire cut all the time to maintain the correct angle) took care of that. I won't say it was a perfect fit where you couldn't even see the joint when I got done but it was pretty close. I mixed up some epoxy and thickened it slightly with cedar dust for color and a little milled fiberglass to give the epoxy some extra strength in case it had to bridge any small gaps. I don't know if that will do any good or not, or that it was necessary, but it made me feel better. I'll see how it looks tomorrow when the clamps come off.


20140725_006 by Alan Gage, on Flickr

Oh, and stripperguy, to answer your above question: The sheer line will be as-is.

Alan
 
You're making great progress!

Half the fun is figuring out how to complete the different tasks.

I'm glad you are keeping at it.
 
Thanks, Hanz. It's been fun figuring things out on this one. More fun than the first one, I don't feel so intimidated and I've got a bit more woodworking experience since then.

Not a very productive day today, or is it yesterday now. It's late, I don't know. I had some other commitments to attend to so I didn't get to spend my normal 10 hours on the boat. :)

But I did get the inside sanded down and ready to go:


20140726_001 by Alan Gage, on Flickr

Remember those sabots, or shoes, or whatever you want to call those solid blocks of wood I used in the bow and stern stems? I meant to give them a tapered profile on the inside of the hull before I installed them but I forgot. This means I've got a about a 1" or so tall vertical wall that the fiberglass isn't going to want to lay over. So I thickened some epoxy with cabosil and cedar dust and built little "ramps" as well as filling in some other areas that I thought could benefit from it. Here's the bow with peel ply over it:


20140726_002 by Alan Gage, on Flickr

The bow turned out good. The stern not so much. I just couldn't get it to lay in like I wanted and the epoxy was already starting to kick. It was burning my fingers and starting to get solid lumps when I got it as good as I could. This is what it looked like when the peel ply came off.


20140726_003 by Alan Gage, on Flickr

It was worse than the picture showed. Very uneven, too far up the sides and over the top of the block and didn't reach smoothly to the bottom of the boat. Thankfully the epoxy wasn't fully hardened yet so a little work with a sharp chisel took down the high spots and cleaned it up. It actually looked worse after scraping but then I mixed up some more thickened epoxy and gave it a skim coat to smooth it out. Much better now.


20140726_004 by Alan Gage, on Flickr


20140726_006 by Alan Gage, on Flickr

I'll hit them with the sander tomorrow morning (or is it this morning?) and then it's time for inside fiberglass!

Alan
 
And since I'm depriving myself of sleep anyway I thought why not stay up a bit longer and make a seat mold? I've got a tractor seat that I really like and I might be selling the boat so I wanted a mold of the seat. Don't know if one will go in the Barracuda or not, but it might. A few years ago I messed around a bit with vacuum bagging (making other seats) and I knew I had enough extra materials left and I was glad to finally use them.

So this afternoon I went hunting around to find what I needed. I found the vacuum fitting and the cotton bat material but that was it. No perforated peel ply and no bags. Guess I didn't have extra afterall. That really bummed me out since in case you haven't noticed I don't like to wait and I knew it wouldn't be until the end of the week that I'd get anything shipped to me and I want to make a seat now!

So I started thinking. I might not have the perforated peel ply used in vacuum bagging but I do have regular peel ply and sharp, pointy, objects. And certainly I could come up with something else to use for a bag. Some sort of thin plastic that has some stretch to it. I was rolling different ideas around in my head when garbage bags came to mind. Sounded like a winner to me so I got everything organized, waxed my seat a few times and spread some PVA (mold release) gunk on it. I poked a bunch of holes in my peel ply and then wetted out a bunch of scrap pieces of cloth on the seat. The regular nylon peel ply doesn't work as good as the perforated stuff for vacuum bagging, I think that stuff was more flexible and conformed better, but it should be good enough for this purpose. Probably didn't need to perforate it either as epoxy can flow through the weave naturally. I think the other stuff is solid except for the perforations.

Everything was going just dandy until I pulled a vacuum on the garbage bag. Had some trouble getting it to seal but once I did things looked great until the bag suddenly developed a leak under high vacuum. So I pulled that one off and tried another bag. Same thing. Maybe this isn't such a good idea afterall! These are just regular kitchen bags.

Went inside and found some bags that were ever so slightly thicker and I doubled them up. Pulled a vacuum the third time and the same thing happened, but then it regained most of its vacuum and seems to be working pretty well. This is what it looked like when I left the shop 20 minutes ago:


20140727_007 by Alan Gage, on Flickr

It's running about 25" vacuum but I can't shut the pump off because of the leak. I realize now after inspecting the other bags that what's causing the leak is some reinforcement with sharpish edges on the bottom side of the seat. It pulls a vacuum, sucks the bag in tight, and then gets punctured. This might have been a problem with regular vacuum bags too. The easy fix would have been to put a layer of that cottony bat stuff under the seat as well for bag protection. But so far it's doing a good enough job and I'm tired of switching out bags so I'll let it go.

Hopefully in an hour or so the epoxy will be set up enough that I can turn off the pump and go to bed.

Alan
 
Alan, as my old mentor used to say “"Pretty work”".

I have a couple of rolls of perforated release film that are useless to me (I don’t have vacuum bagging equipment). Send me a PM with your address and they are yours.
 
Mike - Thank you for the compliment and the generous offer. But are you sure you don't want to keep them? It doesn't take much capital to get into basic vacuum bagging and it seems like something that would come in handy for you. It doesn't have to be in a "bag." Pretty sure I've seen pics of people using it for "on the boat" repairs as well, just taping the plastic off to the hull to seal. Does a nice job of squeezing out the excess resin and leaves everything very smooth.

I was very surprised when I looked at vacuum pump prices on the sites for composite dealers. Much higher than I expected even for basic ones. I work in auto repair and do a lot of AC work so I can always grab one of the extra vacuum pumps from work but if you look up automotive vacuum pumps (Robinair would be the most common) I'd think you could pick up a suitable one for small work for around $100-$150. Shouldn't require too much CFM for small repairs or molds.

My seat mold didn't turn out too hot, BTW. I guess I should have put a few more coats of wax on my seat. I was afraid I wasn't going to get it back for a while! Didn't use enough layers of glass either so the mold is too flimsy, though that was probably good for getting it off my seat. Added some more layers tonight and it's back in the garbage bag sucking down now. Wrapped the whole thing with batting this time and no holes!

Alan
 
On today's agenda was to fiberglass the inside of the boat. Hit a little snag early when I ran short on fiberglass! Thankfully I had a scrap piece that was just the right size.


20140727_002 by Alan Gage, on Flickr


20140727_003 by Alan Gage, on Flickr

I 'glassed the inside in 4 separate sections with an extra layer of reinforcement in the center. I've never tried to 'glass the inside with one full piece but I have a hard enough time keeping up with little separate ones. I'd think the overlap would add some strength as well.


20140727_004 by Alan Gage, on Flickr

I started at the stern and got pretty nervous because it took forever to finally get the first piece where I was happy with it. I was having nightmares of dealing with hardening epoxy but after that things went much smoother until I got to the bow piece. Nothing insurmountable but the stems were a lot more work than the middle. But overall things went smooth and I'm pretty happy with it. I should have done a better job squeegeeing epoxy out of a couple areas where it got to heavy but it was difficult to do it without pulling the cloth out of place so I just left it be. A couple places where the cloth seemed to wrinkle just a little bit after the epoxy had started to setup but not very noticeable and they'll be covered by the seat anyway. What a relief to be done sanding and fiberglassing the inside!


20140727_005 by Alan Gage, on Flickr


20140727_006 by Alan Gage, on Flickr


20140727_008 by Alan Gage, on Flickr

A couple things I found when fiberglassing the inside:

Wear a nice pair of TIGHT fitting nitrile gloves. Tight gloves let you get a lot better use of your fingers, almost like wearing nothing at all. Can't imagine trying to do this with a loose pair that are always slipping around. Also can't imagine doing it without gloves.

Always start by wetting out the bottom and then work up the sides. Do a foot or two at a time. If you do the sides before the bottom you'll have a heck of a time getting more cloth to the bottom of the boat if needed since you can't just pull it down.

Trim off the excess fiberglass hanging over the shear as soon as that section has been wetted out and you know how much you can trim. Trim is so there is only an inch or two sticking straight up. If there's more than an inch or two instead of standing up in drapes over the side and this tends to pull the fiberglass away from the shear strips.

I suppose I'll move onto the gunwales tomorrow. Think I've got it figured out how I'll do them. I'll cut some test pieces and see. Also have a plan of attack for my seat. If things go well I'll be paddling it in a week or so. Can't wait!

Tomorrow will also be weigh-in #2. Pretty excited.

Alan
 
A,

I always start in the middle and work towards each stem, while working up to the sheer line as I go. You're absolutely correct, once the cloth is wetted out, it's very tough to get it to move around much. Same for the excess cloth at the stems causing the cloth to lift.
Are you sure this is build #2??

And I look in the background of your photos, I see Cabosil, a box from RAKA, a tractor...but, is that a tennis ball? Do you have a dog?

Anyway, real clean work, and really quick!
I bet you're itching to get that thing in the water!!
 
A,


And I look in the background of your photos, I see Cabosil, a box from RAKA, a tractor...but, is that a tennis ball? Do you have a dog?

Yes! Sadie the wonder dog. My ever-present companion. A lot of the reason for building this boat is because I want to start doing more workout paddles and racing now and again but she loves to be in the canoe and I like having her along. So I'm looking for the fastest boat that she can ride in. So far this one looks like a winner as there's a fair amount of flair in bow at the shear.

Some pics from Woodland Caribou. She loves canoe tripping. Get in the boat, run down the trail, get in the boat run down the trail, get in the boat, run down the trail, hunt frogs at camp in the evening.

20120828_007 by Alan Gage, on Flickr

20120824_002 by Alan Gage, on Flickr

20120823_002 by Alan Gage, on Flickr

20120827_002 by Alan Gage, on Flickr

Alan
 
Last edited:
Just a little earlier I said to myself, in all seriousness, "I think I've got enough clamps to do both gunwales tonight." Next thing I know I'm running around the shop doing a little happy dance every time I find a random clamping device hidden under some pile of junk.


20140728_001 by Alan Gage, on Flickr

Planed my pieces down to 1/2x3/4 then rounded top and bottom edges with a 3/8 round over bit in the router. Thought about going to 3/8 thick but while low weight is fun to aim for a half pound here or there really isn't going to make a difference on this boat so I erred on the side of caution because I don't really know what I'm doing. They're getting epoxied on. I guess that's what you call a commitment.

Clamping gunwales: When I started, thinking I might have enough for both at the same time, I figured I'd put a clamp every 10 or 12 inches and then come back to fill in where needed (which was everywhere). I'm wondering if I went about that wrong. Should I have started by putting them every six inches? I think that when I went every 12 inches it left some "slack", so to speak, between the clamps and as I started filling in with more clamps there really wasn't anywhere for that slack to go. I really had to load up on clamps in a couple areas. Tomorrow I'll try it the other way.

Oh, and I weighed the boat again this morning. Amazing how much more stiff it was when I picked it up compared to when it only had the outer layer of fiberglass. Was pretty floppy then. Weight this morning was 21 lbs. 4 oz., so the inside fiberglass added 3 pounds. Tonight, after installing one gunwale, I estimate the weight to be about 125 pounds.

Alan
 
. Weight this morning was 21 lbs. 4 oz., so the inside fiberglass added 3 pounds. Tonight, after installing one gunwale, I estimate the weight to be about 125 pounds.

Alan

Whew!! That is one heavy gunnel! By my calculations, your gunnel was around 104 lb. If it was 18 ft long or so, it had a volume of 67 in^3, allowing for the two 3/8 round overs...That's a density of 1.53 lb/cu. in.. (about 2.5x the density of lead!!)
I thought you used Alder?? Wow, I don't know of a material that dense, what is it!!??;);)

Kidding aside, looks like you'll be in the water with it in just a few days?
 
Back
Top