-
Happy Discovery of the Rosetta Stone (1799)! 𓋹𓂀𓀮𓀛𓀾𓁀 𝞹βδΔ
You are using an out of date browser. It may not display this or other websites correctly.
You should upgrade or use an alternative browser.
You should upgrade or use an alternative browser.
Time to build again - Short solo/kid's tandem
- Thread starter Alan Gage
- Start date

Looks good !
So what is on top of the carbon ?
Also, what did you use for a release, between the mold, and carbon?
You will likely have that hull done, by the time our river is back to normal .
We will need to paddle !
Jim
So what is on top of the carbon ?
Also, what did you use for a release, between the mold, and carbon?
You will likely have that hull done, by the time our river is back to normal .
We will need to paddle !
Jim
So what is on top of the carbon ?
A couple layers of fiberglass at the stems.
what did you use for a release, between the mold, and carbon
PVA.
The morning after laying down the first layer of fiberglass I at least separated the edges before laying the carbon on top. If I would have been thinking I would have put down tape on the mold at the edge. As it was it was a bit more difficult than I would have liked to achieve separation. I'll find out Sunday how the rest of it releases.
Alan
I was able to separate the composite copy from the stripper used as a mold....but not without some challenges.

The biggest problem was at the edges. They did not want to release! In hindsight I should have ran a line of tape at the edge and my life would have been much easier.
I started with a layer of 6oz fiberglass and the next day added a layer of carbon.
Just before putting down the carbon I decided to separate the edges, figuring it would be easier with the flexible single layer of fiberglass. Even then it was difficult because the epoxy had run under the edge of the sheer and this needed to be sanded off before I could get the fiberglass pulled away.
I figured I would be home free after putting down the carbon but unwittingly I had made it worse. When I separated the edges this damaged the thin layer of PVA. Epoxy was able to wick up into the gap between the fiberglass and the hull of the wood canoe while wetting out the carbon and because of the damaged PVA it was stuck pretty hard.
There were 3 small locations where the fiberglass was pulled away from the wood of the stripper. I sanded away the damaged areas and applied small patches. I covered them with peel ply and will add a couple fill coats before sanding them flush.
I might set the record for how many different ways you can screw up a stripper.
I have no doubt it will turn out fine though.
A question for those of you that have put wood or foam cores in your composite canoes:
How did you support the canoe to keep its shape? This thing is like a wet noodle right now. I put a few stretchers in place along the sheer and this seems to be doing a pretty good job but I worry a little there might be imperfections in hull shape that I either miss or that occur during the process of laying in the core.
And what have you guys been using to adhere the core? Straight epoxy or thickened?
I know @Jim Dodd weights his cores down. Has anyone used vacuum bagging for this? Anything in particular to watch out for?
@stripperguy: didn't you just build yourself a composite with a foam core? Did you use foam sheets or did you use scored and scrimmed foam? Any tips?
The foam I have is scored and scrimmed. Seems like it should be easier but what do I know.
Alan
PVA will hold things together, put it should release, with some persuading.
Next time for me ?
I will add plastic, just on top of the football, and PVA on the side
Looking good !
Jim
I built with more layers, gave the epoxy more time to cure, before removal.
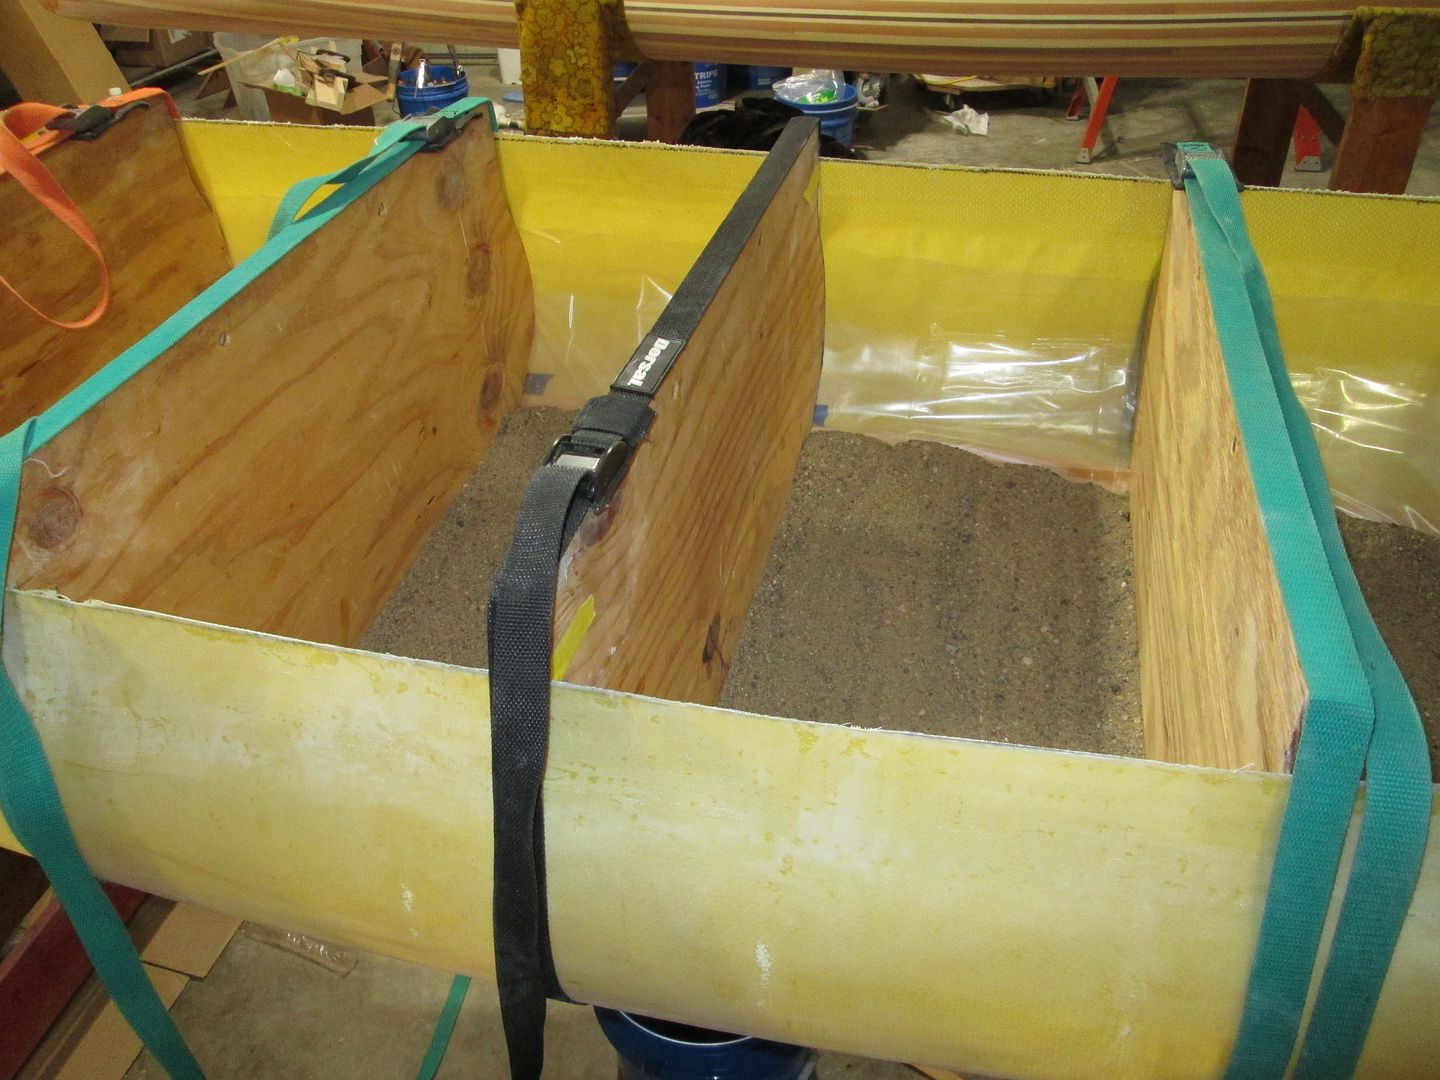
Put 1X 4s on the sling saddles to support the hull, from the underside. With over 300# of sand you need support.
With the insert in place, and positioned, I laid the plastic, strapped in the forms, and added sand
Hind sight I should have clamped temporary outwhales to add even more support.
I would highly recommend vacuum bagging !
Thickened my epoxy with Cabo-sill or micro ballons. The stuff, that makes epoxy thicker, no ground glass.
Spread it with a notch troll, and laid in the formed insert.
Had a few spots that you can see a bridge, but not bad.
That is why I would vacuum bag.
They make a vacuum set up, using a venturi, and an air compressor. Not sure if they would work.
I know you have a vacuum pump, for Air Conditioning service. That would probably be your best bet.
Anxious to here how you handle this next phase !
Jim
Next time for me ?
I will add plastic, just on top of the football, and PVA on the side
Looking good !
Jim
Buckled one of my composites. Fixed it, but you can still see it.A question for those of you that have put wood or foam cores in your composite canoes:
How did you support the canoe to keep its shape? This thing is like a wet noodle right now. I put a few stretchers in place along the sheer and this seems to be doing a pretty good job but I worry a little there might be imperfections in hull shape that I either miss or that occur during the process of laying in the core.
And what have you guys been using to adhere the core? Straight epoxy or thickened?
I know @Jim Dodd weights his cores down. Has anyone used vacuum bagging for this? Anything in particular to watch out for?
@stripperguy: didn't you just build yourself a composite with a foam core? Did you use foam sheets or did you use scored and scrimmed foam? Any tips?
The foam I have is scored and scrimmed. Seems like it should be easier but what do I know.
Alan
I built with more layers, gave the epoxy more time to cure, before removal.
Put 1X 4s on the sling saddles to support the hull, from the underside. With over 300# of sand you need support.
With the insert in place, and positioned, I laid the plastic, strapped in the forms, and added sand
Hind sight I should have clamped temporary outwhales to add even more support.
I would highly recommend vacuum bagging !
Thickened my epoxy with Cabo-sill or micro ballons. The stuff, that makes epoxy thicker, no ground glass.
Spread it with a notch troll, and laid in the formed insert.
Had a few spots that you can see a bridge, but not bad.
That is why I would vacuum bag.
They make a vacuum set up, using a venturi, and an air compressor. Not sure if they would work.
I know you have a vacuum pump, for Air Conditioning service. That would probably be your best bet.
Anxious to here how you handle this next phase !
Jim
Last edited:
Wow, that hull looks great!
Alan,
I used carefully placed supports, 3 of them, and measured the gunnel width at those support locations. I also temporarily screwed in place a few thwarts, which I removed after the foam was firmly adhered. The plug was laying nearby and I made sure to duplicate the dimensions before adding the stiffening bottom piece and ribs.
All of that 1/8” H80 foam was heat formed in place to match the compound curves of the hull. It forms quickly and easily with a heat gun set at 500F or so, don’t overheat it. Foam stuck in place with Cabosil thickened epoxy. Bottom stiffener held down with zip lock bags filled with sand. I had good conformance so it didn’t take much load. Ribs adhered with the same thickened epoxy, held temporarily with tape. Again, they matched the hull shape so well that tap was just insurance.
Then a layer of 6 oz was layed in, after beveling any edges of bottom stiffener and ribs, most were pre beveled, but some needed massaging.
I’m sure my hull was just as noodly ( is that a word?) as yours, but was stiff enough after that I could have paddled it without gunnels or thwarts!
Son josh and I have been struggling to come up with better methods for the next ones and yes, we have discussing vacuum bagging. He wants to do a full foam core, but I have trouble to see how to hold it in place on a non sacrificial plug.
I spent a few hours sanding the interior until I decided it was either going to be good enough or I'd paint it when done. Then I gave it the same treatment as the exterior with a coat of thickened epoxy to fill all the gaps and cracks.


Fiberglassing the interior is usually pretty easy except for the stems. What I've started doing is fiberglassing the stems first. This allows me to do the fiddly bits with small pieces of cloth and small amounts of epoxy without so much worry about the clock. This, obviously, leaves a seam but I find it to be barely noticeable at the close to the stem. I do the full layer the following day so there is no need to sand first.
Of course I managed to shoot myself in the foot because I used a faster setting hardener, thinking I'd be done in no time, and before I realized what was happening the epoxy in the cup was getting HOT and I had some resin I was unable to smooth out. But, again, with this goober being way up in the stem it will either be invisible because of a float tank or nearly invisible because of a deck.
Peel ply makes for a smoother transition.

I'm a little worried about the strength of the flat bottom of this canoe so I laid down an extra layer of 6 ounce cloth on the bottom of the hull before laying 4 ounce cloth over top.
I'm using up leftover rolls so the only way to make the 6 ounce cloth work was to take multiple short pieces off the roll to cut down on waste.
When I rolled out the full layer of 4 ounce cloth I discovered it was just a little too short to meet the stem fiberglass I'd laid the night before so I had to cut some short 5" wide sections to splice them.


I'm not entirely happy with how well the layers of 6 and 4 ounce cloth consolidated. It's all fully wetout but even after a lot of squeegeeing there are some spots where I couldn't remove all the excess epoxy. As I would squeegee harder the cloth would start to slide so I just left it be. These now show up as shiny spots because the weave is completely filled in those areas.
As with the rest of this build this won't be an issue and to the casual observer it will look fine when completed.

Fiberglassing the interior is usually pretty easy except for the stems. What I've started doing is fiberglassing the stems first. This allows me to do the fiddly bits with small pieces of cloth and small amounts of epoxy without so much worry about the clock. This, obviously, leaves a seam but I find it to be barely noticeable at the close to the stem. I do the full layer the following day so there is no need to sand first.
Of course I managed to shoot myself in the foot because I used a faster setting hardener, thinking I'd be done in no time, and before I realized what was happening the epoxy in the cup was getting HOT and I had some resin I was unable to smooth out. But, again, with this goober being way up in the stem it will either be invisible because of a float tank or nearly invisible because of a deck.
Peel ply makes for a smoother transition.
I'm a little worried about the strength of the flat bottom of this canoe so I laid down an extra layer of 6 ounce cloth on the bottom of the hull before laying 4 ounce cloth over top.
I'm using up leftover rolls so the only way to make the 6 ounce cloth work was to take multiple short pieces off the roll to cut down on waste.
When I rolled out the full layer of 4 ounce cloth I discovered it was just a little too short to meet the stem fiberglass I'd laid the night before so I had to cut some short 5" wide sections to splice them.
I'm not entirely happy with how well the layers of 6 and 4 ounce cloth consolidated. It's all fully wetout but even after a lot of squeegeeing there are some spots where I couldn't remove all the excess epoxy. As I would squeegee harder the cloth would start to slide so I just left it be. These now show up as shiny spots because the weave is completely filled in those areas.
As with the rest of this build this won't be an issue and to the casual observer it will look fine when completed.
What resin did you use ?
Raka
Remember those areas where the glass pulled aways from the wood hull when trying to separate the composite hull? It was just a simple fix with some small patches before sanding it flush.
Before:

After:

Tonight the hull got a light sanding with 100 grit before applying the first coat of varnish. It's often advised to wipe down the shop and let the dust settle before applying varnish. That might be good advice for fine furniture but I've never found it necessary for canoes. This hull got sanded, vacuumed, wiped down, and immediately varnished. It will look great, even if there are some dust nibs.
And just for some extra excitement the new foam brushes I picked up today are absolute junk. The handles break off after only a couple strokes so I had to apply the varnish by holding the pad with my fingers.

Before:
After:
Tonight the hull got a light sanding with 100 grit before applying the first coat of varnish. It's often advised to wipe down the shop and let the dust settle before applying varnish. That might be good advice for fine furniture but I've never found it necessary for canoes. This hull got sanded, vacuumed, wiped down, and immediately varnished. It will look great, even if there are some dust nibs.
And just for some extra excitement the new foam brushes I picked up today are absolute junk. The handles break off after only a couple strokes so I had to apply the varnish by holding the pad with my fingers.

I'm really disappointed with how the interior fiberglass turned out. I've done multiple layers before without issue but for whatever reason it gave me fits this time and the resin got away from me. It was especially obvious after sanding the finish before applying the spar urethane.

After applying a satin finish it's better but still noticeable. There are a lot of things that can be covered up but this isn't one of them. In a perfect world I would have sanded/scraped all this smooth but I had no desire to do so.

I began fitting the gunwales yesterday. The inwales are only 1/2" thick and that doesn't leave much room for attaching seats. So after laying out the seat locations I cut some 1/4" thick pieces and glued them at the seat locations.


After applying a satin finish it's better but still noticeable. There are a lot of things that can be covered up but this isn't one of them. In a perfect world I would have sanded/scraped all this smooth but I had no desire to do so.
I began fitting the gunwales yesterday. The inwales are only 1/2" thick and that doesn't leave much room for attaching seats. So after laying out the seat locations I cut some 1/4" thick pieces and glued them at the seat locations.
Similar threads
- Replies
- 12
- Views
- 1K
- Replies
- 19
- Views
- 1K
- Replies
- 9
- Views
- 469
- Replies
- 25
- Views
- 3K
- Replies
- 42
- Views
- 6K