Another Tacoma Outfitting Project.
My last several months have been spent tinkering with outfitting the back of my pickup truck cap to better serve me while camping/traveling. Mr. McCrea's posts along these lines have been very helpful as I have shamelessly borrowed (poached) ideas that worked out for him. It is almost impossible to calculate the time I've saved by adopting quickly those ideas that have been tested and proven. Thanks Mike!
As one moves forward on this kind of project, there can be moments of clever thought as one leverages existing hardware into uses beyond their original intent.
In the interest of sharing what I've learned so far, here are some things I discovered.
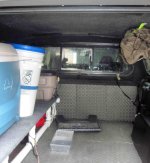
The Tacoma bed rail system comes with tie down cleats that mount into the recessed rail channel. As good fortune would have it, there are 1/4 inch holes factory drilled in the handle ends of each cleat. I purchased 1/4 inch rod, cutting it to a length that would provide anchoring support for my 5/8 inch plywood shelf. The rod is threaded through the cleat, then through a 1/4 inch hole drilled into the plywood shelf and down to the bed floor. Presto - a shelf support structurally strong, with virtually no movement, and easily disassembled. The rod also serves quite handy in retaining poles and hiking staffs.

A Yakima rack was ordered with the cap and this past week I noticed the install of the rack resulted in 1/4 inch threaded bolts extending a slight ways into the interior of the cap. Hmmm, it struck me that use could be made of the excess threaded bolt in the ceiling if I could find a nut that would marry with the 1/4 inch bolt.
Rummaging in my shop's nuts and bolts collection, I was disappointed to discover a 1/4 inch/20 nut would not thread its way onto the bolt. A closer examination of the bolt revealed a finer thread than 20 was on the bolt. In hopes that a call to Yakima could be avoided, I headed to the hardware store in search for 1/4 inch nut with finer threads. After looking in numerous bins of nuts it appeared a call to Yakima would be necessary and then I discovered a bin of 1/4 inch/28 locking nuts. Taking one out to the truck a testing resulted in a perfect match with the bolt!
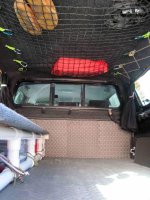
Time to make some fabric loops and create ceiling tie downs; the result was wonderful. 6 loops were installed on the ceiling of each side of the cap. Along with loops installed on the upper part of the side window frames, a crisscrossing bungee cord was threaded through the ceiling loops. Into that web of bungee I mounted my sturdy chair in a bag. "Chair in the Air" I call it. Although light weight, the chair is bulky - now it sits very out of the way and yet easy to get to.

"Chair in the Air"

My last several months have been spent tinkering with outfitting the back of my pickup truck cap to better serve me while camping/traveling. Mr. McCrea's posts along these lines have been very helpful as I have shamelessly borrowed (poached) ideas that worked out for him. It is almost impossible to calculate the time I've saved by adopting quickly those ideas that have been tested and proven. Thanks Mike!
As one moves forward on this kind of project, there can be moments of clever thought as one leverages existing hardware into uses beyond their original intent.
In the interest of sharing what I've learned so far, here are some things I discovered.
The Tacoma bed rail system comes with tie down cleats that mount into the recessed rail channel. As good fortune would have it, there are 1/4 inch holes factory drilled in the handle ends of each cleat. I purchased 1/4 inch rod, cutting it to a length that would provide anchoring support for my 5/8 inch plywood shelf. The rod is threaded through the cleat, then through a 1/4 inch hole drilled into the plywood shelf and down to the bed floor. Presto - a shelf support structurally strong, with virtually no movement, and easily disassembled. The rod also serves quite handy in retaining poles and hiking staffs.
A Yakima rack was ordered with the cap and this past week I noticed the install of the rack resulted in 1/4 inch threaded bolts extending a slight ways into the interior of the cap. Hmmm, it struck me that use could be made of the excess threaded bolt in the ceiling if I could find a nut that would marry with the 1/4 inch bolt.
Rummaging in my shop's nuts and bolts collection, I was disappointed to discover a 1/4 inch/20 nut would not thread its way onto the bolt. A closer examination of the bolt revealed a finer thread than 20 was on the bolt. In hopes that a call to Yakima could be avoided, I headed to the hardware store in search for 1/4 inch nut with finer threads. After looking in numerous bins of nuts it appeared a call to Yakima would be necessary and then I discovered a bin of 1/4 inch/28 locking nuts. Taking one out to the truck a testing resulted in a perfect match with the bolt!
Time to make some fabric loops and create ceiling tie downs; the result was wonderful. 6 loops were installed on the ceiling of each side of the cap. Along with loops installed on the upper part of the side window frames, a crisscrossing bungee cord was threaded through the ceiling loops. Into that web of bungee I mounted my sturdy chair in a bag. "Chair in the Air" I call it. Although light weight, the chair is bulky - now it sits very out of the way and yet easy to get to.
"Chair in the Air"