• Happy National Blueberry Pie Day! 🫐🥧

Knife project

Good analogy Dave. It was very helpful to see the different design and method choices laid out like that. Also a good point about makers' preferences for specific designs and materials. I'm gonna sit here quietly and try to keep up. Can I ask a question? You mentioned your handle material. What is stabilized wood?
Thanks Dave.
 
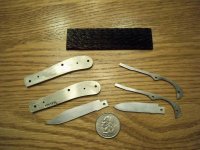
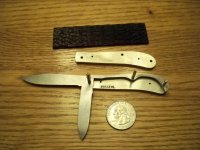
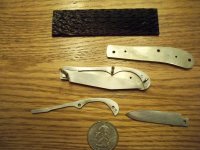
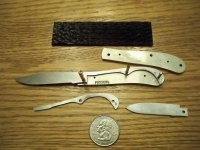
Brad, stabilized wood is natural wood that has went threw a process that uses vacuum to impregnate the wood with a water resistant substance, acrylic enamel in this case, in order to make it more stable to humidity changes. It gets drawn through the end grain while under vacuum. You cant tell by looking at it or working the wood that it is in there. It will swell and shrink less and be less likely to crack in the future.

As far as my analogy I could have mentioned "alot more tree limbs" and variances that exist in small but important details. Blade finish's , edge sharpening techniques and so on. But I didn't want to give people a head ache. I will mention many of these things individually and spread them out so it doesn't get too boring.
 
Part of my reason for the tree analogy was to show that it is hard to make a fair comparison of one knife to another. Even with knives that seem similar at first glance, often time we're not comparing apples to apples. To evaluate a knife fairly, I feel you have to understand both it's intended usage and what the priorities are in the design. For example steel selection always seems to be a compromise. The maker or manufacturer makes a choice based on priorities. You can't have it all. Handles, do you like non destructible or do you like the warm feel of wood in your hand?

To put it in a canoe perspective. Think of canoes paddled solo by members on this site. After trying different rides I went back to paddling a tandem canoe solo. It fits all my needs best. If there was something that worked better for me I would do it. There are people here with nice higher tech (in design and materials) dedicated solos here. That's cool if that's what you want and it works for you. Mem is building an old school solo canoe, I think he's going to like it allot. Materials range from nano nothing to WC. If we try to decide which is the "best" canoe allot of people are going to feel bad or uncomfortable. So lets not do that. This is why I avoid the what's the best knife in the world debates.
 
Rippy, I get your analogy. It's perfect for laying out most of the options and decisions to be considered in choosing a blade project. As far as which is the best knife in the world, well I'm not too bothered about that. I came to the conclusion a long time ago that just about every tool and possession is a personal thing. I do like the comparisons of the options so I can make more knowledgable decisions. i.e. Flat grind vs Scandi grind. SS vs carbon blade. etc. Don't let me side track your thread Dave, just carry on. You've got a lot of people here watching and listening. It's good stuff.
 
Brad if I get side tract'd it's my own fault. I seem to be in a random orbit lately.

So looking at my knife tree illustration we immediately see that I'm on the stock removal side of the tree. On the other side are the forged knives. These knives are formed by heating the steal and hammering it to a rough blade shape and then refined further by grinding it to shape. Forging narrows your steel selection to simpler steels that can be forged properly. Higher alloy tool steels don't lend them selves to forging and it is discouraged by the steel makers. However there are still many things you can forge a blade from and many recycle materials like car springs. The hardening of the blade is also done in the forge by heating the steel red hot and quenching (dipping) it in oil. I have zero experience on this side of the tree and have only read of this process.

With the stock removal method you select steel in flat bar form that will have the properties you want and remove steel to get the desired knife shape. The first step is to profile the blade. I saw some of the material away with a band saw and grind the rest away on a belt sander. The blade bevel is shaped, usually using a belt sander. Holes are drilled if needed to mount bolsters and handle materials. Then the blade is heat treated in a heat treat oven. These processes require equipment so I will give a quick tour of my shop. I will explain processes as I go later on in the build.

My shop is a mess right now so I'm going to cheat and use last year's pictures for a quick shop tour.
On this bench are my sanders.
1538952_721756067858916_1509511348_n.jpg

Another view of the bench. On the left is my buffer.
1526630_721756054525584_1664793403_n.jpg

On this bench I have my heat treat oven on the right and my hardness tester on the left.
1503397_721755981192258_1520312362_n.jpg


That's all for now.
 
He got carried away tidying up his shop, and if he's anything like me, now he can't find a thing. I'd help him of course, but now I can't find the chair in the corner I used to sit on.
 
SG and Brad caught me loafing so I guess it's time for an update on Stabby. I have made good progress on the blade. First I transferred the pattern to the blade stock. I did this by making a copy of the drawing and drawing the tang in. Then I cut out the paper blade pattern and glued it to the steel. Next I rough sawed the blade profile. I then cleaned up the saw cut on the belt sander. Using a vernier height gauge I scribed two lines on the cutting edge of the blade about .025" apart. These lines will help me keep the edge centered on the blade when I am grinding the bevels. I concave ground the bevels using a 8" diameter contact wheel on my home made sander.
74016_164427720258423_907935_n.jpg

As you can see grinding is done with the blade edge up. It takes some practice to be able to hit the same grind line each time as you are grinding "blind".
73155_164427750258420_6763341_n.jpg


I'm pleased with the progress so far. Ready to start fitting handle pieces to the tang.

10482187_921721027862418_7375222130428595322_n.jpg
 
Last edited:
No Title

He got carried away tidying up his shop, and if he's anything like me, now he can't find a thing. I'd help him of course, but now I can't find the chair in the corner I used to sit on.

Cleaning didn't happen, in fact it got messier in my shop. I got sidetracked making some wooden furniture for my wife's 1911.

SG, I know you get a kick out of things like this so I threw in some pics of my grip sander that I designed and built. It's kind of crude but it solves the problem of two different radius's. I like my grips about .250" thick and they are wider at the bottom than at the top. To solve the problem my jig has two different length arms to swing two different radius's.
 

Attachments

  • photo1394.jpg
    photo1394.jpg
    211 KB · Views: 0
  • photo1395.jpg
    photo1395.jpg
    271.3 KB · Views: 0
  • photo1396.jpg
    photo1396.jpg
    257.3 KB · Views: 0
  • photo1397.jpg
    photo1397.jpg
    275.3 KB · Views: 0
Last edited:
Rippy,
I do like that that sander!! That's sort of what I do for a living, design machines...
And I see you have a variable speed DC motor, I use those all the time, the low speed torque is great, isn't it?
Are those just dowel pins holding the handle pieces in place? You don't seem to have room for even a small flat head fastener.

But look, if you're ever going to resurrect your hand model career, you gotta clean under those nails...the fake cut on the thumb is a nice effect though.;)
 
SG I'm going to claim that it was someone else's dirty thumb nail. That's an old picture too. My thumb nail still isn't right from when I smashed it last winter. The dowels locate the piece and two sided tape holds it while sanding. I counter bore the screw holes after the radius is cut.
 
beautiful work! I love fine knives,but hesitate to take them tripping. I lost a great one on Round Like in the ADKs once. learened a hard lesson.
Turtle
 
beautiful work! I love fine knives,but hesitate to take them tripping. I lost a great one on Round Like in the ADKs once. learened a hard lesson.
Turtle

I feel your pain Turtle. For years I carried my favorite folding knife on trips then I started to worry about loosing it. I bought a folding knife to carry that I thought I could replace easier if it was lost and carried it a couple trips. It just wasn't the same. Now I'm back to carrying my favorite again. Can't live in fear, gotta enjoy life and things while you can.

Favorite folder. The blade is 3" long. Knife is 4" closed. The handle is Buffalo horn that I jigged with a Dremel tool.
46610_147578681943327_8250281_n.jpg


That folder would never be left at home in a drawer Dave. I'd proudly carry that on every trip. If I ever had the misfortune to lose it, I'd miss it ,but fondly remember the days I'd been fortunate enough to have carried a finely crafted tool such as that. I like the size of it too. Sensibly big enough for tasks, but small enough for compact portability. Perfection in a folder.
 
Beautiful folder! really practical blade shape. The folder I lost was a Russell with an ATS34 blade. I carry a cheaper one now,but that blade steel spoiled me.
Turtle
 
No Title

Kind of side tracked myself with all this folder business so I decided to throw up some pics of the other project I am working on in the shop. It's a small two blade folder that I am making as a gift for a female family member. The dark handle material is dyed jigged bone. I put a quarter in the picture just for Brad so he could gauge the size. I will be getting back to work on Stabby tomorrow.
 

Attachments

  • photo1459.jpg
    photo1459.jpg
    312.4 KB · Views: 0
  • photo1460.jpg
    photo1460.jpg
    238.6 KB · Views: 0
  • photo1461.jpg
    photo1461.jpg
    281.5 KB · Views: 0
  • photo1462.jpg
    photo1462.jpg
    312.5 KB · Views: 0
  • photo1463.jpg
    photo1463.jpg
    308.5 KB · Views: 0
You sure are talented Dave, cool looking knife buddy, what type of steel is that folder made out of?

Bob.
 
Bob, I use 440C heat treated to 58 RC in my folders. It meets my priorities which in this case are different then for a sheath knife. My folders are meant to be functional art and they hold up very well for traditional folder tasks. The one in post #36 is ten years old now and has seen allot of use. 440C takes a nice polish and with 16 -18 % chromium content it is very stain resistant so it will keep looking nice. 440C has 1% carbon and has fair edge holding properties and good stain resistance. The D2 I use for sheath knives has 12.5% chromium and 1 1/2% carbon. It has very good edge holding properties and fair stain resistance and is tougher than 440C. There are tougher stainless steels than 440C but they have less chromium content and therefore less stain resistance than 440C. ATS 34 for example is tougher than 440C and has about 14% chromium and 1% carbon. 13% is the minimum for a steel to be considered stainless. Performance wise I believe that D2 has a slight edge over ATS 34. If I was making a "tactical" folder I would use a tougher yet non stainless steel like A2 and Cerakote it to keep it from rusting. Dave
 
Last edited:
Back
Top