• Happy National Zipper Day (pat. 1913)! 🤐

Klepper Kamerad TS rebuild

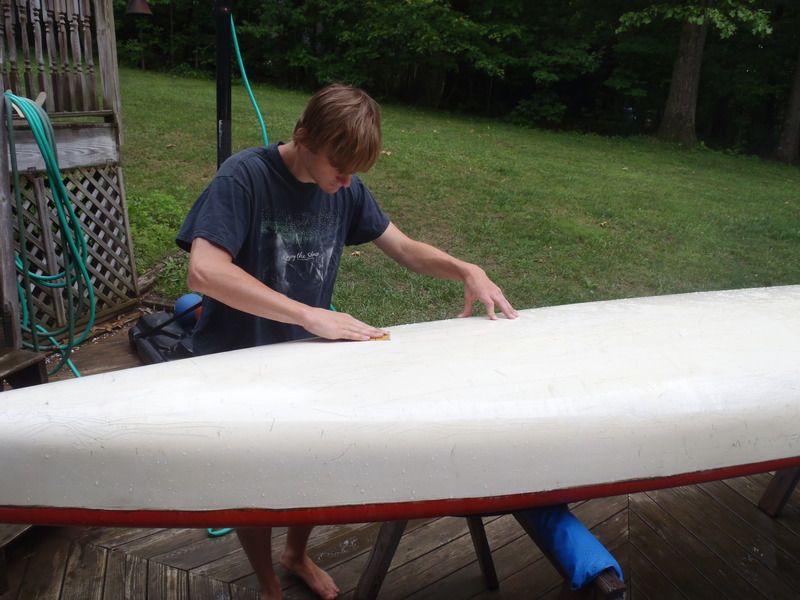
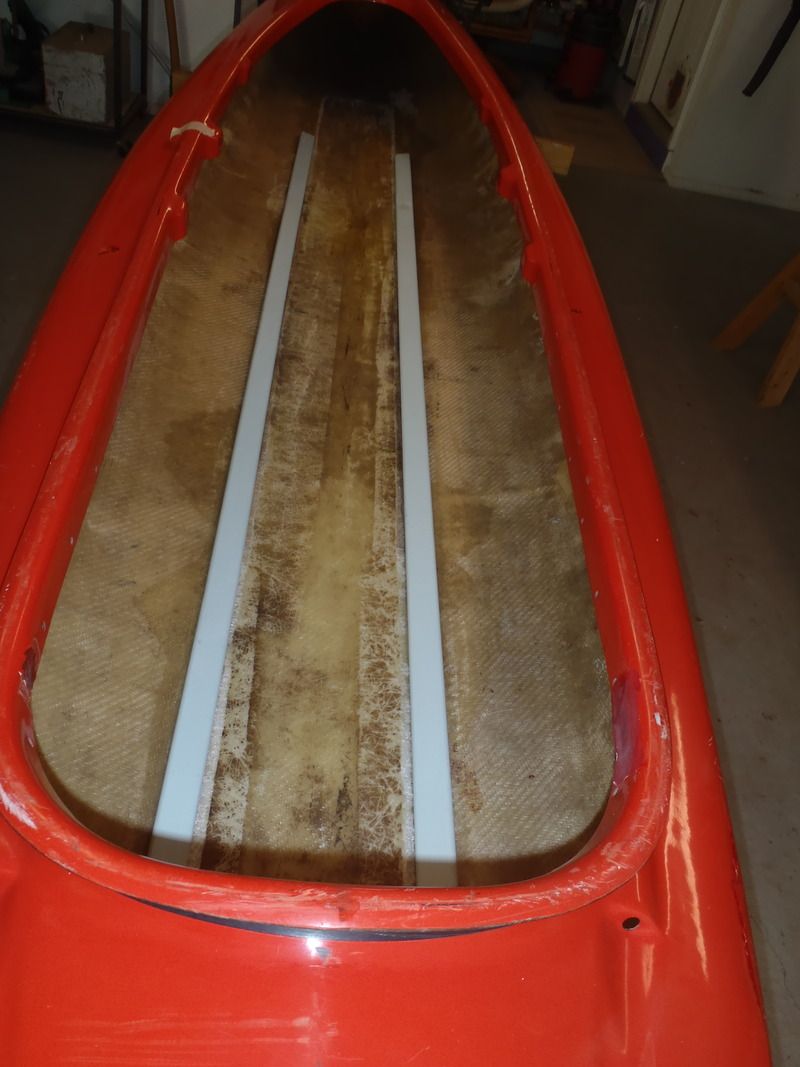
That week’s work was just to get the Comrade hull gutted and repaired. A solid week of putzing around just to get a clean, naked and repaired hull to begin outfitting.


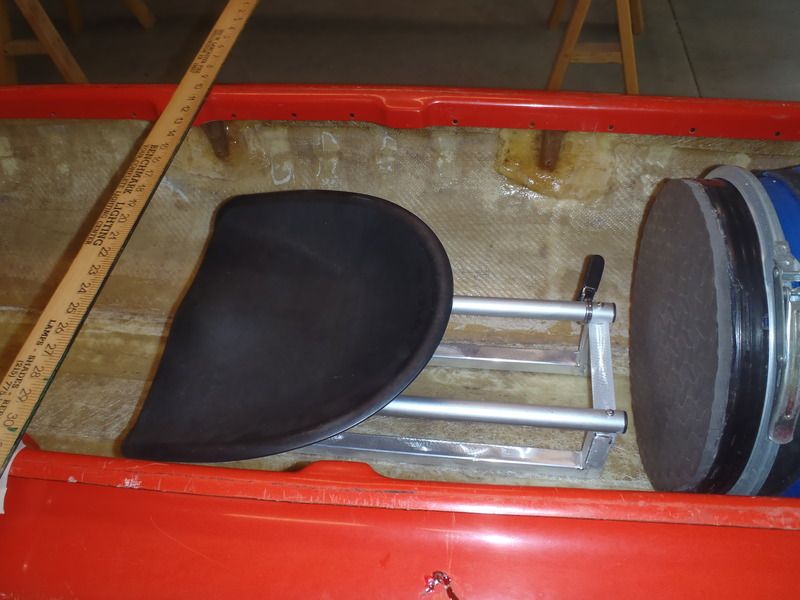
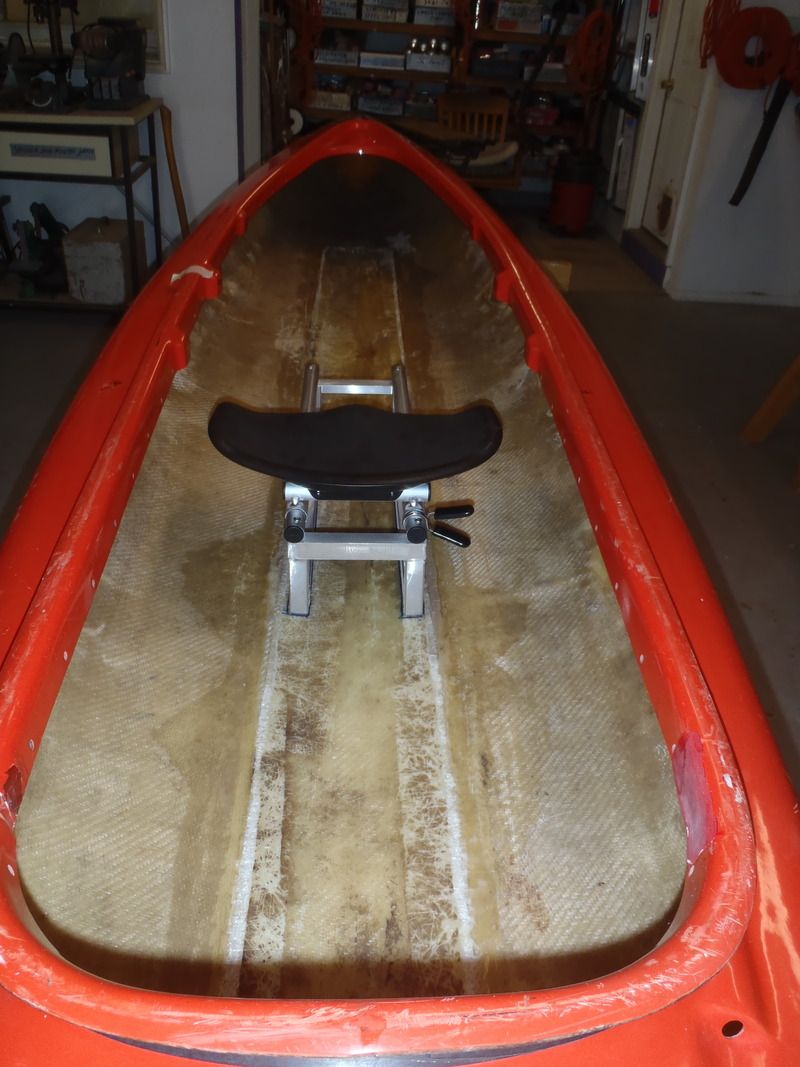
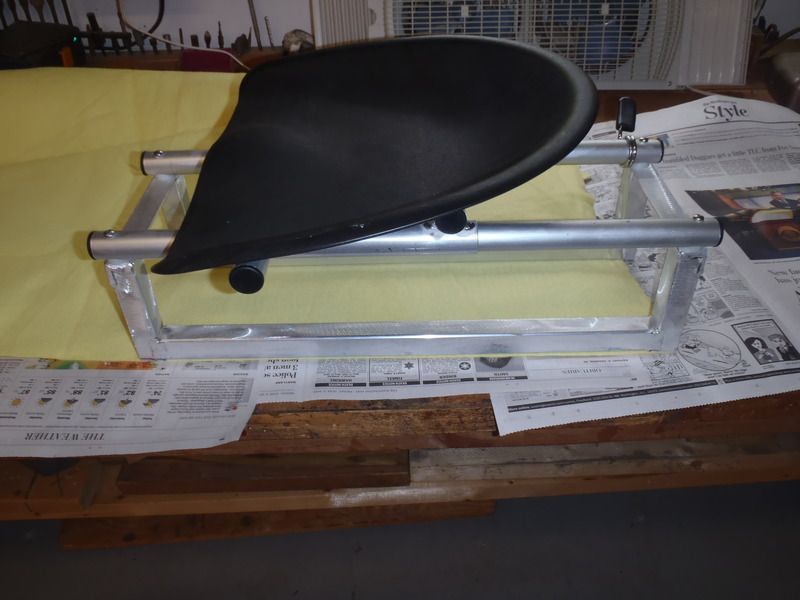
Now the real fun began, starting with some serious seat cogitation. I opted for the sliding Wenonah pedestal, in part because the weight savings become important in a hull that tips the scale at 60 lbs without outfitting, but mostly because the slider allows for easy trim adjustment and eliminates the issue of the fixed utility thwart being too far away for short statured paddlers.

I used the Monarch seat placement as a model. The Monarch is 13 ¾” deep at center and, with the seat in the middle hanger notches, the seat pan is about 7” high with the center of the seat positioned 6” back of center hull.

The Comrade is 13” deep and the bucket seat on a Wenonah pedestal slider will sit 6 ¼” high. Depth-wise the Wenonah pedestal should be just about right.

On solo hulls Wenonah often positions the pedestal so that the front edge of the seat, if slid all the way forward, is nearly at the center of the hull. I tend to prefer sailing hulls be seat positioned a little bow light, to compensate for when the sail presses the bow into the water. The sliding seat should accommodate that for different loads, conditions or paddlers.

Fore and aft positioning required additional sliding seat considerations, prime among them making sure there was room for a blue barrel behind the seat.


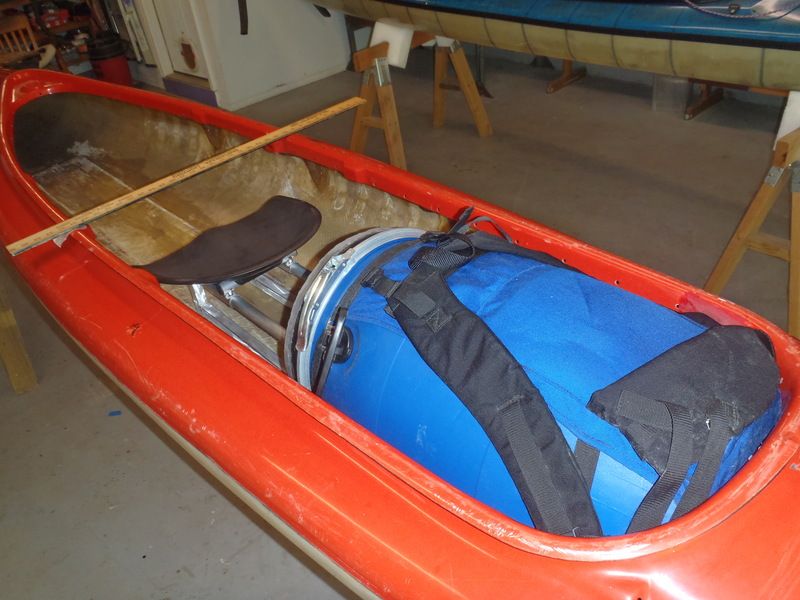
Wow, I love it when a plan comes together. With the pedestal laid in the hull at the typical Wenonah placement, with the front edge of the seat pan slid all the forward to the center of the hull, I can slide the seat all the way back (10” of travel) and still have room for a 60L barrel (or 115L pack) behind the seat. That looks to be spot on for a sliding seat.

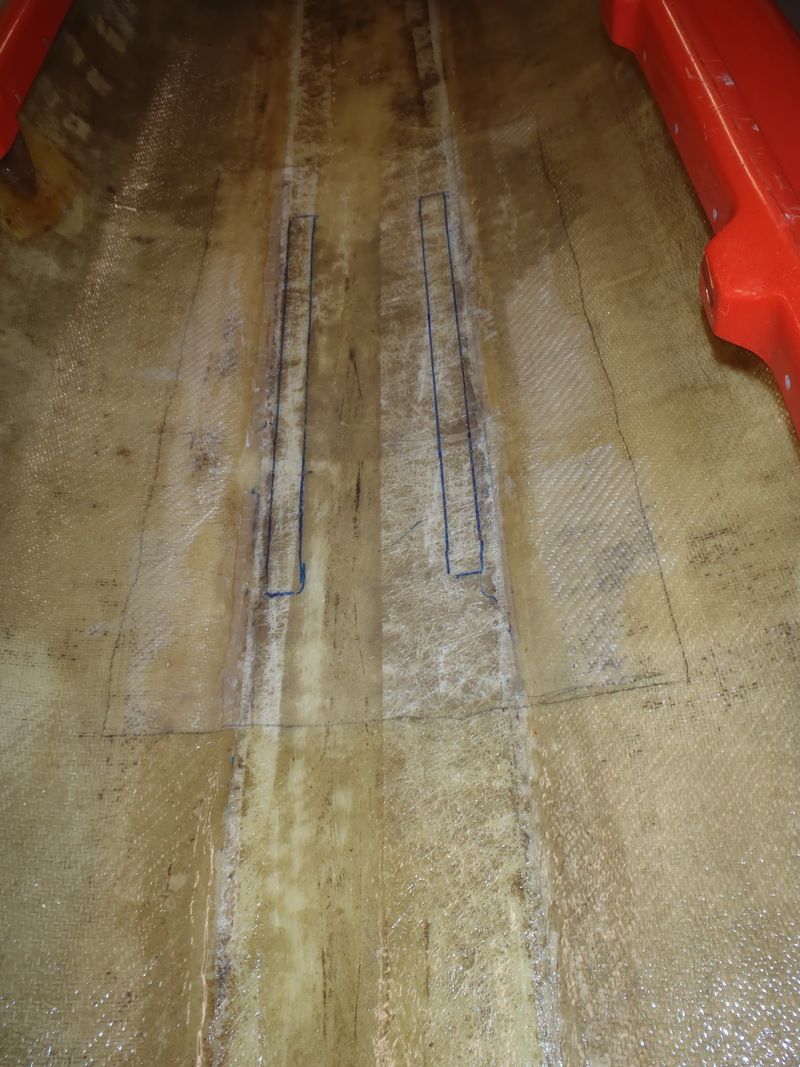
Marking the exact position of a pedestal mount, especially on old somewhat imperfect hulls, is tricky, with lots of measuring from different points, lots of eye balling.

That was made easier on the Comrade. The parallel lines from the old seat and mast step keelson are plainly visible and a couple of conveniently (unintentionally) pre-warped 1x2’s laid in the hull atop those lines gave me a good aiming point.


I still measured the seat and frame position off a half dozen fixed hull points, adjusted it 1/8” this way and that ‘til I deemed it Wabi-sabi perfect and marked the pedestal frame on the hull in Sharpie. I want those rail outlines to be plainly visible through several layers of cloth.


On a 40 year old woven roving hull full of spider cracks I wanted to install a sturdier sub-floor for the pedestal, to help better distribute paddler weight on the seat frame, starting with a large rectangle of Dynel.

While the Comrade was clean and upright I rolled out a thin coat of unadulterated 105/206 over any of the foot/heel or gear wear areas of the bottom. And then I mixed a little more epoxy and kept going until I had rolled out all of the bottom and sides I could reach. 8 more pumps of West System epoxy was probably another ounce well spent.

I had traced out the Dynel position and left that rectangle bare of epoxy when I roll out the rest of the inside. For the Dynel and glass tape sub-floor I used a 50/50 mix of West 105/206 and G/flex to lay and wet out the cloth layers in that sub-floor.


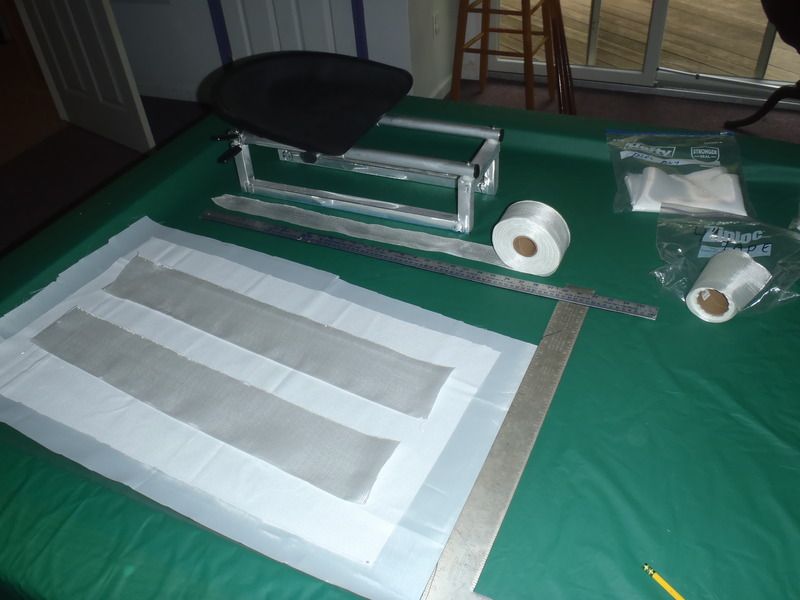
First a 30 long by 16 wide piece of Dynel, followed by two 26” long pieces of 4” tape, topped by two 24” long pieces of 2” tape. Those staggered shorted layers were laid and positioned in sequence to fit beneath the pedestal platform base, epoxied with 105/206 and G/flex mix and covered with a large piece of peel ply.

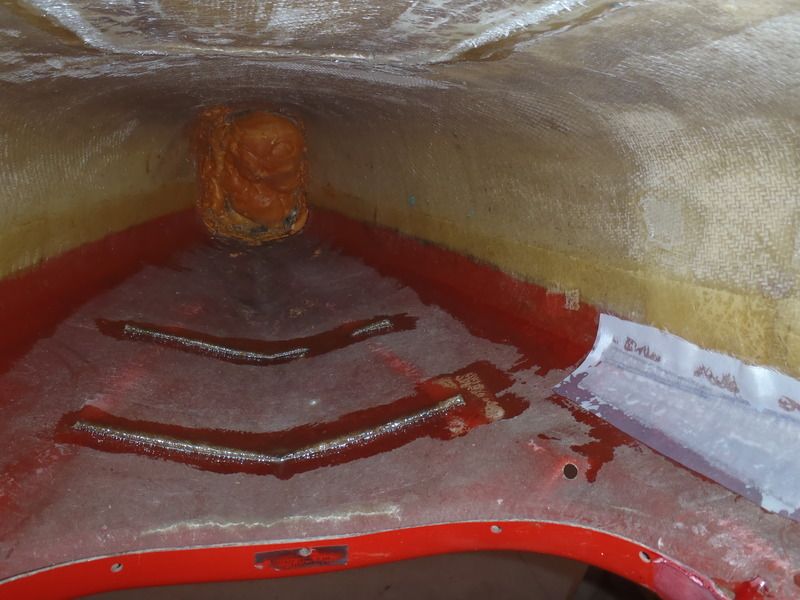
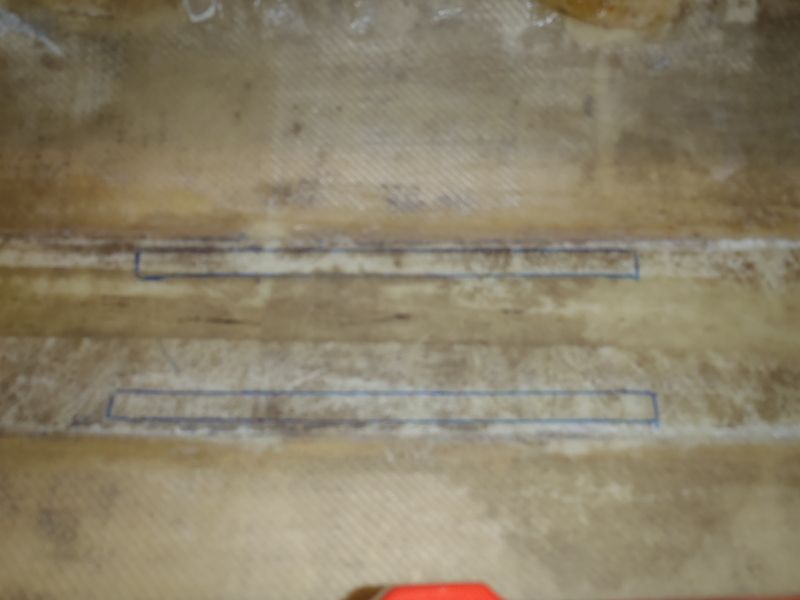
While I was slicing cloth I cut two 1” x 21” pieces of kevlar felt, sized to fit underneath the pedestal frame tubes. That kevlar felt is a godawful skid plate material (never again), but it is useful for filling the slight gap where the slight curve of the hull bottom and straight aluminum base the platform tubes don’t quite match.


Those pieces of epoxy saturated kev felt go inside the platform base trace, and hold the seat firmly in place when I get to laying glass tape across the platform base to affix it to the sub-floor.


I walked away for a few hours, until I could pull the peel ply with the epoxy still green*, laid and resined the kevlar felt, put the seat down and walked away for another couple of hours. Once that had set up immovably I epoxied a length of 4” glass tape across the bottom of the seat frame and covered the tape with peel ply.

*I discovered that release treated peel ply is as hard to remove from still-green epoxy as the nylon stuff that HAS to be pulled green. I wanted all of the base layers installed with the epoxy still green for better chemical adhesion. Release treated peel ply pulls like a Post-it note after a 12 hour cure, and needs both hands and a strong back if pulled green.

The (possibly excessive) sub floor, interior resin roll out and seat installation added considerable weight. The Comrade now weighs in at just under 65 lbs, without the rudder or controls.
 
Not that rudder.

Rudder installation and outfitting is next on the list. The rudder than came with the Comrade is massive, and configured unlike any rudder I have ever seen before. It came with the hull, but not on the hull.


There’s a reason for that. No way, no how did that rudder ever go on this boat with just the parts I have. I suspect that there was some adapter piece that fit between the stern pin hole and the existing rudder housing.


It is a big, clunky, complex antique in any case, and since I can’t see a way to adapt it I need to think about installing a more modern rudder.

One advantage of these inexpensive 70’s decked boats is that they usually come with a rudder, and even those crude 70’s rudders can be retrofitted to accommodate modern controls. I may still e-mail a query to Klepper, maybe they have an answer to adapting 1976 rudder parts.

I don’t actually need the rudder, I can make that part, and make the blade sized and shaped for my tripping/sailing purposes with the Comrade. What I lack is the control arm housing. Either a standard Feathercraft style rudder housing


or something similar to the simplistic T that came on the Optima hulls.


I can’t bear the thought of spending more on a new rudder than I paid for the boat. Time to start looking for a used rudder or adaptable parts.

I’m not at a complete standstill until I find a used rudder; there are a lot of little Wabi-sabi imperfections remaining on the current repairs. Time to slow my roll and turn my attention to some detail work.
 
That's a big arsed rudder. From a float plane?
I really like the roominess in that cockpit, with plenty of space for the barrel or bag. Is there a spray cover(s) in the future?

Interestingly inappropriate lab coat "coverage". I'm thankful you don't wear matching pants. I bet so are you.
 
Last edited:
That's a big arsed rudder. From a float plane?
I really like the roominess in that cockpit, with plenty of space for the barrel or bag. Is there a spray cover(s) in the future?

I like the size and shape of that 18” x8” rudder for sailing purposes and may yet try to adapt it or at least re-purpose the blade. It is easy enough to make the appropriate blade size and shape, adapting a rudder housing/control arm is the tricky part.

Being able to simply lift a barrel or largest pack out from behind the seat is one of the things that make that style hull work for me as a tripper.

Spray cover? Probably a storage cover for use in camp, so I can leave the hull upright with paddling gear inside, dry and hidden from view. Probably not a spray skirt. I’m not a fan of wearing skirts (I draw the line at exhibitionist lab coats) and skirts that large tend to implode without stays or some arched reinforcement.

I’m actually kind of pleased with the mystery of the rudder resolution. There is a lot of TLC work on deck repairs both inside and out, and that will be easier without the rudder and control outfitting in place.

Plus I’m looking forward to hearing from Klepper US about parts for a 39 year old hull. I sent them an e-mail and expect that they are either intrigued or laughing at me.
 
Last edited:
Plus I’m looking forward to hearing from Klepper US about parts for a 39 year old hull. I sent them an e-mail and expect that they are either intrigued or laughing at me.

Wow, Klepper US responded the same day. With photos. They have parts for that classic rudder assembly that should work on the Comrade.

I’ve never dealt with Klepper before. I’m impressed.

Back to sanding and filling the wabi-sabi on the deck repairs.
 
Wow, that's pretty impressive. It's times like this you'd like to reward a company by buying one of their new boats.....then you remember you could never bring yourself to buy a new boat when you could fix up some old piece of junk instead. ;)

Alan
 
Wow, that's pretty impressive. It's times like this you'd like to reward a company by buying one of their new boats.....then you remember you could never bring yourself to buy a new boat when you could fix up some old piece of junk instead. ;)

I’m sure you know that there is no way I could possibly have this much fun or learn this much buying a new boat.

And even when I’ve bought new boats I’ve taken them apart and put them back together again to satisfy my personal paddling peccadilloes.

I have rebirthed a dozen or so open canoes, but there is something about resurrecting those old 70’s decked hulls that present unimagined challenges. Every one is a little different and every one throws up new puzzles.

It’s my shop Sudoku or Lumosity. And the best taught lessons come from my mistakes.

And WE get to learn as well, thank you!
 
The rudder resolution can remain a mystery for some time. I have lots of TLC yet to do on the Comrade.

The crack on the back deck has been filled with thickened epoxy on both sides and the inside has been sanded smooth and overlaid with a length of glass tape. The outside of that crack is still raised a bit ugly, and I want it smooth.

I took a Dremel sanding wheel to the outside of the crack until the surface was smooth and red-pigment epoxied a length of tape and peel ply atop the deck. Nice and smooth.

I have an idea of both badge the Comrade and hide that area, and the UV visible “Kamerad TS” shadow on the front deck.


I liked the ounce of epoxy weight rolled out inside the hull bottom and sides, sealing the 40 year old woven roving. Liked it enough to (once again) flip the Comrade upside down on the tall horses and roll out the remaining un-epoxied parts of the underside decks. There wasn't a lot of area left to seal.


Maybe another half ounce of epoxy to finish coating the undersides of the decks, but well worth it to help smooth out that old woven roving.
 
Mike, when you're finished dolling up that old boat, Klepper might enjoy getting some pics of your work. Might make a great marketing tool for them and a way to say thanks for their support.
 
And WE get to learn as well

If you want to learn from someone’s mistakes, I’m your man. Hold my shop beer and watch this.

I’m rebuilding the Comrade differently than the past decked canoe soloization rehabs, with a higher seat to better accommodate bent shaft paddle use. And it is the first decked hull in which I have installed a sliding seat. I expect I have a lot to learn, and tomorrow should be illustrative.

I’m putting the Comrade on the water tomorrow for the first time. I measured, re-measured, compared and contrasted the sliding seat position and height with the seats in every other solo boat we own, which vary in customized outfitting sized for individual family members, both decked and open canoes. I’m fairly confident that I have that seat is at least Wabi-sabi correct.

But in the back of my mind there is still a slight chance that I will be teetering like a pig on a unicycle. The prime reason for tomorrow’s test paddle is to adjust the sliding seat trim and mark the locations for the back band, foot pedals, knee bumpers, heel pads and utility thwart, and size to the location of those pieces so that the positions (some fixed, some adjustable) will accommodate shorter or taller paddlers on the sliding seat.

I absolutely count on those padded points of contact, not just for comfort, but to help lock me in the boat, and without them my first impression may be that I’m wobbling about uncomfortably unsupported with an aching back. I can fix that; I just need to know where it goes. If I’m not comfortable in the boat something needs work,

Thinking about a test paddle, I’ll put four 10 liter dromedary bags in the boat. At 10 lbs each those should allow me to replicate my typical gear weight distribution, which is usually a bit stern heavy due to the amount of open cockpit space available behind the seat for a barrel or large pack. Umm, cooler full of beer.

Let’s see, what all do I need for this test? A Sharpie and tape for marking outfitting locations. A clamp-on utility thwart to mark for best position. I know the preferred location of the utility thwart, for my wingspan, is 22 inches from the front of the seat edge. That is far enough away that the sail doesn’t interfere with my paddle stroke range yet still within lean-forward reach. I’ll mark it to start there.


A bailer, bilge pump and sponge, maybe a change of clothes, just in cas…..glubb, glubb, glubb. I don’t have the Comrade outfitted for floatation bags yet, but I still want to test its limits with some leans and turns.

A willing offspring companion to help ascertain the hull trim on waer, eyeballed from another boat, and mark the hard to reach outfitting locations after I find my best seat-slid position in the Comrade.

And, while I have him available, put a taller, skinnier paddler in the Comrade to recheck my adjustable outfitting locations. I don’t have a short-stack to put in the Comrade, but if I have an Ectomorph and an Endomorph I can calculate the Mesomorph middle.

https://www.google.com/search?q=mal...2Fguys-do-you-know-your-body-shape%2F;600;416

I need to rack another boat and pack some gear. And a camera.


Jury-rigged test paddles are the best! When I test paddled my Kite to pin down the best position for the sliding pedestal I took an unexpected swim when the hold thing fell over during a lean.

Good luck!

Alan
 
Test paddle results

My timing weather-wise could have been better, temps in the mid-90’s and extremely high humidity. In all other regards the test paddle was successful.

Starting with, to my great relief, discovering that the seat location and, more critically, seat height, was spot on. The seat height, which is actually 6 ¼” high at the molded thigh positions, was the product of much comparison, measuring and re-measuring. And I had, as a matter of faith, fully glassed the seat in place before test paddling.

And, once glassed immovable in place, I kept looking at it thinking “dang, that looks awfully tall”. I had a nightmare vision of top heavy me getting in the boat and feeling like I was paddling some high kneel sprint canoe.

https://www.google.com/search?q=hig...an-that-canoe-racing-is-not-same.html;584;400

The seat height was purt near perfect. I have two prime criteria in boat design and outfitting. One is that the hull has sufficient primary stability to not just allow me to turn around and look behind me, but to retrieve or reposition gear while afloat sans any ready paddle brace.

I had put four 20lb dromedary bags in the Comrade to approximate gear weight distribution. While underway I retrieved one from the bow and put it in the stern, essentially swinging 20 lbs of deadweight outside the coming.

That seat height worked as well for me as for my taller, skinnier son and met with his approval as well.


Oh yeah, that’ll do.

The utility thwart location as marked in advance 22” from the front seat edge was close; it can come back one inch due to the higher seat position.

The knee bumpers will need to be nearly 10” longer than usual to accommodate the variance in sliding seat positions. And once you go knee bumper you’ll never go back; I had brought along two lengths of split foam pipe insulation and stupidly left them in the truck.

Waaaa! The right angle edge of the interior cockpit coming hurwt my wegs. That is my other prime criteria in a boat, it has to be comfortable everywhere my body makes contact with the boat or something needs work.

I tossed a kneeling pad in the Comrade to replicate the heel pads I usually install for foot brace or rudder pedal use.


Installing the Yakima foot pedals is going to present a challenge. As it turned out I had foot braces perfectly position – the front pair of partial bulkheads happen to be located exactly where I typically brace my feet.


I can either cut those bulkheads out on either side, or maybe puzzle a way to incorporate them as supports in the middle of the fixed rail. The latter might afford a more ergonomic pedal location, but would necessitate glassing in additional supports on either end of the rails.

The heel pad size and location remains a wait and see. They will need to be longer than usual to accommodate the sliding seat and I won’t mark those locations until the foot pedals are installed.

It was nice to trade off boats and get back in the Optima for the paddle back. dang that old Hyperform is a fine paddling (and sailing) boat.


A friend of Doug’s took his Optima out and declared that is was a Cadillac. It swallows gear, it’s comfortable, easy paddling with a surprisingly fast cruising speed and sails very well.

That ’77 Hyperform Optima is my favorite so far of the soloized decked tandems from the 70’s. But I don’t yet have the Comrade outfitted for a true comparison.
 
I’m not in the mood to start cutting out bulkheads or fashioning some bizarre end supports for the rails. But I can’t help playing with the hull a wee bit.

What have I got in the way of mystery gear that might be useful on the Comrade?

I glue Ridge-rest foam to all of my bucket seats. That wee bit of waffle cushion makes an amazing comfort difference for day-long paddle trips.

But for the Comrade maybe another bit of paddling history, a “Grade VI Avant Equipage” bucket seat pad.


Why Grade VI was getting all Frenchy with “Avant Equipage” in Urbana Illinois remains a mystery to me, and the translation is no help:

http://bfy.tw/K2V

They did make some cool stuff, and it is a killer bucket seat pad. It not only adds comfort, it effectively increases the width of the seat pan by an inch or so all the way around, which is all the better for fat butt boys or shifting sailing weight on the seat.

What else? That is a big cockpit opening on the Comrade, well sized for non-entrapment of the bow paddler as a tandem. I wonder which of the other decked tripper cockpits it approximates, if any.

Cockpit dimensions on the retrofitted decked canoes:

The Klepper Kamerad TS is 98 inches long by 22 inches wide at the outer edge of the cockpit coming. By rough multiplication 2156, a number which unfortunately does not reflect the actual cockpit shape and rand dimensions. But it’s close enough for a starting point.

Klepper Kamerad 98 x 22 = (roughly) 2156
Hyperform Optima 79 x 21= (roughly) 1649
Phoenix Vagabond 96 x 23 = (roughly) 2208
Mad River Monarch 90 x 23 = (roughly) 2070

While I’m at it, I’ll measure the cockpit dimensions from a couple of early generation Pamlico tandems (I believe those dimension may have changed over the years with subsequent re-designs).

Pamlico 160T 90 x 24 = (roughly) 2160
Pamlico 145T 84 x 22 = (roughly) 1848

A P160 storage cover should fit…..nope that rough rand math didn’t work, a P160 cover actually came up several inches short.

The storage cover for the (now-soloized) Phoenix Vagabond fit nicely though.


Oh, heck, while I’m at it I might as well check storage covers sizes for the other decked boats.

The Pamlico 145 storage cover, like the P145 solo spray shirt on Doug’s Cadillac, fits the Optima, albeit puddled loosely in high humidity.


Don’t laugh about the Pamlico. The P145T, once soloized with a raised seat, is a fantastic decked canoe hull for a smaller person. The lessened wetted surface means wee folk can get it up to a comfortable cruising speed and keep it there. It handles waves and sails wonderfully with that bow layout.

I know, paddling an effing Pamlico….screw the shame factor, the earlier generation Pamlico 145T’s make a really nice decked canoe with a raised seat and some simple, mostly mechanical, retrofitting. For smaller folk or day use the P145 is great little soloized hull.

About the nylon cover sag. Any of the nylon covers will droop in rain or even high humidity, and in camp I try to remember to cock the hull at a sideways drainage angle for the night to prevent cover imploding puddles.

Lastly, for Monarch owners (maybe Loon), a 1[SUP]st[/SUP] generation Pamlico 160T storage cover fits a Monarch with a bit of sag. (Pardon my dust, I need to get the Monarch out soon)


And a 2[SUP]nd[/SUP] gen P-160 storage cover fits nice and snug.


That those Harmony/Wilderness storage covers fit many of the old decked boats is a wallet saving boon. And being able to leave the PFD, paddles, compass, back band and etc all in the upright hull, hidden but dry and ready to go at a moment’s notice while in camp is a wonderful thing.
 
Why Grade VI was getting all Frenchy with “Avant Equipage” in Urbana Illinois remains a mystery to me, and the translation is no help:

http://bfy.tw/K2V

Well, after playing around with your example, and making an educated guess, I got:

"equipment" can translate as "le équipage de voyage"

Of course, if you switch it around, you are sort of back where you started. I suspect that someone in marketing thought that he understood French, and assumed that syntax and rules for shortening phrases work the same as in English.

Note to anyone studying marketing: In most languages, you cannot replace a phrase word for word and have it make sense!

I've been having fun watching this thread. This kind of boat is not really my thing, but its enjoyable to see how the same hull could be rigged out many different ways.
 
Seat height is so dern important, lower for stability versus higher for single blade leverage, and account for being fully loaded and possible kneeling. Glad you got it just right on the Comrade.

I will be interested to see how you solve the foot pedal dilemma. It would be a job cutting out those bulkhead-deck-support-thingies, but obviously you are up to the task if needs be.

Also, interesting that the Comrade cockpit designed as a tandem is only about 8" longer then the cockpit on the Monarch designed for one.

And the cockpit length in Optima, designed as a tandem, is 11 inches shorter than the Monarch

It was time to deal with those in-the-way bulkheads for foot pedal installation.

Cutting the entire bulkhead out is possible, but it would mean tackling that continuous curve under the cockpit coming. That cut and looks like a huge PITA. Leaving the bulkheads intact and supporting the pedal rails at either end actually detracts from foot placement ergonomics.

Before tackling anything overly elaborate I tried a half-way step, cutting a rail sized slot in the bulkhead to seat the pedal controls fully against the hull as usual, but leaving the bulk in bulkhead.

A coping saw got me down close to the hull and a hacksaw blade finished up the slice nearly flush with the hull.


A Dremel tool cutting wheel slice in the center of the bulkhead and that rail slot popped right out. Hey, there’s foam backing on the inside.

“Nearly flush” was a bit too Wabi-sabi. I wanted the bolt ends of the rail to sit flush inside the hull, and even a ¼” tall bulkhead resin mess was too tall of a center support. Back to the Dremel grinder, ‘til the rail fits flush at both ends and the center.


That part is all well and good, I just needed to cut a wider passageway through the bulkhead for the adjustable foot pedal. Wide enough to accommodate some fiberglass epoxied over the foam open bulkheads.


That passageway proved to be such an interesting cut, and grind, and re-cut/grind a little more, and a bit more, to get right that I didn’t want to have to freehand it again on the other side.

Before going any further I made a cut-out template to replicate on the other side.


With the foot pedal slot cut and the Comrade already held sideways I cut the glass and peel ply to cover the exposed foam bulkhead slots. And, what the heck, a couple of little 2x2 squares of glass to reinforce the bolt hole locations on the inside
 
I just changed out the clunky, height adjustable web seat in my Wenonah solo for a sliding pedestal seat. Strangely the pedestal seat, if mounted normally to the bottom of the canoe, is lower than the low position of the web seat which is a good height for me. I ended up mounting the seat on 3/4" teak blocks to duplicate the height and using G Flex epoxy to secure the blocks to the canoe. Works great and I find the tractor seat more comfortable than the web seat.
P6130004.JPG

I like that pedestal solution. Did you just screw the bottom of the pedestal frame into the wood supports? That would allow for much easier future seat removal than glassing the bottom tubes in place.

Those Wenonah adjustable seats are clunky, and they rattle like an SOB on the roof racks. I ended up gluing a piece of minicel between the side of the seat drop and the inside of the hull to eliminate the rattle, which was driving me crazy while driving with the canoe on the racks.

That reminds me, I need to do that to my Wilderness, which remains sans minicel anti-rattle foam.

Which Wenonah is that?
 
Did you just screw the bottom of the pedestal frame into the wood supports? That would allow for much easier future seat removal than glassing the bottom tubes in place.

Ohhhh, I see the bolts atop the bottom seat frame.

Countersunk under the teak supports, unscrew the bolts and remove the seat if ever necessary?

I like that trick!
 
Back
Top