• Happy International Mermaid Day! 🧜🏼‍♀️

Repair a hole in the hull

Joined
Aug 20, 2013
Messages
427
Reaction score
179
Location
Eastern NC
A friend of mine has a royalex canoe with a quarter size hole in the side of her canoe. The hole is near the water line so it will allow water in creep into the canoe. She has asked me to repair it for her. Looking for advice.

Only once have I been faced with this problem - 20 years or so ago. My solution then was to use a 3M product in a caulk like tube. It was called Marine Sealant. My memory was I used the 3M to fill the void and then after it cured laid 2 or 3layers of fiberglass over the patch and epoxied the glass to the surrounding royalex.

With all the experienced craftsmen on this site, I thought someone may have a better idea on how to approach this repair.

Suggestions welcome.
 
Get some West System G Flex epoxy. I would suggest getting the "Aluminum Boat Repair Kit" which sells for around $30. This contains 4 ounces of hardener, 4 ounces of unthickened resin, some cab-o-sil colloidal silica gel powder, mixing cups, spatulas, and some dental syringes. Some 4 ounce or 6 ounce per square yard plain weave fiberglass cloth will suffice.

There are many ways to go about this repair. I would do it in such a way as to maximize the cosmetic result of the exterior of the hull. For very small punctures, I would just fill in the hole with G Flex epoxy thickened with silica powder to form an epoxy glue. For a quarter-sized hole I would be inclined to use some fabric to fill the void. I would bevel the edges of the hole on the interior of the canoe to increase the bonding surface. Seal the hole on the exterior of the hull using some strong, clear plastic packing tape applied tautly to contain the epoxy. I would then apply some thickened G Flex epoxy to the sides of the hole to seal the interstices of the foam core. This might require several applications of a small amount of epoxy at a time. After the epoxy has cured, smooth the surface with sandpaper so that cloth will lie flat.

Fill in the hole from the inside using concentrically larger, circular patches of fiberglass, smallest patch going to the bottom of the hole. Use unthickened or lightly thickened epoxy for this purpose. You can apply the next patch as soon as the epoxy has cured to a "green" state, typically in a couple of hours at usual working temperature. Orient the fibers of the weave of each patch at different angles at you go. Keep filling in the hole with cloth and epoxy until flush with the interior surface of the hull.

I would remove the interior layer of vinyl from the hull for a distance of about 2" around the circumference of the hole. You can usually do this using a wood chisel. This will allow you to bond directly to the ABS of the Royalex. Smooth the interior of the repaired hole with sandpaper. If necessary, you can use some thickened epoxy to bring the surface up flush to the adjacent hull. Cover the repair with two layers of fiberglass cloth, one extending 1" beyond the edges of the hole, and the other 2" beyond. After the epoxy has cured, smooth the interior by sanding.

After removing the tape on the outside, you may have to use a little additional unthickened epoxy to fair the exterior surface. Let the epoxy cure well, then wash it to remove any amine blush. Paint the epoxy on the inside and outside with a paint color that most closely matches the interior and exterior hull color.
 
I once repaired a softball size hole in a Royalex hull made by a falling white pine limb. Most of the pieces of Royalex making up the hole were still attached. I pushed them into place and filled any remaining gaps with G-flex epoxy. It was a while ago, but I believe I let that cure, and then came back and scuffed both sides of the hull and applied a fiberglass patch on both sides filled with G-flex epoxy. I let that cure and painted the interior and exterior with matching spray paint especially made for adhesion to plastics. I likely washed the patch before painting to avoid any blush issues. As far as I know, the canoe is still going strong.
 
Thanks Pete. I was hoping you would add your thoughts. I have a very clear idea on how to proceed, thanks to your well written description. You are skillful with written explanations, two thumbs up.

I'm tardy with my thanks, but I've ben paddling the last several days and not online.

Thanks again!
 
I once repaired a softball size hole in a Royalex hull made by a falling white pine limb. Most of the pieces of Royalex making up the hole were still attached. I pushed them into place and filled any remaining gaps with G-flex epoxy. It was a while ago, but I believe I let that cure, and then came back and scuffed both sides of the hull and applied a fiberglass patch on both sides filled with G-flex epoxy. I let that cure and painted the interior and exterior with matching spray paint especially made for adhesion to plastics. I likely washed the patch before painting to avoid any blush issues. As far as I know, the canoe is still going strong.

Fitz, same exact scenario. A friend dropped a tree that, oops, holed the bottom of a neighbor’s OT Camper, leaving a coffee can sized hole dead center, with the jagged pieces of Royalex dangling from vinyl skin.

This was in pre G/flex days, but the same repair sequence and easy since the Camper had such a flat bottom. Got the pieces held back in position and masked on the inside, filled the cracks on the outside with thickened epoxy, glassed that side with a couple layers of cloth, waited a few days, flipped the boat over and glassed the other side, let it cure and hit the outside patch with a can of red Rustoleum. Likely a $10 fix in materials.

I got that canoe for free, used it as a loaner for a few years and gave it to my then neighbors. I think it is still going strong as well.
 
I have a quick and dirty method for repairing a holed Royalex hull that many of my whitewater friends have put to use. It goes as follows:

Buy one bottle of Gorilla Glue and a 2" wide roll of Gorilla tape. Cover outside of hole with a 2 x 2" square of Gorilla Tape. Fill in hole with Gorilla Glue, which I am told will actually seal the exposed holes in the foam core pretty well as it expands. After glue has hardened, sand off excess more or less flush on interior and cover with a 2 x 2" square of Gorilla Tape. Replace Gorilla Tape periodically as needed.

Pete, is there any reason you are aware of why G/flex with the colloidal filler wouldn't work as well as the Gorilla Glue in the hole? West put "flex" in the title for a reason, and I'm just wondering if if might not be both stronger and more flexible than a plug of Gorilla Glue.

Here is the Aluminum Boat Repair Kit Pete recommended. I used it to successfully to fill and patch a rotted section of a wooden gunwale.


vx02Q87rcdODTabojErgjl7wa9BHrEf2Xmi7PsZiX_7fdTgvQI7GH7pMa7kdxdC-G97t_KsZO9FELcnA1O5k6gvGUXasmO40Vc2ryQnO-VhbkJKzId5OmxVw8s5jbQdHIkjH1hUa-mgULoO4k69siI78rzSLUHxQb1h9Wf_e4A3pGBplAOlG3_jv1DmSQQPdjxOcBnP9i7Qinqh6xL2ZFpj3eNnj_lZX9ZkYEQ7JJEsTR5dxSd_jzOgAjUfivn_KuK4hB7DYg7S97fpFv-HMdHe-NkQJkhXlru8JRhSwwpAg8HXhcuBGJuOYX1YruI2McYc6hCVAgfFBR2swt5JxWRZhxAHM0SU_Yr27F_a1pHa-SYAYTGmOHcofuRrrY8Y9DIE2aJ-GZBCRpYJc2FkpTgq0CU8iMvlPZfEi7Cz_X7coPqZQUVEKi7pg4zJDWiQaEHFcybtkadww-_uLNl7bQHMRM5Sb8CRsMI4ocHcd1sinS3wp9M5b4t4cbbhaAGhWmYcI71Dbgw9-vZpF_c2psGPh6xQC9qFmNWd_RZEgZTQAYpeThRinJZMHDByPUfkX7u5dP4mXvB4_u5Q3y54N_vscTSAMJaqWMg-4j6mbG3OTW3TNiGs-=w695-h926-no
 
Glenn, G Flex thickened with colloidal silica powder is exactly what I would use as a filler and sealant for the foam core as I mentioned earlier in the thread. I have never used Gorilla Glue but I know quite a few people who have and claim good results with it. But then, I have heard people claim good results with just about anything that can be stuck in a hole, including JB Weld, Marine Goop, polyester auto body putty, you name it. But if you are going to apply a fiberglass patch at all, G Flex is the best epoxy for ABS, and if you are going to use it for patching over the hole, why not use it to fill the hole?

In reality, a quarter sized hole in many locations of a hull that is not subject to high stress or abrasion could probably be filled with just about anything, including bubble gum, so long as it was waterproof. My preference is to use some type of cloth for any through and through hole bigger than 1/4" or so. The method I first described, a concentric laminated cloth repair, might be thought to be overkill but will result in a very strong repair and really sounds much more complicated to describe than it is to do.

Here is a West System video describing the process: http://www.youtube.com/watch?v=6N7YMr6E564&t=210s

The video recommends using a shallow angle bevel of 1:12. I would probably use a less shallow bevel for a hole of this size, maybe 1:8 or 1:10. With a dremel and an appropriate grinding tip, beveling can be accomplished pretty quickly. You just measure the thickness of the hull at the site of the hole, multiply that by whatever bevel ratio you prefer to use, and mark a circle around the hole accordingly. So if the hull is 3/8" thick at the hole, and your bevel ratio was 1:8, you would mark out a circular perimeter 3" from the margins of the hole all the way around. Then take your dremel and make a smooth bevel from the hole margin out to the perimeter of the circle.

The video also show wetting out all layers of the patch simultaneously. G Flex epoxy is rather viscous and I would generally not recommend trying this as I suspect it might result in air voids. But you can cut out all the layers and apply the next one as soon as the epoxy of the preceding layer has cured to a tack. So you can really complete the whole repair in an afternoon. The video also recommends applying the biggest patch first. I honestly don't believe the order big to small, or small to big, makes any difference from a structural standpoint. I think it would be easier to get the cloth to lay down smoothly against the exterior of the hull and the foam core by applying the smallest patch first and working from small to large. But either way will work. The idea is that the margins of each patch are bonded directly to the ABS.
 
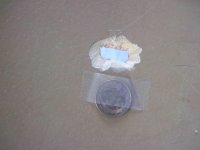
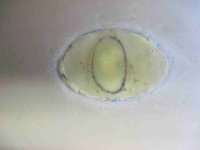
The damaged canoe is now in my hands and the image below is the hole in the side of the canoe. I've cleaned it off and cut away the hull material projecting into the interior of the canoe. That is a quarter taped to next to the hole.

I don't have a Dremel tool and don't intend to buy one for one project. Accordingly, I've beveled out the interior with a razor knife. I'll work on evening out the bevel before I begin the patching.

There is some other more serious damage to this canoe. I'll post photos of that in another thread. These look to be challenging and would be open to ideas on how best to approach these.
Side002 (2).JPG
 
That looks good for a start. I would mark a nice oval around the perimeter of the beveled out area, and use coarse sandpaper to even up the perimeter of the defect and bevel the solid ABS stratum at the edge. Apply some clear packing tape to the outside to cover the hole. Use thickened G Flex epoxy to fill in the exposed cells of the foam core and after it is cured, sand it nice and smooth. In this case, it looks as if making the first layer of cloth the largest to extend out to the edges of your marked oval might work well. Wet out that layer of cloth starting at the bottom and making sure you have worked it down to your applied tape. Apply successively smaller ovals of cloth cut at different angles of bias. You can apply the next layer as soon as the preceding one has cured green. Once you have filled the hole up flush with the undamaged hull, let it cure well, sand it nice and smooth, and cover the entire repair with another fabric patch that extends out onto undamaged hull by at least an inch (two is better). Once that is done, you can paint the interior.

Anytime you are applying more epoxy, paint, or fabric over epoxy that has fully cured, you should wash the area first to remove any amine blush. This is not necessary if you are bonding over epoxy that is still green.

When you go back to the outside to remove the tape, you will find that it has bonded to the epoxy of your internal repair. No worry, just sand off the tape that has bonded. In order to achieve a totally smooth external repair, you may need to apply a little epoxy and sand it smooth if the surface is not already smooth. Paint the exterior of the repair once the epoxy has cured and you have washed it well.
 
Anytime you are applying more epoxy, paint, or fabric over epoxy that has fully cured, you should wash the area first to remove any amine blush. This is not necessary if you are bonding over epoxy that is still green..

There are a lot of Blush Free epoxies out there. They would be my first choice.

A point that solves the bonding issues, is to keep applying epoxy, while the previous coat is still tacky.. Don't let it cure, keep applying resin, until you are done.
The exception to this, is during the wetting out coat. There is enough texture to bond and hold the first Fill coat. Allow the wet out coat to stiffen enough, so the cloth won't move, and start in with the fill coat.This trick alone has saved me countless hours of sanding, and makes for a clearer finish, as well as giving a strong bond.

Jim
 
Apply successively smaller ovals of cloth cut at different angles of bias. You can apply the next layer as soon as the preceding one has cured green. Once you have filled the hole up flush with the undamaged hull, let it cure well, sand it nice and smooth, and cover the entire repair with another fabric patch that extends out onto undamaged hull by at least an inch (two is better).

"successfully small ovals" ...........any reason an oval followed by concentic circles wouldn't work?

"another fabric patch that extends out onto undamaged hull by at least an inch" ...............Is this last fabric cover cosmetic in nature, so you don't see 2 or 3 layers of cloth?

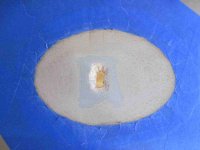
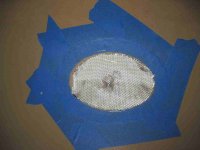
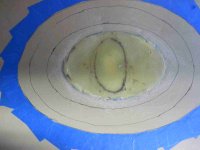
Here some photos of WIP. My current thinking is the large oval FG sheet goes down first, followed by 2 circles. Alternatively I could put 2 circles (they are just easier to draw) down first and the large oval be the final cover. I would ensure one the 2 circles extends onto the grey ABS layer.


Side Repair002 (2).JPG

Side Repair003 (2).JPG
 
Well, sure you could use circles but what your are trying to achieve is to fill in the defect (which is basically oval in shape) with the successive layers of cloth and epoxy until it is flush with the surrounding hull. You would also like to maximize the bond contact area at the edge of each patch with the beveled foam core so that you just don't have a strong "plug" in the hole that is relatively weakly attached to the adjacent hull. Successively smaller oval patches are going to do both better than circular ones.

Oval patches are really no harder to cut than circular ones. I would make a template out of brown packing paper that is the size and shape of the first (largest) patch. Lay it on your fabric and trace around it with a sharpie. Then take scissors and trim off a millimeter or two of paper around the edges of your template for the next patch. You can have all the layers cut out and ready to go before you wet out the first patch, then apply each successive one while the epoxy of the last is still tacky.

The purpose of the last interior layer is to distribute whatever stress the repair sees over a significant area of adjacent intact hull. I have seen what appeared to be strong and well done patches of Royalex boats "flake off" intact, sometimes a long time after the repair was done. I believe the reason is compliance mismatch between the cured epoxy (which is quite stiff) relative to the rather flexible Roylex. This compliance mismatch results in gradual weakening of the bond of the patch to the adjacent hull. G Flex epoxy when cured has a lower modulus (is more elastic) than conventional epoxies which is one reason it makes it a better choice for repair of Royalex boats.

Putting a larger patch on the inside over the repair will diffuse the "stress riser" that otherwise would occur right at the edge of the repair. The large final patch should bond very well to the underlying repair, and by extending a couple of inches onto adjacent healthy hull, it will greatly increase the total bonding surface of the repair to the hull.
 
If you can lay the hull so the area to be patched is level ( A no brainer)
Keep adding layers while the resin is wet. Waiting between layers won't give you the best bond.

When I apply bias strips to the ends of my strippers, I lay 2 or 3 layers , one on top of the other with out waiting for cure.

It gives the clearest appearance when finished also.

Jim
 
G Flex epoxy is significantly more viscous than conventional epoxies. That is why I never try to wet out more than one 6 ounce cloth layer at a time. But it is certainly OK to lay on the next lamina as soon as you are convinced that the underlying one is fully wet out. Also, G Flex cures to a honey color, so if you are looking for a clear cure, it is not the best choice.
 
Well, every now and then we at Slacker Boat Works take an extra step. Yes, that is inconsistent with our motto of "Do no more work than you have to".

However, it is cold enough that inside work has its appeal, and ovals, or rather ellipses have always fascinated me. Having a pretty good math background, my thinking was to brush up on my coordinate algebra and work on the equation for an ellipse that would fit my problem area.

Once you calculated the foci (there are two in an ellipse) it is a simple matter to tack each foci down and tie a string between each one long enough to trace/draw your ellipse.

Calculating the foci is pretty easy ------- C² =A²-B²; where
C= foci point
A= length of long axis ( from 0,0)
B=Length of short axis ( from 0,0)

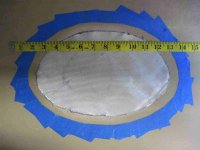
Here is my template that will be the large patch which will fit over the other ellipses. IMG_2843 (2).JPG
 
Photos - Steps in the Patch Repair

It has all come out quite nicely, but a small oversight at the beginning of laying out the final coat of FG has cost me another step.

Perhaps in the way deer hunters get buck fever, I suppose I had patch fever as I was 2 minutes into mixing up the epoxy. Earlier that day I had determined there was sufficient carbon powder on hand to add to the epoxy and give me UV protection and no need to paint.

However, the carbon powder came to my mind after the hull had been painted and the cloth wetted out.

Thanks for everyone's help.


CT.jpg

CT2.jpg


Tinkering With Ellipses


CT4.jpg

CT5.jpg

CT6.jpg
 
Wound Repair from the Outside

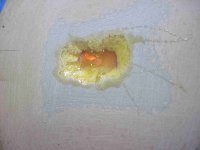
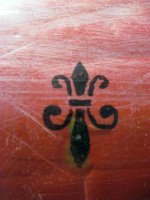
Stenciled over the repaired hull, this pattern will be applied after I finish up. The margins of the wound extend beyond the stencil pattern. So, I'll next remove the stencil pattern, paint the wound red, and re-apply the black stencil pattern.


IMG_2865 (2).JPG
 
Back
Top