• Happy Weed Appreciation Day! 🌱🌿🌻

More Skid Plate Repairs and Retrofits

G

Guest

Guest
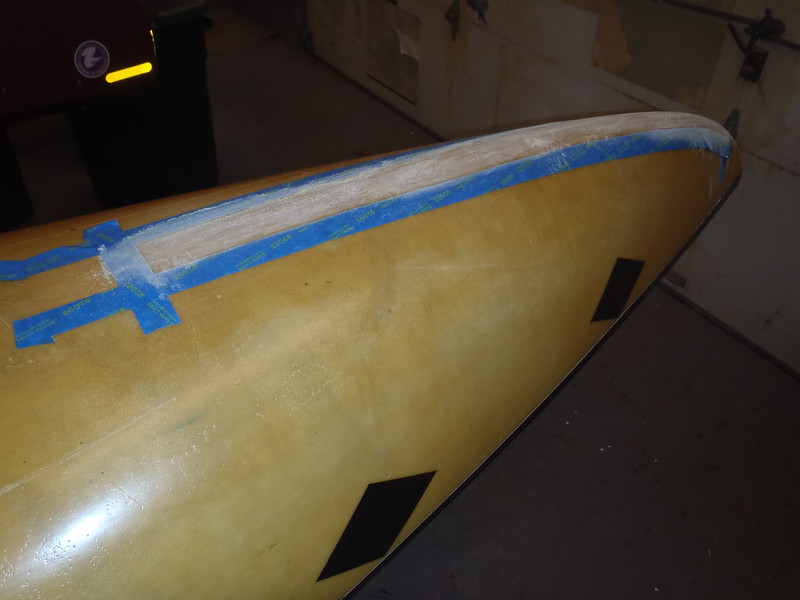
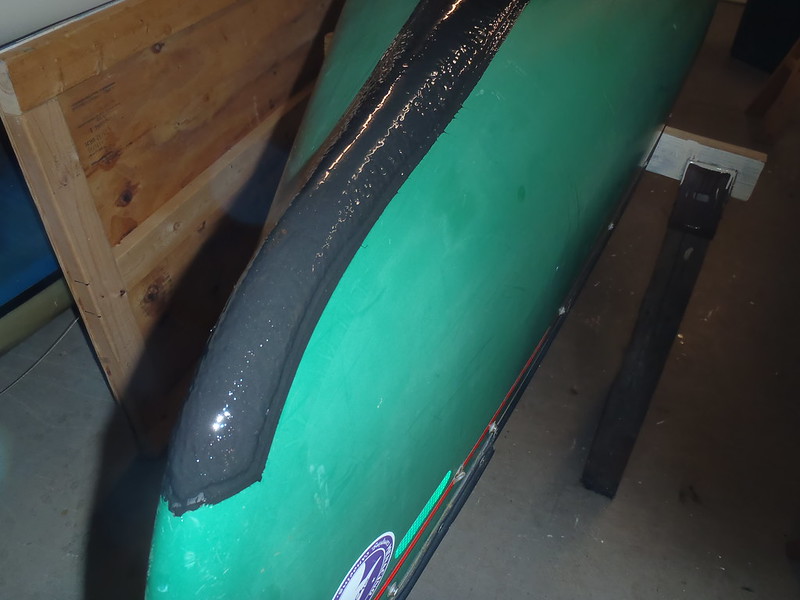
The skid plates on my favorite RX big boy tripper, the soloized Penobscot 16, are kevlar felt with OT urethane resin, still firm and flush-ish to the hull. That was one of the last kevlar felt skid plate kits I ever installed; even done properly, smoothed down with beveled edges, I curse the day every time I see it.

I did a decent job of smoothing it and faring down the tall felt edges as the epoxy set up, but did not think to pigment the yellow kevlar felt. Just adding a dab of green pigment in the resin saturating that kevlar felt would have worn down more hull matching and less fugly.

With the attention to detail application technique that 16 year old skid plate has held up well. I did patch some chips and recoat it with pigmented epoxy some years ago, and it is drag and scrape worn nearly baby butt smooth, with a couple new chips of felt busted out, and is again getting down to kev felt yellow showing.

PB040024 by Mike McCrea, on Flickr

One skid plate application trick I have learned; once you have the process down it is much faster to do two boats at once rather than doing one at a time. If the fabric and epoxy and mixing pots, brush and tape and etc are already out, doing skid plates on two boats is only a little more work than doing one. Eh, 2x prep work, but even that is bit of a time saver doubling up.

Which second canoe to bring in? I did a (very) rudimentary skid plate experiment years ago, at the end of my kev felt skid plate era. We did four canoes at once, two friend’s canoes using two Old Town skid plate kits, with the leftovers of excess kev felt and urethane resin going on our Freedom Solo and Odyssey.

The MRC Freedom Solo got two short kev felt and OT urethane epoxy skids, and the Mohawk Odyssey more experimentally one felt and one no-fabric just urethane resin skid (ran out of extra felt from the kits), using up every bit of excess resin. The Freedom Solo needs help, but the Odyssey is crying out for skid plate refurbishment.

The Mohawk Odyssey 14 is my favorite canoe for shallow water streams; I swear it would grumblebump over a dewy lawn. It is likewise wonderfully stable traversing “step out” logs. Love that little canoe for shallow waters and swampy applications.

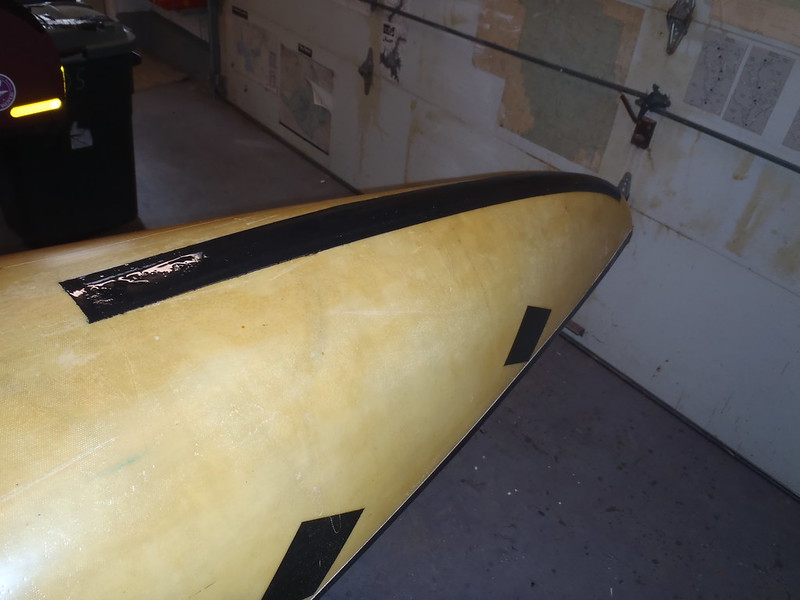
Kevlar felt and urethane resin skid plate on the Odyssey

PB040027 by Mike McCrea, on Flickr

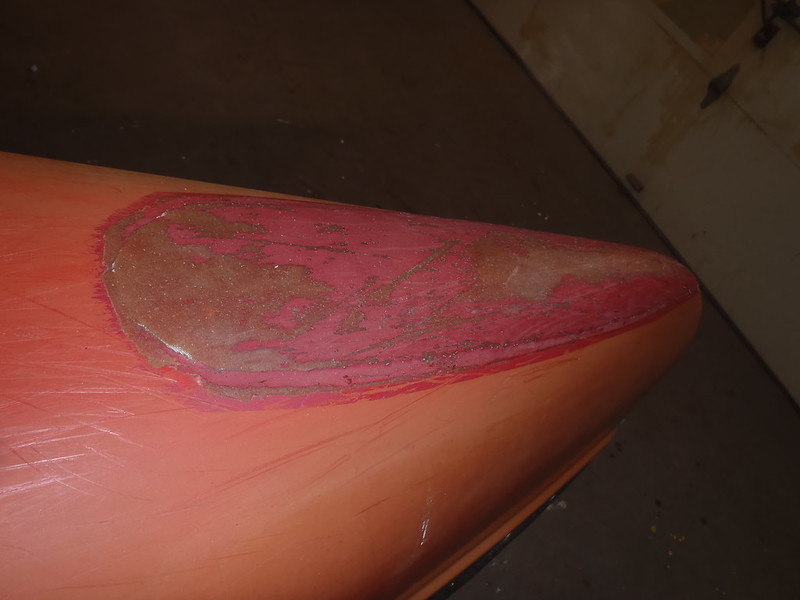
Urethane resin only skid plate

PB040025 by Mike McCrea, on Flickr

That urethane-only skid plate held up surprisingly well, but is worn vanished thin on the edges and up the centerline. It is on the bow and less susceptible to abuse when dragging the canoe around strainers. Those two will do as the next renovated skid plate applications.

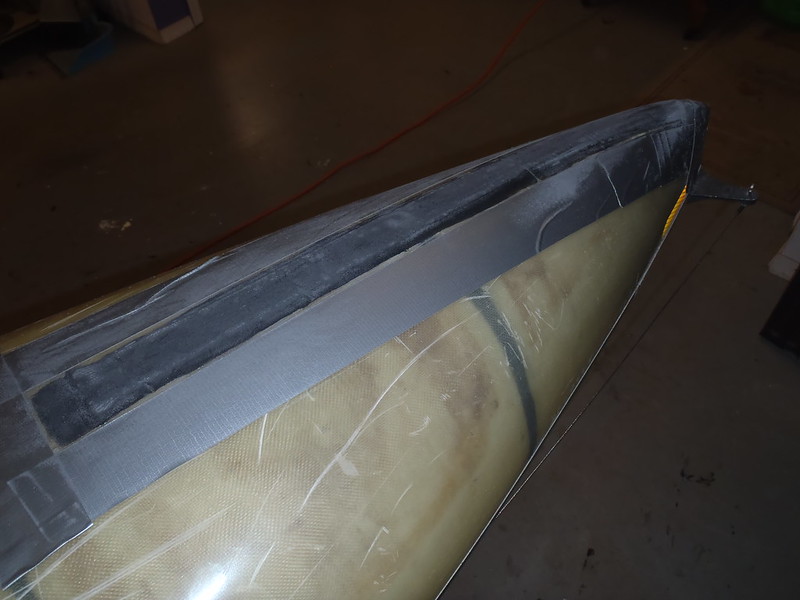
The well-done kevlar felt skid plates on the Penobscot, so well done I have little hope of chiseling or grinding them off, got a coat of straight G/flex, graphite powder and black pigment.

Both ends of the Odyssey got a layer of Dynel, graphite powder and pigment. The no-fabric end was originally done with thickening in the pot leftover urethane resin, so thick it was raised 1/8” gloppy at one edge. RO sander knocked that raised glop edge down flush. 60 grit disc needed; that Old Town urethane resin is some tough stuff.

Prep work on two boats took a while. I have never bothered to keep track of time when installing skid plates, but what the heck.

Debridement/scrubbing/cleaning the old skid plates – 10 minutes

Lay out/staging the epoxies, brushes, cups, gloves, graphite power, pigment – 10 minutes tops (there may have been a let’s-think-ahead-about-the-sequence beer in that time span).

PB040030 by Mike McCrea, on Flickr

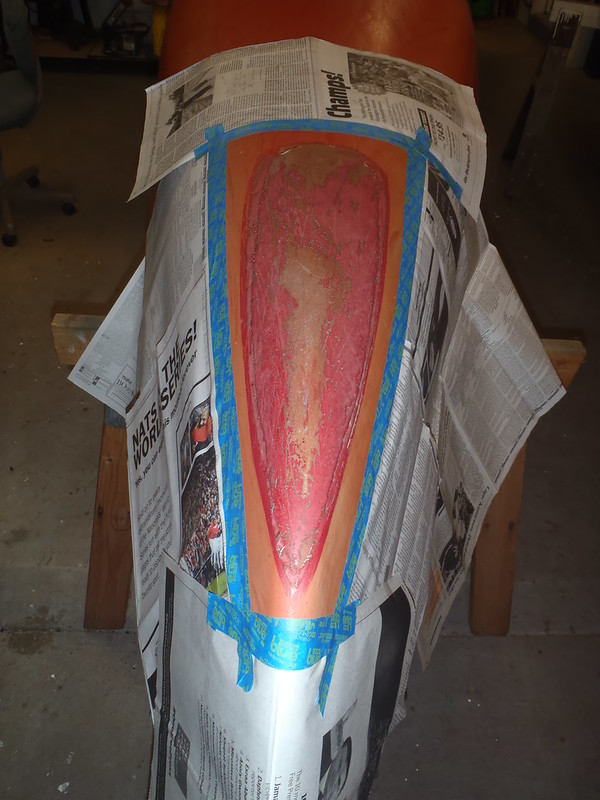
Cut paper templates for the Dynel fabric size and shape, cut the Dynel, cut the release treated peel ply – 20 minutes. I even remembered to Sharpie a centerline on the Dynel to help my aim down the keel line, and cut a couple inch slit up the narrow end of the Dynel so the fabric could fold over more neatly at the curved tip.

PB040032 by Mike McCrea, on Flickr

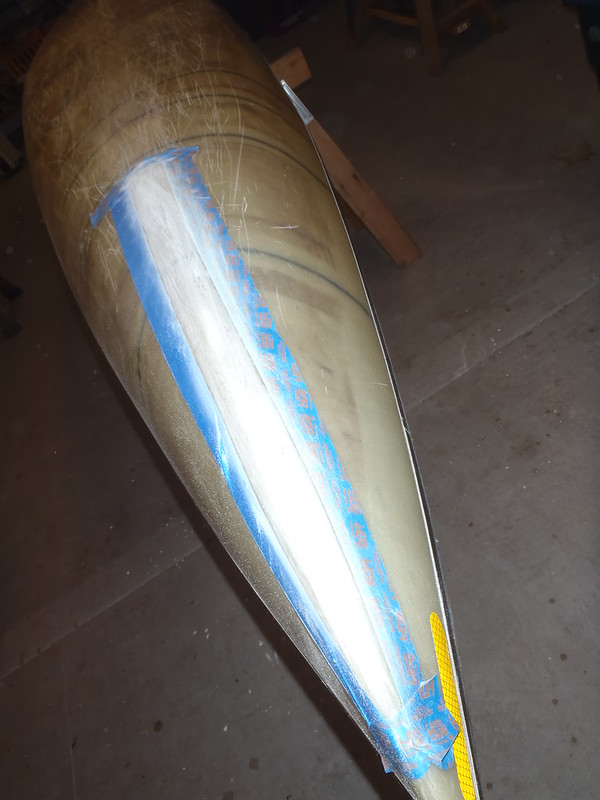
Lay the Dynel fabric on the Odyssey for a test fit and tape out the perimeter, and tape out the Penobscot. Paper half way up the 1[SUP]st[/SUP] perimeter of tape, 2[SUP]nd[/SUP] run of tape over the edge of the newspaper – 35 minutes. That chore was the longest single time demand, and yet surprisingly fast this time.

It used to take me that long to tape and paper mask a single canoe; if nothing else I have gotten efficient at that part. I muscle-memory know the best order to lay the tape and paper for when it comes removal time, know where to most conveniently leave pull-tabs on the tape, and can even cut the curves in the stem end of the masking paper by eyeballing, without tracing a line.

PB040034 by Mike McCrea, on Flickr

PB040035 by Mike McCrea, on Flickr

Mixing the epoxy pots, painting on an undercoat of resin, laying the Dynel fabric, top coating with G/flex, walk away and begin Sharpie marking the ends of the drips – 30 (ish) minutes; I didn’t check the time until I was painting on the first pot .

PB050039 by Mike McCrea, on Flickr

I (mostly) remembered to keep the brush and pot over the skid plate areas at all times, so I (mostly) didn’t waste epoxy by dripping it on the floor or my shoes.

The rough texture of the Dynel develops quickly. Without using peel ply that surface gets much rougher as the epoxy sets up.

The two Dynel fabric plates and the two G/flex on existing kevlar took 4 small batches of epoxy, each batch about 1/3 of a cup by volume. Total resin used for both boats, 1 1/3 cup, or about 11 oz, including some excess that dripped down onto the paper mask, and the dregs of the last pot applied to another epoxy need project. Yes, this time I actually remembered to prep a use for any leftover epoxy in the last pot. Really need to get better at remembering that waste-not part.

The resin undercoat for the Dynel was roughly fifty-fifty West 105/206 and G/flex (plus a half teaspoon of graphite powder and dab of pigment per pot). The 105/206 and G/flex mix made it easier to saturate the Dynel once laid and gloved hand compressed before the peel ply went on. The top coats on both boats was 100% G/flex with graphite and pigment.

The runs had stopped dripping in 40 minutes observation and I could pull the paper and outer layer of tape; the inner tape perimeter gives me one last look at the epoxied edges. Five undrippy minutes later I pulled that last tape surround to lay on the peel ply.

PB050046 by Mike McCrea, on Flickr

Release treated peel ply laid atop the Dynel. I wished I had helping hands to hold and align one end of the peel ply while laying it in place. Gloved hand compressed and further compressed with the hard surface roller - 5 minutes.

PB050050 by Mike McCrea, on Flickr

Next morning I pulled the release treated peel ply on the Dynel skid plates

PB070054 by Mike McCrea, on Flickr

Total elapsed time: 2 hours 40 minutes, with some of that baby sitting the epoxy and beer drinking time.

The painting/topcoating plan is to use something better than black enamel this time.

PB070055 by Mike McCrea, on Flickr

I scored a discount can of black EZPoxy; black seems an unloved epoxy paint color. I can’t imagine using black on anything other than graphite powder and black pigment skid plates, but for topcoating already near Vantablack skid plates, why not.

The Freedom Solo needs more generously sized Dynel skid plates laid atop the shortie kev felt and OT resin leftovers, and we have a couple of glass & nylon decked canoes that could use some stem scrape protection.

I wonder how many boats I can line up side by side in the shop for a day of masking and black EZPoxy skid plate painting.

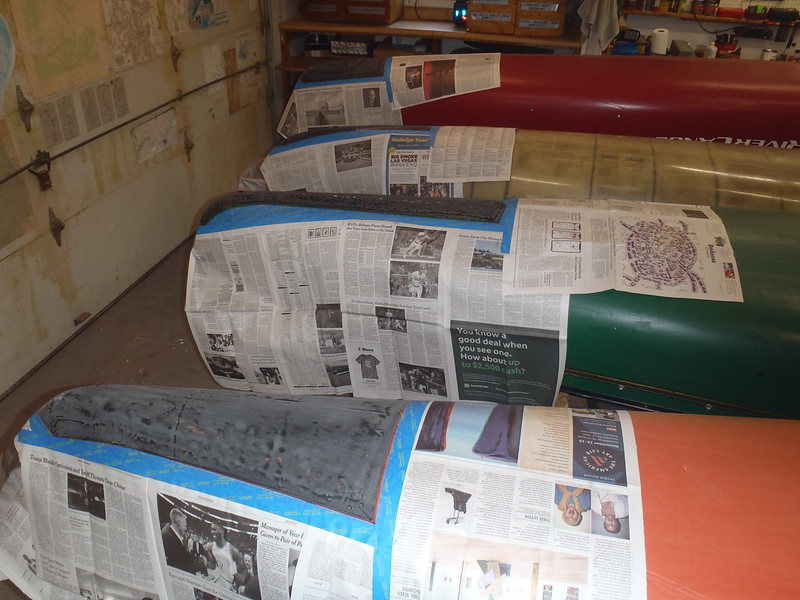
We shall see; it would be easiest to tape and paper and EZPoxy paint a bunch of boats at once. I think I can go four-wide in the shop for skid plate taping and painting.

I could probably skip the painting; I suspect (don’t know) that the graphite powder and pigment provide some UV protection. But there is some red hull peeking through the blackened epoxy on the Odyssey where there is no cloth to soak up color, and even with my heavy epoxy hand and peel ply compression a bit of fabric weave is, as always, visible right at the steepest curve of the tip where the epoxy tends to run away.

A coat of epoxy paint should hide both visual flaws.
 
I've still got your post from 2014 bookmarked on my computer.

I have gotten much better in the last 5 years, or at least more efficient and practiced at properly completing each step from prep work to masking to mixing epoxy. I still forget some tricks; ie Sharpie-ing a center line down the middle of the Dynel to help my aim be true, cutting a couple inch slice up the narrow stem end of the Dynel for a puckerless foldover, adding the fly away graphite powder a little at a time while mixing the epoxy pot.

Laying out a spare brush and pot, just in case. Laying out the can of acetone and a rag, which is needed more often than the spare pot and brush.

I remembered all those tricks last time(s) around, and just finished laying down the fabric and epoxy/graphite powder/black pigment mix on four more skid plates. I’m babysitting the fabrics until the epoxy stops dripping and I can pull the tape and paper and lay down the peel ply.

One set are 20” long Dynel vees, well lapped over existing worn kevlar felt. I really like the way a single layer of Dynel comes out when epoxied atop an ugly worn kev felt skid plate. The kevlar felt, for whatever little it is worth, does provide a substrate to help withstand sharp impacts. I’d rather the kev felt wasn’t there at all, but chiseling or grinding it off is too much work, with possibly fugly consequences.

The other set are 24” long x 1 ½” wide heavyweight bias weave Twaron tape, on a glass and nylon decked boat with sharply vee’ed stems. That hull doesn’t see many rocks, and it was much easier to use the thick 10oz bias tape than to mess with cutting a long skinny strip of Dynel.

The thick Twaron tape I used on that hull needs occasional tongue depressor attention to push the ends and edges back down flush as the resin begins to set up. If that 14ml thick tape wasn’t bias weave it would be impossible to keep such a narrow strip flush on that sharp vee and curve.

Plenty of time to go slowly, have a beer and get over wordy with posts.
 
Last edited:
I have gotten much better in the last 5 years

Er, except I still have trouble aligning and laying peel ply atop wet epoxy, more so with bigger pieces of peel ply when working solo. Peel ply, especially the blue stuff from Jamestown Distributors, is so lightweight sheer that it is hard to drape flat with only two hands.

The long skinny pieces of peel ply over the Twaron tape were easy two handed solo, but I got off kilter laying the peel ply on the epoxied Dynel at one stem and had to readjust it. That adjustment left some wrinkles and crinkles in the peel ply, but continued used of the hard side roller pushed those almost invisibly flat into the Dynel.

And the cut ends of the thick Twaron tape at the tips of the stem curve, despite babysitting and peel ply compression, are more raised/less compressed than I would like. The selvage edge however is invisibly flush. Bless the hard roller.

With those less than satisfactory results I might as well sand down the any small fault on each skid plate, mix another pot of epoxy and graphite powder and lightly top coat all four.

The sanding difference between the Dynel and Twaron was instantly noticeable. It took 60 grit in an RO sander to take down even the teeny wrinkles on the Dynel. I barely touched the Twaron with the 60 grit before it cut into the fabric and 220 proved plenty of cautious RO action.

The thick bias weave Twaron tape has held up well on another sharply vee’ed decked canoe that, like the Optima, sees mostly sandy bottoms. I suspect that limestone, worm rock or oyster bars would slice the heck out of it compared to Dynel. If/when any of the Twaron skid plates start to wear through - despite the fact that my scissor work has never improved - I’ll bite the bullet and cut long strips of Dynel as a top cover. If Dynel will sit flush atop kevlar felt it’ll work fine over that thick bias tape.

Still haven’t found a source for Dynel tape. Dynel tape would make skid plate installation really easy, and I know the roller knocks down the selvage edge to imperceptibility.

Twaron is an aramid fabric, much the same as Kevlar.

https://en.wikipedia.org/wiki/Twaron
 
How are you getting along with your blue 3M tape? I grew to hate pretty much all the masking tapes available in local stores (including 3M) until a painter friend told me about Diamond Vogel masking tape. She said it was all they used and that another painter friend had turned her onto it. He'd gone so far as to state that if Diamond Vogel quit making their masking tape he'd quit painting. Maybe a bit strong but I gave it a try and found out they were right. It doesn't tear apart when trying to unroll it and it sticks great and releases without tearing too. There is a store that carries it about 45 minutes away and I load up whenever I start getting low.

Alan
 
How are you getting along with your blue 3M tape? I grew to hate pretty much all the masking tapes available in local stores (including 3M) until a painter friend told me about Diamond Vogel masking tape. She said it was all they used and that another painter friend had turned her onto it. He'd gone so far as to state that if Diamond Vogel quit making their masking tape he'd quit painting. Maybe a bit strong but I gave it a try and found out they were right. It doesn't tear apart when trying to unroll it and it sticks great and releases without tearing too. There is a store that carries it about 45 minutes away and I load up whenever I start getting low.

The 3M Scotch Blue Edge-Lock tape works well enough, and it is available at either hardware store I frequent . There are less expensive blue (colored) tapes that seep and weep epoxy or paint along the edges.

Because I double tape almost everything I use a lot of tape, and sometimes use the less expensive stuff for the 2[SUP]nd[/SUP] layer on the paper mask.

I’ll keep an eye out for Diamond Vogel, though I don’t think I have seen it.
 
I can go four boats wide in the shop for topcoating with black EZpoxy paint, so two more boats came in for prep work and new/refurbished skid plates.

The RX Freedom Solo as #3. Every canoe can’t be my favorite canoe, but that one is always my choice as a solo for moving water day trips. The existing skid plates are same vintage siblings to those on the Odyssey, done the same day with leftover kevlar felt and urethane resin and a dab of red pigment to color saturate the felt. And once cured a topcoat of red enamel paint.

Both skid plates on the Freedom Solo are now well worn.

PB100001 by Mike McCrea, on Flickr

PB100002 by Mike McCrea, on Flickr

Those were originally done with gloopy, starting to firm up in the pot leftover urethane resin, which left some raised bumps and ridges. Duct taped perimeter to protect the vinyl outside the glop and RO sanded flush.

PB100005 by Mike McCrea, on Flickr

I needed to sand off the remaining paint coat anyway, for better epoxy adhesion.

PB100009 by Mike McCrea, on Flickr

The Freedom Solo gets a layer of Dynel, G/flex and graphite powder/black pigment, lapped over the now flush kevlar felt by an inch or two on both stems.

As boat #4, the 1977 Hyperform Optima. I don’t need that one to be a personal “favorite”, it was converted from an early glass & nylon “European style” tandem canoe into a solo decked sailing tripper, sized and outfitted perfectly fit my younger son’s build and preferences. The Optima sails wonderfully in that guise no matter who is on the rudder pedals.

Oddly most of the wear on the Optima is on the bow stem. That boat is used in open coastal areas, and often paddled (or sailed) up onto sandbar shallows or beaches. The Optima has sharply vee’ed stems, and most of the wear is centered in a 1” wide area.

PB100008 by Mike McCrea, on Flickr

I suck at cutting long thin strips of material, even fray resistant Dynel. On another gently used decked boat we used 1 ½” bias weave Twaron tape from Sweet Composites (10oz/yd, 14ml thick). The bias weave tape accommodates the sharp vee plus stem curve with less puckering, and it comes off the roll with a little natural curve.

The Optima bottom was rebuilt sanded smooth, coat of epoxy rolled and tipped, wet sanded, couple coats of spar urethane rolled and tipped for UV protection. I want epoxy to epoxy adhesion for the skid plates, so some topcoat removal was in order on that one as well. Lay the pre-cut Twaron tape in place for size and shape, tape out a perimeter box and scuff it up with 150 grit to remove any remaining urethane.

PB110011 by Mike McCrea, on Flickr

Easy to tell where the tape and paper mask goes for the epoxy coat on the scuffed stems.

PB110013 by Mike McCrea, on Flickr

Roller compressed under peel ply even the selvage edge on that thick tape will disappear, and a thin graphite and pigment black strip will look good.

Time to tape and paper a couple hulls, cut some fabric and peel ply and mix some epoxy with magic additives. If pigment or graphite powder enhance UV protection using both should be even better.

PB110018 by Mike McCrea, on Flickr

PB110020 by Mike McCrea, on Flickr

That all went well, until I misaligned the peel ply on one wet-epoxy skid plate and left wrinkles in the Dynel below. Once the peel ply came off those crinkles were much less perceptibly with repeated used of the hard roller on the peel ply as the epoxy set up, but still more evident than a coat of paint would hide.

And, with the peel ply off, despite a lot of babysitting and roller action, the cut end of the thick Twaron tape stood a little taller at the stem curve end that I would like. There especially I don’t want anything standing proud, gurgling or catching rocks.

In for a penny, in for a thin topcoat of epoxy, graphite powder and pigment mix. Which first meant another protective duct tape perimeter and more RO sanding the Dynel crinkles and Twaron lips. Might as sand them overall.

It took 60 grit with the RO to remove even the teeny crinkles in the Dynel cloth; Dynel is some tough, abrasion resistant stuff. And, oopsie, the 60 grit cut into the Twaron tape in short order. RO with 220 worked fine with some caution.

PB110023 by Mike McCrea, on Flickr

PB110025 by Mike McCrea, on Flickr

Retaped and masked and topcoated, that’ll do. The edge lines and peek-a-boos on the Optima will (hopefully) disappear under a coat of black paint.

PB120026 by Mike McCrea, on Flickr

PB120028 by Mike McCrea, on Flickr

The hardest part will be waiting a week to tape and all paper eight skid plates and paint them with black EZ-Poxy.
 
I can go four-canoes wide in the shop, and still have a passable walkway along each side.

PB150003 by Mike McCrea, on Flickr

The black EZ-Poxy paint over the Dynel & Graphite skid plates is a bit of an experiment. I know EZ-Poxy is (at least) a bit tougher than hardware store enamel, but maybe not worth the cost delta, even at a discounted price.

But, off we go. I waited a week+, cleaned and sanded the skid plate epoxy enough to take all of the gloss off. Some cautious RO work and the rest by hand. That scuffing was easy enough and sanded cleanly, assuring me that the epoxy had cured enough to paint.

PB160004 by Mike McCrea, on Flickr

Even so that was a lot of sanding. Full PPE, with respirator and goggles; the fine sanded graphite powder gets everywhere. I leaf-blowred the black graphite powder (and other accumulated dust) out of the shop. And then took a shower and let the residual dust settle for a day.

PB170005 by Mike McCrea, on Flickr

Then, once more into the breach, double taped and papered all eight skid plates. I am getting really freaking efficient at taping and papering; luckily most of the skid plates have straight-ish lines.

PB170007 by Mike McCrea, on Flickr

PB170009 by Mike McCrea, on Flickr

The (old?) can of EZ-Pozy needed a lot of stirring to free up bottom sediment, and demanded a foam brush tip out. Eight skid plates used up very little paint from the quart of EZ-poxy.

Paper mask and outer tape layer pulled.

PB170010 by Mike McCrea, on Flickr

Inner tape pulled

PB180013 by Mike McCrea, on Flickr

PB180014 by Mike McCrea, on Flickr

Individually, Dynel over kevlar felt skid plate kit on the Penobscot.

PB180015 by Mike McCrea, on Flickr

Dynel over kevlar felt and urethane scraps on the Mohawk Odyssey

PB180017 by Mike McCrea, on Flickr

Dynel over kev felt on the MRC Freedom Solo

PB180020 by Mike McCrea, on Flickr

Twaron tape on the Optima

PB180018 by Mike McCrea, on Flickr

That’ll do for now. Gawd I want my expanse of shop floor back, but that paint needs to cure for a few days.
 
Dynel sleeve as skid plate material

There appears to be no such thing as Dynel tape, and after speaking with Dave Hearn I ordered some lightweight Dynel sleeve from Sweet Composites.

It measures 1 ½” wide flat*, is a much finer/tighter weave than the Dynel fabric and doesn’t seem quite as thick/heavy as the 5oz plain weave Dynel, perhaps because it is more satin-like and not as stiff. When cut to length the ends are less frayed and cleaner than with glass tape or Twaron tape.

And, obviously, there are zero cut-edge frays on the long sides.


Bottom Dynel fabric, middle Dynel sleeve, top bias Twaron tape.

PB210036 by Mike McCrea, on Flickr

*Very flat. It is straight woven along the length, not bias, and the folded edges lay completely flat right off the roll. Simply laid on the stems to tape out a perimeter for sanding off the UV topcoat of spar urethane is drapes over a vee even without epoxy and peel ply.

Long linear sleeve skids laid on the Vagabond stems for perimeter taping.

PB210037 by Mike McCrea, on Flickr

Sanded inside the tape box to remove a UV coat of spar urethane. As a test, to see how well the Dynel sleeve conforms to a sharp vee and stem curve, I laid the bow skid plate further up than really necessary for demonstrated wear, which necessitated some curve on the tape and mask.

PB210040 by Mike McCrea, on Flickr

Cleaned, re-taped and papered, and on to the epoxy mix(es).

PB220046 by Mike McCrea, on Flickr

Not knowing the (new word) saturatability of the Dynel sleeve I went two-thirds West 105/206 and one third G/flex (with graphite powder/black pigment) on the base coat, laid the lengths of sleeve atop that epoxy layer and then topcoated them with the reverse mix, two-thirds G/flex, one third 105/206 with graphite and pigment.

Had a beer (finally!), watched and marked the drips, and when they stopped running down the paper pulled the tapes.

PB220048 by Mike McCrea, on Flickr

Dynel wants to set up rough and raspy even with still wet epoxy. The more “satin weave” sleeve less so than the 5oz fabric, but still rough.

Peel ply laid on top and lightly (gloved) hand compressed at first to see how pliable the epoxy remained without squishing out the edges too much.

PB220049 by Mike McCrea, on Flickr

Then hard rollered as the epoxy firmed up more under the peel ply.

Next morning’s peel ply pull revealed that the Dynel sleeve is fairly flush with the hull along the edges and mid-section ends, maybe a touch more noticeable than the near-invisible Dynel fabric. The cut end at the steep vee curve stood a bit abrupt for my liking. I probably should have kept at that test end longer with the hard roller.

I hull-protective duct taped the sleeve end and hit it with some 60 grit in the RO to smooth it down.

PB220050 by Mike McCrea, on Flickr

The finer weave of the Dynel sleeve left no visible fabric pattern, as sometimes happens with the compressed 5oz Dynel cloth. There are some see-through edge holidays where the tape was laid ¼” away from the sleeve. Those would be hidden under a topcoat of paint, but while everything was out and the epoxy chemically fresh I retaped and papered it up again. Dayum I am getting fast at that taping part, even with some curvy bits.

PB220052 by Mike McCrea, on Flickr

Lightly top coated on yesterday’s epoxy with more epoxy/graphite powder/pigment mix.

PB220054 by Mike McCrea, on Flickr

PB220056 by Mike McCrea, on Flickr

Epoxy mix used on two 30” long X 1 ½” wide Dynel sleeve skid plates, including second coat, about 2/3 of a cup in total. I went very heavy/drippy with the initial epoxy coats to make sure it fully saturated under, inside and atop the sleeve. Deducting what dripped down the paper, came off with the tape (and the leftovers that got brushed on a DIY wooden trashcan lid), maybe 2.5oz of epoxy weight on each Dynlel sleeve skid plate.

Lightly second-coated with epoxy the Dynel sleeve is almost imperceptibly raised, and much of that wee bump will vanish after a light sanding and paint topcoat.

I’ll set the Vagaond aside in the shop tomorrow and get the Monarch ready to skid plate with Dynel sleeve. Then both can wait a week for some light sanding and EZ-Poxy topcoat.

Dynel sleeve is now my go-to if I need long 1 ½” wide skid plates on a vee stem or along vee bottoms, and my long and heretofore fruitless search for Dynel “tape” has finally been resolved.
 
Good pics Mike. Do you plan to put skid plates on the stern of the monarch? That 90 degree bend would be the ultimate test for the tapes ability to form to a curve.

Mark
 
Good pics Mike. Do you plan to put skid plates on the stern of the monarch? That 90 degree bend would be the ultimate test for the tapes ability to form to a curve.

I do plan to Dynel sleeve skid plate the stems of the Monarch. Need to repair some busted out chunks of gel coat first so I have a smoother surface to work with. That boat has seen some awful wave swept rocky landings and hurried gear disgorgement.

The stern of the Monarch has a sheer vertical rise __I. Going all the way to the end and doing just the vee bottom of the stern should be easy enough. I don’t think I need to put Dynel sleeve on the vertical part, but if I do I’ll cut a second piece of sleeve and do it separately; trying to wrap a single piece of fabric around that right angle turn would be a puckered nightmare.

The Monarch bow has continuous curve and may be trickier; I’ll have to see how far up that curve shows wear and tear and extend a bit past that.

Those will be skid plates #11 and 12 in the past month and I learn something new every time. More on that later.
 
Ten Skid Plate Lessons Learned

Every skid plate I install teaches me something new. I learned, or re-learned, or remembered too late a bunch of tricks and tip doing those last 10 skid plates.

(This could get long; I have several paddling friends interested in laying down Dynel fabric or Dynel sleeve rub strips, as well as full length Dynel sleeve keel strips on vee bottoms. And wish they were close enough to come for a shop visit; the two of them together in the shop are a joy to behold, and the best of shop times)

http://www.canoetripping.net/forums...s-sailing-tripper-rebuild-with-dougd-and-joel

The most valuable lesson this time is the realization that I can install larger Dynel & graphite powder skid plates, lapped over ugly worn kevlar skids, while paying less than a 3oz per stem weight penalty. They look better, they are more abrasion resistant, and even with the worn smooth-ish kevlar felt layer underneath they turn out far more hull-flush along the edges, which is agreeable for many reasons.

That layer of kevlar felt underneath can only help with impact resistance.

Lesson #2. The Twaron tape (essentially Kevlar) is nowhere near as abrasion resistant as the Dynel. Now that I have tried the Dynel sleeve (more about that later) I wish I had not used that Twaron material. If the Twaron scrapes through I’ll cover those with Dynel as well. Maybe by then I’ll have found 3” wide Dynel sleeve; my Dynel material search continues.

Lesson #3, drawing a centerline down the fabric helps with aligning straight down the keel line. The tape and sleeve are narrow enough not to need a center line, but the wider Dynel fabric skid plates do. Especially if the tape box perimeter is close to the fabric; a wee bit off kilter and the fabric is epoxied over the tape. I should do the same to help with alignment of wider pieces of peel ply as well.

And when laying down a really long piece of sleeve on a keel line I would (try to remember to) draw the exact centerline down the hull before laying out the tape box; it’s easy to visualize that keel line center from an end-on view, not as easy when working along the side laying down tape. I’d like a full length piece absolutely straight, not wobbly.

Lesson #4, which I kinda knew. There was a lot of taping, and re-taping, and re-re-taping involved in my drip-protective methodology with those ten skid plates. The 10 skid plates used 1 ½ rolls of decent quality painter’s tape, and some leftover junky tape for sanding protection or as the second tape layer over the edge of the newspaper mask edge.

Lesson # 4a. Simplifying that oft-repeated taping and papering effort (I taped and papered some boats up to five times), it was handy to have straight-ish edges along the perimeter of the fabric and epoxy. Faster and easier to tape, and easier to lay down the newspaper mask without cutting out curves. Which came in handy when I taped and masked the first eight skid plates for the paint coat. And will come in handy again for future UV paint coats refreshed over scrapes and scratches.

I could have rounded out the wide end corners when I re-taped them for the paint topcoat to make them more aesthetically pleasing teardropped. Screw the aesthetics of teardrop curves; that would just make them harder to re-tape/re-paint again in a few years +/-, depending on how well the EZ-Poxy paint holds up.

Lesson #5. I went heavy on the G/flex in the top epoxy mix, and doing ten skid plates took a lot of G/flex, at least for someone who tries to my precious use it sparingly.

I started with the last of some G/flex bottles, progressed to two virgin 16oz each bottles of parts A and B, and used almost half of those. Call it 16oz of G/flex, along with a dozen (total) pumps of West 105/206 in the G/flex for the undercoat, sprinkles of graphite powder, dabs of pigment and fabric materials. There is maybe $100 - $120 max in those ten skid plates, including epoxy, graphite powder, fabric, tape, brushes and sandpaper. Maybe $123.50 if I include the cost of the NYT or WaPo newspaper.

Which sounds pricey until I do the math. At $12.35 per skid plate that is a protective bargain. A fugly (less effective) kevlar felt skid plate kit runs $100 at cheapest, and $300 for Old Town’s with urethane resin.

Yeah, that’s at least $1000 worth of skid plates in “kit” form ($300 for Old Towns), all of which would have been heavy, ugly kevlar felt. BWAHAHAHA!

Lesson #6, it was faster and more efficient in many ways to install skid plates on multiple boats. I’m not sure I’d suggest doing four boats at a time; the prep work, sanding and taping just to topcoat the first eight skid plates with a paint topcoat was a chore, and painting four boats occluded the entire shop floor for another week waiting to make certain the topcoat fully cured. But, two at a time, if you has them that need doing, is worth doubling up.

Lesson #7, it took a full week for the (G/flex/105-206/graphite powder/pigment epoxy mix) Dynel to set up enough to sand in preparation for a topcoat of black EZ-Poxy. And, once sanded, I waited another day just to be sure. FWIW that was in a warm, low-ish humidity shop, never below 55-60f at night. Glad I wasn’t desperately heating the shop for two weeks in the dead of winter.

Lesson #8. A single coat of black EZ-Poxy on graphite black skid plates hid all of the visible epoxy edge holidays completely, no need to second coat. Using Rustoleum enamel sometimes needed a second coat of paint to hide the tape edges. Probably not worth the EZ-Poxy quart cost. . . . .wonder if EZ-Poxy comes in pint cans?

After painting eight skid plates I still have almost a full quart of black EZ-poxy left, enough to do, oh, maybe another 100 skid plates. I don’t have a hundred skid plates left to do, just two. And I really don’t want a black boat. . . . .well, maybe someday a lightweight carbon fiber.

What I need is not more black EZ-poxy; I need a quart of white. We have two white bottomed hulls that desperately need repainting. I know that a quart of EZ-Poxy will three-coat a 16 foot canoe; it oughta be enough to three-coat just the white gel coat bottoms of three decked boats. If not maybe I’ll Zebra one of the bottoms in black and white stripes.

Lesson #9, a lesson I seem unable to remember every single time I mix epoxy or paint. Have something already prepped and ready to coat with wet epoxy brushes and pot dregs when done. Every. Single. Time. Sawhorse feet, a wood trash can lid, the leaky bird bath bowl, anything to use any dregs from the last epoxy pot and wipe the brush down on. That may not matter as much to wood strip builders who use gallons of epoxy, it does to us frugal Scot’s waste-not dubbers.

Lesson #10 was, like Lesson #1, invaluable. Dynel sleeve is by far the easiest the way to go for 1 ½” wide skid plates. Or, even more so, for a full vee keel line length of Dynel. That lightweight sleeve works on a sharp vee, and works on a curve. One scissor snip to length from the roll and it is cut and ready to go on with clean, straight edges and zero strays or frays.

That Dynel sleeve seems to be the equivalent of 5oz Dynel fabric in epoxied thickness, and could made even more impact resistant with a 1” strip of glass tape epoxied underneath the Dynel. I may need to order another roll of 1” glass tape from Sweets.

Further lessons will have to wait. I washed and inspected the Monarch and, while the bottom has 10,000 scratches in the gel coat (it had not a scratch on it when I bought it), the stems are still in very good shape.

That is a 1992 Monarch, towards the end of model production (1982 – 1995). As demonstrated on the Monarch, and some other composite Mad River canoes of the day, the Vermont guys did an amazingly sturdy gel coat job; however they did it they did it right.

There will be more lessons; thanks to Stripperguy’s prodding I will be doing some lay up tests and inspections with the Dynel sleeve. Hopefully before said Dynel sleeve-smitten friends get started.
 
Hey Mike, I learned a lot of the same lessons while putting Dynel on the stems of a Kruger Sea Wind. It turned out good and seems pretty dang tough. I'm definitely going to do the Dynel sleeve next time though! Now you really got me interested in a quart of the white EZPoxy. You think 3 coats of that would do the trick on a very well used and UV yellowed old Sea Wind? Re-gelcoating a boat is a tough proposition and not something I want to tackle. But people use epoxy to recoat skin boats all the time. I never thought of using a pigmented epoxy!
 
Hey Mike, I learned a lot of the same lessons while putting Dynel on the stems of a Kruger Sea Wind. It turned out good and seems pretty dang tough. I'm definitely going to do the Dynel sleeve next time though! Now you really got me interested in a quart of the white EZPoxy. You think 3 coats of that would do the trick on a very well used and UV yellowed old Sea Wind? Re-gelcoating a boat is a tough proposition and not something I want to tackle. But people use epoxy to recoat skin boats all the time. I never thought of using a pigmented epoxy!

Joe, I am now a believer in EZ-Poxy. A two-part epoxy paint would probably be better, but a quart of EX-Poxy will triple coat a hull and is one-can easy to apply, it rolls on and tips out very smooth.

http://www.canoetripping.net/forums...ssions/diy/80884-pettit-ez-poxy-topside-paint

A recommendation from Curtis is good enough testimonial for me. I went all in cleaning, prepping and wet sanding with the UL kevlar Malecite and am very happy with the results. I did wet sand and recoat that hull with a coat of epoxy resin first, let that cure and wet sanded again before painting. I think I wet sanded & washed it at least 4 times between different epoxy and paint coats.

http://www.canoetripping.net/forums...sions/diy/85159-dirt-magnet-canoe-question-ii

Come spring I will be purchasing another quart of white EZ-Poxy to recoat the white bottoms of the ’71 Sockeye and ’77 Klepper Kamerade decked canoes.

Which white is still in question, there are four choices in “white” before it becomes more Hatteras cream.
 
Back
Top