Anyone have experience with this paint? I read in a review that this is what Dave Curtis recommends for DIY painting fiberglass hulls. I would have gone with Interlux Briteside, as it seems to be a favorite on this site, but it doesnt come in the color i need. I want to stick with the original Burgundy color of the boat, that way scratches wont be so noticeable.
-
Happy National Sunglasses Day! ☀️🕶️😎
You are using an out of date browser. It may not display this or other websites correctly.
You should upgrade or use an alternative browser.
You should upgrade or use an alternative browser.
Pettit EZ-Poxy Topside paint
- Thread starter jish1969
- Start date
I use it quite often. It is a good paint. Brushes well and flows out eliminating brush marks. Too much paint and it does run easier than others so as I do with any paint I haven't tried do a test panel a couple of days ahead of time to get a feel for it. Use a good brush, but if you don't have a good brush a foam brush is better than a bad bristle brush.
Jim
Jim
Thank you Boatman, now my next question, would I be safe with just one quart of it for two coats of a 15.4 ft boat or should I stop thinking cheap and get the gallon? I'll be mixing it with thinner like it says.
Sorry for the slow reply. I was driving for 12 hours yesterday, and not for fun.
One quart will paint a canoe at least three times, maybe four.
Jim
One quart will paint a canoe at least three times, maybe four.
Jim
Thank you Boatman, saved me some dough there...
G
Guest
Guest
I use it quite often. It is a good paint. Brushes well and flows out eliminating brush marks. Too much paint and it does run easier than others so as I do with any paint I haven't tried do a test panel a couple of days ahead of time to get a feel for it. Use a good brush, but if you don't have a good brush a foam brush is better than a bad bristle brush.
Jim, any other suggestions or recommendations for using Pettit EZPoxy beyond the instructions on the can (in a 0.25 font that required cheaters, a magnifying glass and squinting to read)?
The instruction (and even the lid) mention “rolling on with no larger than 3/16” nap roller and tipping out”. That would very much be my preference; my brush work, even with a quality brush, sucks as an initial coat. Especially when applying a thin coat, but I do have a gentle and even hand with both foam roller and foam tip out brush.
I have done similar full-hull topcoats using paint, varnish, urethane and epoxy, doing half the hull from (just past) keel line to gunwale one side at a time.
One coat, let cure, sand (or wet sand & wash?) second coat?
I use it without thinning. If it is a large enough area I use a foam roller, usually one of the West System yellow rollers mostly because I always have them at the shop for epoxy work. I can not report on other types of rollers. Rolling is tipping is fine, go for it. Keep us posted.
Jim
Jim
G
Guest
Guest
I use it without thinning. If it is a large enough area I use a foam roller, usually one of the West System yellow rollers mostly because I always have them at the shop for epoxy work. I can not report on other types of rollers. Rolling is tipping is fine, go for it. Keep us posted.
The first coat of EZPoxy has been rolled on, tipped out and (a day+ later) wet sanded.
My initial EZPoxy impressions:
The EZPoxy rolled on and tipped out easily, and the first coat filled 99.99% of the remaining weave still showing after the epoxy coat.
Rolling & tipping that Off-white on the yellowish hull made it easy to see where I had started and stopped. I roll out two foot sections on one side of the hull from keel line to gunwale at a time, and then immediately tipped that out and moved on to the next two foot section. For the 2[SUP]nd[/SUP] coat I may try rolling out half the hull stem to stern, and then tipping along that full length to eliminate any start and stop tip out spots.
There are some too-thin streaky areas on the first coat, which to my eye appear kinda blueish, so a second coat is absolutely necessary.
I will almost certainly do a 3[SUP]rd[/SUP] coat, maybe a 4[SUP]th[/SUP]. I do not know how well EZPoxy keeps and I doubt it will store well in a ¾ empty quart can. I would like to have some of that off-white EZPoxy left over for future touch ups, so I acetone cleaned up a couple of little half pint cans containing the dregs of some stain. Bright and shiny inside, ready to capture the last of the EZPoxy with little head space remaining.
I did a wabi sabi job of tipping out, especially down at the taped over gunwales, but caught those untipped pebbly areas with a heavier hand at 320 wet sanding. The EZPoxy filled the 320 wet much faster than the epoxy layer, even with a light touch on the rest of the hull
Water readily beaded up on the not-yet wet sanded surface, but not on the areas that had been 320 wet sanded. That made it easy to see any spots where I had missed or gone too lightly wet sanding the first paint coat.
With that EZPoxy beading water like a marine wax job and the exposed weave filled I am hoping the Malecite is faster and has better glide; it felt pokey to me and I should have now eliminated a lot of wetted surface drag.
I’m liking the EZPoxy so far, but gawd it is white. If this if Off-White I’d go snowblind looking at White. I really wish I’d gone with Hatteras Cream, or Fighting Lady Yellow.
https://www.google.com/search?q=easy...xml4U7FlX2ZROM:
No turning back now. And the white Malecite should look dang good on the white Tacoma Tripping Truck racks.
Last edited:
G
Guest
Guest
The first coat of EZPoxy went on EZ.
Half of the first coat; it was more roll on/tip out efficient working from the keel line down to the gunwale on each side.
 PA261301 by Mike McCrea, on Flickr
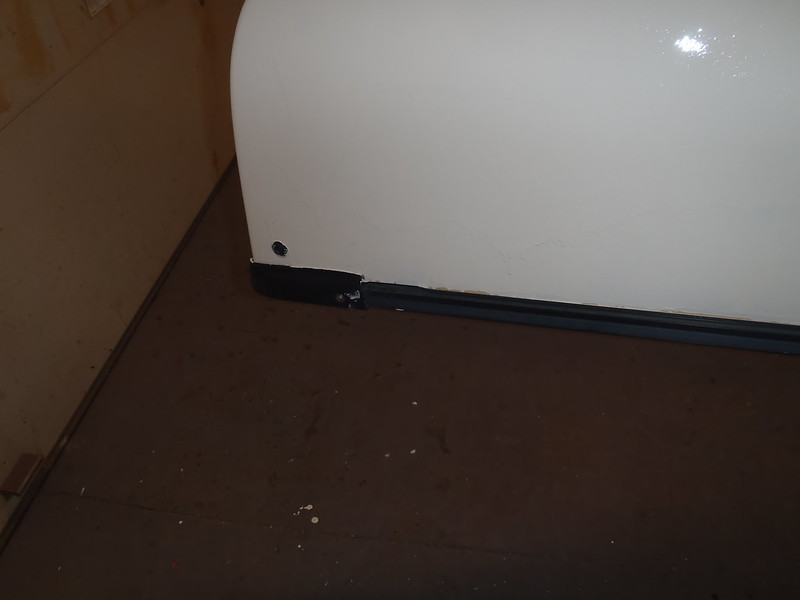
The taping wasn’t hard, but the deck plates, painter eyes and HIN were as time consuming as the gunwales.
 PA291303 by Mike McCrea, on Flickr
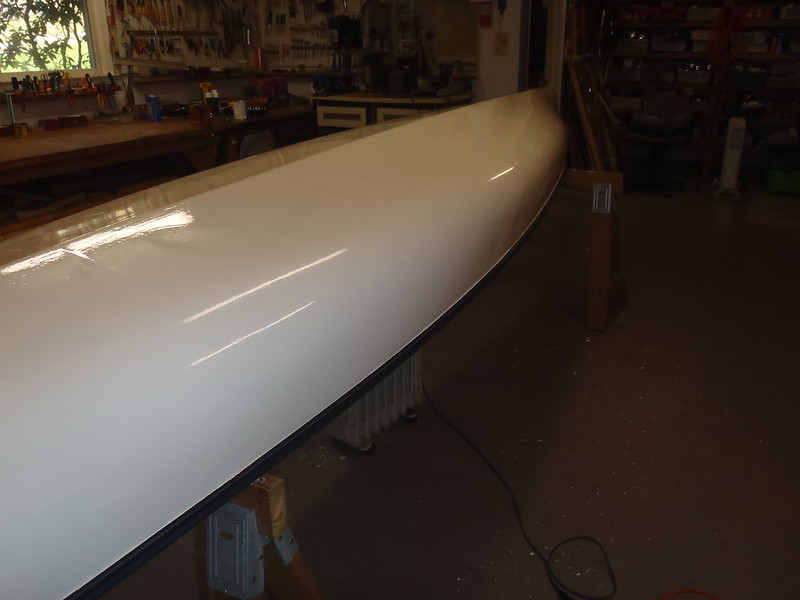
Not too shabby. I missed a little paint along the edge at the gunwale line with the first coat.
 PA291307 by Mike McCrea, on Flickr
But mostly it came out well.
 PA291308 by Mike McCrea, on Flickr
The second coat of EZPoxy has been rolled and tipped. The rolling and tipping out is the easiest part of course, like any boatwork most of the time is prep time; cleaning, wet sanding, taping the gunwales, painter holes (I epoxied the caps on firmly years ago, they weren’t coming off) and HIN plate, laying out tools and materials, making sure everything is at the ready.
What did I forget to lay out. Oh, yeah, acetone, and a rag. And spare gloves.
And other spare gloves; DougD sent me some Dollar store disposable gloves. Not only are they disposable, they are also dissolvable with acetone. I think Doug finally got me back for the box of purple Nitriles I sent him. Box carefully opened, first 8 gloves slit with a razor along the middle finger, neatly repackaged and sent off to Doug.
Doug called to mention some mysterious defect with the gloves. He got as far as “Hey, about those glov” before all I could hear was laughter. Me, cackling like a madman.
Good news/bad news. The Malecite needs a third coat of EXPoxy. The good news is that I have enough of the quart can to roll and tip the Malecite a third time, with (maybe) a half pint of paint left for future touchups.
The good news about the 3[SUP]rd[/SUP] coat is that I really didn’t want to wet sand it and tape it for a 4[SUP]th[/SUP] coat.
The bad news is that the 2[SUP]nd[/SUP] coat is noticeably sloppier than the first. Working with white paint on the yellowish epoxied hull it was easy to see any drips, sags or missed spots when tipping out.
The white-on-white second coat, not so much. I’m still not doing a great job just at the edge of taped over gunwales. Of course that is most noticeable when viewed at the 12 inch mark while staring at the underside of the outwale; the Malecite already passes the 30 foot test.
One more wet sanding, one more taping, one more coat of EZPoxy to go. That’s all I have in me before moving on to some new project and making dust in the shop.
 PA311313 by Mike McCrea, on Flickr
For anyone counting, I washed and elbow grease scrubbed (vinegar and Dawn) the Malecite five freaking times on the initial work day trying to get it clean. I acetone wiped and epoxy coated it, wet sanded the epoxy once cured, taped it again and EZPoxied painted it, wet sanded that paint coat, taped and EZPoxied it yet again.
FWIW a quart of EZPoxy should cover that canoe three times with a little left over. The Malecite is 16’ 5” long, 34.5” widest, 13” deep. A quart of EZPoxy would do a smaller hull four times. Have fun with that.
And, once again, for the umpteenth time, what did I not remember to do before starting work on the canoe?
Weight it before I started dammit.
Half of the first coat; it was more roll on/tip out efficient working from the keel line down to the gunwale on each side.
PA261301 by Mike McCrea, on FlickrThe taping wasn’t hard, but the deck plates, painter eyes and HIN were as time consuming as the gunwales.
PA291303 by Mike McCrea, on FlickrNot too shabby. I missed a little paint along the edge at the gunwale line with the first coat.
PA291307 by Mike McCrea, on FlickrBut mostly it came out well.
PA291308 by Mike McCrea, on FlickrThe second coat of EZPoxy has been rolled and tipped. The rolling and tipping out is the easiest part of course, like any boatwork most of the time is prep time; cleaning, wet sanding, taping the gunwales, painter holes (I epoxied the caps on firmly years ago, they weren’t coming off) and HIN plate, laying out tools and materials, making sure everything is at the ready.
What did I forget to lay out. Oh, yeah, acetone, and a rag. And spare gloves.
And other spare gloves; DougD sent me some Dollar store disposable gloves. Not only are they disposable, they are also dissolvable with acetone. I think Doug finally got me back for the box of purple Nitriles I sent him. Box carefully opened, first 8 gloves slit with a razor along the middle finger, neatly repackaged and sent off to Doug.
Doug called to mention some mysterious defect with the gloves. He got as far as “Hey, about those glov” before all I could hear was laughter. Me, cackling like a madman.
Good news/bad news. The Malecite needs a third coat of EXPoxy. The good news is that I have enough of the quart can to roll and tip the Malecite a third time, with (maybe) a half pint of paint left for future touchups.
The good news about the 3[SUP]rd[/SUP] coat is that I really didn’t want to wet sand it and tape it for a 4[SUP]th[/SUP] coat.
The bad news is that the 2[SUP]nd[/SUP] coat is noticeably sloppier than the first. Working with white paint on the yellowish epoxied hull it was easy to see any drips, sags or missed spots when tipping out.
The white-on-white second coat, not so much. I’m still not doing a great job just at the edge of taped over gunwales. Of course that is most noticeable when viewed at the 12 inch mark while staring at the underside of the outwale; the Malecite already passes the 30 foot test.
One more wet sanding, one more taping, one more coat of EZPoxy to go. That’s all I have in me before moving on to some new project and making dust in the shop.
PA311313 by Mike McCrea, on FlickrFor anyone counting, I washed and elbow grease scrubbed (vinegar and Dawn) the Malecite five freaking times on the initial work day trying to get it clean. I acetone wiped and epoxy coated it, wet sanded the epoxy once cured, taped it again and EZPoxied painted it, wet sanded that paint coat, taped and EZPoxied it yet again.
FWIW a quart of EZPoxy should cover that canoe three times with a little left over. The Malecite is 16’ 5” long, 34.5” widest, 13” deep. A quart of EZPoxy would do a smaller hull four times. Have fun with that.
And, once again, for the umpteenth time, what did I not remember to do before starting work on the canoe?
Weight it before I started dammit.
I like shiny things, me. Looks great!
Thanks for the update Mike. It looks pretty good from here.
Jim
Jim
I'm curious. What problem did the canoe have that made you want to paint it?
It it does look sharp in white. A quart of water weighs about 2 lbs so you paid a small penalty for dressing it up.
It it does look sharp in white. A quart of water weighs about 2 lbs so you paid a small penalty for dressing it up.
G
Guest
Guest
I'm curious. What problem did the canoe have that made you want to paint it?
Willie, it was an instantly grimy dirt magnet with exposed fabric weave. The refurbishment wandered over to the EZPoxy topic from this thread:
http://www.canoetripping.net/forums...sions/diy/85159-dirt-magnet-canoe-question-ii
I like shiny things, me. Looks great!
Me too, but dang is it white. I’m afraid I’ll be molested by an amorous manatee if I take it to Florida.
It needs some flourishes; a Duckhead sticker, some Hi Intensity reflective tape and the shop Gogetch hand painted on the bow.
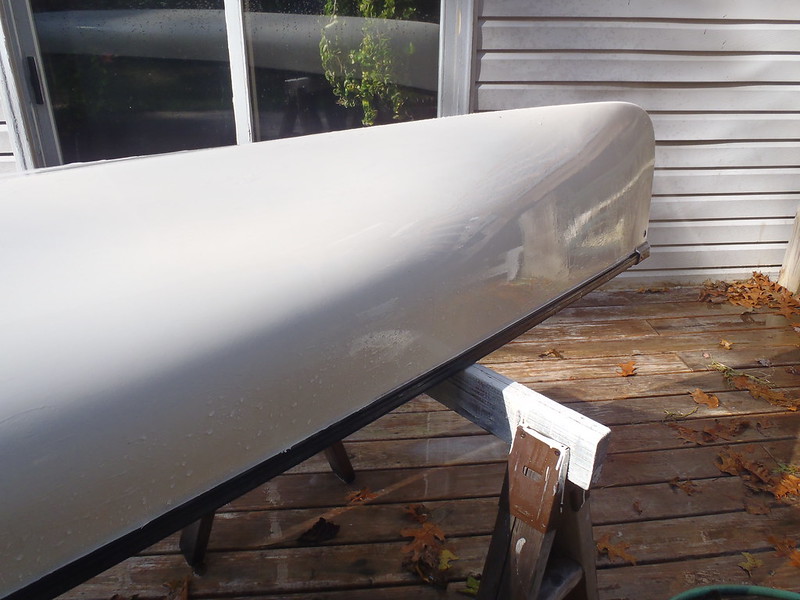
One more curious note about the painting. The third coat of EZPoxy looked great, past tense. Until I turned the canoe over right side up this morning. The hull had been upside down on sawhorses for all of the painting and wet sanding, and I was mighty proud of the apparent smoothness of those wet sanding sessions and 3[SUP]rd[/SUP] coat of paint.
With the hull right side up under the shop fluorescents a lot of heretofore invisible drips and sags are immediately apparent. The Malecite still passes the 30 foot test. Hell, it passes the 10 foot test. I’ll just have to live with it.
Mike can you explain your wet sanding process for me please? I just put the first coat of EZpoxy on my Northern Light yesterday, one i am a total rookie at wet sanding. I bought two 220/320 grit sponges, just wondering if you soaked them in a solution.
My first coat went on pretty well considering it was my first time. Sanded the hull after the last coat of filler primer, acetone wash, taped, then rolled and tipped. It's lighter where I started, before I got a good feel for it but has a nice shine to it overall.
I started yesterday at about 4pm, and brought the dehumidifier into the garage for the overnight cure. It's ever so slightly tacky, so I'm going to give it another day before I wet sand.
I'm most nervous about the wet sanding, as I have never wet sanded, do you soak the sanding sponges in a solution or just water? I bought a couple 220/320 grit sponges, any help is much appreciated
Attachments


G
Guest
Guest
I just a bucket of water (to rinse the sandpaper) and a hose to rinse the hull (so I can see any holidays). And 220 or finer sandpaper, cut into long strips and wrapped around a dish sponge, which helps keep things wet without retreating to the bucket every 10 seconds.
Sand the hull, hose it off and go back for any still shiny areas I have missed.
A quart of paint should be good for three coats. If you have a small pint sized can you can clean out (I use empty stain cans) decant the remaining EXPoxy into that and label the top for future touchup work.
Sand the hull, hose it off and go back for any still shiny areas I have missed.
A quart of paint should be good for three coats. If you have a small pint sized can you can clean out (I use empty stain cans) decant the remaining EXPoxy into that and label the top for future touchup work.
Thank you Mike McCreary for the rundown! Here I sit after three wet sanding and 3 washings.
The 330 grit side of the sanding sponge does a good job of catching the runs I don't see. The Important think to remember was to let the sponge do the sanding and keep only enough pressure to hold it to the canoe. I kept telling myself that the final product was dependent on the quality I put I to it so after 3 sanding I am letting it sit for a few hours, then an acetone wash, then second coat tonight.
I must admit that being my first time doing this kind of painting, it was mildly depressing watching that first shiny coat go dull. Catching all the runs made up for it though and the weave absorbed a lot of paint, so I think the second coat will look better than the first.
Attachments


G
Guest
Guest
I must admit that being my first time doing this kind of painting, it was mildly depressing watching that first shiny coat go dull. Catching all the runs made up for it though and the weave absorbed a lot of paint, so I think the second coat will look better than the first.
The second coat often looks better, after you have developed a sense of how heavily to load the roller, and have a better feel for tipping out.
The last coat is the trickiest; you won’t be wet sanding out runs or sags, so what you have is what you get.
BTW, like using any sandpaper it is better to move on to a new piece instead of trying to keep using something worn out and unscuffy.
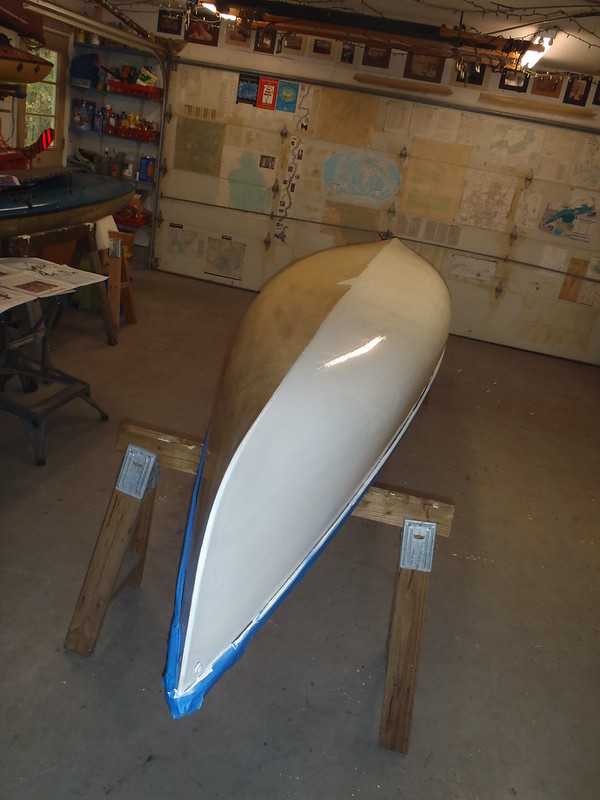
Second coat went on decently enough, I covered the missed spots by the gunwales, but got a little carried away with the tipping and will definitely have to wet sand and apply a third coat. Somehow it's a little thicker at the bow too, I'll have to remember that on the final coat. I bought a good brush but two bristles fell out and eneded up in the paint job so I may buy another one for the final coat just to be sure.
All in all I am confident this will turn out to be a respectable job when finished later this week. I have two solos and wanted to sell one but I was unsure last year how this was going to turn out. I think the Curtis Blue Gill will be the odd man out now, as I appreciate the qualities of the Northern Light more. It may not look as nice but it fits what I want to do with it until I am ready to spend real money on an untralight solo, which to be honest is years away
Crappy I door pic but 2nd coat looks decent enough before wet sanding.
Attachments

Don't obsess too much. It is going to get scratched up again.
Similar threads
G
- Replies
- 7
- Views
- 11K
G
G
- Replies
- 3
- Views
- 3K
G