• Happy National Telephone Day! 🔔☎️📱📶

Stem-less building questions

Joined
Jan 22, 2012
Messages
405
Reaction score
31
Location
Wyoming
Greetings,

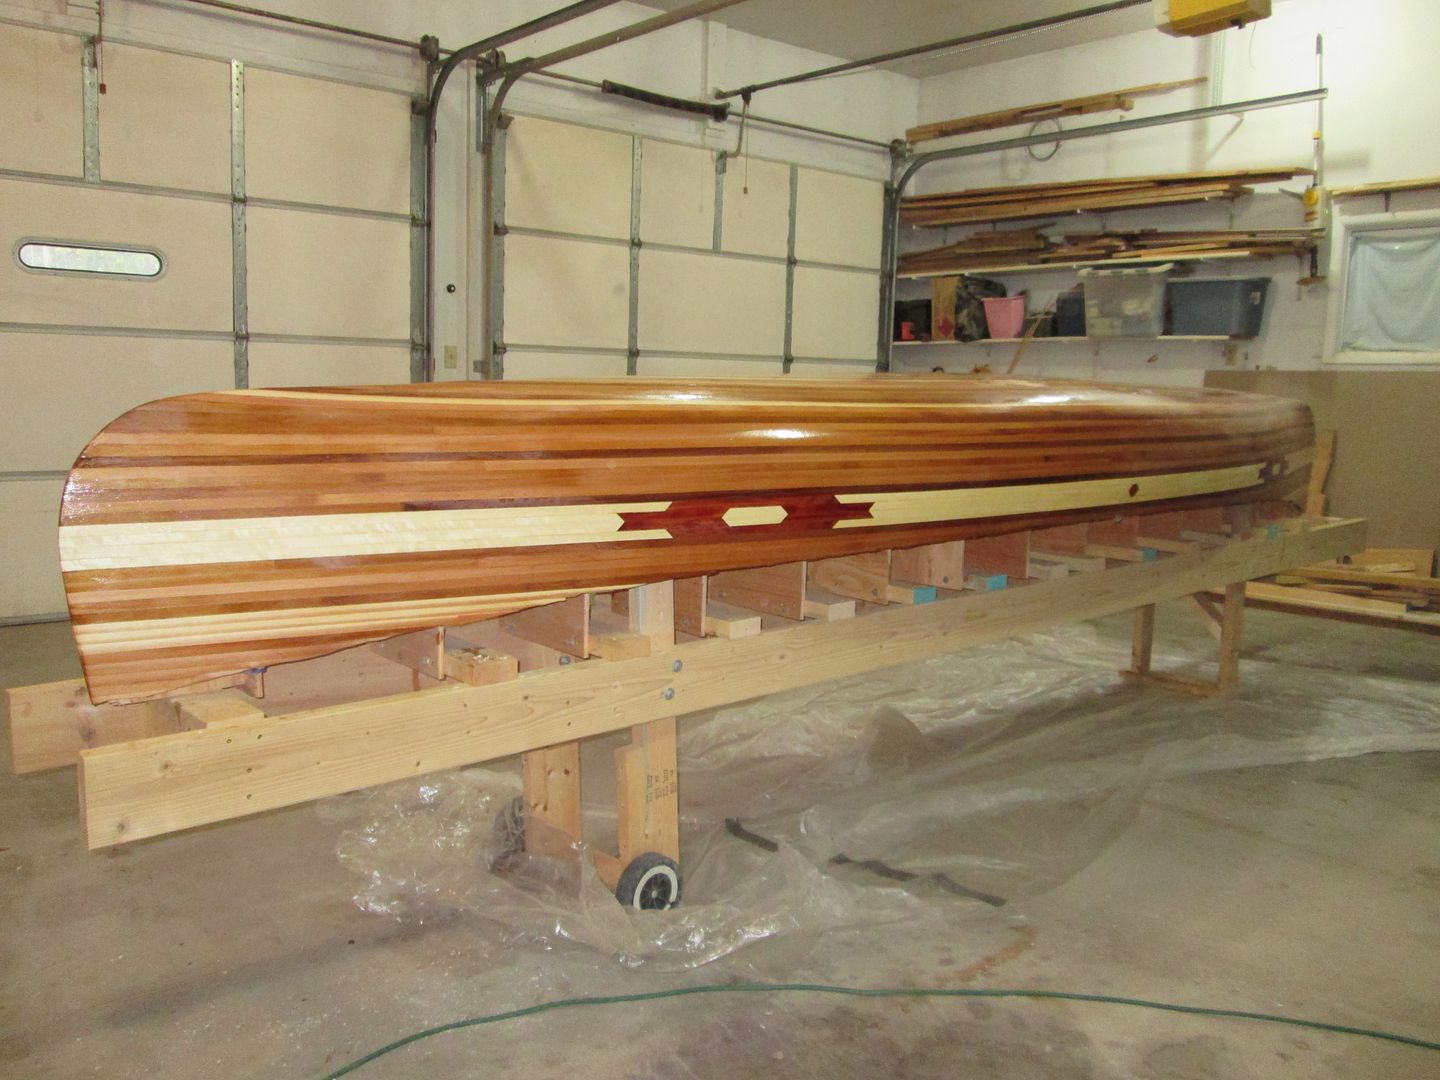
I'm thinking of trying my hand at a stem-less build for my next canoe. I've heard it referred to as the Minnesota Method. I've always built with inner & outer stems but this will be a light duty flat water recreational cruiser and I'd like to save a bit of weight here and there. I plan to use glued cedar gunwales towards that goal.

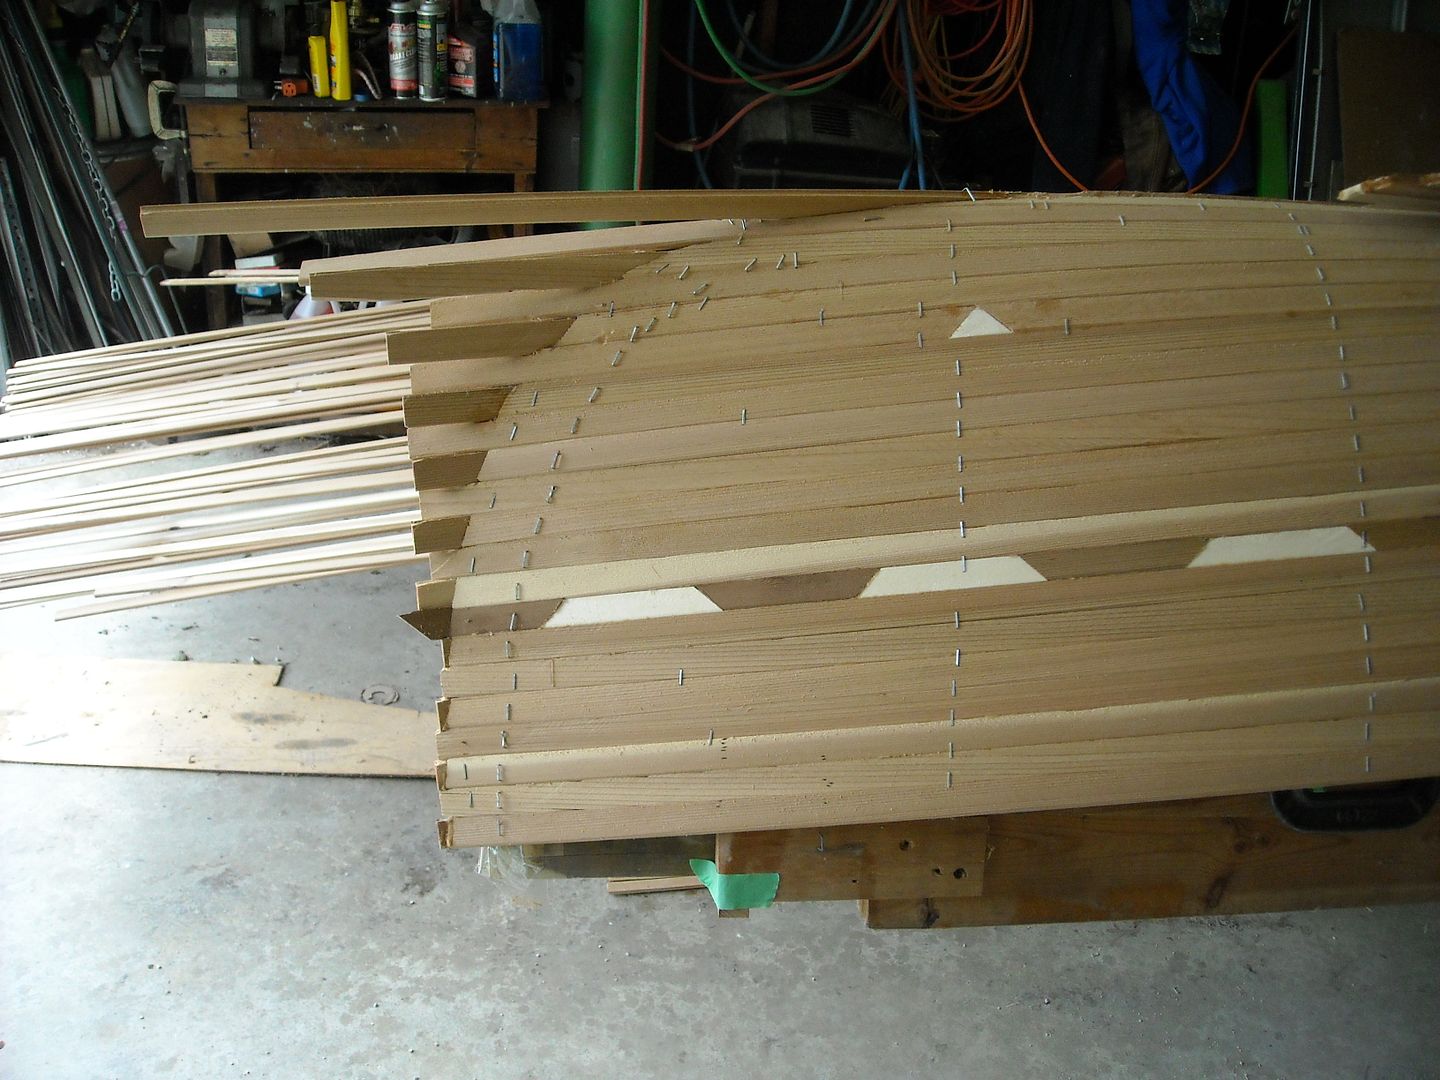
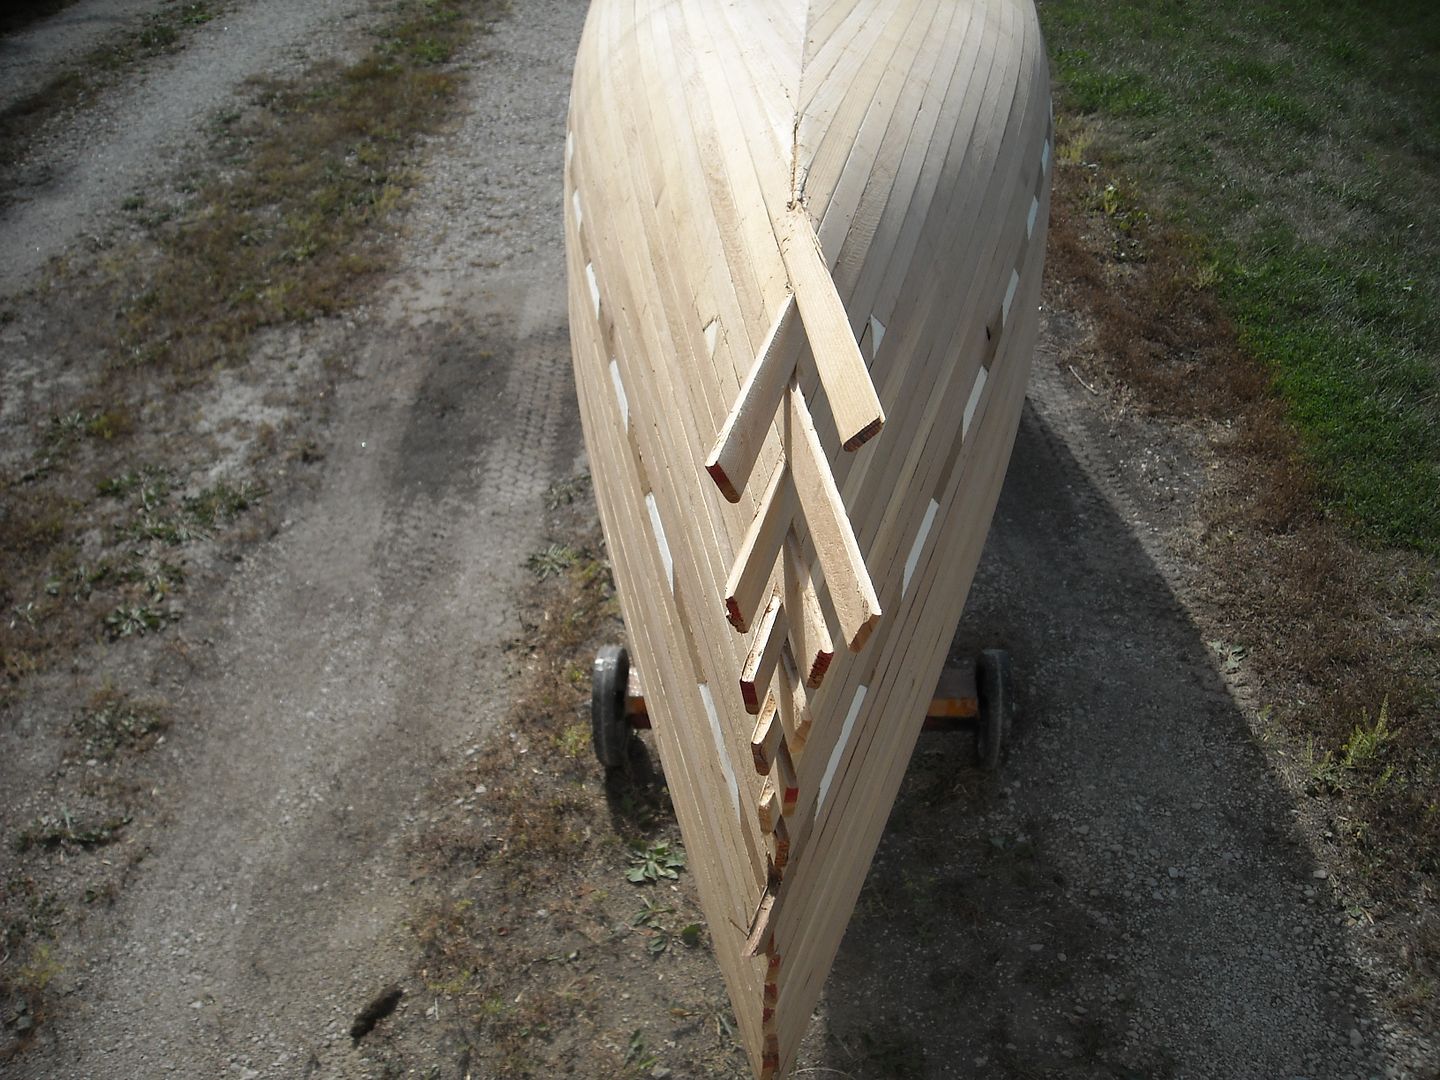
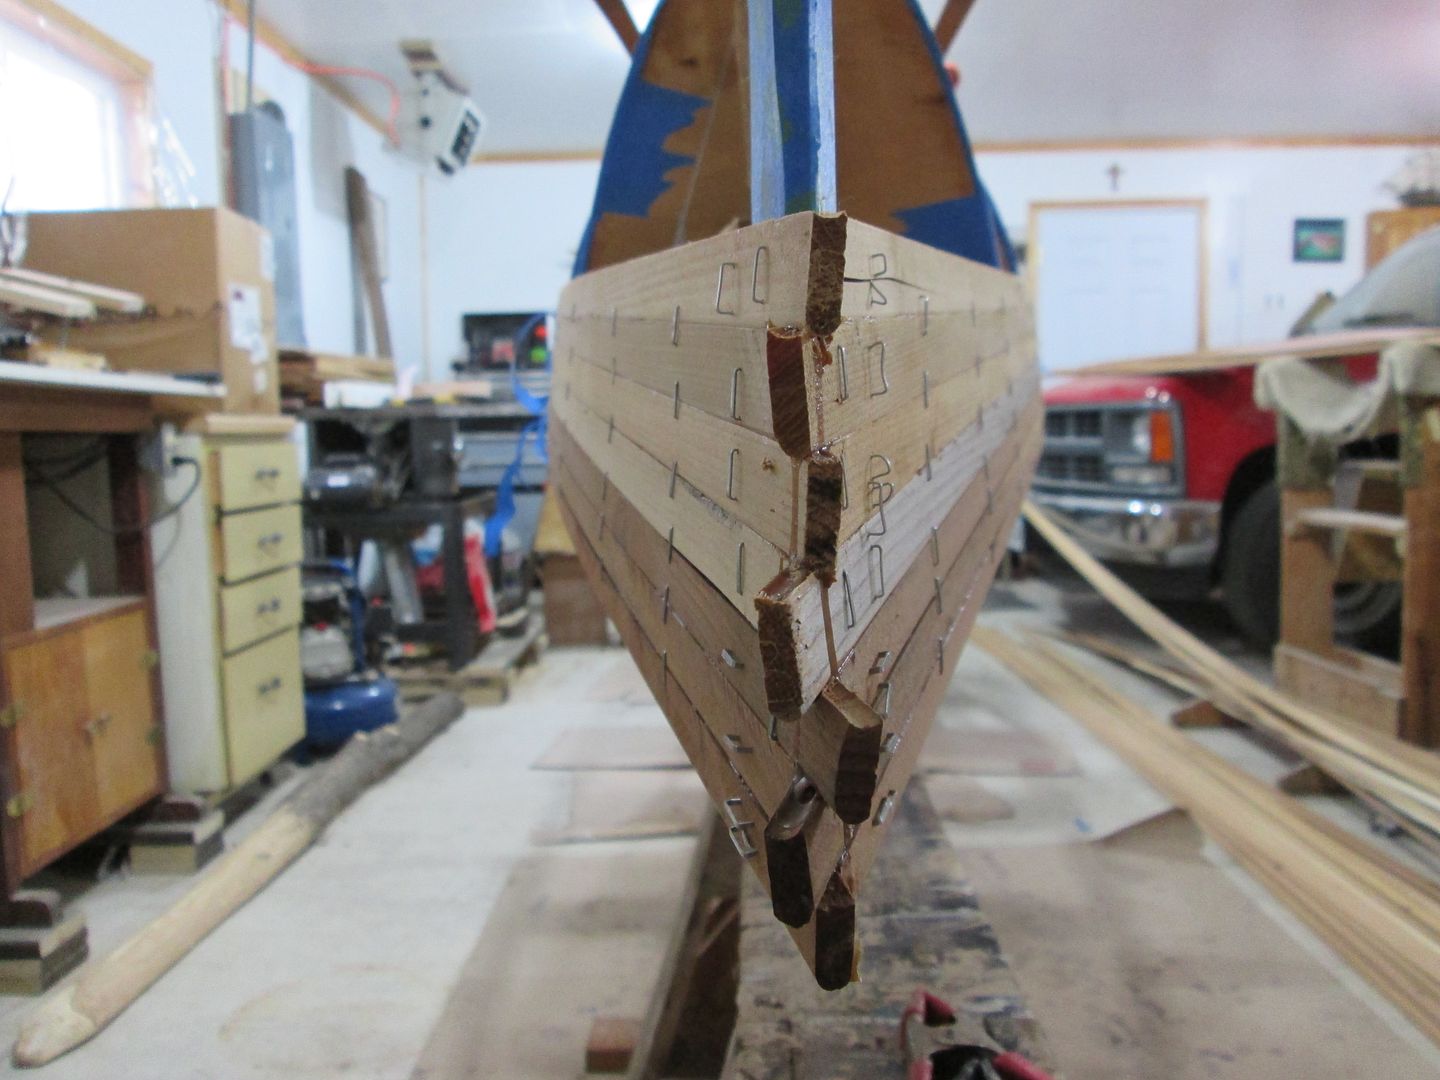
When building stem-less are the bow and stern forms tapered to receive the strips as one does with an inner stem?
Lay one side strip, angle trim it, lay its opposite counterpart, let it fly slightly and do this in an alternating pattern?
How is the strip end gluing best done?

I imagine a stem-less build has some interesting aspects when it comes time to do the interior layup. This boat will not have a pointy pinched bow/stern but I'm guessing a bias-cut strip of cloth glassed in each end prior to laying out the main cloth might be a good idea.

Any comments and experiences on building stem-less would be most appreciated.

Thank you.
 
Yes.The stem forms are tapered as though they were the inner stem. The forms are covered with a few layers of masking tape, or duct tape or plastic packaging tape, to make it easy to remove the forms after the outside is glassed.

Most often the stripping pattern starts with one strip on side A, and two on side B. Then back to side A with two and so on.
This interlocks the two sides, especially if you bead and cove, in which case you need to file a notch in so the strip from the opposing side, settles into the cove.

You can make a sharp leading edge if you want, but too sharp, and you invite wear.

As far as the interior, stemless is easier. The glass is laid in to overlap each joint. Some will add a fillet of thickened epoxy to the inside joint, but I've never found it necessary.
Here's a pic of how I strip, that I hope will help!
DSCN0219_zpsdd380bed.jpg
DSCN0222_zps643511f4.jpg


Jim
 
My stitch and glue Eureka 155 is a completely different type of build from what appears to be a strip-built design. All I can say is that I filled the concavity behind the bow and stern with a roughly 3/4" bead of mixed epoxy and filler, then smoothed it down with a dowel... 8 years later, it's still good. I don't use the canoe a great deal here in LA (couple times a year the last few, once or twice a month the first few). What water we have is flat and calm, and there are no rocks to speak off on shore... mostly muddy beaches, sand if you're lucky. I do bang it a lot on submerged stumps and logs.

There are a couple YouTube videos I remember seeing on stemless building... I'm pretty sure there was a guy who built a Freedom 17 model, and did it stemlessly (sp?)...

I also remember there were two schools of thought... one was that you could just lay up one side, hit it with a laser and draw a line down the exact center, cut the protruding ends of the strips off, then lay up the other side and custom fit each one to the exact length it needed to be, trimming the end with a hand plane. The other school was alternating ends, presumably to provide more gluing surface between the two sides, and theoretically providing more strength. Not sure which is really better, though my gut tells me the alternating style was stronger. My gut also tells me that if I were to chose the 'cut along the centerline' method, I'd be backfilling that void with something. Maybe a hidden stem?

Stripperguy will hopefully chime in, along with some other smarter builders than I, with experience in both methods.
 
Last edited:
I put two layers of bias cloth on TOP of the main cloth. That way when I come back to sand, you're not cutting into the main layer, just FEATHERING the two bias strips of cloth.

I know others do it the other way, to me this is my preferred method.

Jim
 
One more. These strips were leftovers from at least three other builds. Some from friends canoes.
IMG_0099_zpsri0zjfph.jpg
 
Jim: Thanks for the pictures, they offer excellent illustration of the process. Thank you for taking the time to post them for me. And putting the bias strips on top of the main cloth fold-over makes sense inside the hull ends. In the pinched ends of kayak hulls I've laid them in first and scraped the edges after they set up enough but while still green. Then lay the main cloth while within the chemical bond window. The inside ends of a canoe are much nicer to work in as compared to a Greenland style kayak ;)

Seeker: My second build was a S&G kayak for a friend. I certainly learned how to make a nice fillet by the time I was done :) That kayak has seen quite a few seasons now fishing and scraping it way over gravel bars along the North Platte river. The S&G construction is very strong. I did finally find a YouTube video sowing the stem-less interlocking strip method. The fellow is a Canadian named Jason Eke. I believe I have a handle on the technique now with Jim's excellent pics and the video.

My last two builds were staple-less projects and I'm not going that way this time. Quite honestly, they were slow enough and troublesome enough ( especially the kayak) that I kind of burned out for a few years. I'm building this one with leftovers from previous builds. I've enough B&C strips to get me up past the bilge and I have some square strips that I'll use to fill in the football. I'm going to clamp where its easy and pop a staple where I need to. The strips I have are all shorties - western & eastern cedar - from various purchases over thus a furniture build is out of the question anyway and I don't want to get tied down to another 2 or 3 strips-a-day project just to avoid the staple holes :)

Thank you for the input, gentlemen.
 
Not really anything to add to Jim's advice other than have fun. I've never had a problem building stemless and do it pretty much the same as illustrated above. There are always a few joints that don't quite match up and that I think will look terrible but once it's been sanded back and rounded over they're not much more than cracks and they disappear with a little thickened and tinted epoxy.

I put an thickened epoxy fillet on the interior of the stems and no glass. I don't know if that way is any better, worse, or a draw.

I believe stripper guy does one side at the time rather than alternating and it seems to work out for him.

Alan
 
Holmes,

I'm at work and can't see Jim's photos...bear with me if I repeat.
Yeah, I typically build stemless. I am tough on my boats, beachings, launching, rock bashes, beaver drags. As far as strength, stemless will cause no measurable difference from inner/outer stem construction. Once everything is wrapped in multiple layers of glass and resin, the stems themselves make little contribution. What will affect stem life is the stem radius. As Jim said upthread, sharp stems will wear more quickly than blunt stems.
I do an entire side at a time, right up past the keel line. Of course the stem forms are tapered, and taped well.
I run the strips on one side long, about 2 or 3 inches past the end of the stem form. Some hulls need a little extra support of those extended strips to maintain hull profile. Some do, some don't, I play safe and waste a few inches of cedar.
After I've stripped one full side, I trim the stem profile with a hand saw held upside down (teeth up). The saw is guided by the stem form and the next form, most folks call it the #1 form. As I saw upwards, I keep the blade in contact with stem and #1 forms, keeping the blade parallel to the way the strips run. I saw all the way to the already trimmed keel line. When all is said and done, I end up with a nice angle on the back of the strips that will allow a substantial lap joint for the future strips on the second side. Later, after the second side is stripped, a simple plumb cut at a right angle to the keel line finishes the stem profile.
You do need to plan on the strips extension when you set up your forms, you'll gain 2 or 3 inches overall, usually not a problem, but if you're building a specific class hull, you could end up on the wrong side of the class measurements.
There is a funky transition near the keel line, where the joints change from lap joints to butt joints, that transition is the most difficult part, IMHO.
On the inside, the stem is narrow, it usually needs a fillet of Cabosil thickened epoxy. I always put at least a single layer of glass inside the stem, and make sure that the interior is well sealed with epoxy. I've had the kids wear through the stems quite a few times, and actually taken water into the sealed bulkhead chamber. Still no big deal, I just drilled a hole and drained the hull, then patched everything up from the outside.
I'll add some photos later today, I'm at work just now and our firewall makes viewing and posting photos very cumbersome.
 
Howdy Stripperguy.

I got into your galleries and studied a couple of the build documentaries - very interesting method. I'll bet that joint transition can be a bit of a trick. I will be using a fillet in the inside stem area. I don't really do it for strength but simply to ease the cloth lay. The one time I didn't do this I got a couple of air traps under my cloth right in the crease. Didn't see them in time and had to later open them and fill 'em with a needle syringe. Achieved integrity but they were more visible than I cared for.

Also interested in your seat mounting and gunwale designs. I'm going to use lightweight cedar gunwales (glassed), and I don't want to hang from them. I'm drawing up decks that will be cleat supported and incorporate a carry handle and I'd like to mount the seats using cleats as well. What are the dimensions of the cleats you use for your seats?

Thanks for your comments and a peek inside a most interesting stripping technique.
 
Holmes,

Glad you found the Picasa photos, that's exactly why I have them publicly shared.
Now, which cleats did you want dimension for? I did a few different versions.
Did you see the testing I did in single shear? I had a cabosil thickened epoxied cleat stuck to a representative section of spare hull. I then applied load in a load frame (instrumented to measure displacements, loads, strain and so on) until I failed the joint. It failed at over 300 lbs and much like Alan's CF over cedar tests, the failures were benign and incomplete.

Wait here a minute...

OK, here's the photos of the set up and a plot of the test results.

DSC_0002.JPG

DSC_0004.JPG

seat%2520cleat%2520plot.JPG

From the photos above, you can see that the mahogany cleat failed, not the epoxy joint. Also, from the plot, the applied load is the lower part of the hysteresis loop..from the kink in the slope at about 270 lbs (where the slope steepens) I would call that the yield point. That test piece was about 3 inches long, so I got 100 lbs load capacity per linear inch. You can see that you don't need much of a cleat to hold an average paddler.

Lastly, I'll dig up some photos of the stem trimming and stripping...for those that haven't perused my Picasa photos.
 
Stem stripping, stem trimming. Photos should be self explanatory, this is my nephews build from 2 or 3 years ago, his first ever.
You can see how far past the stem form the actual stems ends up, just plan for that (if necessary) and strip away.
Also, you can see how long that lap joint is at the stem line, it really makes for a reliable joint and there's plenty of wood to work with and shape the stem profile.
DSC_4627.JPG
DSC_4628.JPG
DSC_4632.JPG
DSC_4638.JPG
DSC_4654.JPG
 
Last edited:
Here is a close up of the lap joint at the stem...pretty tight, no??
I looked for photos of that funky transition between stem and keel line, sorry man, no good photos. It's just a little tricky, no big deal though. Certainly easier than those last few strips at the keel line.

DSC_4677.JPG
 
Excellent pics -thank you. That lap joint does look very good with plenty of meat to carve. I think I just might give this method a go, I'm sure I can figure out the transition once I'm there.

Your seat cleat tests are very interesting and educational. I thought long and hard about my plan to use 'glassed cedar gunnels last night and I think I'm going to chicken out and go with conventional ash gunwales and hang the seats with ash brackets. I think I'd like to retain the option of changing seat height down the road.

I spent some time on the phone with Dennis at NWC today regarding their Cottager design and he was most helpful. We discussed a couple different methods of lengthening the boat as I'd like to get it to 15.5' or so. Given the overall hull design I don't think this will be a problem at all. Once I have forms cut and cleated I'll hand-clamp them in place and use battens to see which way I decide to go.
 
Holmes,
I wasn't sure if I did an overload on the photos and descriptions. I know there are a few members here with very technical backgrounds, but I'm never sure sure how to talk to those that I don't know of their background. I don't like to talk above or below someone's understanding...if ever you want more detail, let me know.
And for anyone else, if you guys find me droning on, just tell me to put a lid on it!

So, is that gonna be it? A stretched Cottage? And then? Are you going to create a thread for your build? No matter how many builds I see, I always enjoy seeing things through others' perspectives.
 
Personally ! I'm enjoying it all ! :)

Stripperguy, When you strip all of one side, does that tend to pull your stem forms in the direction of the first side you are stripping ?

How do you treat the joint where the two sides meet ! Isn't the seam on one side ?

The testing equipment that you are using, is strikingly similar to what is in use at our High School. Amazing what they are teaching our kids these days !
 
Holmes,
I wasn't sure if I did an overload on the photos and descriptions. I know there are a few members here with very technical backgrounds, but I'm never sure sure how to talk to those that I don't know of their background. I don't like to talk above or below someone's understanding...if ever you want more detail, let me know.

Your explanations are very useful to this non-technical builder. The graph would have had little value for me without your interpretation. I know some of the other builders here have a rather high grasp of these things but I ain't one of 'em ;) Hardwood of any kind other than small decorative boards have become very difficult to come by in my area and its a 10 hour round trip to the nearest availability. I'm going on a local lumber prowl next week to see what I can find and that will make my gunwale/seat mounting decision for me.

So, is that gonna be it? A stretched Cottage? And then? Are you going to create a thread for your build? No matter how many builds I see, I always enjoy seeing things through others' perspectives.

Ya, I think so. Dennis was really good to work with today and I like many of the avocational activities and organizations that he's working with and supporting. I also like the classic leisure design with a touch of tumblehome introduced. We reviewed the Cottager design with regard to lengthening it 6 or 8" and it seems doable with the wide flat admidships profile. I ran my differential spacing plan of the central 6 forms by him and he thinks it would work without introducing any flats. I'll let the battens tell me the final story. He seemed rather interested to see how it plays out.

I'm in the middle of an apartment remodel that I'm hoping to have finished by mid-April and I can get started. I'll get the mold templates printed next week and pick up material to get those cut and I need to build a new strongback. I'd like to have these tasks ready by the time I finish the payin' job.

I'm not a big photo doc guy but I'll certainly snap a few as I go along. I have some 'glass layup techniques that might be of interest to some. Most of the rest will be simply emulating what you and the other masters have exhibited.

I'm going to do the exterior with 6 oz cloth plus a little extra for the stems. The interior will get 4 oz cloth - I like its texture - with an extra layer from seat to seat. Hoping to keep it at/under 55#.
 
Holmes
Here is a pic of one of my friends North West Cottage Cruiser.
It was his first boat, and he totally amazed me by his quality of workmanship !
IMG_0492_zpsio4e1qhx.jpg


Jim
 
Wow - that is a beauty! And a first build no less. The fellow certainly earned a thumbs-up.

I like that strongback. I'll probably do a plywood box beam as that's what I used to. I put mine on wheels, too, so I can do my heavy sanding outdoors.

I think a stretched version will be nice. The trick - I think - is inserting the added length amidships where it will be of most value to me for the dogs but without creating a flat spot in the hull shape. My initial plan is to increase the spacing of the 6 central most forms by 1.5" for a 9" gain. If that's too much I'll back off to 1" increases. If that doesn't seem to fair nicely with battens then I'll build it to the 15' spec, soak it with hot water and stretch the dang thing ;)

Thanks for posting the picture of that lovely boat.
 
Back
Top