Bitten by the DIY bug, the next gear project on my checklist was a functional canvas tarp from an inexpensive painter's drop cloth. Of course it'll never be as lightweight and compact as modern tarps, but I like the fact that they are rugged and spark resistant. Already had to repair an 8x10 silnylon tarp twice because of its poor abrasion resistance and don't want to burn holes in the CCS 10x10 tarp obtained a few seasons back. Along with a canvas bedroll cover, the intention is to use this heavier canvas tarp as a basic shelter in the shoulder season when flies are gone and a warming fire can be confidently built to reflect heat.
Many bushcraft sites discuss using canvas painter's drop cloths as an affordable base material. But, there are conflicting opinions about whether the commonly sold, 9x12, 8oz. plain-weave cloths from hardware stores are too loosely woven to be effective shelters in heavy rain. Others folks have commented that the weave can be tightened by hot washing and drying a few times before applying a basic waterproofing agent. Just when I was about to pull the trigger and buy one, I found another brand being offered on sale with a much larger coverage of 12'x14'. Not only that, it was woven with what appeared to be a tighter twill weave. Here's a web image of the brand (although this is a pic of their 8'x12')
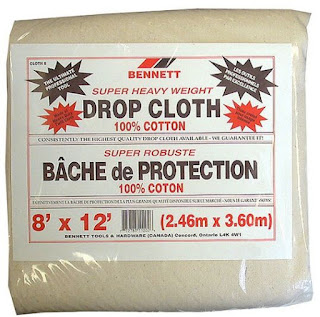
Bennett Brand Twill Woven Drop Cloth
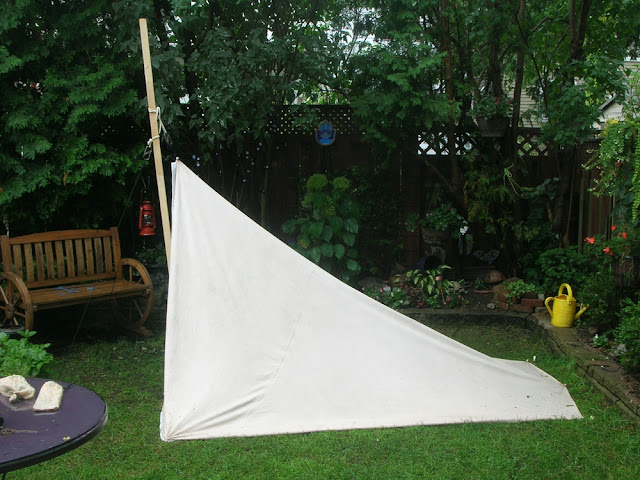
Hoop's tarpology skills are epic and I'm a convert to his gable style method for the CCS tarp too. But I also like a lean-style tarp pitched right on the ground sometimes. One of my go-to pitches is the "Adirondack Wind Shed" because one can sleep laterally warmed by a fire and have an exposed view.
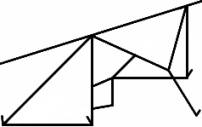
Adirondack Wind Shed Pitch
http://www.survivalprimer.com/Tarp Shelters -Macpherson.htm
The pitch resembles a Whelen Leanto and I remember coming across an old illustration of a Whelen with a canoe tipped over as additional coverage...
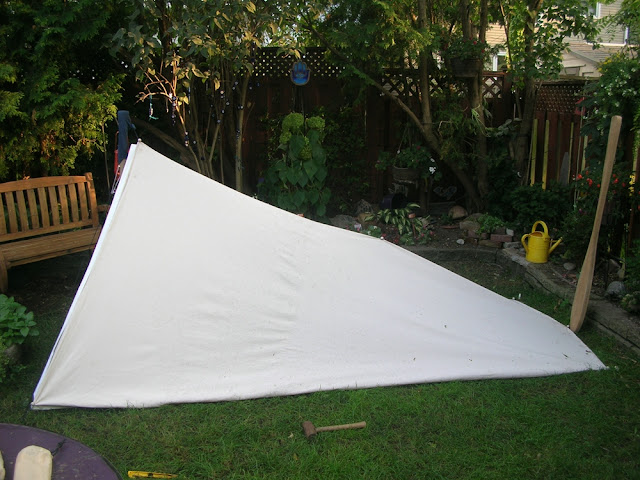
So with this goal in mind, the project was begun. First the tarp was washed twice in hot water and machined dried with high heat to "tighten the weave". Not sure if this was necessary for this twill woven drop cloth but I followed the advice of posters on forums who suggested this be done before any cutting and modifications to the drop cloth take place. One interesting thing was that the single seam on this 12'x14' behemoth was not actually centered on the tarp - instead it was around 4' from one edge. Marked out to get a 10x10 square and positioned the cuts to take advantage of the stitched outer edges. Only 2 sides would be raw edged after cutting.
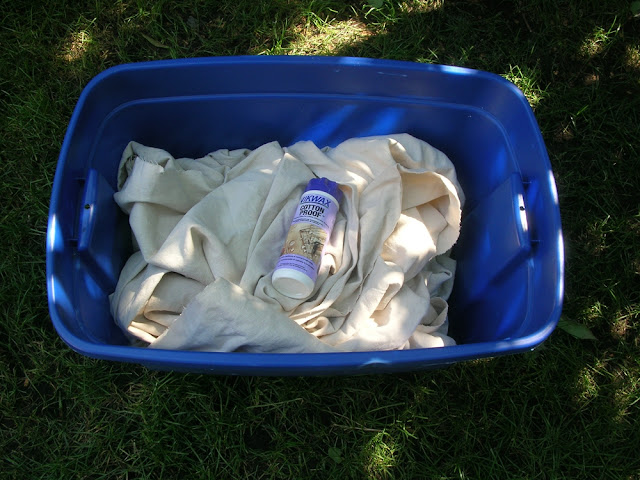
Keeping in mind that I don't have a sewing machine, at this stage I moved on to the waterproofing process and had plans to deal with the raw edges later. I had obtained a bottle of NIKWAX Cotton Proof years ago thinking I would use it on a canvas pack, but never did. The Nikwax didn't seem to have an expiration date so figured now would be the time use this thing. I followed the hand washing instructions listed on the label which involved using the whole bottle (300 ml) while sloshing the tarp around in giant tub. 5 Minute soak, quick rinse and then air dried. This was before Bob B's recent post on natural waterproofing methods like Boiled Linseed Oil and Iron Oxide powder.
It was then brought back in to deal with the raw cut edges and center seam. Like I said, we don't have a sewing machine but figured I could do a quick temporary job on the seams with pretty strong duct tape. Got the idea from Seeker's post of his homemade Whelen constructed with a poly tarp and Gorilla duct tape. Of course, nothing will properly replace the need for stitched edges but for the time being simply folding the raw edges in some of this heavy duty tape did the trick until I can get a used sewing machine and learn how to use it. A strip was also taped to the underside of the off-centered seam.
For tie outs, I just used the old method of marbles and a little cordage. In total 8 of these were used so that there were tied out points every 5'. The beauty of this system is that the tie out positions can moved anywhere on the tarp for some pretty interesting pitches.
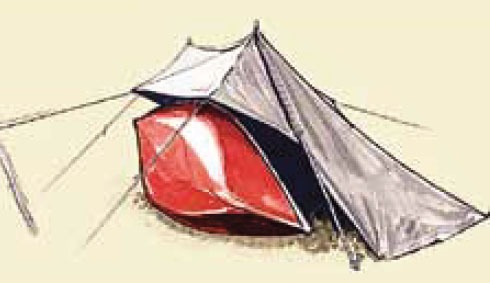
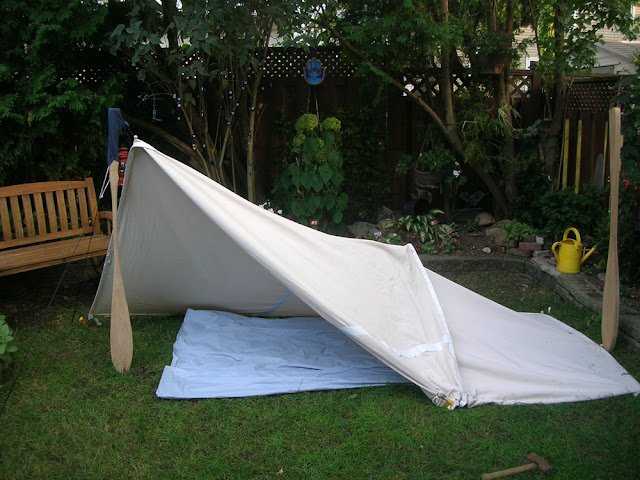
It was set it up in the backyard to give the waterproofing a quick test run. While most sites show the Adirondack Wind Shed pitched with a horizontal ridge line tied between trees, I wanted to see if it could be free standing using paddles as supports. Amidst the chaos, I'm also working on 2 more paddles so these incomplete projects were used here. This pitch needs just 4 ground stakes on the tarp and 2 more for the guylines line supports. The awning is tied out to patio table for this pic, but my intention would be to have the overturned canoe serve as an anchor point when out in the field.
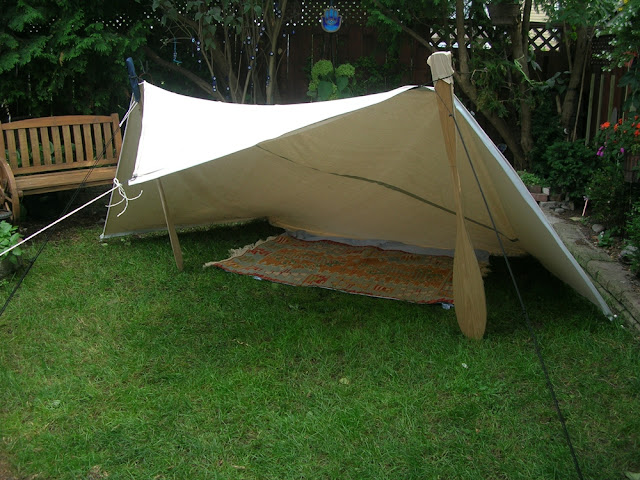
As an extra bit, another line was run between the 2 paddles and tensioned to support the "awning" but given the heavier weight of the canvas, there is a pronounced curve. When I did this setup months ago with my 10x10 silnylon tarp, the awning was flatter. Still I can live with it in calmer weather. This pitching style creates a sloped rear to allow for coverage in modest rain with a height of just over 4 feet at the awning. As a bit of scale, my wool kilim blanket is roughly 65" inches long. Lengthwise, there's more than enough space under there for my bedroll and some gear.
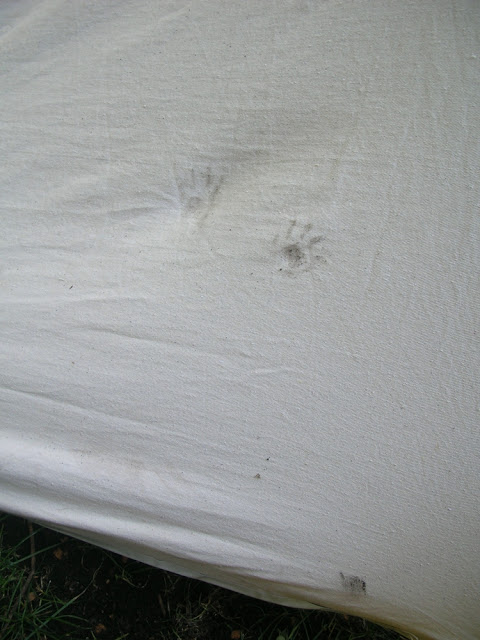
After leaving it out overnight to see if any winds would slacken the line, I was pleasantly surprised to see that the thing didn't budge. This included a visit by the local racoon gang living in my back neighbour's shed. One of them tried to climb up the backside and left his muddy paw prints on the tarp...
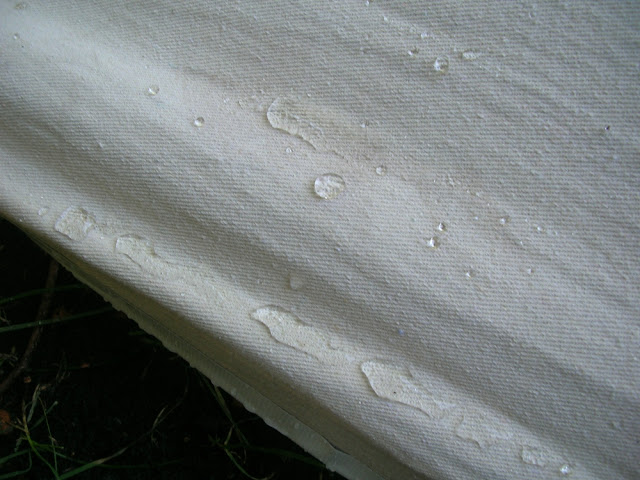
Anyway, some water was sprayed on with the garden hose and it looks like the Nikwax coating did its job. Water droplets immediately beaded up and flowed down the back of the tarp
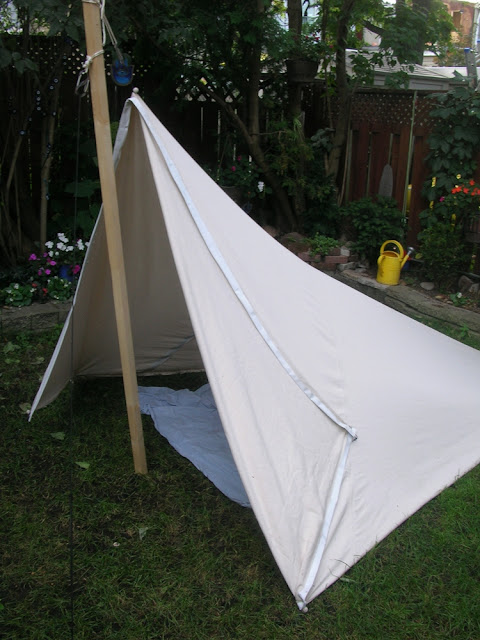
Other pitches include a more tunnel shaped pitch with one paddle in front and another in the rear. It needs many more stakes but found it to be functional.
I've also played with this setup a bit. By opening up one side and staking the end at the half-way point, you get a bit more coverage but still retain an open feel. Basically with a bedroll thrown in there, your upper body can be exposed to a warming fire with your lower body more covered by the tarp.
Lastly, there's the pyramid tarp tent. The NorthWest Woodsman's webpage tutorial on this setup is very well explained. This pitch works best with a rectangular tarp but it can still be done with a 10x10 square design resulting in a more narrow and compact solo shelter (roughly 5.5' high at the entry x 5' wide x 7.5' long). However, my 58" paddles are too low to raise the front entry to practical levels. For that reason, one would need to find something in the bush or use a canoe pole. Here I just used a piece of 8ft - 2x2 lumber. The pole was rigged with two prussic loops that hold in position once everything is tensioned. One is connected to the top of the tarp with a carabiner, the other supports some guylines on the opposite side.
The door flaps can be staked closed as in the above picture, angled out or fully pulled back to give a bit more air and space. It requires a minimum of 7 stakes to pitch properly plus the guyline. It could be rigged better with two lashed poles in front to free up space in the entryway but I didn't have another piece of suitable lumber to play with at the time. Here's another view of the interior with one door flap angled out and another folded fully back...
Overall, it seems like a success for minimal work and supplies. Plus there's plenty of left over material for other goodies in the future. Just need to learn how to sew.
Many bushcraft sites discuss using canvas painter's drop cloths as an affordable base material. But, there are conflicting opinions about whether the commonly sold, 9x12, 8oz. plain-weave cloths from hardware stores are too loosely woven to be effective shelters in heavy rain. Others folks have commented that the weave can be tightened by hot washing and drying a few times before applying a basic waterproofing agent. Just when I was about to pull the trigger and buy one, I found another brand being offered on sale with a much larger coverage of 12'x14'. Not only that, it was woven with what appeared to be a tighter twill weave. Here's a web image of the brand (although this is a pic of their 8'x12')
Bennett Brand Twill Woven Drop Cloth
Hoop's tarpology skills are epic and I'm a convert to his gable style method for the CCS tarp too. But I also like a lean-style tarp pitched right on the ground sometimes. One of my go-to pitches is the "Adirondack Wind Shed" because one can sleep laterally warmed by a fire and have an exposed view.
Adirondack Wind Shed Pitch
http://www.survivalprimer.com/Tarp Shelters -Macpherson.htm
The pitch resembles a Whelen Leanto and I remember coming across an old illustration of a Whelen with a canoe tipped over as additional coverage...
So with this goal in mind, the project was begun. First the tarp was washed twice in hot water and machined dried with high heat to "tighten the weave". Not sure if this was necessary for this twill woven drop cloth but I followed the advice of posters on forums who suggested this be done before any cutting and modifications to the drop cloth take place. One interesting thing was that the single seam on this 12'x14' behemoth was not actually centered on the tarp - instead it was around 4' from one edge. Marked out to get a 10x10 square and positioned the cuts to take advantage of the stitched outer edges. Only 2 sides would be raw edged after cutting.
Keeping in mind that I don't have a sewing machine, at this stage I moved on to the waterproofing process and had plans to deal with the raw edges later. I had obtained a bottle of NIKWAX Cotton Proof years ago thinking I would use it on a canvas pack, but never did. The Nikwax didn't seem to have an expiration date so figured now would be the time use this thing. I followed the hand washing instructions listed on the label which involved using the whole bottle (300 ml) while sloshing the tarp around in giant tub. 5 Minute soak, quick rinse and then air dried. This was before Bob B's recent post on natural waterproofing methods like Boiled Linseed Oil and Iron Oxide powder.
It was then brought back in to deal with the raw cut edges and center seam. Like I said, we don't have a sewing machine but figured I could do a quick temporary job on the seams with pretty strong duct tape. Got the idea from Seeker's post of his homemade Whelen constructed with a poly tarp and Gorilla duct tape. Of course, nothing will properly replace the need for stitched edges but for the time being simply folding the raw edges in some of this heavy duty tape did the trick until I can get a used sewing machine and learn how to use it. A strip was also taped to the underside of the off-centered seam.
For tie outs, I just used the old method of marbles and a little cordage. In total 8 of these were used so that there were tied out points every 5'. The beauty of this system is that the tie out positions can moved anywhere on the tarp for some pretty interesting pitches.
It was set it up in the backyard to give the waterproofing a quick test run. While most sites show the Adirondack Wind Shed pitched with a horizontal ridge line tied between trees, I wanted to see if it could be free standing using paddles as supports. Amidst the chaos, I'm also working on 2 more paddles so these incomplete projects were used here. This pitch needs just 4 ground stakes on the tarp and 2 more for the guylines line supports. The awning is tied out to patio table for this pic, but my intention would be to have the overturned canoe serve as an anchor point when out in the field.
As an extra bit, another line was run between the 2 paddles and tensioned to support the "awning" but given the heavier weight of the canvas, there is a pronounced curve. When I did this setup months ago with my 10x10 silnylon tarp, the awning was flatter. Still I can live with it in calmer weather. This pitching style creates a sloped rear to allow for coverage in modest rain with a height of just over 4 feet at the awning. As a bit of scale, my wool kilim blanket is roughly 65" inches long. Lengthwise, there's more than enough space under there for my bedroll and some gear.
After leaving it out overnight to see if any winds would slacken the line, I was pleasantly surprised to see that the thing didn't budge. This included a visit by the local racoon gang living in my back neighbour's shed. One of them tried to climb up the backside and left his muddy paw prints on the tarp...
Anyway, some water was sprayed on with the garden hose and it looks like the Nikwax coating did its job. Water droplets immediately beaded up and flowed down the back of the tarp
Other pitches include a more tunnel shaped pitch with one paddle in front and another in the rear. It needs many more stakes but found it to be functional.
I've also played with this setup a bit. By opening up one side and staking the end at the half-way point, you get a bit more coverage but still retain an open feel. Basically with a bedroll thrown in there, your upper body can be exposed to a warming fire with your lower body more covered by the tarp.
Lastly, there's the pyramid tarp tent. The NorthWest Woodsman's webpage tutorial on this setup is very well explained. This pitch works best with a rectangular tarp but it can still be done with a 10x10 square design resulting in a more narrow and compact solo shelter (roughly 5.5' high at the entry x 5' wide x 7.5' long). However, my 58" paddles are too low to raise the front entry to practical levels. For that reason, one would need to find something in the bush or use a canoe pole. Here I just used a piece of 8ft - 2x2 lumber. The pole was rigged with two prussic loops that hold in position once everything is tensioned. One is connected to the top of the tarp with a carabiner, the other supports some guylines on the opposite side.
The door flaps can be staked closed as in the above picture, angled out or fully pulled back to give a bit more air and space. It requires a minimum of 7 stakes to pitch properly plus the guyline. It could be rigged better with two lashed poles in front to free up space in the entryway but I didn't have another piece of suitable lumber to play with at the time. Here's another view of the interior with one door flap angled out and another folded fully back...
Overall, it seems like a success for minimal work and supplies. Plus there's plenty of left over material for other goodies in the future. Just need to learn how to sew.
