• Happy National Garlic Day! 🧄🚫🧛🏼‍♂️

Outfitting a New Ultra Light Kevlar Canoe

Joined
Aug 20, 2013
Messages
427
Reaction score
179
Location
Eastern NC
After the better part of a year looking on the used market for just the right solo canoe, I opted to purchase new rather than wait for an uncertain future time I might happen upon one.

Buying local is my preference, but my local dealer was not able to get me in the canoe to demo it. Searching I found one in Annapolis I could test paddle.

My timing was good. As I made plans to head north to Annapolis and a test paddle, I became aware of the Western PA Solo Canoe Rendezvous where a vast number of solo canoes would be available to test paddle. Hmmmm....this called to my retired side - a ROAD TRIP!! So I took the better part of a week, in a huge looping drive around the mid Atlantic states, in search of my next solo canoe.

I have soloed for many years. but it has always been in a tandem, flipped around. It was quite a treat to get in a canoe designed with only one paddler in mind. After paddling about 10-12 canoes in western PA, I settled on the one I had test paddled in Annapolis - a Wenonah Wilderness in the ultra light Kevlar construction.

The canoe had to be built (the test canoe was a heavier gelcoat layup) so in early June it was ordered. Mid July it arrived in Annapolis and I planned another trip north to pick it up.

Suspecting Mike McCrea's would love a shop day tinkering with a brand new canoe and little need for messy epoxy work, I dangled the carrot of opportunity in front of him to help me outfit the new canoe. That bait had barely struck the surface before Mike struck and swallowed it whole. So on a Monday in July I picked the canoe up in Annapolis and headed for Mike's workshop in northern Maryland.

The following will illustrate the outfitting we did on the canoe. It's not at the level of master craftsmanship that others in this forum have shared in their building and repairing of boats, but it may prove useful to others looking for ideas on what to do with their boats. Along with Mike, Dave I (04) and Conk shared their work on canoe outfitting with me, and it was a delight to have so many ideas to work with.

Mike and I worked pretty much non-stop in the effort to get the canoe on the water as soon as possible and we set no time aside for photos. I would have stayed longer, but Mike was caught fondling a rudder near my canoe and I became fearful my canoe might sprout a rear appendage if I lingered too long. Since then I've returned home to further refine my canoe outfitting and I have time to photo document the outfitting of my canoe.

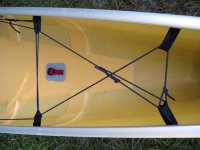
Deck plate shock cord retainer for painter


Dressing the end of a line with heat shrink tubing - thanks Mike!


Velcro paddle restraint - thanks to Conk for this idea


MORE TO FOLLOW
 
Dressing the end of a line with heat shrink tubing - thanks Mike!


Line Dressing.jpg

Velcro paddle restraint - thanks to Conk for this idea

Velcro padle retainer.jpg

Did I mention I'm fond of loops made of webbing? Using a 3/16" bit, drill out the factory rivet, install a home made loop on a longer rivet, back with a washer and pop the new rivet in place.

Tie Off Loops.jpg
 

Attachments

  • Tie Off Loops.jpg
    Tie Off Loops.jpg
    257.8 KB · Views: 1
Great ideas here. I put the bungee painter under the deck plate so branches wont catch on it.
Turtle
 
I put the bungee painter under the deck plate so branches wont catch on it.

The teensy deck plates on Wenonah composite boats don’t allow much surface to work with.

On larger deck plates I use a single piece of bungee that runs down one side of the top, back diagonally underneath, out and back down the other side of the top. That gives me two bungees on top and one underneath, and allows me to make the final bungee knot at the accessible end of the deck plate.
 
Canoe End Treatment Outfitting

We both considered whether or not to install loops at the bow and stern canoe end points, using the last two silver pop rivets Wenonah had installed. After a brief pondering I chose to install them. Good choice, they've come in handy when hanging a red flag off the end of an overhanging canoe, as well as a nice end float bag restraint. The 3mm cord holds the bag down and the bag end point clipped to the loop holds it in securely.

Canoe End Treatment-001 (2).JPG


Canoe End Treatment-002 (2).JPG


Canoe End Treatment-003 (2).JPG
 
It Looked Good on Paper

I asked for an additional thwart be installed 24.5 inches in front of the seat edge, close enough to be within reasonable reach of the seat with the idea being I could hang a thwart bag and have easy access to small day gear.

Sea trials on the Susquehanna revealed that it was OK for close access to my thwart bag but got in the way of trying to kneel. It cramped up the cockpit area, making it quite difficult, if not impossible, to put your butt on the floor of the canoe if you needed to in dicey water. And perhaps most importantly, it blocked your hands from gripping the gunnels and sliding your hands forward towards the foot bar as I sought stability to transition to kneeling. My thumb would have to be lifted to get around the thwart and temporarily left me without a grip. And the kneeling move is made when conditions are getting rough - no time for an unsure grip.

So Wednesday afternoon the thwart was removed and the two loops with d-rings you see were pop riveted in where the thwart had been installed.


Extra Thwart-001 (2).JPG


Extra Thwart-002 (2).JPG
 
We both considered whether or not to install loops at the bow and stern canoe end points, using the last two silver pop rivets Wenonah had installed. After a brief pondering I chose to install them. Good choice, they've come in handy when hanging a red flag off the end of an overhanging canoe, as well as a nice end float bag restraint. The 3mm cord holds the bag down and the bag end point clipped to the loop holds it in securely.


I liked the loops, but not the biners. I am not a fan of those inexpensive aluminum mini-beeners. I hope I have bought my last of them and can continue to resist the urge at the check out counter. The first (couple) dozen crapped out in short order; they bent, the gates failed, the gates bent and failed. Not something I trust.

I remain in search of preferred clips. I like the 2 inch Scotties or a 2 inch stainless caribeener (for different purposes), but I’d really like to find some 1 inch stainless caribeeners or similar SS clip that are easy to attach and detach.
 
Last edited:
Truck/Car Topping Outfitting

The forward canoe handle is the tie off point for securing a line(s) from the canoe to the vehicle. Yes the painter could be used. However, a trip of any distance has me wanting two bow lines in play, angled in opposition to each other to better keep the bow oriented into the wind.

To make loading quicker I fashioned a loop of yacht line around the handle using a double fisherman's knot. Then two pieces of line are cut to the length needed to reach the vehicle tie off points. Using a bowline, a brass (or is it bronze?) clip is tied to one end of each rope. When loading, once the canoe belly lines are tied down, I simply clip these lines to the fisherman's loop and then tie their ends off.


Hwy Travel-003 (2).JPG


Back Band

If the canoe has a foot bar, adding a back band really helps lock you into the boat. A bonus is the lower back support it provides during the paddling day. We tried to use existing pop rivets to secure the loops for the forward straps but found we needed to drill two new holes for those loops.


Back Band-003 (2).JPG
 
What I meant was that with the same bungee set up shone, you can tuck the folded painter under the deck with the end sticking out for quick access. I paddle a lot of narrow streams with brush and branches that grab the painter if its on top of the deck.
Turtle
 
I liked the loops, but not the biners. I am not a fan of those inexpensive aluminum mini-beeners. I hope I have bought my last of them and can continue to resist the urge at the check out counter. The first (couple) dozen crapped out in short order; they bent, the gates failed, the gates bent and failed. Not something I trust.

I remain in search of preferred clips. I like the 2 inch Scotties or a 2 inch stainless caribeener (for different purposes), but I’d really like to find some 1 inch stainless caribeeners or similar SS clip that are easy to attach and detach.

Have you tried the Niteize S Biner? Used teh SS ones last week on our trip and they held up well.
 
Have you tried the Niteize S Biner? Used teh SS ones last week on our trip and they held up well.

I am using those in certain applications, but I almost never need two gates and in the beefier weight rating those are still 2 inches long.
 
I remain in search of preferred clips. I like the 2 inch Scotties or a 2 inch stainless caribeener (for different purposes), but I’d really like to find some 1 inch stainless caribeeners or similar SS clip that are easy to attach and detach.

Don't know if these would fit the bill or not:

http://www.dutchwaregear.com/dutch-ridgeline-biners.html

I ordered a couple for attaching my tarp to the ridgeline HOOP style and they should show up in a couple days.

Alan
 
Alan,

Those look great. I would be very interested in your assessment once they arrive.

The stainless S-biners discussed above I find unreliable - over time their gates become balky and have, at times, fallen stuck into an open position. I no longer use them in marine applications. The same also happens with the mini aluminum carabiners, but not as quickly.

This new one could be a solution. It certainly looks small and light; gate reliability would be the key for me.

For the airbags, I could just as easily tie some cord on the bag end and then tie a bowline onto the canoe loop. But a quick and easy clip is very appealing

Bill
 
Those look great. I would be very interested in your assessment once they arrive.

And I'll be interested in trying your's if you get some.

I've seen a bunch of Dutchware in use with friend's hammocks, but never paid much attention.
 
Knee Cushions

I've owned two other canoes with aluminum gunnels and found they are an uncomfortable place to rest your legs on. Typically, when paddling from the seated position and using the foot bar, my legs are splayed out and rest against the hard metal gunnels. In the past I've used a section foam pipe insulation to cover the part of the gunwale where my legs would make contact. Invariably, they would become missing - falling off and into the water or forgetting to bring them.

In the past I had seen the results of Mike McCrea crafting knee bumpers as permanent installs in his boats. While they looked effective, his early attempts at this struck me as overly massive and, for my tastes, unsightly. Like anything done multiple times, Mike has incrementally improved his technique and his latest knee bumper efforts I find appealing - an effective cushion with a fairly small footprint.

So with his help we installed knee bumpers on the canoe. Sitting in the canoe with feet on the foot bar I let my legs fall out to the gunnels. We marked the gunnels with locations of my knee contact and added about 3 inches fore and aft to ensure we have the good coverage.

Using 2 inch mini-cell, we cut pieces to size. Beveled the edges with dragon skin and then glued in place with contact cement. Put the bumpers in place, trace the bumper outline on the hull to locate where contact cement would go and then began the cementing process. 3 coats on the mini-cell, 2 on the hull, letting each coat dry before adding the next. Flash the last coat of dried cement with a heat gun and carefully put in place (you only get one chance as this will bond upon contact). Clamp to hold in place and let it cure.

Knee Bumpers.jpg


Knee Bumpers2.jpg
 
Raising The Seat Height.

The canoe seat, as delivered, was too low to allow me to get my feet underneath with ease. At its highest position the seat was 8 1/4 inches off the floor.

To raise the seat I used using nylon spacers 1" and 1/2". If this proves to be the right height, I will construct a single wood spacer for each side - that will be stronger than individual spacers. Adding the spacers rendered the kneeling thwart option on the Wenonah seat hanger not useable - the seat frame contacts the gunwale edge before the seat can rise and fall into the high adjustment position.

Perhaps with some shaping of the rear wood frame ends there might provide the needed clearance to use the seat thwart position. Another project to consider.


Spacers.jpg


Seat Height - 004 (2).JPG


Seat Height - 007 (2).JPG
 
I'm enjoying-learning so much Will. Thanks for this. Also a big thanks to Mike M for his obsessive refinement of outfitting boats.
 
Knee Cushions
In the past I had seen the results of Mike McCrea crafting knee bumpers as permanent installs in his boats. While they looked effective, his early attempts at this struck me as overly massive and, for my tastes, unsightly. Like anything done multiple times, Mike has incrementally improved his technique and his latest knee bumper efforts I find appealing - an effective cushion with a fairly small footprint.

All of our boats, open and decked canoes, have knee bumpers. Two of them have outsized knee bumpers. The soloized Penobscot, which has oversized bumpers to reduce the knee brace spread from 32 inches to 25 inches, and the wide (and deep) cockpit Sea Wimp, on which the knee brace spread is reduced by a couple of inches on each side.

Without bringing those edges closer I would have to sit splayed out like a cheap hooker in order to brace my knees against the “inwales”. Not a comfortable paddling position, and I don’t want risk pulling a groin muscle while be being scolded by Catholic school teachers of old.

The Penobscot knee bumpers are fugly looking, largely because I had a big chunk of white minicel and used that. Grey looks so much nicer. If they were flat slab minicel I would cover them with black neoprene just for appearances.

But those oversized knee bumpers are also heavily shaped and carved, both to fit the placement of my knee, tibia knob and upper calf, and are also carved out underneath so I can use them as tight braces. That lock in place function may be why the Penobscot and Sea Wimp are the most comfortable of any of our boats.

That custom carving was an incremental process. Sit in the boat on the shop floor, Dragonskin a bit, test sit a bit, carve out a little bit more and repeat.

I sent you home with some Dragonskin. Unless the side of your knee is flat you can do better.

BTW, minicel knee bumpers was a BMO idea. Blue Mountain Outfitters sells minicel chunks, already cunningly shaped so that there is an outward angle along the inner horizontal edge of the minicel to brace against.

Hard to describe, kinda like this on either side.
|_/ \_|
 
Back
Top