• Happy National Garlic Day! 🧄🚫🧛🏼‍♂️

Homemade wall tent inspired by Robin

Joined
Feb 1, 2013
Messages
534
Reaction score
315
Location
Ontario
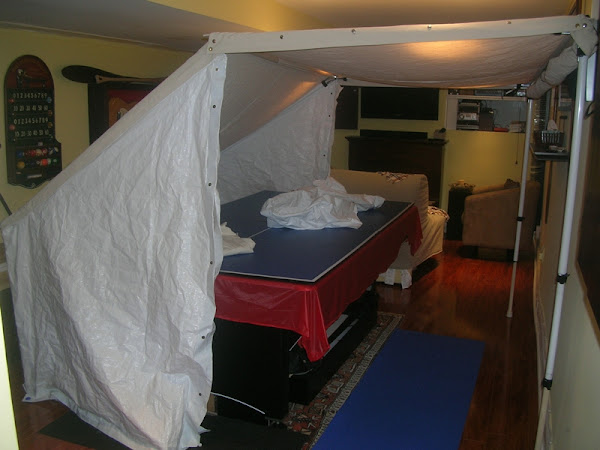
Seeing all those great photos & videos of Robin's customized wall tent gave me some serious cravings for a canvas shelter. Been spending part of the winter making my own custom version as a sort of prototype. It's a 7x7x 6 with 3foot walls. Canvas drop cloth roof with side panels and backwall from poly tarp. One door is also made from canvas and am planing to eventually add a pipe jack there for eventual use with a wood stove. Honestly don't see myself using it for full on winter camping but for shoulder season tripping instead, where a cozy space and warm stove would really improve the typical weather conditions.

CustomCanvasTent%2B24_rs.jpg


CustomCanvasTent%2B27_rs.jpg


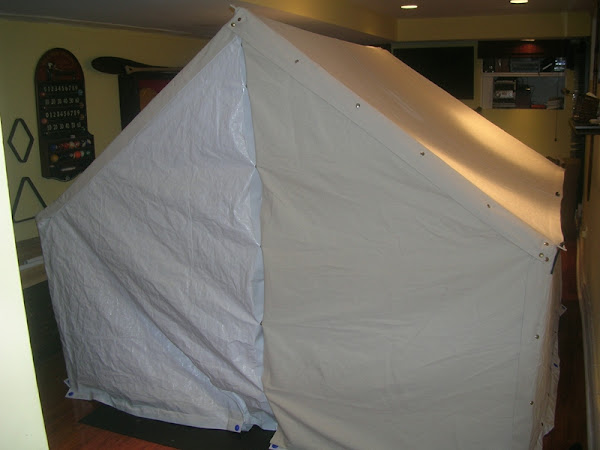
Two side panels are removeable with some heavy duty snaps (for a reason that'll be clear later in the post). Also planned it so that the poly material would extend 12" past the ground level to fold inward and form a sod cloth of sorts.

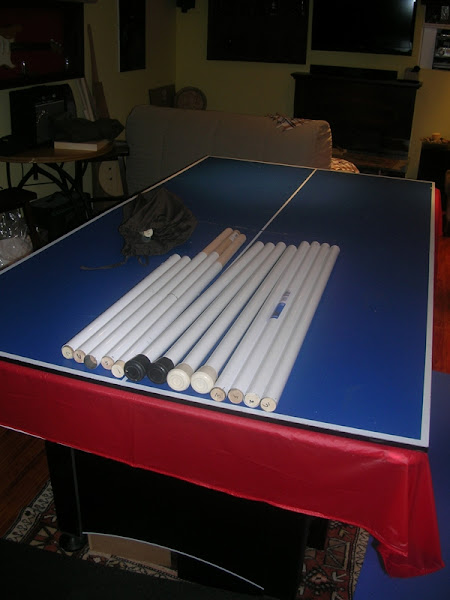
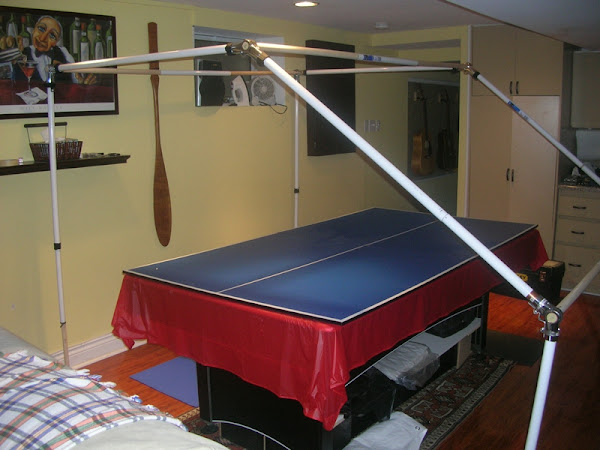
It wouldn't work without Robins pine closet rod frame idea so I hacked together something similar from a combination of 1-1/4" metal closet rods and slightly narrower wood dowels. Here's the frame assembled.

CustomCanvasTent%2B13_rs.jpg


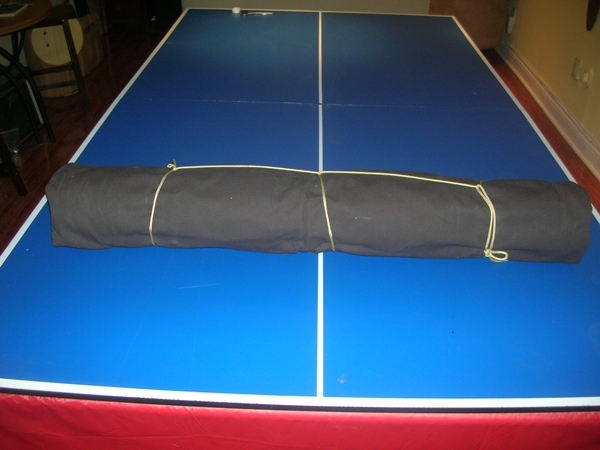
The largest length of rod is 3 feet and the wood dowels can nest inside the hollow space of the metal rods. So it packs up pretty well. I've wrapped it with another piece of heavy canvas (cut off from another project) to form a bundle. The heavy canvas will serve double duty as a ground cloth for half the tent.

CustomCanvasTent%2B29_rs.jpg


DSCN9814_rs.jpg


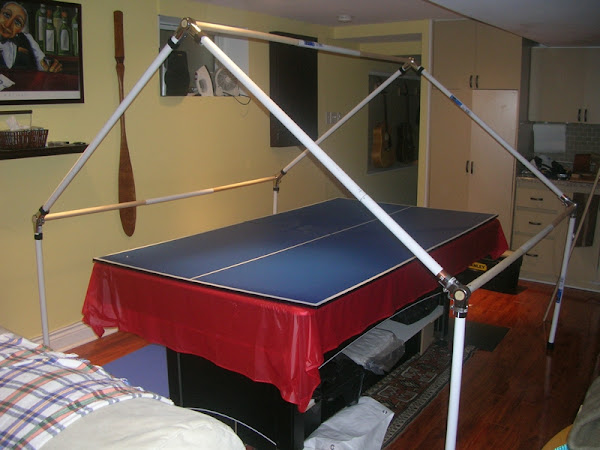
About half way through the project, realized that the wall tent could be convertible into an open side Baker. This is why two side panels doors were made to be removable. The cheap 3-way angle pipe fittings I sourced on Amazon worked out because they are adjustable. With some extra fiddling, the one side of the frame can be lifted up. Nested dowels inside the legs can slip out to form 6' high supports for the canopy.

CustomCanvasTent%2B15_rs.jpg


In this setup, there's a nice canopy cover that is 4.5 ft x 7 ft and seems pretty sufficient for coverage.

CustomCanvasTent%2B16_rs.jpg


It's been constructed with a ridge flap with grommets to suspend the center ridge with a line and also the usual eaves flaps for tie outs to support the side walls. So the whole frame setup might not be needed with plenty of trees at a site. I'll likely do what Robin does and use a surplus nylon tarp to add more weather protection in the field.

Haven't weighed everything yet since there are a few more bells and whistles to work on. Planning to give it a whirl for a season and then might invest in getting something properly made with better materials by a professional tent maker in the future. Already thinking of a early spring river trip where there won't be a need for major portaging.

Thanks Robin for the inspiration!
 
Last edited:
Murat, like I said, I'm impress and hope it gives you years of enjoyment!! I would add sod flap at the bottom... But you might not need them...
 
I am impressed. Great concept and execution. I can think of a number of shoulder season circumstances calling for a relatively lightweight, modular system providing a comfortable retreat to warm up in. Perhaps you would be willing to share the specifics of the cheap 3-way angle pipe fittings you sourced on Amazon.
 
As DaveO said "Perhaps you would be willing to share the specifics of the cheap 3-way angle pipe fittings you sourced on Amazon."
I'll second that, please and appreciated.
 
Nie work Murat, how high is the ridge line. Your Baker tent idea looks nice too. Your ability to put things together is always amazing. Since you won't be winter camping, I bet a small stove will heat it up nicely.
Will you be making the stove?
Will you be making a unique canvas pack with etched leather straps to carry the stove. haHa, Just half kidding. You have some beautiful kit in the workings.
 
Updated the original post with the Amazon.ca link to the angle joints. Just under 9$ Canadian a piece with cheap shipping too. Never expected them to be high quality but should hold up well enough for my planned usage. I'm not taking this thing on an expedition across Labrador or something.

Angle%2BJoint1.jpg

32mm ID Adjustable Angle 3 Way Pipe Clamp Fitting

Here's another pic found online showing a sort of play structure made from more joints and wood dowels. Sort of got me thinking that these would work for this project.

HTB166IMIpXXXXbhXXXXq6xXFXXXv.jpg


Robin, the center ridge is 6ft high. Decided I wanted something I could stand up in. Yes, planning on eventually making a stove too and then replicating CanotRouge's recent stove bag. Got a HomeDepot gift card as a present that just begging to be spent on metal supplies.
 
I like the fact it comes with a pool table, good for sleeping on and a boredom breaker, just may be difficult to carry.

Maybe the engineers of those Helinox chairs will work their magic and make a 2 lb backcountry billiard table that folds up to the size of a nalgene bottle.
 
glad you went with the split sides -- opens up a whole range of options -- i've seen this in rutrum and the beckel/eena catalog and think it's a pretty nifty idea -- if i could only justify yet another canvas shelter...

some snap-in screens might be fun too...
 
Nice work Murat. I'm not surprised your prototype is as well designed and made as many people's finished article. Your own final tweaked tent will be an instant family treasure. I especially like the Baker/Campfire design. I'm partial to that. Wishing I had one too. I agree that a solid canvas hot tent would be a delight to hunker down in during the shoulder seasons.

ps Don't be put off by all the jealous paddlers swooning over your paddler's ping pong table. If you can cart a canoe you sure as heck can cart a table. Specially carved ping pong paddles, what's your preference, Animal or Sugar Island style? lol. Games night every night right after supper. Winner gets the primo spot down by the shore watching the sunset, loser does dishes.
 
ps Don't be put off by all the jealous paddlers swooning over your paddler's ping pong table. If you can cart a canoe you sure as heck can cart a table. Specially carved ping pong paddles, what's your preference, Animal or Sugar Island style? lol. Games night every night right after supper. Winner gets the primo spot down by the shore watching the sunset, loser does dishes.

You all know I'm a traditionalist to the extreme. Nothing beats hand-eye coordination like using a skinny animal tail mini paddle!

DSCN9842_rs.jpg


Although annoyingly yelling out "HUT" on every backhand sometimes confuses the opponent.
 
Last edited:
Now that is something! And nicely done too - love the Baker style option.

Something I have hemmed about (to anyone who would listen, ask the wife!) for years, but the various frame mutations I had for my medium sized wall tent left me thinking one homemade not so great hybrid frame was enough...hard to move as well, despite some hacks over the years. A Baker style, self standing, w two additional wind flaps* added when necessary, one w a stove jack...man, you are talking my language!

*ability to swap out mosquito netting for the warmer weather.
 
Well done Murat! I'm also patiently waiting for the first trip report with your new tent!
Jason

Sent from my SM-G930V using Tapatalk
 
How are you stopping the extension/movement/angle of the adjusters?

I know you probably have a sewn foot that the floor poles fit into that locate position but thinking that when go to set up with verticals, rafters and ridge pieces...it is all just going to naturally want to fall over in different directions.
One pic looks like you might have some short metal straps that limit and set the angle?
 
The adjustable angles split in half and are loosened or tightened with a 6mm hex bolt. The ridge pieces slip into the O shaped hole between them and when the bolts are fully tightened, it clasps very tight, especially on a wood dowel. So it does not move or flop over. Problem is that if your angle is off then you half to loosen the hex bolts and start all over. At first, I was just guessing the correct angle and after throwing on the canvas, it would be too wide or shallow and the tent would be too high or low or a proper pitch. Reaching the hex bolts to adjust once the fabric is on is too cumbersome.

So to help with future setups, I took a 3" L bracket that I bent to the correct angle and secured it with hose clamps to serve as a bit of guide to set the correct angle. Guess it would also add extra support in case the hex bolts loosen. Very amateurish I know, but it I like using scraps and extra hardware collecting dust in the house.

As for the whole setup, I found the best methods was to work on each half side and set them on ground. At this stage the legs,rafters and 3 feet of ridge (wood dowel) are installed and don't collapse or move. Then I stand in the middle, lift up by the 3 foot ridges and connect them in the center with another piece of metal closet rod. The whole structure stays put.

Sorry if my explanation is weird to visualize. Hoping to get a video or take pics of a proper setup outdoors in the next few weeks.
 
Back
Top