• Happy Midnight Ride of Paul Revere (1775)! ⛪🕯️🕛🏇🏼

Restoration of an early Chestnut Bobs Special

Joined
Oct 29, 2019
Messages
604
Reaction score
919
Location
southeast PA
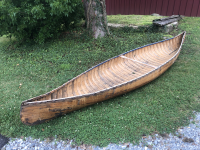
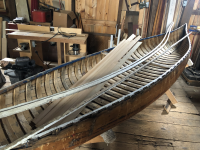
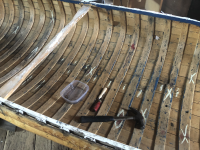
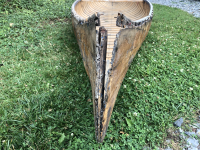
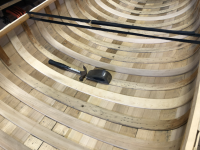
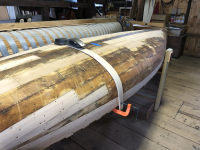
I picked up another Chestnut restoration project recently. The seller presented it as a "pre-fire Chestnut Bobs Special". Now that I've had it a while, and started working on it, I'm thinking it's a Chestnut Ranger- one of their Prospector series of canoes. It measures 15' x 35" x 13.5" deep. Bobs were consistently offered at 37" wide and 12" deep.

While searching Google, I came across this post from Canoetripping:

I was gratified to hear Bob B.'s remarks on his Ranger (built by Headwaters, but on an original Chestnut form). It'll be a long time before this ugly duckling sees water but it should be worth the wait!
 

Attachments

  • tempImagebNEvX1.png
    tempImagebNEvX1.png
    1.9 MB · Views: 37
  • tempImage3JVp4Z.png
    tempImage3JVp4Z.png
    1.9 MB · Views: 34
  • tempImageTHCLtz.png
    tempImageTHCLtz.png
    1.3 MB · Views: 33
  • tempImagekLunqD.png
    tempImagekLunqD.png
    1.4 MB · Views: 35
  • tempImagenNfWAI.png
    tempImagenNfWAI.png
    1.9 MB · Views: 36
The key to identifying a Bobs is that it has thinner than standard ribs and planking to save on weight.

Reaching back in my foggy noggin, I think the ribs are 1/4 inch thick and planking 1/8 inch thick. The Bobs is the only Chestnut that I am aware of that was built this lightly.

Fitz
 
Fitz,
According to the 1960 Chestnut catalog, the Ranger ribs are 3/8" thick x 2 3/8" wide, with a 2' spacing. This matches my ribs pretty accurately. Planking is about 1/8" in thickness. The Bob Special ribs are 1/4" thick x 2 3/8" wide & 1 1/2" spaced in that same catalog. Just to confuse matters more... my Chestnut Chum ribs are 1 1/2" wide x 1 1/2" spacing, again as in the catalog.

The biggest difference in my mind between Ranger and Bob Special is in width & depth; 35"x 13.5" vs. 37"x 12" respectively. Obviously, none of this is important other than exploring the nuances between canoe models, and therefore their respective performance traits one would assume.

Chestnut Ranger?
tempImagec1NTAS.png

Chestnut Chum:
3C2EDC0C-F5D1-49E0-92FB-574FE7AD57B3_1_201_a.jpeg
 
The biggest difference in my mind between Ranger and Bob Special is in width & depth

I don't think Chestnut listed rocker measurements in its catalog and it's hard to measure in any event, but I'd venture that a 15' canoe in the Prospector lineup, such as the Ranger, would have noticeably more rocker than the 15' Bob.
 
Wow, looking at my original posting about this canoe, I can't believe more than a year has passed since I have commented!

In spite of how the canoe may look, there has been a significant amount of repair work done. I actually think the hardest part is the assessment phase; deciding how much to remove, repair, modify, etc. Both stems have been repaired- roughly 8" of the top of each stem replaced with maple backed with a tapering oak 'spine' which extends past the scarfed glue joint, and glued
down along the back side of the intact lower stem:

tempImagec43B9M.png

Seat frames and center thwart removed, stripped, and seats re-dowelled and glued. Thanks to Cheeseandbeans who I met at the WCHA.org assembly, and who introduced me to Schuyler Thomson in CT, I was able to procure full length Spruce stock for inwales on this canoe and the Atkinson Traveler that's a-building simultaneously. The Chestnut inwales were ripped with an 8 degree bevel, then the bow and stern upsweep steamed on the form I built to mimic the original sweep on the canoe:

tempImageNKgeXr.png

The big job however, involves repairing rib tops and rib replacements. So far, I've repaired 22 rib tops on the starboard side, and 10 this evening on the port. There are about 6 ribs which need full replacement, including one about 4 ribs back from the stem which will be nearly bent double and somehow have to be slid within the planking and under the stem foot, then under the new inwales.... all at the same time! The new ribs will have to wait until the new inwales are fully installed giving the canoe some rigidity which will allow me to turn her over to use as a bending form for the new ribs.
tempImagekh3i80.pngtempImage2dHvjj.png

Here, the temporarily installed inwales give an idea of the final shape of the rejuvenated canoe... tempImage1G8e3W.png
Hopefully she's canvassed and filled prior to cold weather, and I have time to get one of her sister ships out in the ADKs for some time on the water; here entering Bog Pond, St. Regis Canoe Area, during the WCHA assembly.
tempImageYL8cn1.png
 
Looks like a pretty major project. I have tripped extensively in my Ranger, from the post you quoted. It has really good speed for a large 15 footer, is very nimble and even paddles superbly with a load. This canoe is hands down my favorite from anything else I have ever tripped with.

Good luck with your project. The Ranger is an awesome solo tripping canoe, even for extended trips with no resupply.

Bob.
 
Any thoughts on a color for this one?
Oh my... this may be the hardest part! I have a gallon each of Kirby's #12 Bottle Green and #13 Blind Green so it will likely be one of those two. I'm torn though because there are so many green canoes, and so many other great colors in Kirby's palette to choose from. I have plenty of time to ponder color; I won't likely paint until next Spring!
 
so many green canoes
In the wood/canvas world: Indeed. Followed by so many red ones. In the early 20th century Chestnut only had green, red and the green-gray color, which I've read was called Dead Grass and is distinctive, but you already have something like that. Variety is the spice . . . .


Copy of Old Town color chart.jpg

ez-poxy-color-chart.jpg
 
Robin, your inwales appear to be square stock. Are they permanently installed or will they be shaped prior to installation? The original Spruce inwales on my Chestnut are shaped, 9/16" at the top to 11/16" on the bottom. The original inwales failed (split) at seat bolt locations in two places on the canoe so I'm replacing with the same shape but slightly larger dimensions, 5/8" top to 3/4" bottom- the flared side goes against the planking, square side against the deck sides.

In fairness, the canoe was once a part of a fleet of w/c canoes at a girls camp in Pennsylvania and most likely abused unmercifully. And, in addition to being fully painted inside and out, the canoe was fiberglassed as well. Nightmare to restore.... I should have my head examined!

New stock on left, original on right:tempImagem3tuTj.pngtempImageTiGRQF.png
 
Inwales installed, joined at the stems, and 10 new ribs steamed and clamped to the canoe for installation in a couple of days.
tempImagew3RvJ3.pngtempImagejPHDrF.png
Note the rib replacement to the right was bent with two ribs together. The second "backing" rib acts to reduce grain breakout at the most severe part of the bend. It will also give me a slightly larger rib to from which to choose if the inner one doesn't fit just right within the canoe.
tempImagexRd6FV.png
The black straps are nylon webbing with hook & loop sewn on and a D ring at one end. Looping the running end of the webbing and back against itself gives a 2 to1 mechanical advantage. It helps to keep the ribs down in contact with the hull where there's no place for a C clamp.
 
Your restoration is an exercise in triage, critical thinking and creative problem solving. The nylon webbing band clamp is perfect for it's task. Well done!

Rick
 
The project progresses! All repairs are complete. What remains is a final washing and then interior varnish, exterior planking treatment with 50/50 varnish/mineral spirits, then canvas and filler. Most likely primer, paint, and final fitment of thwart and seats will wait until Spring- it will soon be too cold out in the barn for paint to cure!

A note of interest (to a few...). I have been calling this canoe a Ranger as in the 15' iteration of the Chestnut Prospector series. After working so intimately with it I now believe it is a factory-modified Bobs Special or Lightweight canoe. It's deeper than a Bobs should be but is very lightly built; 1/4" thick and wide-spaced ribs, 5/32" plankingtempImageq27KAy.pngtempImagexaexRn.pngtempImage2NB5IL.pngtempImageDR9TMN.png, etc. Certainly not as robust as a Prospector would have been built.
 
Patrick, do you plan on using some method to try to match the interior coloration of the new planks to the old?
 
Glenn, short answer... yes. Long answer... I'll try my best but the results are far from predictable! There are so many variations in the original planking and ribs, as well as decades of wear and tear, dirt ground into the interior, and remnants of blue paint deep in the scratches, dents, and grain that the interior will never be anywhere near perfect. I'm experimenting with stains, shellac, varnish, and variations of all three to attempt to achieve a good result. The unknown lurking behind all this is the effect of sunlight/UV which will ultimatelydarken the new wood. Making a perfect match now will not match in the years to come. My first priority is to make the hull structurally sound. Second, to make it aesthetically pleasing within reason.

I washed the completed hull thoroughly with TSP, and having done so, discovered yet another broken rib! Knowing I would never be happy just leaving that compromised rib, so one more repair- now complete.

For the sake of others who may make a rib replacement, here's my method:
Identify broken rib:
tempImagenOU4QZ.png
Cut inwale nails with hacksaw:
tempImageGd86pY.png
Grind away plank tack clinches with a 40 grit flap disc on an angle grinder:
tempImagepbktl0.png
Cut rib near center with a thin blade saw in a plank gap:
tempImagehQ23ty.png
Gently pry the old rib away from the planking, remove shortened tacks from outside hull, and scrape and clean the dirt/varnish behind the old rib:
tempImageHV9JLI.png
Bend new rib blank two rib spaces ahead of it's final position:
tempImageOvxzw2.png

Allow to dry for two days then install, sliding first one rib tip behind the inwale & planking on one side, then the other with the center of the rib tilted away, then positioned when rib tips are in place. Begin tacking & clinching through existing tack holes in the planking, starting at the center and working toward inwales, finally place two ring shank 7/8" bronze nails through rib tips into inwales. Use clinching iron to back up the nailing blows. tempImageqCeD8M.png
 

Attachments

  • tempImagecfUOpH.png
    tempImagecfUOpH.png
    1,018.8 KB · Views: 8
  • tempImageNQMzqy.png
    tempImageNQMzqy.png
    1.1 MB · Views: 10
That's a lot of interesting and impressive work, at least to this novice. Thanks for documenting it.
 
Nicely explained and done. I usually just pull the tacks from the outside of the hull when I'm removing a broken rib, but I'm going to give your method with the angle grinder a try next time.
Your new planking looks very good.
I have a deep Chestnut Pal, much deeper than anyone I have ever seen. I think you're correct about the canoe being a factory-modified Bobs, which is a great canoe, imho.
 
Back
Top