As I've been thinking about doing more tripping, I've been thinking about the issue of food. I know some of you guys go the freeze dried route. But I want to be able to eat more of the stuff I eat when I'm at home, whether that means steaks, hamburgers, chicken, etc. That means I need a means to preserve some food while camping. I'd love to buy a YETI or other high end cooler to bring/keep food fresh on a trip, but the prices of those high-end coolers are astronomical (I guess that's why they are high-end)!
So I decided to build a tripping cooler.
Approach # 1. I went on a guided tour on the Allagash last Fall and we had great food. All the food that needed to be kept frozen or at least cold was carried in a traditional wooden wannigan that the outfitter had rigiged up with closed cell foam insulation panels on the inside; it looked like about 1" thick. The panels seemed kind of loose. But it worked well enough as far as I could tell. So that's approach #1.
Approach # 2. I also have a copy of a book titled "Building Ourdoor Gear" by Maine Guiide Gil Gilpatrick (probably better known for his book on building cedar strip canoes). Gil shows how to build a "trip box" and one option is to convert the trip box into a cooler. Gil's design calls for a design that is distinctly more upright than a traditional wannigan. The advantages he claims are that backpack straps can be added to make it more readily portaged. Aside form the shape, the interesitng thing about the design is its construction. Many wannigans are solid wood or thick plywood. Gil uses thin 1/4" ply but the entire thing is covered in fiberglass/epoxy like a strip canoe -- both to water-proof it and to give it added strength. The interior of Gil's design has 2 inches of rigid closed-cell foam insulation which is also covered in fiberglass and epoxy. Gilpatrick says this design will keep frozen food cold for 7 days without ice. The idea is to pack the cooler with unfrozen food (appropriate bagged) and then place the entire cooler into a chest freezer to freeze the food into a more-or-less solid mass, which will stay cold longer than freezing individual items and then packing them. Anything to be kept merely cold rather than frozen is put on top, cold but unfrozen, just before going on the trip. So that's approach # 2.
I've decided to do a hybrid of #1 and #2. I am using Gil's building materials but I've decided to build mine more in the shape of a traditional wannigan. The places I am likely to take this do not involve long portages so the backpack idea has limited appeal. Keeping the weight low in the canoe and out of the wind, like a traditional wannigan, is a higher priority.
My dimensions, which are driven somewha by my canoe but mostly by the size of the stand-along freezer the cooler needs to fit inside, are 22" long by 16" tall by 15.5" wide.
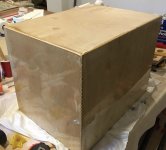
On to the picture of the build so far. In the attached photo, the box is sitting bottom up and has just received a sealer coat of epoxy. You may be able to see that the vertical edges were all box jointed. Gil recommends using brads to hold the box together before epoxying/fiberglassing. But I've got a good box joint jig (Incra iBox) so I decided to do that instead. The box joints were glued with Titebond III but that's not the only thing that's holding those thin plywood edges together. What you can't see is that on the inside of the box I've already applied a thickened epoxy fillet to each joint. Probably overkill, but I feel confidant that the these joints will be the last thing to fail on my box. The bottom (which, again, is up in this photo) is just attached with thickened epoxy fillets on the inside. The edges have all been eased/rounded over so that the fiberglass will sit down better on the corners.
Next step is to seal the interior. I'll post more as the build continues. Word of warning. I am a slow builder (that's why I named my cedar strip canoe "A Slow Boat to Nowhere"), so I make no promises that this will be done any time soon.
Oh, and I'm building this with materials I had on hand. The epoxy and fiberglass are all left overs from my canoe build. And the plywood was leftovers from another project.
So I decided to build a tripping cooler.
Approach # 1. I went on a guided tour on the Allagash last Fall and we had great food. All the food that needed to be kept frozen or at least cold was carried in a traditional wooden wannigan that the outfitter had rigiged up with closed cell foam insulation panels on the inside; it looked like about 1" thick. The panels seemed kind of loose. But it worked well enough as far as I could tell. So that's approach #1.
Approach # 2. I also have a copy of a book titled "Building Ourdoor Gear" by Maine Guiide Gil Gilpatrick (probably better known for his book on building cedar strip canoes). Gil shows how to build a "trip box" and one option is to convert the trip box into a cooler. Gil's design calls for a design that is distinctly more upright than a traditional wannigan. The advantages he claims are that backpack straps can be added to make it more readily portaged. Aside form the shape, the interesitng thing about the design is its construction. Many wannigans are solid wood or thick plywood. Gil uses thin 1/4" ply but the entire thing is covered in fiberglass/epoxy like a strip canoe -- both to water-proof it and to give it added strength. The interior of Gil's design has 2 inches of rigid closed-cell foam insulation which is also covered in fiberglass and epoxy. Gilpatrick says this design will keep frozen food cold for 7 days without ice. The idea is to pack the cooler with unfrozen food (appropriate bagged) and then place the entire cooler into a chest freezer to freeze the food into a more-or-less solid mass, which will stay cold longer than freezing individual items and then packing them. Anything to be kept merely cold rather than frozen is put on top, cold but unfrozen, just before going on the trip. So that's approach # 2.
I've decided to do a hybrid of #1 and #2. I am using Gil's building materials but I've decided to build mine more in the shape of a traditional wannigan. The places I am likely to take this do not involve long portages so the backpack idea has limited appeal. Keeping the weight low in the canoe and out of the wind, like a traditional wannigan, is a higher priority.
My dimensions, which are driven somewha by my canoe but mostly by the size of the stand-along freezer the cooler needs to fit inside, are 22" long by 16" tall by 15.5" wide.
On to the picture of the build so far. In the attached photo, the box is sitting bottom up and has just received a sealer coat of epoxy. You may be able to see that the vertical edges were all box jointed. Gil recommends using brads to hold the box together before epoxying/fiberglassing. But I've got a good box joint jig (Incra iBox) so I decided to do that instead. The box joints were glued with Titebond III but that's not the only thing that's holding those thin plywood edges together. What you can't see is that on the inside of the box I've already applied a thickened epoxy fillet to each joint. Probably overkill, but I feel confidant that the these joints will be the last thing to fail on my box. The bottom (which, again, is up in this photo) is just attached with thickened epoxy fillets on the inside. The edges have all been eased/rounded over so that the fiberglass will sit down better on the corners.
Next step is to seal the interior. I'll post more as the build continues. Word of warning. I am a slow builder (that's why I named my cedar strip canoe "A Slow Boat to Nowhere"), so I make no promises that this will be done any time soon.
Oh, and I'm building this with materials I had on hand. The epoxy and fiberglass are all left overs from my canoe build. And the plywood was leftovers from another project.
Attachments
Last edited:


