• Happy Scream Day! 😱

​Boatworking mistakes confessional callout

G

Guest

Guest
Thinking about DougD’s trials and travails in re-railing the Rob Roy, and the fugly stem “repairs” someone attempted on the kevlar Explorer currently in his shop, got me pondering my past boatworking mistakes.

I’d like to qualify those as “early, self-taught mistakes”, but I’m still making new ones. Boatwork remains a learning process.

OK, using Hard as Nails construction adhesive on foam was plumb dumb as a stump, especially since, had I known, contact cement was probably one shelf over in the hardware store. At the time I didn’t know what I didn’t know.

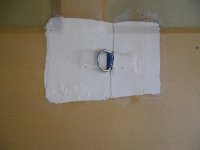
In the spirit of learning process admission I’ll confess that the single horrible-est thing I ever did was to buy kevlar skid plate kits and install them. On my boats. And friend’s boats. Maybe a dozen boats total. Even though my latter attempts were well and durably installed, the excess of those kev felt kits was used for worse applications.

The “worse” was that I cut off the overlarge extra of the kevlar felt and used that fugly scrap crap along with the excess resin to repair hull cracks. On my boats. And on friend’s boats. I didn’t know what I didn’t know about epoxy resins and cloth and I am so sorry.

It’s too late for a boatworking 12 step program. Making amends in steps 8 and 9 would be a b*tch, even with the allowance of shop beers for grinder courage, and although it would keep me busy for some time I see no joy in chipping and grinding off dozens of those awful kevlar felt skid plates. So, so sorry.

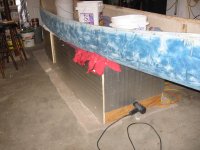
I know y’all have screwed the pooch on builds and rebuilds, forcing aluminum gunwales on strippers, laboriously sanding away resin and cloth mistakes and experiments, rebuilding canoes bow-to-stern bass akwards, running out of peel ply when installing Dynel.

Oh, wait, that last one was me again. Dammit, I really need to order more peel ply.
 
There aren't many screw-ups that I haven't already done, some even twice.

Every boat brings up a new set of OOPs ! Correcting them is a learning experience.

But of late I used Pink Owens Corning 1/4" foam as a laminate between layers of Kevlar and E-glass. It worked to stiffin the hull OK, but I can hear it delaminating over every rock I meet up with. I've been abusing this hull, and one day plan to cut the foam out, and replace it with something sturdier.
This was on my first Kevlar. I have come to love this hull, even with it's flaw.

I may throw some more into the "Ring" later. But will enjoy the ponderings of others for awhile !

Jim
 
Not necessarily mistakes as much as just not knowing any better at the time or rushing some things. I have some ugly glassing in the present project which is easily seen which I could grind off but won't bother. The hull also has some ugliness to it due to too dry wood and flat sawn strips, but again, I have to live with that. Opposite to most, my second stripper wasn't as good as the first one I did. The more restorations I do, the worse I get it seems as well.
 
Drilling holes in the new inwales for seats...in the wrong spot! Cutting canvas too short around the stems of a wood canvas canoe. Forgetting to put peel ply on some G-flex and finding it had run down the side of the hull the next morning. Improper spacing on a seat webbing job. wrong spacing between screws on new rails. snapping bronze screws in a deck....

I could go on and on, but like Jim and Mihun, I chalk it up to learning and try to do better. It's too much fun to quit no matter what I screw up..

Schuyler Thomson has restored or built over 1500 canoes and he told me there are days when he snaps one too many ribs or has a bad paint day and he thinks he might try selling insurance instead...even after 35 years.
 
I once built some beautiful seat frames, laced with synthetic snow shoe lacing.
In a genius type move, I put the dadoed lap joint on the bottom of the frame.
A near instant failure was the result, on the maiden voyage.

More serious, I rushed the application of varnish over not quite cured epoxy on a 19 ft sailboat (lots of hull!) that I built. The result was a gradually increasing gooiness, that I couldn't sand and dared not apply any solvents. Two weeks of part time scraping and I was back where I started, except for the wasted quart of Epifanes and the blisters on my hands.

Also once used 3.25 oz cloth for a build...after 6 years the next owner informed me of a big split along the keel line on the inside. Of course, I repaired it gratis, and learned a lesson about building too light!!
 
No Title

Sloppy overkill
 

Attachments

  • photo4004.jpg
    photo4004.jpg
    254.9 KB · Views: 0
No Title

Ha man, where do I start.... Maybe I don't even start... Like all of us I made a bunch of mistakes, some stupid, some I didn't know better at the time and some I did know better but didn't do better.... Info under the photo:(
 

Attachments

  • photo3466.jpg
    photo3466.jpg
    133.5 KB · Views: 2
Ha man, where do I start.... Maybe I don't even start... Like all of us I made a bunch of mistakes, some stupid, some I didn't know better at the time and some I did know better but didn't do better.... Info under the photo:(

Canotrouge, oh gawd, more than once. Pencil marks and even Sharpie lines, permanently displayed beneath a layer of glass and resin. More than thrice.

I recognize that most of my mistakes, and nearly all of my repeated mistakes, come from working too fast and not taking the time to stop and consider the next best sequence of steps.

If working too fast and thinking too little constitutes 90 percent of my mistakes then a fair proportion of that falls under the heading of “Poor Prep Work”.

I have a Think-Stupid reminder hung in my shop. We were reinforcing the hard chines on a friend’s much abused sea kayak. With the boat propped in its side we laid long strips of 4 inch and 2 inch glass tape along those < interior chines. One side at a time.

We remembered to sand, clean and alcohol wipe one side. But, probably in a thoughtless rush, not the other.

A few months later said friend mentioned that one side was delaminating. I got his boat back in the shop and with a gentle tug that entire section of chine reinforcement pulled off with less resistance than a Post-it note. We had inscribed his contact info under that section of glass and resin with an enamel paint pen and even lettering that pulled cleanly off the hull.

No prep work sanding, washing or alcohol wipe, combined with him using silicon spray on the foot pedals = zero epoxy adhesion.

That long, nicely rigid piece of glass and resin, with his name in block letters, is stapled to the shop wall as a dipshit hull prep reminder.
 
The biggest boat building mistake I can think of is the Colman canoe.

I have to agree.

The story I have heard is that the Coleman design impetus was based on having naked hulls that could nestle together like teacups for compact shipment, with a minimum wage monkey on the receiving end installing the aluminum keelson, seats and other supports necessary for poly hull rigidity.

So what if they paddled like a clawfoot bathtub, or that the bottoms warped hideously even with the interior keelson. They weren’t designed for paddling, they were designed for shipping.

As a close second I would nominate some of the one-piece molded poly canoes with stiffening kiss offs extending from the seat bottom to the floor, structural “center” seats (or coolers) in place of yokes and wide kiss off bases disguised as 24 individual cup holders. If you already have a built in cooler why do you need 24 cup holders?

While some of those designs paddle far better than the Ram-X teacups, a 16 foot Big Box canoe that weighs 90 pounds has probably done more to dissuade people from paddling than was ever inflicted by the discomfort of capsize wet jeans and lost beer coolers. Just getting the dang thing up on the roof racks quickly becomes Dante’s 4[SUP]th[/SUP] circle.

If I had one bit of advice to offer to a novice looking to buy a used canoe it would be this: Watch Craigslist for a month. Take notice of the makes and models that appears with great regularity. Don’t buy one of those; there’s a reason.
 
I think I posted one before...

Ahh... There it is!


No mold release.... That's glassed on both sides in more ways than one. It was so pretty!

I've got to know if you broke the glass ?
It would be so tempting to take a small hammer, a ball peen, and break that up.

Jim
 
No Title

Harkening back to '07 and the rehab of a far gone Chipewyan. Among other issues, like splits down the stems, and completely rotten brightwork, the boat was so oil canned that I could pour about a gallon of water on the overturned hull and none of it would run off, rather forming a big puddle on the bottom of the hull. I decided I'd just warm up the hull a little and reform the bottom.

I built a box out of insulation material, placed the hull on the box, laid planks and weight in the hull, mounted a heat gun, and turned it on. As near as I could learn, the melting point of royalex is somewhere around 220F. That's not really that hot. I had a temperature gauge mounted on the side of the box, and the heat gun could not get near that temperature. So, I added some number of old fashioned, high-wattage light bulbs inside the box, and watched the gauge as the temps slowly built to over 210. Somewhere north of 210, but still less than 220, things started to happen.

One of my light bulbs was either too close to the hull, or that might have been a 200 watt bulb, but whatever it was, three large chasms opened in the hull at that spot. They were tears about six inches long and half an inch wide, parellel to each other and about 2 inches apart. So, for my un-oil-canning effort, I was rewarded with a significant patch job. My effort also significantly reduced the oil canning of the hull.

Ultimately, this was a failed experiment, but I think my approach might have been more successful if I had a way to more evenly heat the hull. I reasoned the heat had to build very slowly because you need all the royalex to get hot, not just the surface. I had the inside of the hull insulated so the heat would be retained in the royalex. But, at some point, when the melting point is reached, the hull can quickly change, and that change might not be the thing you were trying for. And once the hull becomes pliable, there is the question of how to arrest the reshaping, i.e., not go too far.
 

Attachments

  • photo4018.jpg
    photo4018.jpg
    96.1 KB · Views: 1
Harkening back to '07 and the rehab of a far gone Chipewyan. Among other issues, like splits down the stems, and completely rotten brightwork, the boat was so oil canned that I could pour about a gallon of water on the overturned hull and none of it would run off, rather forming a big puddle on the bottom of the hull. I decided I'd just warm up the hull a little and reform the bottom.

I saw a crapped out Chipewyan on Craigslist back in ’07. It was beyond fugly mess and needed far more rehab work than I wanted to undertake for a mediocre hull design.

I noticed it was located near a friend of mine, so in a moment of devilment I sent him the link.

How could I resist? A Chipewyan for Chip. BWAHAHAHA. . . . .
 
Sailsman63, interesting. I too discovered how porous (grippy) the surface of glass is when I tried to scrape some cured epoxy off a nice piece of 10mm shower glass-- scratched the glass in the process.

Because wood has virtually no coefficient of expansion (temperature) but glass does, you might try heating or freezing the project-- that differential might stress the interface sufficiently to cause it to delaminate. Just a thought.
 
Going way back to my SOF built kayak in High School (mid seventies). Vinyl-ester resin, where I should have just varnished. In fact - the whole resin and glass thing. Didn't know, and had nobody to mentor me.
 
Here's one I've repeated too many times to count: there's a time to transition from spokeshave/plane to sandpaper, and it's most important when the grain swaps direction on a piece. A blade can easily pull some wood that goes deeper than the target finished dimension.

"Aw f#@&*!#^!!"
 
Last edited:
Here's one I've repeated too many times to count: there's a time to transition from spokeshave/plane to sandpaper, and it's most important when the grain swaps direction on a piece. A blade can easily pull some wood that goes deeper than the target finished dimension.

"Aw f#@&*!#^!!"


Oh yeah - especially with hemlock. Hemlock - a poor choice for canoe poles and other "shafty" accessories.
 
Yes. A lot of softwoods can have pullout: pine, Sitka, fir, cedar etc. Less so in quarter-sawn, but there too. Stringy hardwoods like ash and Honduras mahogany pull some, as does black walnut.

I love cherry and basswood for their stability across the grain.
 
Jim Dodd Well, I started by trying to pry apart. That soon lead to some cracks. (I do have a photo of that stage somewhere...) That lead, eventually, to a hammer. Didn't work. You know that they laminate glass and resins to make windshields for cars? I managed to pulverize parts of that glass, and it still stuck.

Then I got a brainstorm that Peach Canoe will love. (gotta remember, this was a couple of years ago...) I realized that cured epoxy is a thermosetting plastic (it melts, or at least softens, in heat) and took a plumber's propane torch to the glass. Not enough to crack an intact glass sheet. I Don't think the thermal expansion did much, but I did manage to reach the yield temperature of the resin. Everything peeled off, leaving a nice glass-cloth print on the surface.

I still have that blade around, and I'm eyeing it for salvage into another paddle. The heated resin penetrated very well. The entire structure acts like a single, homogeneous piece, very flexible, and the surface is harder than most of my resin layups. I still have not taken the time to clear off that cloth-print.
 
Back
Top